


heroku
When I first came across Heroku it was a Ruby-only cloud service. I wasn’t a Ruby developer so I quickly forgot about it. But then they partnered with Facebook and you could create a Facebook app hosted on Heroku with the Facebook PHP-SDK in just a couple of clicks.
当我第一次遇到Heroku时,它是一个仅Ruby的云服务。 我不是Ruby开发人员,所以我很快就忘记了。 但是随后他们与Facebook合作,您只需单击几下,便可以使用Facebook PHP-SDK创建在Heroku上托管的Facebook应用。
Now the question: is it possible to create a PHP application with Heroku that works both outside and inside of Facebook? The answer is yes, and I’ll show you how.
现在的问题是:是否可以用Heroku创建一个在Facebook内部和外部均可使用PHP应用程序? 答案是肯定的,我将向您展示如何。
In this article you’ll create a simple link-sharing application. Its user can share a URL with a title and an optional description. Each user is identified by a name and email address (which is kept private). If the user runs the app inside Facebook, the name and email fields are taken from his or her profile.
在本文中,您将创建一个简单的链接共享应用程序。 它的用户可以共享带有标题和可选描述的URL。 每个用户都由一个姓名和电子邮件地址标识(该姓名和电子邮件地址为私人)。 如果用户在Facebook中运行该应用程序,则名称和电子邮件字段取自他或她的个人资料。
创建您的Heroku帐户 (Create Your Heroku Account)
All you need to get started with Heroku is to create a free account; it only takes 5 minutes and an email address.
开始使用Heroku所需要做的就是创建一个免费帐户。 只需要5分钟和一个电子邮件地址。
Basic usage of Heroku is free. As stated in the platform documentation, “each app you create has free access to 750 dyno hours per month and a 5MB database.” A dyno is a single web process responding to HTTP requests and running your code.
Heroku的基本用法是免费的。 如平台文档中所述,“您创建的每个应用程序都可以每月免费使用750 dyno小时和5MB的数据库。” dyno是单个Web进程,它响应HTTP请求并运行您的代码。
If you want to take advantage of HTTPS, you need to verify your Heroku account using a credit card. This is required if you want to serve your Facebook app over HTTPS, but you won’t be billed if you use the basic SSL addon.
如果要利用HTTPS,则需要使用信用卡验证您的Heroku帐户。 如果您想通过HTTPS服务Facebook应用程序,则必须这样做,但是如果您使用基本的SSL插件,则无需付费。
安装行业工具 (Install the Tools of the Trade)
The Heroku development process is based on Ruby and Git – the heroku command-line utility is a Ruby gem, and every time you push your code with Git the app will be updated in real time. Thus, you need to:
Heroku的开发过程基于Ruby和Git – heroku命令行实用程序是Ruby gem,每次使用Git推送代码时,应用程序都会实时更新。 因此,您需要:
- Install Ruby (in OSX version 1.8.x is already installed, which is fine). 安装Ruby(在OSX版本1.8.x中已经安装,可以)。
- Install Git. 安装Git。
- Install the Heroku gem (as simple as sudo gem install heroku). 安装Heroku gem(就像安装sudo gem一样简单)。
- Configure your environment with your Heroku credentials and your SSH keys. 使用Heroku凭据和SSH密钥配置环境。
The best way to do all of these things is to follow the Getting Started with Heroku quickstart guide.
完成所有这些操作的最佳方法是遵循Heroku入门快速入门指南。
Also, for this project you want to install the Taps gem to help transferring databases. [sourcecode language=”bash”]Vitos-Laptop:~ vito$ sudo gems install taps[/sourcecode]
另外,对于此项目,您想安装Taps gem以帮助传输数据库。 [sourcecode language =“ bash”] Vitos-Laptop:〜vito $ sudo gems安装水龙头[/ sourcecode]
建立您的应用程式 (Create Your App)
To create the app, you’ll write your code locally, initialize the Git repository, and then push the code to Heroku.
要创建该应用程序,您将在本地编写代码,初始化Git存储库,然后将代码推送到Heroku。
Create Your App Locally
在本地创建您的应用
Create an empty directory for your application and setup your local web server. [sourcecode language=”bash”] Vitos-Laptop:~ vito$ cd /Users/Shared/WebServer/Sites Vitos-Laptop:Sites vito$ mkdir HeroLinks [/sourcecode] Configure your local web server with a new site that points to that directory with an URL like http://herolinks.local.
为您的应用程序创建一个空目录并设置本地Web服务器。 [源代码语言=“重击”] Vitos-Laptop:〜vito $ cd / Users / Shared / WebServer / Site Vitos-Laptop:站点vito $ mkdir HeroLinks [/ sourcecode]使用指向该站点的新站点配置本地Web服务器URL的目录,例如http://herolinks.local。
Init Your Git Repository
初始化您的Git仓库
Initialize your repository inside the app directory: [sourcecode language=”bash”] Vitos-Laptop:Sites vito$ cd HeroLinks Vitos-Laptop:HeroLinks vito$ git init Initialized empty Git repository in .git/ Vitos-Laptop:HeroLinks vito$ cat Vitos-Laptop:HeroLinks vito$ git add . Vitos-Laptop:HeroLinks vito$ git commit -m "HeroLinks app created." [/sourcecode]
在应用程序目录中初始化您的存储库:[sourcecode language =“ bash”] Vitos-Laptop:Sites vito $ cd HeroLinks Vitos-Laptop:HeroLinks vito $ git init在.git / Vitos-Laptop:HeroLinks vito $ cat中初始化空的Git存储库Vitos-Laptop:HeroLinks vito $ git add。 Vitos-Laptop:HeroLinks vito $ git commit -m“已创建HeroLinks应用程序。” [/源代码]
在Heroku上创建应用 (Create the App on Heroku)
By default, Heroku uses a Ruby environment for its hosted apps. To create a PHP application you need to customize the command’s arguments to use the stack named cedar. The command to create an app looks like: [sourcecode language=”bash”]Vitos-Laptop:HeroLinks vito$ heroku create HeroLinks –stack cedar Creating herolinks… done, stack is cedar http://herolinks.herokuapp.com/ | git@heroku.com:herolinks.git Git remote heroku added [/sourcecode]
默认情况下,Heroku为其托管的应用程序使用Ruby环境。 要创建PHP应用程序,您需要自定义命令的参数以使用名为cedar的堆栈。 创建应用程序的命令如下所示:[sourcecode language =“ bash”] Vitos-Laptop:HeroLinks vito $ heroku create HeroLinks –stack cedar创建herolinks…完成后,堆栈为cedar http://herolinks.herokuapp.com/ | git@heroku.com:herolinks.git添加了Git远程heroku [/ sourcecode]
With this command, Heroku creates the application and the remote repository and then returns the URL and app details.
使用此命令,Heroku创建应用程序和远程存储库,然后返回URL和应用程序详细信息。
You publish your application with the following:
您使用以下内容发布应用程序:
[sourcecode language=”bash”]Vitos-Laptop:HeroLinks vito$ git push heroku master[/sourcecode]
[sourcecode language =” bash”] Vitos-Laptop:HeroLinks vito $ git push heroku master [/源代码]
You must create and commit at least one file or the command will fail. I created an index.php file with a welcome message.
您必须创建并提交至少一个文件,否则该命令将失败。 我创建了一个带有欢迎消息的index.php文件。
The output to the push should look similar to: [sourcecode language=”bash”] Counting objects: 3, done. Writing objects: 100% (3/3), 253 bytes, done. Total 3 (delta 0), reused 0 (delta 0)
推送的输出应类似于:[sourcecode language =“ bash”]计数对象:3,完成。 写入对象:100%(3/3),253个字节,已完成。 总计3(增量0),重用0(增量0)
—–> Heroku receiving push —–> PHP app detected —–> Bundling Apache v2.2.19 —–> Bundling PHP v5.3.6 —–> Discovering process types Procfile declares types -> (none) Default types for PHP -> web —–> Compiled slug size is 21.5MB —–> Launching… done, v4 http://herolinks.heroku.com deployed to Heroku
-> Heroku接收推送->检测到PHP应用程序->捆绑Apache v2.2.19->捆绑PHP v5.3.6->发现进程类型Procfile声明类型->(无)PHP的默认类型-> web- –>编译后的子弹大小为21.5MB->启动…完成,将v4 http://herolinks.heroku.com部署到Heroku
To git@heroku.com:herolinks.git * [new branch] master -> master [/sourcecode]
到git@heroku.com:herolinks.git * [新分支] master-> master [/源代码]
开始编码 (Start Coding)
I don’t want to detract from the main focus of this article, Heroku and Facebook, by coding every detail from scratch. Instead, I’m using some pre-made stuff:
我不想通过从头开始编写每个细节来削弱本文的主要重点,即Heroku和Facebook。 相反,我使用了一些预制的东西:
- Bootstrap – a CSS toolkit from Twitter (for interface styling) Bootstrap – TwitterCSS工具包(用于界面样式)
- Slim – a lightweight but powerful PHP framework (for the main controller) Slim –轻巧但功能强大PHP框架(用于主控制器)
- a couple libraries extracted from the CakePHP framework (for data validation and sanitization) 从CakePHP框架中提取的几个库(用于数据验证和清理)
- a simple PDO wrapper database class (self-made) 一个简单的PDO包装数据库类(自制)
As you can see from the following directory structure, the application is very simple.
从以下目录结构可以看到,该应用程序非常简单。
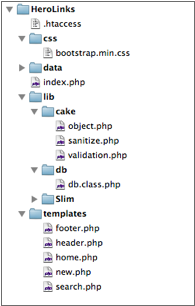
An .htaccess file redirects all traffic to the index.php page which is the main application file and contains all the business logic.
.htaccess文件将所有流量重定向到index.php页面,该页面是主应用程序文件,包含所有业务逻辑。
The lib directory contains the PHP libraries and the folder named templates holds the interface files. I have three pages: a home page that displays a list of all the links shared (home.php), a page with the form needed to submit a new link (new.php), and a search results page (search.php).
lib目录包含PHP库,名为template的文件夹包含接口文件。 我有三个页面:一个主页,显示所有共享链接的列表(home.php),一个页面,其中包含提交新链接所需的表单(new.php),以及搜索结果页面(search.php) 。
数据库访问 (Database Access)
The Heroku platform provides each Ruby application with a shared 5MB PosgreSQL database. For PHP applications, the shared database is not created by default and must be added with the command: [sourcecode language=”bash”]Vitos-Laptop:HeroLinks vito$ heroku addons:add shared-database[/sourcecode] Each application has access to the database using a special environment variable DATABASE_URL which contains the connection string. It is accessible from your PHP code with $_ENV[“DATABASE_URL”].
Heroku平台为每个Ruby应用程序提供了一个共享的5MB PosgreSQL数据库。 对于PHP应用程序,默认情况下不会创建共享数据库,必须使用以下命令添加该共享数据库:[sourcecode language =” bash”] Vitos-Laptop:HeroLinks vito $ heroku addons:add shared-database [/ sourcecode]每个应用程序都可以访问使用包含连接字符串的特殊环境变量DATABASE_URL到数据库。 可使用$ _ENV [“ DATABASE_URL”]从您PHP代码访问它。
If you purchase a dedicated database add-on such as Heroku Postgres, you can use the psql console application to manage your database. For shared databases you have to manage it manually, with the exception of the db:push and db:pull import/export utilities.
如果您购买了专用数据库附加组件(例如Heroku Postgres),则可以使用psql控制台应用程序来管理数据库。 对于共享数据库,除了db:push和db:pull导入/导出实用程序外,您必须手动对其进行管理。
I don’t have PosgreSQL installed on my local machine, so my code use SQLite locally and the data directory contains my database. Here’s how I switch between PostgreSQL and SQLite in code: [sourcecode language=”php”]<?php // if $_ENV["DATABASE_URL"] is empty then the app is not running on Heroku if (empty($_ENV["DATABASE_URL"])) { $config["db"]["driver"] = "sqlite"; $config["db"]["url"] = "sqlite://" . realpath("data/my.db"); } else { // translate the database URL to a PDO-friendly DSN $url = parse_url($_ENV["DATABASE_URL"]); $config["db"]["driver"] = $url["scheme"]; $config["db"]["url"] = sprintf( "pgsql:user=%s;password=%s;host=%s;dbname=%s", $url["user"], $url["pass"], $url["host"], trim($url["path"], "/")); }[/sourcecode] First I set the default SQLite database if $_ENV[“DATABASE_URL”] is empty as it means the app is not running on Heroku. If the app is running on Heroku then I parse the database URL and convert it into a PDO-friendly connection string. The URL looks like this: [sourcecode language=”php”]postgres://username:password@host/database[/sourcecode] and looks like this after it is converted: [sourcecode language=”php”]pgsql:user=username;password=password;host=host;dbname=database[/sourcecode]
我的本地计算机上未安装PosgreSQL,因此我的代码在本地使用SQLite,并且数据目录包含我的数据库。 这是我在PostgreSQL和SQLite之间在代码中进行切换的方式:[源代码语言=” php”] <?php //如果$ _ENV [“ DATABASE_URL”]为空,则应用程序不在Heroku上运行,如果(empty($ _ ENV [“ DATABASE_URL“])){{config [” db“] [” driver“] =” sqlite“; $ config [“ db”] [“ url”] =“ sqlite://”。 realpath(“ data / my.db”); } else {//将数据库URL转换为对PDO友好的DSN $ url = parse_url($ _ ENV [“ DATABASE_URL”]); $ config [“ db”] [“ driver”] = $ url [“ scheme”]; $ config [“ db”] [“ url”] = sprintf(“ pgsql:user =%s; password =%s; host =%s; dbname =%s”,$ url [“ user”],$ url [ “ pass”],$ url [“ host”],trim($ url [“ path”],“ /”)); } [/ sourcecode]首先,如果$ _ENV [“ DATABASE_URL”]为空,则设置默认SQLite数据库,因为这意味着该应用程序未在Heroku上运行。 如果该应用程序在Heroku上运行,那么我将解析数据库URL并将其转换为PDO友好的连接字符串。 URL看起来像这样:[sourcecode language =” php”] postgres:// username:password @ host / database [/ sourcecode]并在转换后看起来像这样:[sourcecode language =” php”] pgsql:user =用户名;密码=密码;主机=主机; dbname =数据库[/源代码]
主应用程序控制器 (The Main Application Controller)
The index.php file is the main application controller. After the database setup, there is the Facebook configuration, the loading of other PHP libraries, and then a new instance of a Slim application object is created. [sourcecode language=”php”]<?php // Load the core Slim framework… require_once "lib/Slim/Slim.php";
index.php文件是主要的应用程序控制器。 完成数据库设置后,进行Facebook配置,加载其他PHP库,然后创建Slim应用程序对象的新实例。 [sourcecode language =” php”] <?php //加载核心Slim框架…require_once“ lib / Slim / Slim.php”;
// …add other accessory libraries require_once "lib/db/db.class.php"; require_once "lib/cake/sanitize.php"; require_once "lib/cake/validation.php";
//…添加其他附件库require_once“ lib / db / db.class.php”; require_once“ lib / cake / sanitize.php”; require_once“ lib / cake / validation.php”;
// and then the Facebook SDK require_once "lib/facebook/facebook.php";
//,然后是Facebook SDK require_once“ lib / facebook / facebook.php”;
// Create a new Slim application $app = new Slim();[/sourcecode] Here I create the Slim application using its default settings, I could also pass an associative array of settings, but the defaults are enough for now.
//创建一个新的Slim应用程序$ app = new Slim(); [/源代码]在这里,我使用其默认设置创建Slim应用程序,我也可以传递一个关联的设置数组,但是默认值现在就足够了。
I use Slim to map the application’s URLs to PHP functions. The application has a total of four URLs: / (the root), /new, /search and /install.
我使用Slim将应用程序的URL映射到PHP函数。 该应用程序总共有四个URL:/(根目录),/ new,/ search和/ install。
With Slim you can map a URL to different functions that handle different HTTP methods or you can map the same function to one or more HTTP methods. I want my root URL to be accessible by the GET and POST methods because when it’s running inside Facebook’s iframe element it receives some POST data from the hosting environment called a signed request. Here’s how to do it: [sourcecode language=”php”]<?php $app->map("/", function () use ($app, $config) { // do something })->via("GET", "POST"); [/sourcecode]
使用Slim,您可以将URL映射到处理不同HTTP方法的不同函数,也可以将同一函数映射到一个或多个HTTP方法。 我希望我的根URL可以通过GET和POST方法访问,因为当它在Facebook的iframe元素中运行时,它会从托管环境中接收一些称为签名请求的POST数据。 操作方法如下:[源代码语言=” php”] <?php $ app-> map(“ /”,function()use($ app,$ config){//做某事})-> via(“ GET”,“ POST”); [/源代码]
The code maps the root URL to an anonymous function allowing only the GET and POST HTTP methods. The function is called whenever the user requests the application root URL using GET or POST.
该代码将根URL映射到仅允许GET和POST HTTP方法的匿名函数。 每当用户使用GET或POST请求应用程序根URL时,就会调用该函数。
应用安装程序 (The Application Installer)
I would normally build a cross-environment installer, but there are some differences between SQLite and PosgresSQL that make doing so beyond the scope of this article. Instead, I enable the installer only in the local version of the app and then use Heroku’s database utilities to copy the data to the remote database.
我通常会构建一个跨环境的安装程序,但是SQLite和PosgresSQL之间存在一些差异,因此不在本文讨论范围之内。 相反,我仅在应用程序的本地版本中启用安装程序,然后使用Heroku的数据库实用程序将数据复制到远程数据库。
The function associated with the /install URI first performs a check against the global $config variable to decide which environment is running in. If you are on your local system then the table-creation query is executed using standard PDO statements. [sourcecode language=”php”]<?php $app->get("/install", function() use ($app) { global $config; // check driver and perform install only for SQLite/local if ($config["db"]["driver"] == "sqlite") { if ($db = Db::getConnection()) { $query = "CREATE TABLE IF NOT EXISTS links ( id INTEGER PRIMARY KEY, url VARCHAR(255), title VARCHAR (100), description VARCHAR(512), username VARCHAR(50), useremail VARCHAR(100), created DATE DEFAULT (datetime(‘now’,’localtime’)) )"; try { $stmt = $db->prepare($query); $stmt->execute(); $app->flash("info", "Application installed successfully!"); $app->redirect("/"); } catch (PDOException $e) { $app->flashNow("error", "Unable to install application: " . $e->getMessage()); } } else { $app->flashNow("error", "Unable to open DB"); } } else { $app->flashNow("info", "Install command is for local/SQLite only, try to run <code>heroku db:push sqlite://data/my.db</code> instead!"); } $app->render("default.php", array("action" => "install")); });
与/ install URI关联的函数首先对全局$ config变量执行检查,以确定正在哪个环境中运行。如果您在本地系统上,则使用标准PDO语句执行表创建查询。 [源代码语言=“ php”] <?php $ app-> get(“ / install”,function()use($ app){global $ config; //检查驱动程序,仅对SQLite / local执行安装,如果($ config [“ db”] [“ driver”] ==“ sqlite”){如果($ db = Db :: getConnection()){$ query =“如果不存在则创建表(id整数主键,url VARCHAR( 255),标题VARCHAR(100),描述VARCHAR(512),用户名VARCHAR(50),用户电子邮件VARCHAR(100),创建日期DATE DEFAULT(datetime('now','localtime')))“];尝试{$ stmt = $ db-> prepare($ query); $ stmt-> execute(); $ app-> flash(“ info”,“应用程序安装成功!”); $ app-> redirect(“ /”);} catch( PDOException $ e){$ app-> flashNow(“ error”,“无法安装应用程序:”。$ e-> getMessage());}} else {$ app-> flashNow(“ error”,“无法打开DB“);}}其他{$ app-> flashNow(” info“,”安装命令仅适用于本地/ SQLite,请尝试运行<code> heroku db:push sqlite://data/my.db </ code >代替!“);} $ app-> render(” default.php“,array(” action“ =>” install“));});
[/sourcecode]
[/源代码]
The $db variable is a PDO object, the static method Db::getConnection() takes care of managing the connection and returns NULL on error.
$ db变量是一个PDO对象,静态方法Db :: getConnection()负责管理连接,并在错误时返回NULL。
The flash() method stores a message in the current session, giving it a key label of “info”. The message is then available to the next request (i.e., the next page).
flash()方法将消息存储在当前会话中,并为其指定关键字标签“ info”。 该消息随后可用于下一个请求(即下一页)。
I also have a flashNow() method; the message stored with this method is available in the current request inside the $flash variable.
我也有一个flashNow()方法; 使用此方法存储的消息在$ flash变量中的当前请求中可用。
Using the appropriate keys (i.e., error, info, warning, etc.) I can style the message accordingly using Bootstrap’s pre-made CSS styles, for example: [sourcecode language=”php”] <?php if (!empty($flash["error"])) { ?> <div class="alert-message error"> <?php echo $flash["error"] ?> </div> <?php }
使用适当的键(例如,错误,信息,警告等),我可以使用Bootstrap的预制CSS样式相应地设置消息的样式,例如:[sourcecode language =” php”] <?php if(!empty($ flash [“ error”])){?> <div class =“ alert-message error”> <?php echo $ flash [“ error”]?> </ div> <?php}
[/sourcecode]
[/源代码]
The render() method takes two parameters:
render()方法采用两个参数:
- the PHP (or HTML) view file to render PHP(或HTML)视图文件进行渲染
- an associative array of variables which are passed to the view file 传递给视图文件的变量的关联数组
In this case I pass a variable named “action” containing the value “install”; the default.php file will have a local $action variable to use. The view files are placed in the templates directory by default, but this path can be customized using Slim’s configuration API (see Slim’s manual for more info). Once your database is functioning locally, you can use Heroku’s tools to import the schema (and data if found) into the remote database.
在这种情况下,我传递了一个名为“ action”的变量,其中包含值“ install”。 default.php文件将使用本地$ action变量。 视图文件默认情况下放置在模板目录中,但是可以使用Slim的配置API定制此路径(有关更多信息,请参见Slim的手册)。 一旦数据库在本地运行,就可以使用Heroku的工具将架构(和数据,如果找到)导入到远程数据库中。
[sourcecode language=”php”]Vitos-Laptop:HeroLinks vito$ heroku db:push sqlite://data/my.db[/sourcecode]
[源代码语言=” php”] Vitos-Laptop:HeroLinks vito $ heroku db:push sqlite://data/my.db [/ sourcecode]
The output should look similar to: [sourcecode language=”php”]Loaded Taps v0.3.23 Warning: Data in the app ‘herolinks’ will be overwritten and will not be recoverable.
输出应类似于:[sourcecode language =” php”] Loaded Taps v0.3.23警告:应用程序“ herolinks”中的数据将被覆盖并且将无法恢复。
! WARNING: Potentially Destructive Action ! This command will affect the app: herolinks ! To proceed, type "herolinks" or re-run this command with –confirm herolinks[/sourcecode]
! 警告:可能具有破坏性的行动! 此命令将影响应用程序:herolinks! 要继续,请键入“ herolinks”或使用–confirm herolinks [/ sourcecode]重新运行此命令。
Type the name of your app to confirm the import and your database will be imported into Heroku.
输入应用程序名称以确认导入,然后数据库将导入到Heroku中。
申请流程 (Application Flow)
The rest of the application is straightforward and follows an approach similar to the Model-View-Controller pattern, except there isn’t a model.
该应用程序的其余部分非常简单,除了没有模型外,它采用与Model-View-Controller模式类似的方法。
The homepage fetches the last 10 links from the database using a common SQL query. The results are stored in the $links array and passed to the view file (home.php) by the render() method. [sourcecode language=”php”] <?php $app->map("/", function () use ($app) { $pageTitle = "Latest Links"; $action = "home"; $links = array(); if ($db = Db::getConnection()) { $query = "SELECT * FROM links ORDER BY created DESC LIMIT 10"; try { foreach ($db->query($query) as $link) { $links[] = $link; } } catch (PDOException $e) { $app->flashNow("error", $e->getMessage()); } } else { $app->flashNow("error", "Unable to open DB"); } $app->render("home.php", array( "pageTitle" => $pageTitle, "action" => $action, "links" => $links)); })->via("GET", "POST");
主页使用常见SQL查询从数据库中获取最后10个链接。 结果存储在$ links数组中,并通过render()方法传递到视图文件(home.php)。 [源代码语言=“ php”] <?php $ app-> map(“ /”,function()use($ app){$ pageTitle =“最新链接”; $ action =“主页”; $ links = array( ); if($ db = Db :: getConnection()){$ query =“ SELECT * FROM links ORDER BY created DESC LIMIT 10”;尝试{foreach($ db-> query($ query)as $ link){$ links [] = $ link;}} catch(PDOException $ e){$ app-> flashNow(“ error”,$ e-> getMessage());}} else {$ app-> flashNow(“ error”,“无法打开数据库“);} $ app-> render(” home.php“,array(” pageTitle“ => $ pageTitle,” action“ => $ action,” links“ => $ links));}) -> via(“ GET”,“ POST”);
[/sourcecode]
[/源代码]
[sourcecode language=”php”] <?php if (!empty($links)) { ?> <h2>Latest links</h2> <table class="linklist zebra-striped" summary="Latest submitted links"> <tr> <th>Site</th> <th>Description</th> <th>User</th> <th>Date</th> </tr> <?php foreach($links as $link){ ?> <tr> <td><a href="<?php echo $link["url"] ?>" rel="external"><?php echo $link["title"] ?></a></td> <td><?php echo $link["description"] ?></td> <td><?php echo $link["username"] ?></td> <td><?php echo date("d F Y H:i", strtotime($link["created"])) ?></td> </tr> <?php } ?> </table> <?php } else { ?> <div class="alert-message block-message info"> <p>Sorry, the link database is empty!</p> <div class="alert-actions"><a class="btn primary" href="/new" >Add a link now</a></div> </div> <?php }
[源代码语言=“ php”] <?php if(!empty($ links)){?> <h2>最新链接</ h2> <table class =“ linklist zebra-striped” summary =“最新提交的链接”> <tr> <th>站点</ th> <th>描述</ th> <th>用户</ th> <th>日期</ th> </ tr> <?php foreach($ links作为$ link) {?> <tr> <td> <a href="<?php echo $link["url"] ?>“ rel =” external“> <?php echo $ link [” title“]?> </ a > </ td> <td> <?php echo $ link [“ description”]?> </ td> <td> <?php echo $ link [“ username”]?> </ td> <td> <? php echo date(“ d FYH:i”,strtotime($ link [“ created”]))?> </ td> </ tr> <?php}?> </ table> <?php}其他{?> <div class =“ alert-message block-message info”> <p>对不起,链接数据库为空!</ p> <div class =“ alert-actions”> <a class =“ btn primary” href =“ / new“>立即添加链接</a> </ div> </ div> <?php}
[/sourcecode]
[/源代码]
The Add Link page retrieves the form’s data using Slim’s request()->isPost() and request()->post() methods. The data is cleaned and validated with the Sanitize and Validation classes from the CakePHP framework. [sourcecode language=”php”] <?php $app->map("/new", function () use ($app) { $pageTitle = "Add new link"; $action = "new"; $data = array(); $errors = array(); if ($app->request()->isPost()) { $data = $app->request()->post(); $data = Sanitize::clean($data, array("escape" => false));
“添加链接”页面使用Slim的request()-> isPost()和request()-> post()方法检索表单的数据。 使用CakePHP框架中的Sanitize和Validation类清除并验证数据。 [源代码语言=“ php”] <?php $ app-> map(“ / new”,function()use($ app){$ pageTitle =“添加新链接”; $ action =“新”; $ data = array(); $ errors = array(); if($ app-> request()-> isPost()){$ data = $ app-> request()-> post(); $ data = Sanitize :: clean ($ data,array(“ escape” => false));
$valid = Validation::getInstance(); if (!$valid->email($data["useremail"])) { $errors["useremail"] = "Invalid email address"; } if (!$valid->notEmpty($data["username"])) { $errors["username"] = "Please insert your name"; } if (!$valid->notEmpty($data["title"])) { $errors["title"] = "Please insert a title"; } if (!$valid->url($data["url"])) { $errors["url"] = "Invalid or empty URL"; }
$ valid =验证:: getInstance(); if(!$ valid-> email($ data [“ useremail”])){$ errors [“ useremail”] =“无效的电子邮件地址”; } if(!$ valid-> notEmpty($ data [“ username”])){$ errors [“ username”] =“请输入您的名字”; } if(!$ valid-> notEmpty($ data [“ title”])){$ errors [“ title”] =“请插入标题”; } if(!$ valid-> url($ data [“ url”])){$ errors [“ url”] =“无效或空URL”; }
if (empty($errors)) { if ($db = Db::getConnection()) { $query = "INSERT INTO links (url, title, description, username, useremail) VALUES(:url, :title, :description, :username, :useremail)"; try { $stmt = $db->prepare($query); $stmt->bindParam(":url", $data["url"]); $stmt->bindParam(":title", $data["title"]); $stmt->bindParam(":description", $data["description"]); $stmt->bindParam(":username", $data["username"]); $stmt->bindParam(":useremail", $data["useremail"]); $stmt->execute(); $app->flash("info", "Link added successfully!"); $app->redirect("/"); } catch (PDOException $e) { $app->flashNow("error", "Unable to save your URL: " . $e->getMessage()); } } else { $app->flashNow("error", "Unable to open DB"); } } }
if(empty($ errors)){if($ db = Db :: getConnection()){$ query =“将链接插入(URL,标题,描述,用户名,用户电子邮件)VALUES(:URL,:title,:description ,:username,:useremail)“; 尝试{$ stmt = $ db-> prepare($ query); $ stmt-> bindParam(“:url”,$ data [“ url”]); $ stmt-> bindParam(“:title”,$ data [“ title”]); $ stmt-> bindParam(“:description”,$ data [“ description”]); $ stmt-> bindParam(“:username”,$ data [“ username”]); $ stmt-> bindParam(“:useremail”,$ data [“ useremail”]); $ stmt-> execute(); $ app-> flash(“ info”,“链接添加成功!”); $ app-> redirect(“ /”); } catch(PDOException $ e){$ app-> flashNow(“ error”,“无法保存URL:”。$ e-> getMessage()); }} else {$ app-> flashNow(“ error”,“无法打开数据库”); }}}
$app->render("new.php", array( "pageTitle" => $pageTitle, "action" => $action, "data" => $data, "errors" => $errors));
$ app-> render(“ new.php”,array(“ pageTitle” => $ pageTitle,“ action” => $ action,“ data” => $ data,“ errors” => $ errors)));
})->via("GET", "POST");
})-> via(“ GET”,“ POST”);
[/sourcecode]
[/源代码]
Errors are stored in the $errors array which is used by both the controller and the view. The controller checks for errors to determine if the data should be inserted in the database and the view to display the error message near to each form field.
错误存储在$ errors数组中,控制器和视图都使用该数组。 控制器检查是否有错误,以确定是否应将数据插入数据库和视图,以在每个表单字段附近显示错误消息。
[sourcecode language=”php”] <form action="" method="post" accept-charset="utf-8"> <fieldset> <div class="clearfix<?php if (!empty($errors["url"])) echo " error" ?>"> <label for="url">Site URL</label> <div class="input"> <input type="text" size="30" name="url" id="url" class="xlarge" value="<?php echo (!empty($data["url"])) ? $data["url"] : ""; ?>"> <?php $field = "url"; if (!empty($errors[$field])) { ?> <span class="help-inline"><?php echo $errors[$field] ?></span> <?php } ?> </div> </div> <!– Other fields here –> </fieldset> </form>
[源代码语言=“ php”] <form action =“” method =“ post” accept-charset =“ utf-8”> <fieldset> <div class =“ clearfix <?php if(!empty($ errors [” url“]))echo” error“?>”> <label for =“ url”>站点URL </ label> <div class =“ input”> <input type =“ text” size =“ 30” name =“ url“ id =” url“ class =” xlarge“ value =” <?php echo(!empty($ data [“ url”]))?$ data [“ url”]:“”;?>“> <? php $ field =“网址”; if(!empty($ errors [$ field])){?> <span class =“ help-inline”> <?php echo $ errors [$ field]?> </ span> <?php}?> </ div> </ div> <!–这里的其他字段–> </ fieldset> </ form>
[/sourcecode]
[/源代码]
PDO prepared statements are used to insert data into the database, wrapped in a try-catch block. The flashNow() method displays any PDO error messages (though obviously in a production environment this should be avoided).
PDO准备好的语句用于将数据插入数据库,并包装在try-catch块中。 flashNow()方法显示任何PDO错误消息(尽管显然在生产环境中应避免这样做)。
The search page is similar to the homepage but with the difference of processing the search term before executing the SQL query. [sourcecode language=”php”] <?php $app->get("/search(/:key) ", function($key = null) use ($app) { $pageTitle = "Link Search"; $action = "search"; $links = array(); if ($app->request()->isGet()) { if (empty($key)) { $key = $app->request()->get("key"); } $key = Sanitize::clean($key, array("escape" => false)); }
搜索页面与主页相似,但区别在于在执行SQL查询之前要处理搜索词。 [源代码语言=“ php”] <?php $ app-> get(“ / search(/:key)”,function($ key = null)use($ app){$ pageTitle =“链接搜索”; $ action =“ search”; $ links = array(); if($ app-> request()-> isGet()){if(empty($ key)){$ key = $ app-> request()-> get (“ key”);} $ key = Sanitize :: clean($ key,array(“ escape” => false));}
if ($db = Db::getConnection()) { $query = "SELECT * FROM links WHERE (title LIKE :key OR url LIKE :key) ORDER BY created DESC"; try { $stmt = $db->prepare($query); $needle = "%" . $key . "%"; $stmt->bindParam(":key", $needle, PDO::PARAM_STR); $stmt->execute(); while ($link = $stmt->fetch(PDO::FETCH_ASSOC)) { $links[] = $link; } } catch (PDOException $e) { $app->flashNow("error", "Unable to execut search: " . $e->getMessage()); } } else { $app->flashNow("error", "Unable to open DB"); }
if($ db = Db :: getConnection()){$ query =“选择*来自链接的地方(标题LIKE:key或URL LIKE:key)ORDER BY创建的DESC”; 尝试{$ stmt = $ db-> prepare($ query); $ needle =“%”。 $ key。 “%”; $ stmt-> bindParam(“:key”,$ needle,PDO :: PARAM_STR); $ stmt-> execute(); 而($ link = $ stmt-> fetch(PDO :: FETCH_ASSOC)){$ links [] = $ link; }} catch(PDOException $ e){$ app-> flashNow(“ error”,“无法执行搜索:”。$ e-> getMessage()); }} else {$ app-> flashNow(“ error”,“无法打开数据库”); }
$app->render("search.php", array( "pageTitle" => $pageTitle, "action" => $action, "key" => $key, "links" => $links)); });
$ app-> render(“ search.php”,array(“ pageTitle” => $ pageTitle,“ action” => $ action,“ key” => $ key,“ links” => $ links))); });
[/sourcecode]
[/源代码]
The syntax $app->get(“/search(/:key) “, function($key = null) means that any string after the /search action name is treated as a search term and stored inside the $key parameter for the function. In any case the $key variable is sanitized before use.
语法$ app-> get(“ / search(/:key)”,function($ key = null)表示/ search动作名称之后的任何字符串都被视为搜索项,并存储在$ key参数内在任何情况下,$ key变量都在使用前被清除。
添加Facebook功能 (Adding Facebook Functionality)
The application works well in stand-alone mode, but in order to use it inside Facebook and take advantage of the user’s data you need to:
该应用程序在独立模式下运行良好,但是要在Facebook上使用它并利用用户数据,您需要:
- download the Facebook PHP SDK from GitHub 从GitHub下载Facebook PHP SDK
- register your application within Facebook starting at the Developer’s page 从开发者页面开始在Facebook中注册您的应用程序
I copied the src directory of the SDK into my app’s lib directory and renamed it to facebook.
我将SDK的src目录复制到应用程序的lib目录中,并将其重命名为facebook。
To register a Facebook app you must provide some details such as the URL of the application (e.g., http://myapp.heroku.com) and the name of the canvas (e,g., myapp) which is the identifier for the application inside Facebook (e.g., https://apps.facebook.com/myapp/).
要注册Facebook应用,您必须提供一些详细信息,例如应用的URL(例如,http://myapp.heroku.com)和画布名称(例如,myapp),这是该应用的标识符。 Facebook内的应用程序(例如https://apps.facebook.com/myapp/)。
Note: It’s possible to omit the HTTPS url. By doing this your application can be used only with the secure-mode option disabled (check your Facebook account’s settings for more info).
注意:可以省略HTTPS网址。 这样,您的应用程序只能在禁用安全模式选项的情况下使用(有关更多信息,请检查您的Facebook帐户设置)。
Once your application is registered with Facebook you can provide the configuration details in the index.php controller: [sourcecode language=”php”]<?php $config["facebook"]["appId"] = "YOUR_APP_ID"; $config["facebook"]["secret"] = "YOUR_APP_SECRET"; $config["facebook"]["canvas"] = "your-app-canvas"; $config["facebook"]["canvas_url"] = "https://apps.facebook.com/your-app-canvas/";[/sourcecode]
在Facebook上注册了您的应用程序之后,您可以在index.php控制器中提供配置详细信息:[源代码语言=” php”] <?php $ config [“ facebook”] [“ appId”] =“ YOUR_APP_ID”; $ config [“ facebook”] [“ secret”] =“ YOUR_APP_SECRET”; $ config [“ facebook”] [“ canvas”] =“您的应用画布”; $ config [“ facebook”] [“ canvas_url”] =“ https://apps.facebook.com/your-app-canvas/";[/源代码]
You also need to provide another configuration setting, the home URL which is passed to the authorization API: [sourcecode language=”php”]<?php $config["app"]["home"] = "https://your-app.heroku.com";[/sourcecode]
您还需要提供另一个配置设置,即传递给授权API的本地URL:[源代码语言=” php”] <?php $ config [“ app”] [“ home”] =“ https://您的-app.heroku.com”; [/源代码]
The integration with Facebook happens in two code sections. The first creates a new Facebook object as a property of the $app object. The advantage of this approach is that you have access to this connection anywhere you have access to the application object. Set the facebookCanvas property to tell the application it’s running inside an iframe provided by Facebook. [sourcecode language=”php”]<?php $app = new Slim(); $app->Facebook = new Facebook($config["facebook"]); $app->facebookUserProfile = null; $app->facebookCanvas = isRunningInsideFacebook();
与Facebook的集成发生在两个代码部分中。 第一个创建一个新的Facebook对象作为$ app对象的属性。 这种方法的优点是,您可以在访问应用程序对象的任何位置访问此连接。 设置facebookCanvas属性,以告知应用程序它在Facebook提供的iframe中运行。 [源代码语言=“ php”] <?php $ app = new Slim(); $ app-> Facebook =新的Facebook($ config [“ facebook”]); $ app-> facebookUserProfile = null; $ app-> facebookCanvas = isRunningInsideFacebook();
[/sourcecode]
[/源代码]
The second integration point is the function isRunningInsideFacebook() which tells the app if it’s running on Facebook (essentially it checks for the signed_request variable sent via the HTTP POST method).
第二个集成点是函数isRunningInsideFacebook(),它告诉应用程序是否正在Facebook上运行(本质上,它检查通过HTTP POST方法发送的signed_request变量)。
[sourcecode language=”php”]<?php function isRunningInsideFacebook() { return !empty($_REQUEST["signed_request"]); }[/sourcecode]
[源代码语言=“ php”] <?php函数isRunningInsideFacebook(){return!empty($ _ REQUEST [“ signed_request”]); }[/源代码]
The function facebookInit() takes care of all the other stuff. For example, it checks to see if it has the right authorization. The signed request is parsed using the Facebook SDK searching for the user_id field. If it doesn’t have that field then the application is not authorized by the user and it redirects him to the authorization page. [sourcecode language=”php”] <?php function facebookInit() { global $app; global $config;
facebookInit()函数负责所有其他内容。 例如,它检查是否具有正确的授权。 使用Facebook SDK搜索user_id字段来解析已签名的请求。 如果没有该字段,则该应用程序未得到用户的授权,它将用户重定向到授权页面。 [源代码语言=“ php”] <?php函数facebookInit(){全局$ app; 全局$ config;
if ($fbData = $app->Facebook->getSignedRequest()) { // redirect to Facebook Authorization if the User ID is not in the request if (empty($fbData["user_id"])) { $auth_url = "https://www.facebook.com/dialog/oauth?client_id=" . $config["facebook"]["appId"] . "&redirect_uri=" . urlencode($config["app"]["home"]) . "&scope=email"; echo ‘<script>top.location.href = "’ . $auth_url . ‘";</script>’; exit; } }
if($ fbData = $ app-> Facebook-> getSignedRequest()){//重定向到Facebook授权,如果用户ID不在请求中if(empty($ fbData [“ user_id”])){$ auth_url =“ https://www.facebook.com/dialog/oauth?client_id=“。 $ config [“ facebook”] [“ appId”]。 “&redirect_uri =”。 urlencode($ config [“ app”] [“ home”])。 “&scope = email”; echo'<script> top.location.href =“'。$ auth_url。'”; </ script>'; 出口; }}
if ($fbAccessToken = $app->Facebook->getAccessToken()) { // if code is present it was sent by an auth request, so redirect back to Facebook App Page if ($code = $app->request()->get("code")) { $app->redirect($config[‘facebook’]["canvas_url"]); } $user = $app->Facebook->getUser(); if ($user) { try { // proceed knowing you have a logged-in user who is authenticated $app->facebookUserProfile = $app->Facebook->api("/me"); $app->facebookUserProfile["logout"] = $app->Facebook->getLogoutUrl(); } catch (FacebookApiException $e) { $app->flashNow("error", $e->getMessage()); $user = null; } } } }
if($ fbAccessToken = $ app-> Facebook-> getAccessToken()){//如果存在代码,则该代码是由身份验证请求发送的,因此如果($ code = $ app-> request() -> get(“ code”)){$ app-> redirect($ config ['facebook'] [“ canvas_url”]); } $ user = $ app-> Facebook-> getUser(); if($ user){试试{//知道您有一个已通过身份验证的登录用户$ app-> facebookUserProfile = $ app-> Facebook-> api(“ / me”); $ app-> facebookUserProfile [“ logout”] = $ app-> Facebook-> getLogoutUrl(); } catch(FacebookApiException $ e){$ app-> flashNow(“ error”,$ e-> getMessage()); $ user = null; }}}}
[/sourcecode]
[/源代码]
If the app is authorized to see the user’s data, it checks for the code parameter passed by Facebook’s OAuth service after a successful authorization. The service redirects the user to the application’s URL outside of the iframe so I chose to redirect back to the framed version. Different parameters are passed in the query string if the authorization is denied for some reason, but I ignore them for this article.
如果该应用程序有权查看用户数据,则在成功授权后,它会检查Facebook OAuth服务传递的code参数。 该服务将用户重定向到iframe之外的应用程序的URL,所以我选择了重定向回带框架的版本。 如果由于某种原因拒绝了授权,则在查询字符串中传递不同的参数,但本文忽略了它们。
The code then requests the user’s profile using the Facebook API which is saved into the $app->facebookUserProfile property.
然后,代码使用Facebook API请求用户的个人资料,该API已保存到$ app-> facebookUserProfile属性中。
But exactly when is all of this code executed? I’ve slightly edited the routing code of the main URLs to accommodate this: [sourcecode language=”php”] <?php $app->map("/", "facebookInit", function () use ($app, $config) { // other code here })->via("GET", "POST");
但是究竟什么时候执行所有这些代码? 我已经稍微修改了主要URL的路由代码以适应以下情况:[源代码语言=“ php”] <?php $ app-> map(“ /”,“ facebookInit”,function()use($ app,$ config){//其他代码})-> via(“ GET”,“ POST”);
[/sourcecode]
[/源代码]
In Slim’s terminology this is called a Middleware. The facebookInit() function is called before the anonymous function that processes the route. By using this feature, each page can access and use the Facebook data.
在Slim的术语中,这称为中间件。 在处理路由的匿名函数之前调用facebookInit()函数。 通过使用此功能,每个页面都可以访问和使用Facebook数据。
摘要 (Summary)
I’ve shown you in this article an example of a simple app built taking advantage of Heroku, the Facebook SDK, and other free components. I hope it has stimulated your curiosity and your desire to build your next application in Heroku’s cloud. You will find the full source code of the application on CloudSpring’s GitHub account if you’d like to clone it and explore. Happy coding!
我在本文中向您展示了一个利用Heroku,Facebook SDK和其他免费组件构建的简单应用程序的示例。 我希望它激发了您的好奇心,并激发了您在Heroku的云中构建下一个应用程序的愿望。 如果您想克隆并浏览,可以在CloudSpring的GitHub帐户上找到该应用程序的完整源代码。 祝您编码愉快!
翻译自: https://www.sitepoint.com/build-your-app-in-the-cloud-with-heroku-and-the-facebook-sdk/
heroku


 1万+
1万+

 被折叠的 条评论
为什么被折叠?
被折叠的 条评论
为什么被折叠?
 到【灌水乐园】发言


