


coldfusion
ColdFusion 9 – The latest version – has just recently been released as a beta preview on Adobe Labs. ColdFusion is Adobe’s server-side platform for web application development and we’re jumping on this opportunity to use it in combination with the brand-new ColdFusion Builder. We’ll develop a rating widget, so that you can provide your users with the option to rate content on your web site. The source code for this article is also available for download.
ColdFusion 9 –最新版本–最近在Adobe Labs上作为Beta版预览发布。 ColdFusion是Adobe用于Web应用程序开发的服务器端平台,我们正抓住这个机会,将其与全新的ColdFusion Builder结合使用。 我们将开发一个评级小部件,以便您可以为用户提供对网站内容进行评级的选项。 本文的源代码也可以下载。
Once you’ve read the article, why don’t you test your knowledge with our quiz? If you’re one of the first 200 to complete the quiz, Adobe will send you a printed copy of the Adobe ColdFusion Evangelism Kit.
阅读文章后,为什么不通过我们的测验来测试您的知识呢? 如果您是完成测验的前200名用户之一,Adobe将向您发送Adobe ColdFusion福音套件的印刷版。
Before we start let me say that this tutorial assumes that you’ve installed a stand-alone ColdFusion 9 server on your local development machine in a non-J2EE deployment and that this server is running on port 8500. If you have set up your server in a way to use a locally installed HTTP server like Apache or IIS, you might need to place the files I’m mentioning in a different location on your hard drive, as well as change all port references to port 80.
在我们开始之前,我要说的是,本教程假定您已在非J2EE部署中的本地开发计算机上安装了独立的ColdFusion 9服务器,并且该服务器在端口8500上运行。如果已设置服务器,为了使用本地安装的HTTP服务器(例如Apache或IIS),您可能需要将我提到的文件放在硬盘驱动器上的其他位置,并将所有端口引用更改为端口80。
设置数据库 (Setting Up The Database)
All right, let’s start! Our task is to add a rating widget to a ColdFusion application or page. Therefore, we need to have a ColdFusion application first, and the easiest way to achieve that is by creating a few database tables to store content and ratings. If you’ve followed Kay Smoljak’s tutorial on building a URL shortener application, the easiest way is to just add a rating table to the existing Derby database. You can do so by executing the sql/db.cfm file of the download package for this tutorial.
好吧,让我们开始吧! 我们的任务是将评级小部件添加到ColdFusion应用程序或页面。 因此,我们需要首先拥有一个ColdFusion应用程序,而最简单的方法是通过创建一些数据库表来存储内容和等级。 如果您已按照Kay Smoljak的有关构建URL缩短程序的教程进行操作 ,则最简单的方法是将评级表添加到现有Derby数据库中。 您可以通过执行本教程下载包的sql/db.cfm文件来实现。
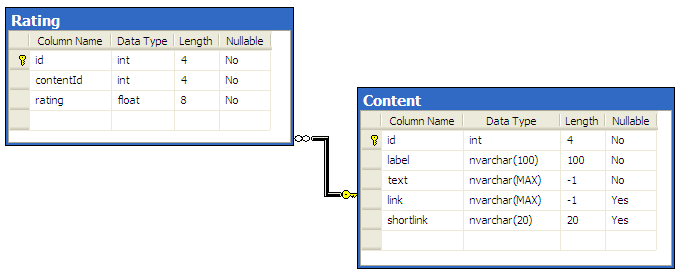
For those users of SQL Server, we aim to keep this tutorial as straightforward as possible. So rather than dive into the depths of database schemas, here’s a screenshot of the schema diagram and how the two tables are related.
对于SQL Server的那些用户,我们旨在使本教程尽可能简单明了。 因此,这不是深入研究数据库架构,而是截取该架构图以及这两个表之间的关系的屏幕截图。

Database schema for content and rating table (View larger image in a new window.)
内容和评分表的数据库架构( 在新窗口中查看大图。 )
SQL scripts that create the two tables on SQL Server 2005 or 2008 are part of the download package (you’d have to create the Content table first, as both scripts assume there’s a database named "sitepoint" already existing on your SQL Server). Keep in mind that this is just an example; the column definitions of the Content table are arbitrarily chosen and the only requirement is really to have a unique content identifier that can be tied into the rating table to associate both entities.
在下载包中包含在SQL Server 2005或2008上创建两个表SQL脚本(您必须首先创建Content表,因为两个脚本都假定SQL Server上已经存在一个名为“ sitepoint”的数据库)。 请记住,这仅是示例; 内容表的列定义是任意选择的,唯一的要求实际上是拥有一个唯一的内容标识符,该标识符可以绑定到评级表中以关联两个实体。
将项目导入ColdFusion Builder (Importing the Project into ColdFusion Builder)
In Kay Smoljak’s and my article “What’s new in ColdFusion 9“, we’ve discussed a variety of the new features in CF9. Among those is the aforementioned ColdFusion Builder. The code samples for this tutorial come as an exported CF Builder project and can be imported into your own project using the import wizard in the File menu of CF Builder. The image below shows the project’s file and folder structure.
在Kay Smoljak和我的文章“ ColdFusion 9的新功能”中 ,我们讨论了CF9的各种新功能。 其中包括上述的ColdFusion Builder。 本教程的代码示例是作为导出的CF Builder项目提供的,可以使用CF Builder的“文件”菜单中的导入向导将其导入到您自己的项目中。 下图显示了项目的文件和文件夹结构。

CF Builder project structure
CF Builder项目结构
显示内容 (Displaying the Content)
The first file we’re going to look at is index.cfm. Let’s pretend this is the main application file that’s supposed to query and show the content:
我们要看的第一个文件是index.cfm 。 让我们假设这是应该查询和显示内容的主要应用程序文件:
...
<cfscript>
oContent = CreateObject("component","nz.co.ventego.sitepoint.Content");
data = oContent.getAllContent();
</cfscript>
<body>
<cfoutput query="data">
<h3>http://#cgi.server_name#:#cgi.server_port#/URLS/?#data.shortlink# (id: #data.id#)</h3>
<p>(#data.link#)</p>
<p>
<strong>Do you like this content? Why not rate it...</strong><br/>
</p>
<br/><br/>
<hr/>
</cfoutput>
</body>
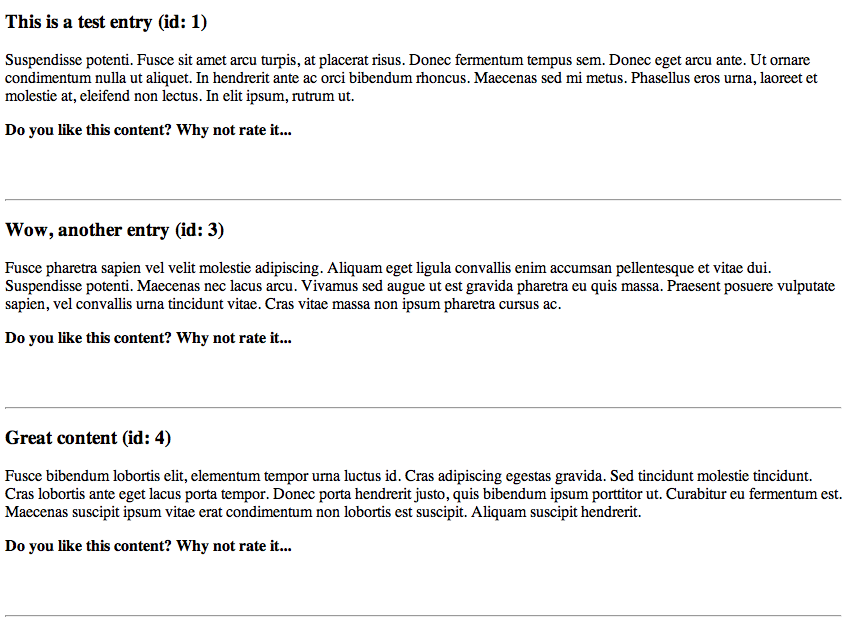
...The top <cfscript> block instantiates a CFC (ColdFusion Component) and calls the method getAllContent. The method executes an SQL query against our database and retrieves a list of all Content entries, together with the amount and the average value of ratings (we’re allowing users to pick a score between one and five stars):
顶部<cfscript>块实例化一个CFC(ColdFusion组件),并调用方法getAllContent 。 该方法对我们的数据库执行SQL查询,并检索所有“内容”条目的列表以及收视率的数量和平均值(我们允许用户选择一到五颗星之间的分数):
SELECT   C.id, C.label, C.text, C.link, C.shortlink, AVG(R.rating) as average_rating, COUNT(R.id) as number_of_ratings
FROM  Content C
LEFT JOIN Rating R ON C.id = R.contentId
GROUP BY C.id, C.label, C.text, C.link, C.shortlink
The resultset of this query is stored in the variable data on the page and can now be used there. The <cfoutput> tag’s query attribute loops over the query resultset and for each row of the query, the HTML content from <h3> to <hr> is created, as shown below.
该查询的resultset存储在页面上的变量数据中,现在可以在此处使用。 <cfoutput>标记的query属性遍历查询resultset并为查询的每一行创建从<h3>到<hr>HTML内容,如下所示。

Database output (View larger image in a new window.)
数据库输出( 在新窗口中查看大图。 )
While looping over the resultset ColdFusion will evaluate the expressions that are embedded between the #-symbols and replace those with data from the resultset. As you can see in the code, we’re using the shortlink and link columns from Kay’s tutorial to rate the shortened URLs her application created. Let me just point out that the Content table has columns to store a label and text as well – so feel free to store whatever data you like in there, and change the display logic shown above in index.cfm to tweak the output for your needs.
在循环resultset ColdFusion将评估嵌入在#符号之间的表达式,并将其替换为resultset集中的数据。 正如您在代码中看到的那样,我们正在使用Kay教程中的shortlink和link列来评估其应用程序创建的缩短URL。 我只想指出一下,Content表具有用于存储标签和文本的列-因此,可以随时在其中存储所需的任何数据,并更改上面index.cfm显示的显示逻辑,以根据需要调整输出。
自定义标签 (The Custom Tag)
The rating widget will be implemented as a ColdFusion custom tag. Custom tags were introduced into ColdFusion back in the days of ColdFusion 3 or 4 but are still the most efficient and preferable way to create modularized functionality for the direct purpose of creating page output. From a high-level point of view a custom tag is nothing more than including a .cfm file into another .cfm file, but we’re in fact following a few guidelines and requirements in writing and accessing this custom tag.
评分小部件将作为ColdFusion自定义标签实施。 自定义标签是在ColdFusion 3或4时代引入到ColdFusion中的,但它仍然是直接用于创建页面输出的创建模块化功能的最有效,最可取的方式。 从高级的角度来看,自定义标签无非就是将.cfm文件包含到另一个.cfm文件中,但是实际上我们在编写和访问该自定义标签时遵循了一些准则和要求。
A CFML custom tag can be called via <cfmodule> and gets passed so-called custom tag attributes by specifying key-value pairs. Our rating widget will need to be passed three pieces of information: the content identifier it’s supposed to be tied against, the average current rating, and the amount of ratings that we’ve already received for this content. We’ll place the following line right after the <strong>...</strong><br/> block in index.cfm later to embed our widget:
可以通过<cfmodule>调用CFML定制标记,并通过指定键值对来传递所谓的定制标记属性。 我们的评级小部件将需要传递三条信息:应该与之绑定的内容标识符,平均当前评级以及我们已经为该内容获得的评级数量。 我们稍后将在index.cfm的<strong>...</strong><br/>块之后放置以下行,以嵌入我们的小部件:
<cfmodule template="customtags/widget.cfm" contentId="#data.id#" rating="#data.average_rating#" ratingcount="#data.number_of_ratings#"/>The widget code itself is placed in the subfolder customtags and named widget.cfm. The latter indicates again that our custom tag is simply a normal .cfm template written in a specific way. The custom tag itself is surprisingly concise, partly due to the fact that we’re leveraging the Ajax framework, Spry to help us with managing the rating mechanism itself. Let’s have a look at the custom tag first:
窗口小部件代码本身位于子文件夹customtags并命名为widget.cfm 。 后者再次表明我们的自定义标签只是简单地以特定方式编写的普通.cfm模板。 自定义标签本身非常简洁,部分原因是由于我们利用了Ajax框架Spry帮助我们管理评级机制本身。 首先让我们看一下自定义标签:
<cfif thisTag.executionMode eq "start">
  <cfif isDefined("attributes.contentId")>
    <cfoutput>
      <p>
        <cfif isDefined("attributes.rating") AND isDefined("attributes.ratingcount")>
          <div>The current score is #DecimalFormat(attributes.rating)# based on #attributes.ratingcount# votes.</div>
        </cfif>
        <span id="rate_content_#attributes.contentId#" class="ratingContainer">
            <span class="ratingButton"></span>
            <span class="ratingButton"></span>
            <span class="ratingButton"></span>
            <span class="ratingButton"></span>
            <span class="ratingButton"></span>
            <span class="ratingRatedMsg thankyou">Thanks for voting!</span>
          <input type="text" id="ratingValue_#attributes.contentId#" name="ratingValue_#attributes.contentId#" value="#attributes.rating#" />
        </span>
        <script type="text/javascript">
          var rate_content_#attributes.contentId# = new Spry.Widget.Rating("rate_content_#attributes.contentId#", {allowMultipleRating:false, ratingValueElement:"ratingValue_#attributes.contentId#", postData:"contentId=#attributes.contentId#&rating=@@ratingValue@@", saveUrl:"rate.cfm"});
        </script>
      </p>
    </cfoutput>
  <cfelse>
    <p>Please supply a contentId value to use this widget for rating content</p>
  </cfif>
</cfif>
A custom tag has different execution modes. The idea behind this concept is that one should be able to “wrap” a custom tag with opening and closing tags around other existing content on a page and apply whatever functionality the tag provides to the enclosed content. In our case, we just want to call the custom tag once to actually include the rating widget and attach it to an item on the page. At the beginning of the custom tag, we’re therefore just checking if the execution mode of this tag is “start”. If the tag is used in any other mode, no output is created and the custom tag has no effect.
自定义标签具有不同的执行模式。 这个概念背后的想法是,人们应该能够通过在页面上其他现有内容周围打开和关闭标签来“包装”自定义标签,并将该标签提供的任何功能应用于封闭的内容。 在我们的案例中,我们只想调用一次自定义标签,以实际包括评分小部件并将其附加到页面上的项目。 因此,在自定义标签的开头,我们只是检查该标签的执行模式是否为“开始”。 如果在其他任何模式下使用标签,则不会创建任何输出,并且自定义标签无效。
Everything that’s been passed into the custom tag from the index.cfm via the <cfmodule> tag ends up in the so-called "attributes scope" within the custom tag. We’re checking if the contentId has been passed in and therefore if the variable attributes.contentId is defined. If that’s the case we can at least safely run the rating widget. If the developer using our widget.cfm passes in both a value for attributes.rating and attributes.ratingcount, we’ll display information of the current average score and the amount of votes for that content item.
通过<cfmodule>标记从index.cfm传递到定制标记的所有内容最终都位于定制标记内的所谓“属性范围”中。 我们正在检查contentId是否已传递,因此是否已定义变量attributes.contentId 。 如果是这种情况,我们至少可以安全地运行等级小部件。 如果使用widget.cfm的开发人员widget.cfm传递attributes.rating和attributes.ratingcount的值,则我们将显示当前平均得分的信息以及该内容项的投票数。
用Spry添加Ajax (Adding Ajax with Spry)
After this conditional CFML code, the real rating widget is being set up. As mentioned earlier, we’re going to use some widgets from an Ajax library called Spry. Spry is a lightwight collection of widgets, effects, and other useful Ajax-related classes developed by Adobe that’s been released under a BSD license. The nested set of <span> tags creates the rating widget itself and five elements of class ratingButton inside. We also throw in a message to be displayed after the user has voted and an <input> element to store the current rating. The latter will allow our rating widget to reveal the average score (in stars) at that point when it’s loaded (see the figure below). It’s worth mentioning that Spry is obviously not the only way of creating a dynamic and Ajax-based widget; other JavaScript frameworks such as jQuery or extJS are also able to provide a solution.
在此条件CFML代码之后,将设置实际评级窗口小部件。 如前所述,我们将使用Ajax库中名为Spry的小部件。 Spry是由Adobe开发的轻巧的小部件,效果和其他有用的与Ajax相关的类的集合,这些类已获得BSD许可。 嵌套的<span>标记集创建了评级小部件本身和内部的ratingButton类的五个元素。 在用户投票后,我们还会抛出一条要显示的消息以及一个用于存储当前评分的<input>元素。 后者将使我们的评级小部件在加载时可以显示该点的平均得分(以星为单位)(请参见下图)。 值得一提的是,Spry显然不是创建动态且基于Ajax的窗口小部件的唯一方法。 其他JavaScript框架(例如jQuery或extJS)也能够提供解决方案。

Preloaded "stars" to reflect the average score
预载“星星”以反映平均分数
Below the section of nested <span> tags we’re actually instantiating an object of the Spry.Widget.Rating class in JavaScript. In our scenario we’re going to have multiple content items with a rating widget each on a single page, so we’ll have to make sure that we’re creating individual instances of the Rating class. This is done by naming the instances rate_content_#attributes.contentId# – the ColdFusion expression in #’s is evaluated on the server before the HTML is delivered to the client and the JavaScript is executed there. The constructor of the JavaScript object is passed a reference to the id of the <span> section we created just before, as well as an object of properties and settings.
在嵌套的<span>标记部分的下面,我们实际上是在JavaScript中实例化Spry.Widget.Rating类的对象。 在我们的方案中,我们将在一个页面上有多个内容项,每个内容项都有一个评级小部件,因此我们必须确保要创建Rating类的各个实例。 这是通过命名实例rate_content_#attributes.contentId# -在rate_content_#attributes.contentId#的ColdFusion表达式在服务器上进行评估,然后再将HTML交付给客户端并在其中执行JavaScript。 JavaScript对象的构造函数将传递对我们之前创建的<span>部分的id的引用,以及属性和设置的对象。
The latter is of particular interest as it allows us to customize the Spry widget in a variety of ways. In this case here, we allow a user to vote just once while being on the page (without additional checks on the server they can vote again when they reload the page) and we define a saveUrl in combination with a postData query string. As soon as a user of the widget clicks on a star, we’re sending the current contentId and the selected rating to the rate.cfm template via a POST request.
后者特别有趣,因为它允许我们以各种方式自定义Spry小部件。 在这种情况下,我们只允许用户在页面上投票一次(无需在服务器上进行其他检查,他们在重新加载页面时便可以再次投票),并且我们定义了一个saveUrl和postData查询字符串。 窗口小部件的用户单击星号后,我们就会通过POST请求将当前contentId和选定的评分发送到rate.cfm模板。
Data that has been sent to a CFML page via a POST request becomes variables in the form scope; then the core task of rate.cfm is to check if contentId and the rating are actually defined in the latter, before executing a SQL statement to insert the new rating into the Rating table. For this data access, we’re following a similar pattern to what we used in the data retrieval before:
通过POST请求发送到CFML页面的数据成为表单范围内的变量; 那么rate.cfm的核心任务是在执行一条SQL语句以将新等级插入到Rating表中之前,检查contentId和等级是否在后者中实际定义。 对于此数据访问,我们遵循的模式与之前在数据检索中使用的模式类似:
Create an instance of a data access CFC:
oRating = CreateObject("component","nz.co.ventego.sitepoint.Rating");创建数据访问CFC的实例:
oRating = CreateObject("component","nz.co.ventego.sitepoint.Rating");Call a method of the previously instantiated component:
oRating.insertRating(form.contentId,form.rating);调用先前实例化的组件的方法:
oRating.insertRating(form.contentId,form.rating);
The Rating.cfc‘s insertRating method executes the following SQL query:
Rating.cfc的insertRating方法执行以下SQL查询:
<cfquery datasource="sitepoint" name="local.qRating">
  INSERT
  INTO Rating(contentId,rating)
  VALUES (<cfqueryparam cfsqltype="cf_sql_integer" value="#arguments.contentId#"/>,<cfqueryparam cfsqltype="cf_sql_integer" value="#arguments.rating#"/>)
</cfquery>
重要提示 (An Important Tip)
Although indirectly related to the rating widget tutorial, it’s worth mentioning this query is an example of two very important best practices that regularly are forgotten by CF developers:
尽管与等级小部件教程间接相关,但值得一提的是此查询是CF开发人员经常忘记的两个非常重要的最佳实践的示例:
Always use the
<cfqueryparam>tag when you’re creating dynamic SQL queries – otherwise you’re creating a barndoor-sized security gap and opening yourself up to SQL injection hacks.<cfqueryparam>ensures at least the correct type of data and additionally creates a parameter binding, which usually executes faster than just using ColdFusion variables, as in...VALUES ('#arguments.contentId#')....在创建动态SQL查询时,请始终使用
<cfqueryparam>标记-否则,您将创建一个barndoor大小的安全漏洞并向SQL注入黑客开放。<cfqueryparam>确保至少数据类型正确,并另外创建一个参数绑定,通常比使用ColdFusion变量执行更快,如...VALUES ('#arguments.contentId#')...。Remember to scope variables that are local to a function. Until ColdFusion 8 that had to be done by declaring function-local variables by using the
varkeyword, as in:<cfset var abc=345>. ColdFusion 9 has introduced a new, alternative (and in my opinion, better) syntax by offering the local scope as shown above by naming the query objectlocal.qRating.切记要对函数局部变量进行范围界定。 在ColdFusion 8之前,必须使用
var关键字声明局部函数变量,例如:<cfset var abc=345>。 ColdFusion 9通过命名查询对象local.qRating来提供如上所示的局部范围,从而引入了一种新的替代(我认为更好)的语法。
整理起来 (Finishing Up)
With that last step we have everything covered – nearly. When we were looking at the index.cfm file earlier in the tutorial, we just saw a snippet of CFML code, rather than all of it. Because our page and the widget.cfm use the Spry Rating class, we need to make sure we import those particular JavaScript and CSS files from the Spry library:
在最后一步中,我们几乎涵盖了所有内容。 当我们在本教程前面查看index.cfm文件时,我们只看到了一段CFML代码,而不是全部。 因为我们的页面和widget.cfm使用Spry Rating类,所以我们需要确保从Spry库中导入那些特定JavaScript和CSS文件:
<!DOCTYPE html PUBLIC "-//W3C//DTD XHTML 1.0 Transitional//EN"
    "https://www.w3.org/TR/xhtml1/DTD/xhtml1-transitional.dtd">
<html xmlns="https://www.w3.org/1999/xhtml">
<head>
  ...
  <script language="JavaScript" type="text/javascript" src="js/spry/SpryRating.js"></script>
  <link href="css/spry/SpryRating.css" rel="stylesheet" type="text/css" />
  <style type="text/css">
    .thankyou
    {
      float:left;
      margin-top:1px;
    }
  </style>
</head>
There’s also an additional style rule for the thankyou HTML class to position the "Thanks for voting" output. The final output is shown below.
thankyou HTML class还有一个附加的样式规则,用于放置“感谢投票”输出。 最终输出如下所示。

Thank-you message
谢谢留言
The user has given the content 4 stars; a revote, as such, is impossible. Reloading the page provides updates to the score and amount of votes, and does enable this user to vote again. There are a variety of possible extensions of this widget to work around this issue and the feasibility of each depends on the use case of the widget. One could think of implementing a very simple, cookie-based solution, but also tie the widget into a proper authentication model that keeps track of user sessions and identifiers; that way, you could prohibit multiple voting on the same content by a given user.
用户给了该内容4星; 这样的投票是不可能的。 重新加载页面可提供分数和投票数量的更新,并确实使该用户能够再次投票。 该小部件有多种可能的扩展方式来解决此问题,每个小部件的可行性取决于小部件的使用情况。 可以考虑实现一个非常简单的基于cookie的解决方案,但也可以将小部件绑定到适当的身份验证模型中,该模型可以跟踪用户会话和标识符。 这样,您可以禁止给定用户对同一内容进行多次投票。
So how would you rate your knowledge? Test yourself with our quiz and, If you’re one of the first 200, receive a printed copy of the Adobe ColdFusion Evangelism Kit. Don’t forget to download the ColdFusion 9 preview, the source code from this article, and have a go at building your first ColdFusion app.
那么您如何评价自己的知识呢? 使用我们的测验来测试您自己 ,如果您是前200名参与者之一,请获得Adobe ColdFusion福音套件的印刷版。 不要忘记下载ColdFusion 9预览 (本文的源代码) ,并开始构建您的第一个ColdFusion应用。
coldfusion


 被折叠的 条评论
为什么被折叠?
被折叠的 条评论
为什么被折叠?
 到【灌水乐园】发言


