


Building practical Flash widgets, like ones that record users votes and display the results, is easy in Flex. In my previous article I demonstrated how to set up Flex Builder and create vote tally widgets. In this second article, I’ll show you how we can upgrade that widget to not only read votes, but post them as well. And I’ll demonstrate how to configure Flex projects to build lightweight Flash applications, which are perfect for deployment as widgets.
在Flex中,构建实用的Flash小部件(例如记录用户投票并显示结果的小部件)很容易。 在上一篇文章中,我演示了如何设置Flex Builder和创建投票提示窗口小部件。 在第二篇文章中,我将向您展示如何升级该小部件,使其不仅可以读取票,还可以张贴票。 我将演示如何配置Flex项目以构建轻量级Flash应用程序,该应用程序非常适合作为小部件进行部署。
Download the code archive for this article if you’d like to play along at home.
如果您想在家玩,请下载本文的代码档案 。
Pay attention! Once again, there will be a quiz at the end of the article. The first 100 people to complete the quiz will receive a copy of my book, Getting Started With Flex 3, for FREE, delivered to your door. For a limited time, the book is also available as a FREE PDF, thanks to Adobe.
请注意! 再次,本文末尾将进行测验。 前100位完成测验的人员将免费获得我的书《 Flex 3入门》的副本。 多亏了Adobe,在有限的时间内,这本书还以免费PDF的形式提供。
建立投票服务 (Building the Voting Service)
Upgrading the widget from one that reads vote tallies to one that can post votes means upgrading the server backend. To do this, we’ll create a very simple MySQL database that stores the vote topics and the options for each voting topic along with their vote count.
将小部件从读取投票记录的小部件升级到可以发布投票的小部件,意味着升级服务器后端。 为此,我们将创建一个非常简单MySQL数据库,该数据库存储投票主题和每个投票主题的选项以及投票计数。
This is the MySQL code we use to create the tables and to preload it with a question:
这是我们用来创建表并预载问题MySQL代码:
DROP TABLE IF EXISTS topics;

CREATE TABLE topics (

  id INT NOT NULL AUTO_INCREMENT,

  text VARCHAR( 255 ) NOT NULL,

  PRIMARY KEY ( id ) );

DROP TABLE IF EXISTS options;

CREATE TABLE options (

  id INT NOT NULL AUTO_INCREMENT,

  topic_id INT NOT NULL,

  text VARCHAR( 255 ),

  votes INT NOT NULL,

  PRIMARY KEY ( id ) );

INSERT INTO topics VALUES ( 0, 'Which is the best Star Wars movie?' );

INSERT INTO options VALUES ( 0, 1, 'Episode I', 10 );

INSERT INTO options VALUES ( 0, 1, 'Episode II', 20 );

INSERT INTO options VALUES ( 0, 1, 'Episode III', 50 );

INSERT INTO options VALUES ( 0, 1, 'Episode IV', 150 );

INSERT INTO options VALUES ( 0, 1, 'Episode V', 250 );

INSERT INTO options VALUES ( 0, 1, 'Episode VI', 30 );
It’s necessary to use mysqladmin to create the database, like so:
必须使用mysqladmin创建数据库,如下所示:
% mysqladmin --user=root create votes… and then load the schema into it using the mysql command:
…,然后使用mysql命令将模式加载到其中:
% mysql --user=root votes < vote.sqlIf you’re using PHPMyAdmin to manage your database, you can create the database using PHPMyAdmin, and then use the database restore function to load these tables into the database.
如果使用PHPMyAdmin管理数据库,则可以使用PHPMyAdmin创建数据库,然后使用数据库还原功能将这些表加载到数据库中。
The next step is to upgrade the AMFPHP service code for the vote system. The complete new code is shown here:
下一步是升级投票系统的AMFPHP服务代码。 完整的新代码如下所示:
<?php

require_once("MDB2.php");

include_once(AMFPHP_BASE . "shared/util/MethodTable.php");

class VoteService2

{

  function getTopics()

  {

    $dsn = 'mysql://root@localhost/votes';

    $mdb2 =& MDB2::factory($dsn);

    $sth =& $mdb2->prepare( "SELECT * FROM topics" );

    $res = $sth->execute();

    $rows = array();

    while ($row = $res->fetchRow(MDB2_FETCHMODE_ASSOC)) { $rows []= $row; }

    return $rows;

  }

  function getOptions( $topic )

  {

    $dsn = 'mysql://root@localhost/votes';

    $mdb2 =& MDB2::factory($dsn);

    $sth =& $mdb2->prepare( "SELECT * FROM options WHERE topic_id=?" );

    $res = $sth->execute( $topic );

    $rows = array();

    while ($row = $res->fetchRow(MDB2_FETCHMODE_ASSOC)) { $rows []= $row; }

    return $rows;

  }

  function addVote( $option )

  {

    $dsn = 'mysql://root@localhost/votes';

    $mdb2 =& MDB2::factory($dsn);

    $sth =& $mdb2->prepare( "SELECT * FROM options WHERE id=?" );

    $res = $sth->execute( $option );

    $rows = array();

    while ($row = $res->fetchRow(MDB2_FETCHMODE_ASSOC)) {

      $sth2 =& $mdb2->prepare( "UPDATE options SET votes=? WHERE id=?" );

      $row['votes'] = $row['votes'] + 1;

      $res = $sth2->execute( array( $row['votes'], $option ) );

      return $row;

    }

    return null;

  }

}
I won’t get into the weeds on this code, because it’s beyond the focus of this article, but I will point out that the script uses the MDB2 extension to access the MySQL database for the votes. The MDB2 library is the new standard for database-agnostic access with PHP.
我不会涉足此代码,因为它超出了本文的重点,但我会指出,该脚本使用MDB2扩展名来访问MySQL数据库以进行投票。 MDB2库是使用PHP与数据库无关的访问的新标准。
The three methods are getTopics, which returns the list of available vote topics, then getOptions, which returns an array of options for the specified topic. Each option includes the option text and the count of votes. Finally, addVote adds a single vote to a particular option.
这三个方法分别是getTopics和getOptions ,该方法返回可用投票主题的列表, getOptions返回指定主题的选项数组。 每个选项均包含选项文本和投票数。 最后, addVote对特定选项添加一次投票。
To test these functions, let’s bring up the AMF service browser that comes with the AMFPHP project and use it to inspect the service, as shown here.
为了测试这些功能,让我们启动AMFPHP项目随附的AMF服务浏览器,并使用它来检查服务,如下所示。

This screenshot shows what happens when we run the getTopics function. It returns an array of objects, each of which has the id of the topic and the text of the topic.
此屏幕快照显示了当我们运行getTopics函数时会发生什么。 它返回一个对象数组,每个对象都有topic的id和topic的文本。
Next we can check the getOptions function, as shown.
接下来,我们可以检查getOptions函数,如图所示。
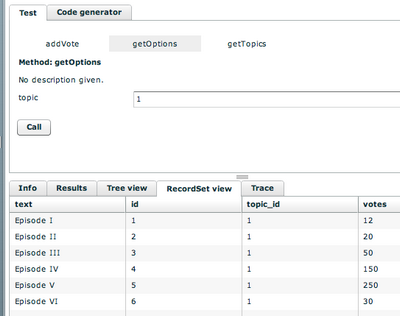
We see that this function returns another array of objects where each object has the text of the option, the unique id of the option, the associated topic’s id, and the current count of votes.
我们看到该函数返回另一个对象数组,其中每个对象都有选项的text ,选项的唯一id ,关联主题的id和当前的votes 。
The final service function to test is addVote. Here it is in action.
要测试的最终服务功能是addVote 。 它在起作用。
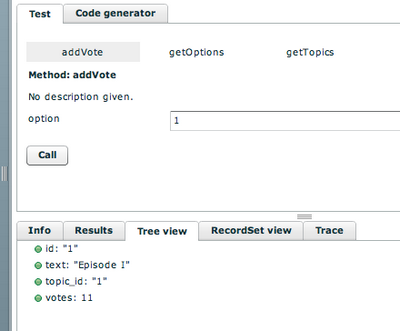
In this screenshot we specify that we’re adding a vote for the option with the id of 1, which is “Episode I” (seriously). The return is a single object with the new values for the option record with the id of 1.
在此屏幕快照中,我们指定我们要为id为1的选项添加投票,即“ Episode I”(严重)。 返回值是单个对象,其id为1的选项记录具有新值。
That’s about all we need concern ourselves with for the web server side. Now comes the fun part: wrapping our application in a nice Flex interface.
这就是我们在Web服务器端需要关注的所有内容。 现在来了有趣的部分:将我们的应用程序包装在一个不错的Flex界面中。
建立投票界面 (Building the Voting Interface)
The first step in building the voting application is to get the list of topics and to pick one to vote on. The code below implements just that portion of the functionality, but it defines the entire web server API in the RemoteObject object:
构建投票应用程序的第一步是获取主题列表并选择要投票的主题。 下面的代码仅实现该功能的那部分,但是它在RemoteObject对象中定义了整个Web服务器API:
<?xml version="1.0" encoding="utf-8"?>

<mx:Application xmlns:mx="http://www.adobe.com/2006/mxml" layout="vertical"

  creationComplete="voteRO.getTopics.send()">

<mx:Script>

<![CDATA[

private var topicID:int = 0;

private function onGetTopics() : void {

  var topicind:int = Math.round( Math.random() * voteRO.getTopics.lastResult.length );

  if ( topicind >= voteRO.getTopics.lastResult.length )

    topicind = voteRO.getTopics.lastResult.length - 1;

  var topic:Object = voteRO.getTopics.lastResult[ topicind ];

  topicID = topic.id;

  topicText.text = topic.text;

}

]]>

</mx:Script>

<mx:RemoteObject id="voteRO"

  endpoint="http://localhost/amfphp/gateway.php"

  source="votes2.VoteService2" destination="votes2.VoteService2"

  showBusyCursor="true">

<mx:method name="getTopics" result="onGetTopics()" />

<mx:method name="getOptions">

  <mx:arguments><mx:Topic /></mx:arguments>

</mx:method>

<mx:method name="addVote">

  <mx:arguments><mx:Topic /></mx:arguments>

</mx:method>

</mx:RemoteObject>

<mx:Label fontSize="20" id="topicText" />

</mx:Application>
There’s a lot here that we’ve seen from the original examples in the first article, but it does contain a lot more ActionScript code than any of the previous examples. Let’s start with what’s familiar.
我们从第一篇文章的原始示例中看到了很多内容,但是与以前的任何示例相比,它确实包含了更多的ActionScript代码。 让我们从熟悉的地方开始。
The <mx:RemoteObject> is exactly the same as the one we had in the first article, with the exception that I’ve added a few more methods, and two of those methods have arguments. The <mx:Label> tag at the bottom will present the text of the question.
<mx:RemoteObject>与我们在第一篇文章中使用的完全相同,不同之处在于我添加了更多方法,其中两个方法带有参数。 底部的<mx:Label>标记将显示问题的文本。
Now, the ActionScript code may look daunting, but it’s relatively straightforward. The onGetTopics method is called in response to a successful call to the getTopics function on the web server. The method takes the topics that were returned and picks one at random using the Math.random method. The code then sets the text of the table to the text of the topic.
现在,ActionScript代码可能看起来令人生畏,但它相对简单。 响应成功调用Web服务器上的getTopics函数,调用onGetTopics方法。 该方法获取返回的主题,并使用Math.random方法随机选择一个主题。 然后,代码将表的文本设置为主题的文本。
The relationship between the getTopics method on the RemoteObject and the onGetTopics method in the application is worth our attention. Web services calls in Flex are asynchronous. In fact, just about everything in Flex is asynchronous and event-based. When you call the send method on getTopics, it returns immediately. Flex then asynchronously makes the call to the web server, gathers the response, and fires the result method which, in this case, calls the onGetTopics method. There’s also a callback for a web services fault, which I don’t specify in this example.
值得我们注意的是RemoteObject上的getTopics方法与应用程序中的onGetTopics方法之间的关系。 Flex中的Web服务调用是异步的。 实际上,Flex中的几乎所有内容都是异步的并且基于事件。 在getTopics上调用send方法时,它将立即返回。 然后,Flex异步调用Web服务器,收集响应,并触发result方法,在这种情况下,该方法调用onGetTopics方法。 还有一个针对Web服务故障的回调,在此示例中未指定。
Back to the example, though. Running this should result in something that looks like this.
回到示例。 运行此命令应会导致如下所示。
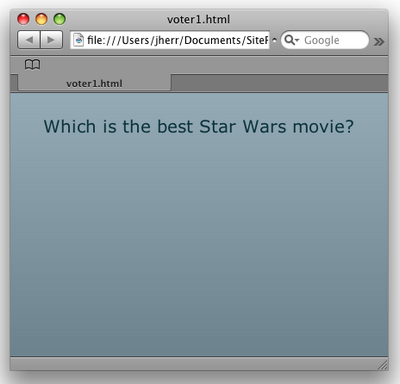
If you have added more topics to the database, you should see one of those topics chosen at random. The data set that I put in the MySQL code just had one topic, and we see that in the figure above.
如果您已向数据库中添加了更多主题,则应该看到随机选择的那些主题之一。 我在MySQL代码中放入的数据集只有一个主题,我们在上图中看到了这一点。
Now, the next trick is for us to build an interface that allows the user to select one of the options. A conventional interface would consist of a set of radio buttons followed by a Submit button. But for a casual voting system like this, it may be just as easy to present a bunch of buttons, where clicking on one registers a vote. We’ll take that approach here.
现在,下一个技巧是为我们构建一个界面,允许用户选择其中一个选项。 常规界面将由一组单选按钮和一个提交按钮组成。 但是对于像这样的随意投票系统,呈现一堆按钮(单击一个按钮进行投票)可能同样容易。 我们将在此处采用这种方法。
The MXML code below, all of which is additional to the previous example, dynamically creates buttons for each of the options and adds them to the Application’s container:
下面的MXML代码都是前一个示例的附加功能,它们为每个选项动态创建按钮并将其添加到应用程序的容器中:
<?xml version="1.0" encoding="utf-8"?>

<mx:Application ...>

<mx:Script>

<![CDATA[

import mx.controls.Alert;

import mx.controls.Button;

private var topicID:int = 0;

private function onGetTopics() : void {

  // ...

  voteRO.getOptions.send( topicID );

}

private function onGetOptions() : void {

  for each( var opt:Object in voteRO.getOptions.lastResult ) {

    var optBut:Button = new Button();

    optBut.label = opt.text;

    optBut.data = opt.id;

    optBut.percentWidth = 100;

    optBut.addEventListener( MouseEvent.CLICK, onOptionButtonClick );

    addChild( optBut );

  }

}

private function onOptionButtonClick( event:Event ) : void {

  voteRO.addVote.send( event.currentTarget.data );

  mx.controls.Alert.show( 'You successfully voted for ' + event.currentTarget.label );

}

]]>

</mx:Script>

<mx:RemoteObject id="voteRO" ...>

...

</mx:RemoteObject>

<mx:Label fontSize="20" id="topicText" />

</mx:Application>
Our original code remains unchanged, except for the addition of the call to getOptions in the onGetTopics method. When getOptions is finished successfully it calls onGetOptions, which creates a Button class for each of the options and adds it to the Application’s container. It also registers the onOptionButtonClick method to respond to mouse clicks on the newly created button.
除了在onGetTopics方法中对getOptions的调用之外,我们的原始代码保持不变。 成功完成getOptions后,它将调用onGetOptions ,该方法将为每个选项创建一个Button类,并将其添加到应用程序的容器中。 它还注册onOptionButtonClick方法以响应鼠标对新创建的按钮的单击。
These two methods, addEventListener and addChild, are fundamental to Flex. Almost every object in the Flex framework posts messages when it changes state. To listen for these messages, call addEventListener and specify the message for which you want to listen, and the method to call when that message is fired.
这两个方法addEventListener和addChild是Flex的基础。 当Flex框架更改状态时,几乎每个对象都会发布消息。 要侦听这些消息,请调用addEventListener并指定要侦听的消息以及触发该消息时要调用的方法。
NOTE: Use the EventDispatcher to Publish Events The messaging model discussed above is implemented by the EventDispatcher base class, and uses the dispatchEvent method. If you wish to create an object that publishes events, you’ll need to ensure that your object inherits from the EventDispatcher class to do so.
注意:使用EventDispatcher发布事件上面讨论的消息模型是由EventDispatcher基类实现的,并使用dispatchEvent方法。 如果希望创建一个发布事件的对象,则需要确保该对象继承自EventDispatcher类。
The addChild method is the cornerstone method of the Flex framework’s visual hierarchy. Just like an HTML document, the Flex application’s visual hierarchy can be represented by a tree. The root container is almost always the Application object. Within that, you can have containers and controls and so on, and in turn, almost every container or control supports child controls or containers. You can add child controls (as I’ve done in the code above) using addChild, and you can remove children with the removeChild and removeAllChildren methods.
addChild方法是Flex框架的可视层次结构的基础方法。 就像HTML文档一样,Flex应用程序的可视层次结构可以由树表示。 根容器几乎总是Application对象。 在其中,您可以拥有容器和控件等,并且依次地,几乎每个容器或控件都支持子控件或容器。 您可以使用addChild添加子控件(就像我在上面的代码中所做的那样),并且可以使用removeChild和removeAllChildren方法删除子控件。
Okay, with that mini-primer on Flex out of the way, let’s take a look at what happens when we launch this code from Flex Builder – check out this figure.
好的,通过Flex上的该迷你引物,让我们看一下从Flex Builder启动此代码时发生的情况–查看此图。
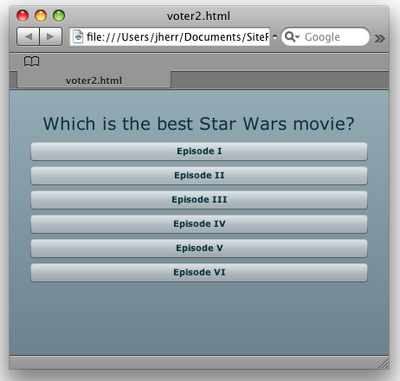
The figure shows that the application picked a question and put up buttons for each of the different options. The user can then respond to the poll by clicking one of the buttons, as demonstrated in this next figure.
该图显示该应用程序选择了一个问题,并为每个不同的选项设置了按钮。 然后,用户可以通过单击按钮之一来响应轮询,如下图所示。
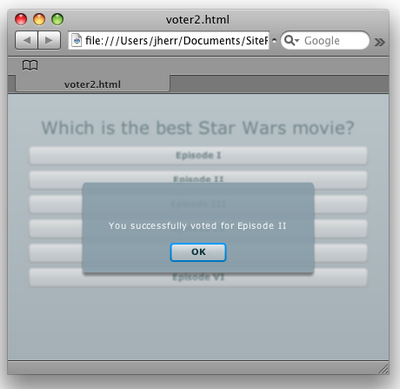
Clicking one of these buttons calls the onOptionButtonClick, which in turn calls the addVote function on the server. The application also displays a nifty message box to inform the voter that the vote has been counted.
单击这些按钮之一将调用onOptionButtonClick ,后者依次调用服务器上的addVote函数。 该应用程序还显示一个漂亮的消息框,通知投票者已经计算了投票。
The final change I’ll make is to display the pie chart of the results of the poll instead of just the alert box. This final version of the code is shown here:
我要做的最后更改是显示民意调查结果的饼图,而不只是警报框。 该代码的最终版本如下所示:
<?xml version="1.0" encoding="utf-8"?>

<mx:Application ...>

<mx:Script>

<![CDATA[

import mx.controls.Button;

private var topicID:int = 0;

private var voted:Boolean = false;

private function onGetTopics() : void {

// ...

}

private function onGetOptions() : void {

  if ( voted )

    resultPie.dataProvider = voteRO.getOptions.lastResult;

  else {

    for each( var opt:Object in voteRO.getOptions.lastResult ) {

      var optBut:Button = new Button();

      optBut.label = opt.text;

      optBut.data = opt.id;

      optBut.percentWidth = 100;

      optBut.addEventListener( MouseEvent.CLICK, onOptionButtonClick );

      optionsBox.addChild( optBut );

    }

  }

}

private function onOptionButtonClick( event:Event ) : void {

  voted = true;

  voteRO.addVote.send( event.currentTarget.data );

}

private function onVoteResult() : void {

  contentStack.selectedChild = pieBox;

  voteRO.getOptions.send( topicID );

}

]]>

</mx:Script>

<mx:RemoteObject ...>

...

</mx:RemoteObject>

<mx:Label fontSize="20" id="topicText" />

<mx:ViewStack id="contentStack" creationPolicy="all" width="100%" height="100%">

  <mx:VBox width="100%" height="100%" id="optionsBox">

  </mx:VBox>

  <mx:VBox width="100%" height="100%" id="pieBox">

  <mx:PieChart width="100%" height="100%" id="resultPie" showAllDataTips="true">

    <mx:series>

      <mx:PieSeries field="votes" nameField="text" explodeRadius="0.1" />

    </mx:series>

  </mx:PieChart>

  </mx:VBox>

</mx:ViewStack>

</mx:Application>
The big change here comes at the end of the file where I’ve added a <mx:ViewStack> object that contains two <mx:VBox> containers. A ViewStack is a lot like a deck of cards. You can pick one card to be visible on top, while all the rest remain hidden below. In this case the first VBox, the optionsBox, will hold the buttons for the options. The second VBox, the pieBox, will hold the PieChart. The PieChart is exactly like the one from the first article.
这里最大的变化是在文件的末尾,我添加了一个<mx:ViewStack>对象,该对象包含两个<mx:VBox>容器。 ViewStack很像一副纸牌。 您可以选择一张卡显示在顶部,而其余所有卡则隐藏在下面。 在这种情况下,第一个VBox ( optionsBox )将保存选项的按钮。 第二个VBox时, pieBox ,将持有的PieChart 。 PieChart完全类似于第一篇文章中的内容 。
The onGetOptions method in the ActionScript has also changed. It now checks to see if we have voted or not. If we have voted, the code sets the dataProvider on the PieChart to the updated response from getOptions. If we have not voted, it adds the buttons to the optionsBox using addChild.
ActionScript的onGetOptions方法也已更改。 现在,它检查我们是否投票。 如果我们投票,代码PieChart上的dataProvider设置为getOptions的更新响应。 如果我们尚未投票,它将使用addChild将按钮添加到optionsBox 。
The onVoteResult method, where we used to put up the alert box, now simply flips the ViewStack card over to the pieBox to present the pie chart. The pie chart updates once the onGetOptions method is fired again.
现在,我们用来放置警报框的onVoteResult方法现在只需将ViewStack卡翻转到pieBox即可显示饼图。 一旦再次触发onGetOptions方法,饼图就会更新。
When we bring this up in the browser, and proceed to vote, we can see the resulting pie chart.
当我们在浏览器中提出并进行表决时,我们可以看到结果饼图。
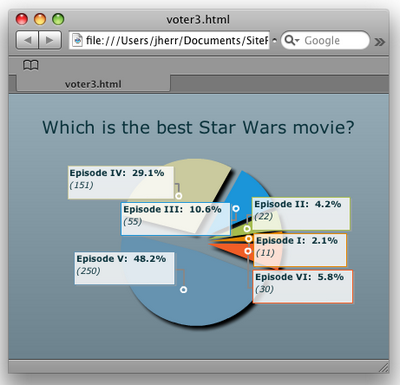
Not bad! We now have a widget that talks to a web service, picks a question at random, presents the question, then displays the voting results using a nifty pie chart if the user chooses to vote.
不错! 现在,我们有一个与Web服务对话的小部件,随机选择一个问题,提出问题,然后如果用户选择投票,则使用漂亮的饼图显示投票结果。
The only problem is that the Flash application itself is fairly heavy. In fact, on my machine at the time of this writing the SWF files are about 350–400K. That’s a little too heavy for a lightweight widget. What to do?
唯一的问题是Flash应用程序本身非常繁重。 实际上,在撰写本文时,在我的机器上,SWF文件约为350至400K。 对于轻量级的小部件来说有点太重了。 该怎么办?
转到运行时共享库 (Moving to Runtime Shared Libraries)
Thankfully, Adobe has a fix for the fat SWF problem – and it doesn’t even require any coding changes. All you have to do is tweak your project a little. The trick is to use Runtime Shared Libraries.
幸运的是,Adobe修复了SWF严重问题–甚至不需要任何编码更改。 您要做的就是稍微调整一下项目。 诀窍是使用运行时共享库。
The idea is simple. When you compile your SWF file instead of including the library in the SWF itself, you tell the Flash player to go fetch the library at a specific URL. The Flash player then downloads the library automatically for you and caches it, so the next time it looks for the library it will just use this stored version.
这个想法很简单。 当您编译SWF文件而不是将库包括在SWF本身中时,您告诉Flash播放器从特定的URL提取该库。 然后,Flash Player会自动为您下载该库并对其进行缓存,因此,下次它查找该库时,它将仅使用此存储的版本。
To make the change, right click on the “voter” project and select “Properties.” Then select “Flex Build Path” from the left-hand column. The result is shown below.
要进行更改,请右键单击“投票者”项目,然后选择“属性”。 然后从左侧栏中选择“ Flex构建路径”。 结果如下所示。
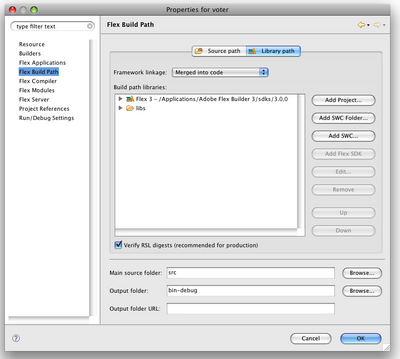
From there, select the framework.swc file as shown here.
从那里选择如下所示的framework.swc文件。
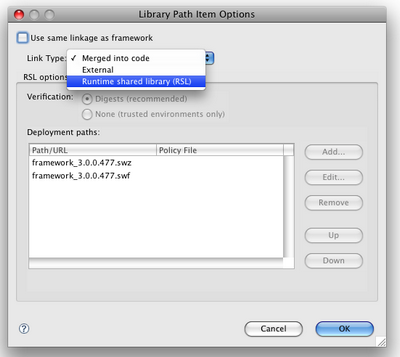
Double-click on the Link Type. This will bring up a dialog where you can uncheck the “Use same linkage as framework” option and select “Runtime shared library (RSL)” from the dropdown, as shown.
双击链接类型。 这将弹出一个对话框,您可以在其中取消选中“使用与框架相同的链接”选项,然后从下拉列表中选择“运行时共享库(RSL)”,如图所示。

The final step is to click on the Add button. This brings up the dialog shown below.
最后一步是单击“ 添加”按钮。 这将弹出如下所示的对话框。
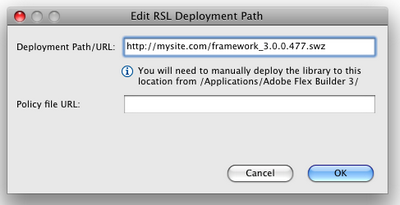
Now, we enter the URL where the swz file for the framework will be located. This file must be copied from the Flex Builder installation directory to your web server.
现在,我们输入该框架的swz文件所在的URL。 该文件必须从Flex Builder安装目录复制到Web服务器。
Because this particular example uses the charting classes, we’ll also follow the same process with the datavisualization.swc library.
因为此特定示例使用了图表类,所以我们还将对datavisualization.swc库执行相同的过程。
从这往哪儿走 (Where to Go from Here)
These two articles should set you up well to get started with with Flex. Small applications, such as this voting application, are the perfect place from which to branch out.
这两篇文章应该为您开始使用Flex做好了准备。 小型应用程序(例如此投票应用程序)是分支的理想场所。
If I had to define the three greatest benefits of Flex, it would be these:
如果我必须定义Flex的三个最大好处,那就是:
- Flex makes building Flash applications easy for developers. Flex使开发人员可以轻松构建Flash应用程序。
- Flash applications run well practically anywhere, and work just as well as their Ajax counterparts. Flash应用程序几乎可以在任何地方运行良好,并且可以与Ajax同类应用程序一样运行。
- Flex 3 can be used to build Flash applications small enough to create Web 2.0 widgets. Flex 3可用于构建足够小的Flash应用程序以创建Web 2.0小部件。
I hope these two articles will leave you pointed in that same direction (be sure to download the code archive for this article).
希望这两篇文章能使您朝同一方向发展(一定要下载本文的代码档案 )。
测验自己! (Quiz Yourself!)
Test your understanding of this article with a short quiz – if you’re quick, you’ll receive a FREE copy of my book, Getting Started With Flex 3 for a limited time, thanks to Adobe.
通过简短的测验来测试您对本文的理解-如果您很快,您将在有限的时间内免费获得我的书《 Flex 3入门》 ,这要感谢Adobe。


 被折叠的 条评论
为什么被折叠?
被折叠的 条评论
为什么被折叠?
 到【灌水乐园】发言


