


ios 相机闪光灯
接下来的是… (Coming Up Next…)
The last time out, I took you on a guided tour of the Flash toolbox, and showed you how to use the various drawing and painting tools available in Flash 5.0. This time, I’ll be getting up close and personal with some of the other things you need to know before you start animating – things like symbols, frames and the library. I’ll also explain the various types of animation available in Flash, and walk you through the process of creating and exporting a movie to your Web site.
上一次 ,我带您参观了Flash工具箱,并向您展示了如何使用Flash 5.0中可用的各种绘图工具。 这次,我将与您进行动画制作之前您需要了解的其他一些事项紧密联系在一起,例如符号,框架和库。 我还将说明Flash中可用的各种动画类型,并引导您完成将影片导出和导出到网站的过程。
Translation: don’t go anywhere!
翻译:不要去任何地方!
整理时间线 (Putting Together The Timeline)
Now, this may come as a surprise to those of you new to the world of animation, but animation doesn’t just spring into existence. An animation sequence is created by stringing together multiple static images, and displaying them in rapid succession. If they are displayed quickly enough, the illusion of movement is enough to fool the human eye.
现在,这可能会让刚接触动画领域的人们感到惊讶,但是动画不只是存在而已。 通过将多个静态图像串在一起并快速连续显示它们来创建动画序列。 如果它们显示得足够快,那么运动的错觉就足以愚弄人眼。
Flash animation works in much the same way. A Flash movie is composed of multiple frames (organized across different "layers"), which you can view, edit, delete and otherwise manipulate to your heart’s content. This manipulation takes place via the Timeline, which is by far one of the most-used components of the Flash work area.
Flash动画的工作方式几乎相同。 Flash电影由多个帧组成(跨不同的“图层”组织),您可以查看,编辑,删除和以其他方式操纵您的心脏内容。 这种操作是通过时间轴进行的,该时间轴是Flash工作区中最常用的组件之一。

When you first start Flash up, the Timeline typically appears above the main work area (you can alter its position if you like, though why you would want to is a mystery to me.) If you take a close look at it, you’ll see that it’s actually composed of two different things – layers and frames. The layers run vertically along the left side of the Timeline, while the frames within each layer run horizontally across the timeline, from left to right.
首次启动Flash时,时间轴通常显示在主工作区上方(您可以根据需要更改其位置,尽管为什么这对我来说还是个谜。)如果仔细看一下,您会发现将会看到它实际上是由两个不同的东西组成的-图层和框架。 图层沿时间轴的左侧垂直延伸,而每一层中的帧则沿时间轴从左至右水平延伸。
一个巨无霸和薯条,去吧! (One Big Mac And Fries, To Go!)
Layers in Flash can best be described as a method of organizing elements of a… nah, scrap that. In order to understand the concept of a Flash layer, you need simply look at your average Big Mac. A Big Mac is composed of layers – there’s the meat layer, followed by a strip of lettuce, followed by a layer of tomatoes and onions, followed by a slice of cheese, followed by a… oh, you get the idea.
最好将Flash中的图层描述为一种组织元素的方法。 为了理解Flash层的概念,您只需要看一下普通的Big Mac。 一块巨无霸是由几层组成的-有一层肉,一层生菜,一层西红柿和洋葱,一层奶酪,再一层……哦,你明白了。
Each layer can be removed and manipulated independent of the other layers. This is true of both Flash layers and a Big Mac.
可以独立于其他层来移除和操纵每一层。 Flash层和Big Mac都是如此。
A new Flash movie contains a single layer; you can add as many as you like. You can also copy, rename and delete layers. In order to modify a layer, you need to first activate it by clicking once on it (a pencil icon will appear on the layer). Once the layer is active, you can draw, paint and manipulate objects on it.
一个新的Flash电影包含一个图层。 您可以根据需要添加任意数量。 您还可以复制,重命名和删除图层。 为了修改图层,您需要先通过单击一次将其激活(铅笔图标将出现在图层上)。 图层激活后,您可以在其上绘制,绘制和操纵对象。
Layers are transparent by default, and you can use the three control buttons on each layer to alter layer visibility, "lock" the layer to prevent changes from being made to it, and display the elements on a layer as outlined (rather than filled) objects.
默认情况下,图层是透明的,您可以使用每个图层上的三个控制按钮来更改图层的可见性,“锁定”图层以防止对其进行更改,并按概述(而不是填充)显示图层上的元素对象。
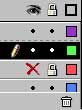
The icons at the bottom left of the Timeline are used to insert new layers, and delete existing layers.
时间轴左下方的图标用于插入新图层,并删除现有图层。
Copyright Melonfire, 2000. All rights reserved.
版权所有Melonfire ,2000。保留所有权利。
陷害! (Framed!)
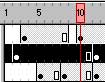
Each layer is composed of one or more frames, which come in two types – the "regular" variety and the "keyframe" variety. A keyframe is a frame in the animation at which some change occurs – for example, movement of an object from one point to another, or a shape morph.
每一层都由一个或多个框架组成,这些框架有两种类型-“常规”变体和“关键帧”变体。 关键帧是动画中发生某些变化的帧,例如,对象从一个点到另一个点的移动或形状变形。
You can distinguish between keyframes and regular frames by the black dot that appears at the bottom of every keyframe.
您可以通过每个关键帧底部出现的黑点来区分关键帧和常规帧。
Keyframes can be added at any point in the Timeline via theInsert->Keyframe command on the shortcut menu. Regular frames Insert->following a keyframe will be identical to that keyframe.
可以通过快捷菜单上的“插入”->“关键帧”命令在时间轴的任何位置添加关键帧。 规则帧“插入”->“跟随关键帧”将与该关键帧相同。
Just like layers, you can copy, move and delete frames and keyframes. When you delete a keyframe, the frames around it remain unchanged. You can convert a keyframe to a regular frame via the Clear Keyframe option on the shortcut menu that appears when you click it.
就像图层一样,您可以复制,移动和删除框架和关键帧。 删除关键帧时,其周围的帧保持不变。 您可以通过单击时出现的快捷菜单上的“清除关键帧”选项将关键帧转换为常规帧。
讲符号 (Speaking In Symbols)
One of the most interesting things about Flash is its use of "symbols".
关于Flash的最有趣的事情之一是它对“符号”的使用。
In Flash jargon, a symbol is an object which can be re-used over and over again at different points in your movie. Each "instance" of the symbol can be manipulated independent of the original symbol, and of other instances of the same symbol in the movie – however, since you’re using instances of the same symbol over and over again, the size of your Flash file remains unaffected.
在Flash行话中,符号是一个对象,可以在电影的不同点上反复使用。 符号的每个“实例”都可以独立于原始符号以及电影中相同符号的其他实例进行操作-但是,由于您一遍又一遍地使用相同符号的实例,因此Flash的大小文件保持不受影响。
In other words, symbols are a Good Thing and should be used wherever possible – especially if you find yourself using the same object(s) over and over again in a single movie.
换句话说,符号是一件好事,应该在任何可能的地方使用-尤其是当您发现自己在同一部电影中一遍又一遍地使用相同的对象时。
A symbol can be of three types – graphic, button or movie clip. For the moment, I’ll be dealing only with graphic symbols – the others will be covered as we progress through this tutorial.
符号可以是三种类型-图形,按钮或影片剪辑。 目前,我将仅处理图形符号-在我们学习本教程的过程中,将讨论其他符号。
Once a symbol is created (I’ll be showing you how to do that as well in a bit), you can edit it, just as you would any other object, or create multiple instances of it for use in your movie. You can manipulate instances of a particular symbol without affecting the parent symbol; however, changes made to the parent symbol will affect child instances.
创建符号后(稍后将向您展示如何操作),您可以像编辑其他任何对象一样对其进行编辑,或者创建要在电影中使用的多个实例。 您可以操纵特定符号的实例而不会影响父符号。 但是,对父符号的更改将影响子实例。
You can create as many symbols as you like for a single Flash movie – and Flash even offers you a mechanism to store and view all the symbols available in the current movie through its Library tool. The Library can be activated via the Window->Library menu, or with the keyboard shortcut Ctrl-L.
您可以为一个Flash电影创建任意数量的符号-Flash甚至还提供了一种机制,可以通过其“库”工具存储和查看当前电影中的所有符号。 可通过窗口->库菜单或键盘快捷键Ctrl-L激活库。
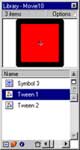
The Library allows you to preview each symbol, and can provide you with information on the symbol name and type, the number of times the symbol has been used so far, and the date on which it was last edited. It also allows you to categorize symbols into folders for easy access, in a manner similar to the Windows Explorer. Libraries can be shared between different Flash movies, and Flash also comes with a number of built-in libraries containing frequently-used symbols.
“资源库”使您可以预览每个符号,并且可以为您提供有关符号名称和类型,迄今为止已使用符号的次数以及上次编辑日期的信息。 它还允许您以类似于Windows资源管理器的方式将符号分类到文件夹中以便于访问。 可以在不同的Flash电影之间共享库,Flash还附带了许多内置库,其中包含常用的符号。
Copyright Melonfire, 2000. All rights reserved.
版权所有Melonfire ,2000。保留所有权利。
灯光,相机,动作! (Lights, Camera, Action!)
Now that you know the theory, it’s time to put it into practice. Over the next few pages, I’m going to walk you through the process of creating a simple Flash movie, exporting it, and embedding it in a Web page. With the exception of the technique used to create the animation, this is the typical process you would use to create any Flash movie.
现在您已经了解了理论,是时候将其付诸实践了。 在接下来的几页中,我将引导您完成创建简单的Flash电影,将其导出并将其嵌入到Web页面中的过程。 除了用于创建动画的技术外,这是用于创建任何Flash电影的典型过程。
If you haven’t already done so, start Flash with a new movie. Pop open the Modify->Movie box, and define attributes for the movie you’re about to create; this includes attributes like movie width and height, background colour and frame rate.
如果尚未执行此操作,请使用新影片启动Flash。 弹出打开“修改”->“电影”框,然后为要创建的电影定义属性; 其中包括电影的宽度和高度,背景颜色和帧频等属性。
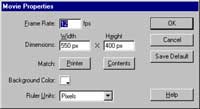
For this next example, select a width and height of 300×300 pixels. Leave everything else the way it is.
对于下一个示例,请选择300×300像素的宽度和高度。 一切都保持原样。
Back on the Stage now. Select frame #1 on layer 1 and then draw a square box in the work area. Fill it with a colour you like using the Paint Bucket Tool.
现在回到舞台上。 在第1层上选择第1帧,然后在工作区域中绘制一个方形框。 使用“油漆桶工具”将其填充为您喜欢的颜色。

Next, select frame #2 and insert a new keyframe via the shortcut menu.
接下来,选择第2帧并通过快捷菜单插入新的关键帧。
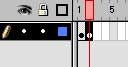
Notice how the playhead (the red bar on the top row of the timeline) moves to frame #2, indicating that frame #2 is now the active frame.
请注意播放头(时间轴第一行上的红色条)如何移动到第2帧,指示第2帧现在是活动帧。
Select the box you just drew and move it a few pixels to the right.
选择您刚才绘制的框,然后将其向右移动几个像素。
Repeat this process for frames #3 through to #5.
对第3帧到第5帧重复此过程。
Now, at frame #6, insert a new keyframe, and move the square a few pixels down. Repeat this process for frames #7 through #10.
现在,在第6帧处,插入一个新的关键帧,然后将正方形向下移动几个像素。 对#7至#10帧重复此过程。
At this point, you’ve created your first animation sequence – you just don’t know it yet. To test it, select Control->Play, or tap the Enter key. Flash will play the animation clip for you by displaying each frame in succession – you should see something like this:
至此,您已经创建了第一个动画序列–您只是还不知道。 要对其进行测试,请选择Control-> Play,或点击Enter键。 Flash将通过连续显示每一帧来为您播放动画剪辑–您应该看到类似以下内容:
Note that you can loop the clip via the Control->Loop Playback command.
请注意,您可以通过Control-> Loop Playback命令循环播放剪辑。
At this point, you should know that what you’ve just created is a traditional frame-by-frame animation, in which every single frame is a keyframe. This is not a technique you’ll be using very often, since Flash comes with powerful "tweening" functions that can automatically generate many of the in-between frames of an animation clip. Tweening, together with other animation tips and tricks, will be covered in future articles.
此时,您应该知道刚刚创建的是传统的逐帧动画,其中每个单帧都是关键帧。 这不是您经常使用的技术,因为Flash具有强大的“补间”功能,可以自动生成动画剪辑的许多中间帧。 补间以及其他动画技巧和窍门将在以后的文章中介绍。
Now, let’s add something else to this movie. Create a new layer via the Insert Layer button (bottom right of the timeline) and name it "dot" by double-clicking on the pencil icon (while you’re at it, change the name of Layer 1 to "square" as well). Select frame #1 on the new layer, and draw a circle in the top right corner with the Circle tool.
现在,让我们为这部电影添加其他内容。 通过“插入图层”按钮(时间线右下方)创建一个新图层,并通过双击铅笔图标将其命名为“点”(当您在它上面时,也将第1层的名称也更改为“ square” )。 在新图层上选择第1帧,然后使用“圆”工具在右上角绘制一个圆。
Next, select frame #2, select the circle you just created with the Arrow tool and move it to another random position on the Stage. Repeat this process for frame #3 through #10 on layer "dot". When you play the clip, you’ll now see something like this:
接下来,选择第2帧,选择刚刚使用“箭头”工具创建的圆,并将其移动到舞台上的另一个随机位置。 对层“点”上的帧3至帧10重复此过程。 播放剪辑时,您现在会看到类似以下内容:
Yes, it *will* give you a headache if you watch it for too long.
是的,如果您观看时间太长,它将*使您头疼。
Copyright Melonfire, 2000. All rights reserved.
版权所有Melonfire ,2000。保留所有权利。
后期制作 (Post-Production)
So that’s your basic animation. It ain’t too impressive – but don’t worry, we’ll fix that as we move along and you learn new animation techniques. Now let’s quickly run through the process of what happens once your Flash movie is complete and you want to embed it in your Web page.
这就是您的基本动画。 它并不太令人印象深刻-但请放心,我们会在您学习新的动画技术的同时修复该问题。 现在,让我们快速完成Flash电影完成并将其嵌入到网页中后的过程。
Once you’ve finished working on the movie, you need to export it as an SWF file. You can do this through the File->Export Movie dialog.
完成电影的制作后,需要将其导出为SWF文件。 您可以通过“文件”->“导出电影”对话框来执行此操作。
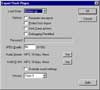
For the moment, leave everything as it is – the default settings are fine for most cases – and hit OK. Flash will save your movie as a .SWF file, ready to be embedded into your Web page.
目前,将所有内容保持不变(默认设置适用于大多数情况),然后单击“确定”。 Flash将影片保存为.SWF文件,准备将其嵌入到您的网页中。
Now, insert the following lines of code into your HTML page:
现在,将以下代码行插入HTML页面:
<OBJECT classid="clsid:D27CDB6E-AE6D-11cf-96B8-444553540000"

codebase="http://download.macromedia.com/pub/shockwave/cabs/flash/

swflash.ca

b#version=5,0,0,0"

WIDTH=300 HEIGHT=300>

<PARAM NAME=movie VALUE="x2.swf">

<PARAM NAME=quality VALUE=high>

<PARAM NAME=bgcolor VALUE=#FFFFFF>

<EMBED src="x2.swf" quality=high bgcolor=#FFFFFF WIDTH=300 HEIGHT=300

TYPE="application/x-shockwave-flash"

PLUGINSPAGE="http://www.macromedia.com/shockwave/download/index.cg

i?P1_Prod_

Version=ShockwaveFlash"></EMBED>

</OBJECT>
Alternatively, you can have Flash perform the above process for you automagically – select the File->Publish menu command, and Flash will create an HTML template containing the code you need.
另外,您可以让Flash自动执行上述过程-选择“文件”->“发布”菜单命令,然后Flash将创建一个包含所需代码HTML模板。
The Publish menu command lets you do a lot more than just create HTML templates – you should play with it to see the various options you have available to you.
通过“发布”菜单命令,您不仅可以创建HTML模板,还可以做更多的事情–您应该使用它来查看可用的各种选项。
三角剖分 (Triangulation)
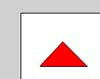
And finally, a quick illustration of how you can create and use symbols. Open up a new Flash movie, and use the line tool to create a triangle. Fill it with a colour.
最后,简要说明如何创建和使用符号。 打开一个新的Flash电影,然后使用线工具创建一个三角形。 用一种颜色填充它。
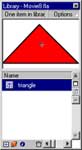
Now select it and use the Insert->Convert To Symbol command to convert your triangle to a symbol (or tap the F8 key). You’ll be asked to enter a name and behaviour for your symbol; since this symbol will be used as a static object, select "Graphic" as the behaviour, and name it "triangle". You should now be able to see your symbol in the Library – you can check this by tapping Ctrl-L.
现在选择它,并使用“插入”->“转换为符号”命令将三角形转换为符号(或点击F8键)。 系统会要求您输入符号的名称和行为; 由于此符号将用作静态对象,因此请选择“图形”作为其行为,并将其命名为“三角形”。 现在,您应该可以在库中看到您的符号–您可以通过按Ctrl-L进行检查。
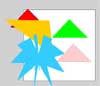
Now, with the Library window active, drag your symbol from the Library and drop it into your work area. Do this until your work area looks something like this:
现在,在“库”窗口处于活动状态时,将符号从库中拖放到工作区中。 这样做直到您的工作区域如下所示:

Copyright Melonfire, 2000. All rights reserved.
版权所有Melonfire ,2000。保留所有权利。
Each of the objects you see is an "instance" of the symbol – these instances can be modified without affecting the parent symbol. To modify an instance, select it and use the Modify->Instance menu item to display the Instance tool panel. From this panel, you can modify certain characteristics of that particular instance of the symbol – in particular, the Effects panel allows you to alter the colour, transparency and brightness of the selected instance. You can also use the Modify->Transformmenu items to scale, rotate, skew and flip the instance of the object.
您看到的每个对象都是符号的“实例” –可以修改这些实例而不会影响父符号。 要修改实例,请选择它,然后使用Modify-> Instance菜单项显示Instance工具面板。 在此面板中,您可以修改符号的特定实例的某些特征–特别是,“效果”面板允许您更改所选实例的颜色,透明度和亮度。 您还可以使用Modify-> Transformmenu项来缩放,旋转,倾斜和翻转对象的实例。
After you’ve finished futzing around with the various triangles, you might end up with something like this:
在完成对各个三角形的处理之后,您可能会得到如下所示的结果:

Again, if you take a look at the Library, you’ll see that the original symbol is untouched – it’s only the instances which have changed.
同样,如果您查看库,您会发现原始符号没有被改动–只有实例发生了变化。
If, however, you’d like your changes to apply to each and every instance of a symbol, you will need to make changes to the symbol itself. You can do this by right-clicking the symbol in the Library and picking the Edit option, or by clicking the Edit Symbols button on the top-right corner of your screen.
但是,如果您希望将更改应用于符号的每个实例,则需要对符号本身进行更改。 您可以通过右键单击“资源库”中的符号并选择“编辑”选项,或单击屏幕右上角的“编辑符号”按钮来执行此操作。
Flash will drop you into symbol-editing mode, where you can edit the shape, size and other attributes of the symbol. Once you’re done, you can return to the work area by clicking the Edit Scene button at the top right corner of your screen.
Flash将使您进入符号编辑模式,您可以在其中编辑符号的形状,大小和其他属性。 完成后,您可以通过单击屏幕右上角的“编辑场景”按钮返回到工作区。
If you made any changes to the symbol while in symbol-editing mode, those changes will be immediately reflected in the symbol instances on the Stage. As an example, try scaling your triangle to twice its size and return to the Stage – you’ll see that the symbol instances have also doubled in size.
如果在符号编辑模式下对符号进行了任何更改,这些更改将立即反映在舞台上的符号实例中。 例如,尝试将三角形缩放到其大小的两倍,然后返回舞台–您会看到符号实例的大小也增加了一倍。
Note that some attributes of the instance may not change – the changes that you have made to a specific instance will be retained wherever possible. In the example above, though the size of each instance changes when the size of the symbol changes, the per-instance colour and shape settings remains the same.
请注意,实例的某些属性可能不会更改-对特定实例所做的更改将尽可能保留。 在上面的示例中,尽管当符号的大小更改时每个实例的大小也会更改,但是每个实例的颜色和形状设置保持不变。
And that’s about it for this week. In the next article, I’ll be showing you how to use Flash’s tweening capabilities in conjunction with symbols and instances to create simple motion and shape morphs.
这就是本周。 在下一篇文章中 ,我将向您展示如何将Flash的补间功能与符号和实例结合使用以创建简单的运动和形状变形。
See you then!
回头见!
Note: All examples in this article have been tested on Macromedia Flash 5.0. Examples are illustrative only, and are not meant for a production environment. YMMV!Copyright Melonfire, 2000. All rights reserved.
注意:本文中的所有示例均已在Macromedia Flash 5.0上进行了测试。 示例仅是说明性的,并不意味着用于生产环境。 YMMV! 版权所有Melonfire ,2000。保留所有权利。
ios 相机闪光灯


 被折叠的 条评论
为什么被折叠?
被折叠的 条评论
为什么被折叠?
 到【灌水乐园】发言


