


This article was created in partnership with WRLD. Thank you for supporting the partners who make SitePoint possible.
本文是与WRLD合作创建的。 感谢您支持使SitePoint成为可能的合作伙伴。
Since the late 2000s, maps have been a staple of the web, and today are more ubiquitous than ever. They have a variety of uses, from complementing a company’s contact page to plotting places of interest across a geographic region. As computing power is becoming more affordable, 3D maps have gained popularity, demonstrating the scale of buildings and the nature of the surrounding terrain, adding a touch of novelty to such experiences, as well as providing practical benefits.
自2000年代末以来,地图已成为网络的主要内容,今天比以往任何时候都更加普及。 它们具有多种用途,从补充公司的联系页面到在整个地理区域中绘制名胜古迹。 随着计算能力变得越来越负担得起,3D地图越来越受欢迎,证明了建筑物的规模和周围地形的性质,为此类体验增加了新颖性,并提供了实际的好处。
One such provider of 3D maps is WRLD. Major cities such as New York, London, Paris and Bangkok have been generated in 3D using real geographic data. This data can be used to author custom maps containing points of interest and other useful metadata, and thanks to their Leaflet-driven JavaScript library, it’s possible to drop them into a web page with a few lines of code; this workflow will be the focus of our article.
WRLD就是这样的3D地图提供者。 纽约,伦敦,巴黎和曼谷等主要城市已使用真实地理数据以3D方式生成。 这些数据可用于编写包含兴趣点和其他有用元数据的自定义地图,并且由于其基于Leaflet的 JavaScript库,可以将它们放入几行代码的网页中; 此工作流程将是我们文章的重点。
Using WRLD’s map designer, we will build a map for a coach holiday, which we will then integrate into a Node.js-powered website.
使用WRLD的地图设计器,我们将为教练假期制作一张地图,然后将其集成到由Node.js驱动的网站中。
入门 (Getting Started)
Before we can use WRLD’s map designer, we must register. Sign in once you’ve created and verified your account.
在使用WRLD的地图设计器之前,我们必须注册 。 创建并验证帐户后,请登录。
Navigate to the Map Designer. This page will list any maps that you have created, as well as allowing you to create new ones. Click on Create Map to launch the designer.
导航到“ 地图设计器” 。 该页面将列出您创建的所有地图,并允许您创建新的地图。 单击创建地图以启动设计器。
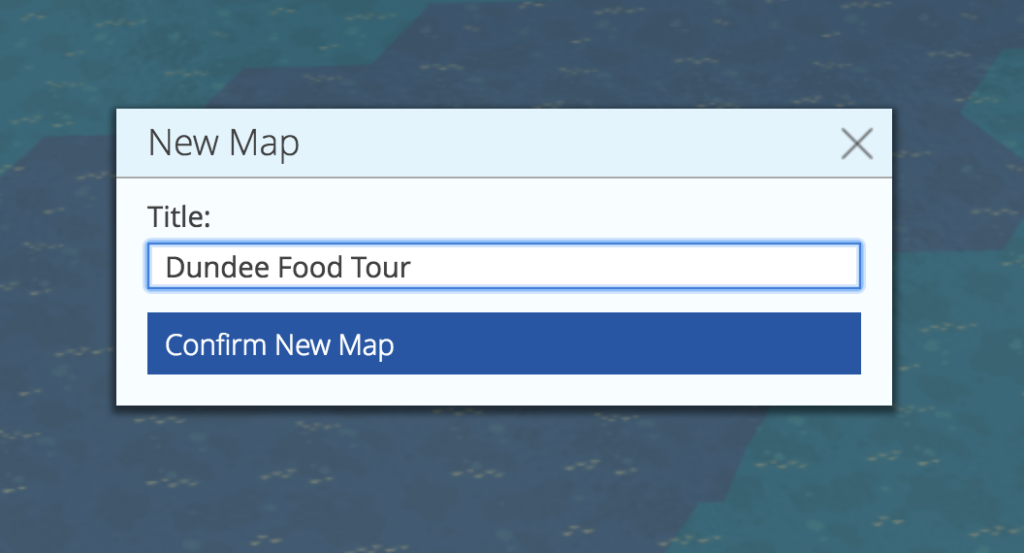
Together, we’re going to create a map for a Dundee food tour. Click New Map on the left and in the resultant New Map modal, enter a title of Dundee Food Tour and then hit Confirm New Map.
我们将共同为邓迪美食之旅创建一张地图。 单击左侧的新地图 ,然后在生成的新地图模态中输入标题Dundee Food Tour的标题,然后点击确认新地图 。
Now that we’ve created our map, we need to choose a starting location. Click the menu button next to the search input, click Locations, and choose Dundee.
现在我们已经创建了地图,我们需要选择一个起始位置。 单击搜索输入旁边的菜单按钮,单击位置 ,然后选择Dundee。

加入我们的第一名 (Adding Our First Place)
To add locations to our map, we have to use WRLD’s Places Designer, which facilitates the creation of place sets that can then be imported and reused.
要将位置添加到我们的地图,我们必须使用WRLD的Places Designer,它有助于创建可以导入和重复使用的位置集。
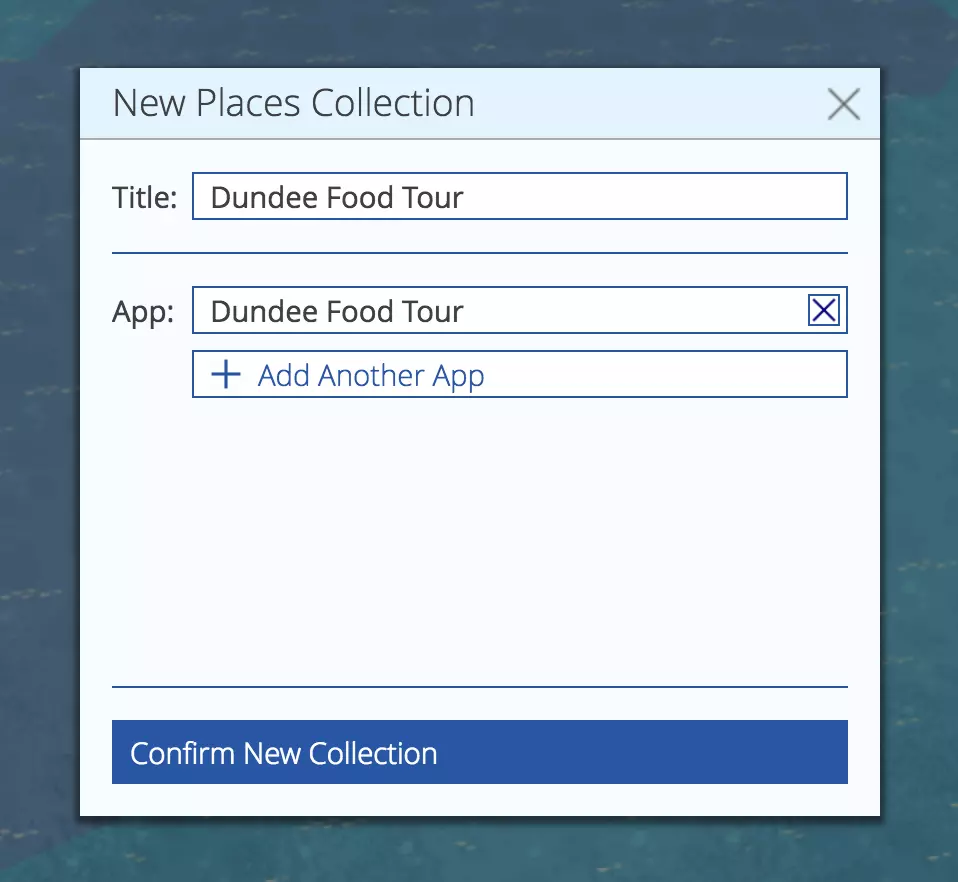
On the right, click the place marker icon, followed by Manage Place Collections. This will open the designer at the same geographical location. Let’s add our first places collection by clicking New Places Collection. Set the title to Dundee Food Tour and then add a reference to our Dundee Food Tour app, which will link the places collection with our map. Finalise this with Confirm New Collection.
在右侧,点击位置标记图标,然后点击管理位置集合 。 这将在相同的地理位置打开设计师。 通过单击新地方集合添加我们的第一个地方集合。 将标题设置为Dundee Food Tour ,然后添加对我们Dundee Food Tour应用程序的引用,该应用程序会将地方收藏与我们的地图链接起来。 使用Confirm New Collection完成此操作。
Click New Place Marker next to the search box. A marker should appear on the Dundee Food Tour building, but it can be dragged into place if necessary. In the pane on the right, enter a title of Dundee Food Tour — this will save automatically.
点击搜索框旁边的新地点标记 。 标记应出现在Dundee Food Tour建筑物上,但如有必要,可以将其拖动到位。 在右侧窗格中,输入“邓迪美食之旅”的标题-这将自动保存。

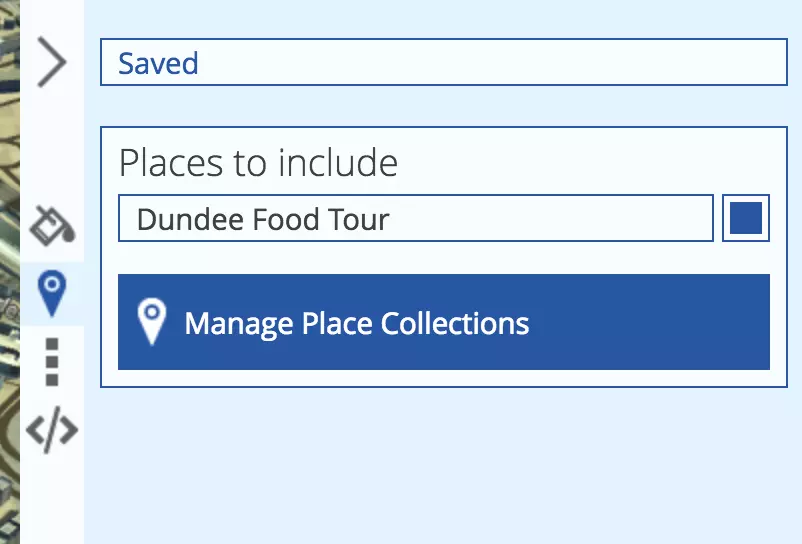
Add as many places as you’d like following this approach, and return to the Map Designer once you feel that you have enough. Our new collection should have been detected and automatically included in our map, but we can configure this manually by clicking the places marker on the right and selecting our place set.
按照这种方法,您可以添加任意多的地方,并在感觉到足够后返回到“地图设计器”。 我们的新收藏集应该已经被检测到并自动包含在地图中,但是我们可以通过单击右侧的地方标记并选择我们的地方集来进行手动配置。
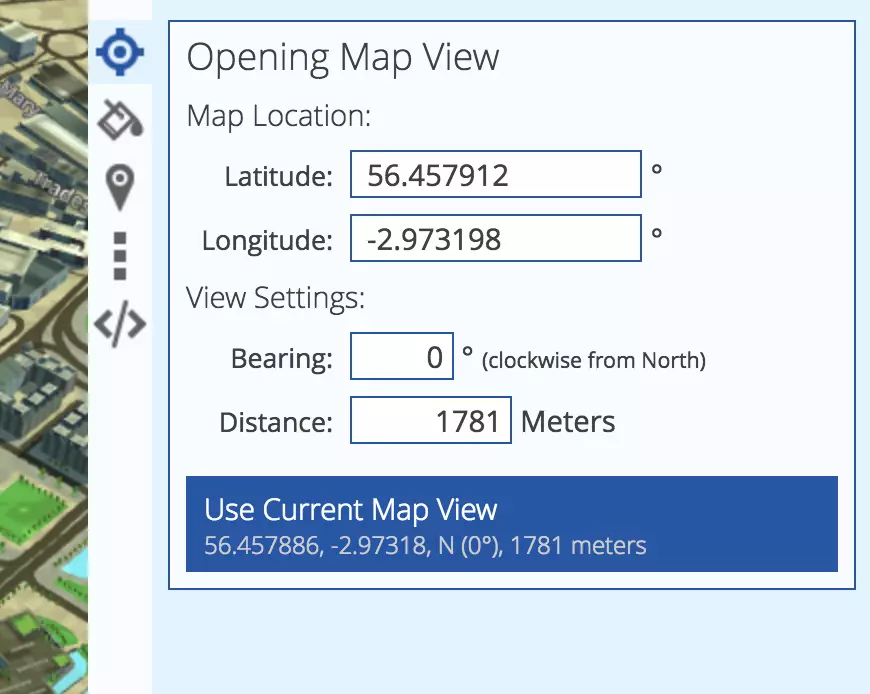
Before we display the map on our website, we should set a starting point. Drag and zoom the map until you’ve found an optimal view, then, using the crosshair icon on the right, open the Opening Map View form and click Use Current Map View.
在我们的网站上显示地图之前,我们应该设定一个起点。 拖动并缩放地图,直到找到最佳视图,然后使用右侧的十字线图标打开“ 打开地图视图”表单,然后点击使用当前地图视图 。
在网站上包含地图 (Including the Map on a Website)
Despite the impressively-detailed 3D modelling provided by WRLD, the real power of this platform is the ability to embed maps into websites and other applications. As well as exposing a variety of HTTP APIs for directly querying data, there are libraries for rendering maps on many platforms, including iOS, Android, and the web. We will use the wrld.js library, which is also available on npm.
尽管WRLD提供了令人印象深刻的详细3D建模,但该平台的真正功能是能够将地图嵌入到网站和其他应用程序中。 除了公开用于直接查询数据的各种HTTP API之外,还有用于在许多平台(包括iOS,Android和Web)上渲染地图的库。 我们将使用wrld.js库,该库也可以在npm上使用 。
配置 (Setting Up)
The boilerplate website to which we will add our map can be found at GitHub. Please clone this repository and install the required dependencies:
可以在GitHub上找到我们要添加地图的样板网站。 请克隆此存储库并安装所需的依赖项:
git clone https://github.com/jamesseanwright/wrld-tours.git
cd wrld-tours
nvm install # this will install the version of Node.js found in .nvmrc. Make sure nvm is installed
npm i
To verify that the project works as expected, run npm run watch; this will start the project using nodemon, restarting automatically when any changes are made. Upon opening http://localhost:8001/trips in your browser, you should see a list of trips with a sole item.
要验证项目是否按预期工作,请运行npm run watch ; 这将使用nodemon启动项目,进行任何更改后将自动重新启动。 在浏览器中打开http:// localhost:8001 / trips后,您应该会看到带有唯一项的行程列表。
抓取并配置您的开发人员令牌 (Grabbing and Configuring your Developer Token)
Our application will consume data from two of WRLD’s HTTP APIs, which are protected by developer tokens. To acquire your token, sign in and head over to the My Account section, and click the Developer Token tab; make sure you copy it.
我们的应用程序将使用来自WRLD的两个HTTP API的数据,这些数据受开发人员令牌保护。 要获取令牌,请登录并转到“ 我的帐户”部分,然后单击“ 开发人员令牌”标签; 确保复制它。

In our app’s codebase, open config.json in the server directory, and paste your token as the value of devToken; this property will be used to make the aforementioned API calls covered in the next step.
在我们应用程序的代码库中,在server目录中打开config.json ,并将您的令牌粘贴为devToken的值; 此属性将用于进行下一步介绍的上述API调用。
{
    "devToken": "insert your dev token here"
}
调用WRLD的HTTP API (Calling WRLD’s HTTP APIs)
Open the project in your editor, and head to the trips.json file in the server directory. This is a hash map of all of the available trips listed on our website, keyed by a hyphen-separated slug. These are accessible via the /trips route, so we can reach the Dundee Food Tour via /trips/dundee-food-tour. You’ll notice that the entry for the Dundee Food Tour has two empty properties, mapSceneId and poiSetId. We will return to this shortly.
在编辑器中打开项目,然后转到server目录中的trips.json文件。 这是我们网站上列出的所有可用行程的哈希图,以连字符分隔的子句作为关键字。 这些可通过/trips路线访问,因此我们可以通过/trips/dundee-food-tour到达Dundee美食之/trips/dundee-food-tour 。 您会注意到Dundee Food Tour的条目具有两个空属性mapSceneId and poiSetId 。 我们将很快返回。
Let’s take a look at the client-side code that fetches the map data. Open TripView.js (not TripViews.js) in the client/views directory and study the onNavigatedTo method. This calls two endpoints that are provided to the client by the server:
让我们看一下获取地图数据的客户端代码。 打开TripView.js ( 不是TripView s 的.js)在client/views目录和研究onNavigatedTo方法。 这将调用服务器提供给客户端的两个端点:
const [mapScene, poiSet] = await Promise.all([
    callEndpoint(endpoints.mapScene),
    callEndpoint(endpoints.poiSet),
]);
These don’t directly point to the WRLD APIs. Rather, they are exposed by our own server so that our developer token is not leaked to the browser. Let’s take a look at these routes in server/apiRouter.js:
这些并不直接指向WRLD API。 相反,它们由我们自己的服务器公开,因此我们的开发人员令牌不会泄漏到浏览器。 让我们在server/apiRouter.js查看这些路由:
router.get('/mapscenes/:id', (req, res) => {
    res.status(404).send();
});

router.get('/pois/:poiSetId', (req, res) => {
    res.status(404).send();
});
Currently, they behave as if they do not exist. To implement them, we can use the already-imported request module to forward our requests to the respective WRLD APIs and stream this back to the browser:
当前,它们的行为就好像它们不存在一样。 为了实现它们,我们可以使用已经导入的request模块将请求转发到相应的WRLD API,并将其流回浏览器:
router.get('/mapscenes/:id', (req, res) => {
    request.get(`https://wrld.mp/v1.1/mapscenes/${req.params.id}?token=${config.devToken}`)
        .pipe(res);
});

router.get('/pois/:poiSetId', (req, res) => {
    request.get(`https://poi.wrld3d.com/v1.1/poisets/${req.params.poiSetId}/pois/?token=${config.devToken}`)
        .pipe(res);
});
Whenever the client-side JavaScript is evaluated for a trip, it will call these endpoints with the relevant IDs, keeping the developer token away from the browser.
每当评估客户端JavaScript行程时,它将使用相关ID调用这些端点,从而使开发人员令牌远离浏览器。
验证我们的端点 (Verifying Our Endpoints)
To check that this has worked, we can call our own API endpoints directly. To get the respective IDs for our mapscene and place collection, we can call the WRLD APIs directory with our developer token, i.e.:
为了检查是否有效,我们可以直接调用我们自己的API端点。 要获取我们的mapscene和place集合的相应ID,我们可以使用开发人员令牌调用WRLD APIs目录,即:
https://wrld.mp/v1.1/mapscenes/?token=[your dev token]https://wrld.mp/v1.1/mapscenes/?token=[your dev token]https://poi.wrld3d.com/v1.1/poisets/?token=[your dev token]https://poi.wrld3d.com/v1.1/poisets/?token=[your dev token]
We can then take the id properties and pass them to our own local endpoints e.g. http://localhost:8001/api/mapscenes/10786 and http://localhost:8001/api/pois/4149. If we have implemented these routes correctly, then we should receive data from the WRLD APIs.
然后,我们可以获取id属性并将其传递到我们自己的本地终结点,例如http:// localhost:8001 / api / mapscenes / 10786和http:// localhost:8001 / api / pois / 4149。 如果我们正确实现了这些路由,那么我们应该从WRLD API接收数据。
更新行程定义 (Updating the Trip Definition)
Return to the trips.json file. Remember the two empty properties, mapSceneId and poiSetId? Set their respective values to the IDs you took for the mapscene and place collection e.g.:
返回trips.json文件。 还记得mapSceneId和poiSetId这两个空属性吗? 将它们各自的值设置为您用于mapscene并放置集合的ID,例如:
"mapSceneId": "10597",
"poiSetId": "4160"
渲染地图 (Rendering the Map)
We’re now ready to plot the API data onto a browser-rendered map. Let’s return to the TripView.js file.
现在,我们准备将API数据绘制到浏览器呈现的地图上。 让我们回到TripView.js文件。
Below the calls to our endpoints (i.e. Promise.all([...), invoke wrld.map with these precise arguments:
在对我们的端点的调用(即Promise.all([... ))下面,使用以下精确参数调用wrld.map :
const map = wrld.map(document.querySelector('.map-container'), mapScene.api_key, mapScene);Using wrld.js, which we have imported into this file as wrld, we are rendering our map into a HTMLDivElement with a class of .map-container, passing the API key and the map data returned by our /api/mapscene endpoint. If you open the Dundee Food Tour trip page in your browser (i.e. http://localhost:8001/trips/dundee-food-tour,) you should see our map with the expected opening view.
使用wrld.js(已将其作为wrld导入到此文件中),我们将地图渲染为带有.map-container类的HTMLDivElement ,并传递API密钥和/api/mapscene端点返回的地图数据。 如果您在浏览器中打开“邓迪美食之旅”旅行页面(即http:// localhost:8001 / trips / dundee-food-tour ),您应该会看到带有预期开放视图的地图。
添加我们的地方集合 (Adding Our Places Collection)
To wrap up, we will add markers for each place in our collection to the map. In the TripView, implement the addPointsToMap method:
总结一下,我们将为我们集合中的每个位置添加标记。 在TripView ,实现addPointsToMap方法:
static addPointsToMap(map, points) {
    points.forEach(({ lat, lon, title, height_offset }) => {
        const popup = wrld.popup({
            elevation: height_offset,
            closeOnClick: false,
            closeButton: false,
        });

        popup.setLatLng([lat, lon])
            .setContent(title)
            .addTo(map);
    });
}
Here, we are taking the raw point data returned by the /api/pois endpoint and mapping them into map markers, transforming them as required for the wrld.popup method.
在这里,我们将获取/api/pois端点返回的原始点数据,并将其映射到地图标记中,并根据wrld.popup方法的要求将其wrld.popup 。
Make sure that the first parameter passed to TripView.addPointsToMap at the bottom of onNavigatedTo is named correctly i.e.:
确保第一个参数传递给TripView.addPointsToMap在底部onNavigatedTo是IE正确命名为:
const map = wrld.map(document.querySelector('.map-container'), mapScene.api_key, mapScene);

TripView.addPointsToMap(map, poiSet);
Upon reloading the page in the browser, we’ll observe that the points have been added to our map, accompanied by the name of each place.
在浏览器中重新加载页面后,我们会发现这些点已添加到我们的地图中,并带有每个地点的名称。
摘要 (Summary)
Web-based maps can easily express information in a variety of contexts, of which we have implemented one with a consumer-orientated focus. With WRLD and a few lines of JavaScript, we have augmented our website’s experience, in turn increasing potential engagement. I hope that this has demonstrated the versatility and importance of maps on the web.
基于Web的地图可以轻松地在各种上下文中表达信息,我们已经以消费者为中心实现了其中的一种。 借助WRLD和几行JavaScript,我们增加了网站的体验,从而增加了潜在的参与度。 我希望这能证明网络地图的多功能性和重要性。
翻译自: https://www.sitepoint.com/how-to-build-a-coach-holiday-showcase-with-wrld/


 6313
6313

 被折叠的 条评论
为什么被折叠?
被折叠的 条评论
为什么被折叠?
 到【灌水乐园】发言


