


 本文介绍如何使用Scrutinizer CI工具优化PHP代码质量,包括配置、问题检查和代码分析等功能,以及与Travis CI的集成,实现持续集成和代码覆盖率报告。
This article has been slightly revised based on the feedback from the people behind Scrutinizer. For the most part, the changes are in the “Configuration” section which is now noticeably simpler.
根据对Scrutinizer背后人员的反馈,对本文进行了轻微修订。 在大多数情况下,更改位于“配置”部分,现在明显更简单。
We’ve gone through a decent number of tutorials about code quality, inspections, auto-build systems and so on here at SitePoint:
我们在SitePoint上浏览了许多有关代码质量,检查,自动构建系统等的教程:
PHP Quality Assurance with Jenkins [4-part series]
JenkinsPHP质量保证 [4部分系列]
In this article, we’ll take a look at Scrutinizer CI – a continuous integration tool that’s quite expensive and closed to private projects, but very handy for public ones.
在本文中,我们将介绍Scrutinizer CI ,它是一种持续集成的工具,价格昂贵,不适合私人项目,但对于公共项目非常方便。

审查者vs / +特拉维斯 (Scrutinizer vs/+ Travis)
Scrutinizer performs many analyses that a compiler does in order to help you find potential bugs, security vulnerabilities, or violations of best practices. It also allows you to combine its results with those of some open-source tools like PHP Code Sniffer that we discussed in our 4-part series on Jenkins.
Scrutinizer会执行编译器所做的许多分析,以帮助您发现潜在的错误,安全漏洞或违反最佳做法。 它还允许您将其结果与我们在Jenkins的4部分系列中讨论的一些开源工具(如PHP Code Sniffer)的结果相结合。
Where Travis is fully customizable, with various virtual environments running your code and letting you know of your build status, it doesn’t really have built-in support for quality assurance. Scrutinizer does, but it doesn’t run tests on public projects, and to power private ones, you need a paid plan.
Travis是完全可定制的,在各种虚拟环境中运行代码并让您知道构建状态,但它实际上并没有内置的质量保证支持。 Scrutinizer可以,但是不会在公共项目上运行测试,而要为私人项目提供动力,您需要付费计划。
Scrutinizer, therefore, cannot run PHPUnit for you, nor can it provide build status or code coverage. We can, however, configure Travis to send coverage reports to Scrutinizer on every build. That way, whenever Travis makes a new build of your project, it automatically makes sure the Scrutinizer report is up to date, too.
因此,Scrutinizer无法为您运行PHPUnit,也无法提供构建状态或代码覆盖范围。 但是,我们可以将Travis配置为在每个构建中将覆盖率报告发送给 Scrutinizer。 这样,每当Travis新建项目时,它都会自动确保Scrutinizer报告也是最新的。
外部代码覆盖率 (External Code Coverage)
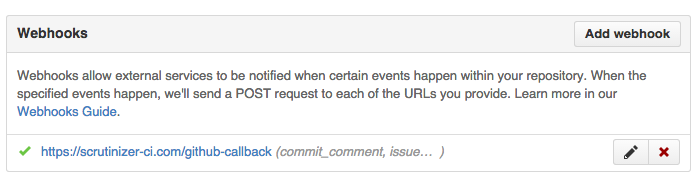
To get started with Scrutinizer, sign up for an account there. Then, connect your Github account with it and authorize access, so it can reach your repositories and verify you’re the owner. Finally, click the Add Repository button and add the one you want checked. Scrutinizer will automatically add a webhook to your repo, so that all events happening on it automatically trigger a scan process:
要开始使用Scrutinizer,请在此处注册一个帐户。 然后,将您的Github帐户与其连接并授权访问,这样它就可以访问您的存储库并确认您是所有者。 最后,单击添加存储库按钮,然后添加要检查的存储库按钮。 Scrutinizer会自动将一个Webhook添加到您的仓库中,以便所有发生在其上的事件都会自动触发扫描过程:
I’ll assume you already know how to configure Travis. If not, please see this post and come back. At the end of our .travis.yml file, we need to add the following:
我假设您已经知道如何配置Travis。 如果没有,请参阅这篇文章,然后再回来。 在.travis.yml文件的末尾,我们需要添加以下内容:
script:
  - phpunit --coverage-text --coverage-clover=coverage.clover

after_script:
  - wget https://scrutinizer-ci.com/ocular.phar
  - php ocular.phar code-coverage:upload --format=php-clover coverage.clover
This first instructs Travis on what to do in order to trigger a build process: run PHPUnit and produce a clover coverage report. After the build executes, Travis needs to download the ocular.phar helper from Scrutinizer, and uses this tool to send the coverage report over. This means that, if you prefer to bypass Travis altogether, you can use this tool from your own machine, too – just run the same commands locally.
首先,这将指导Travis如何执行构建过程:运行PHPUnit并生成三叶草覆盖率报告。 生成执行后,Travis需要从Scrutinizer下载ocular.phar助手,并使用此工具来发送覆盖率报告。 这意味着,如果您希望完全绕开Travis,也可以在自己的计算机上使用此工具-只需在本地运行相同的命令即可。
组态 (Configuration)
When you add your project, Scrutinizer will automatically infer a configuration based on your project structure. It recognizes many common frameworks and CMSes like Symfony, Zend, Laravel, Drupal, Magento, or WordPress, and will automatically adjust its analysis to match that particular project. Scrutinizer also allows you to change its behavior through a config file. The configuration process is a bit too versatile for comfort, so I’ll try and simplify as best I can.
添加项目时,Scrutinizer将根据您的项目结构自动推断配置。 它可以识别许多常见的框架和CMS,例如Symfony,Zend,Laravel,Drupal,Magento或WordPress,并将自动调整其分析以匹配该特定项目。 Scrutinizer还允许您通过配置文件更改其行为。 配置过程对于舒适性来说有点太通用了,所以我会尽力简化一下。
全球/回购 (Global / Repo)
There are configurations that you save on the Scrutinizer website, into your account – global, and repo. Global configuration can be shared among repos (but doesn’t have to be – the word global means it’s globally available, not globally active).
有配置,保存Scrutinizer网站上,您的帐户- 全球和回购 。 可以在存储库之间共享全局配置 (但不必一定要共享-单词global表示它是全局可用的 ,而不是全局活动的 )。
Repo configuration is configuration saved in a repo’s configuration section:
存储库配置是保存在存储库的配置部分中的配置:
At first, it’ll be empty, with some default values implied. To fine-tune it, one can just put in custom values as per the docs. In the case of thephpleague/skeleton, this is already beautifully defined, so you can rip off their configuration and shove it right in there:
首先,它将为空,其中包含一些默认值 。 要对其进行微调,可以按照docs设置自定义值。 在thephpleague / skeleton的情况下,已经定义了精美的代码,因此您可以剥夺它们的配置并直接将其推入其中:
filter:
    excluded_paths: [tests/*]
checks:
    php:
        code_rating: true
        remove_extra_empty_lines: true
        remove_php_closing_tag: true
        remove_trailing_whitespace: true
        fix_use_statements:
            remove_unused: true
            preserve_multiple: false
            preserve_blanklines: true
            order_alphabetically: true
        fix_php_opening_tag: true
        fix_linefeed: true
        fix_line_ending: true
        fix_identation_4spaces: true
        fix_doc_comments: true
tools:
    external_code_coverage:
        timeout: 600
        runs: 3
When a build process is triggered (and this will happen automatically due to the webhook), Travis will run the PHPUnit command and send over the coverage report when it’s done. A timeout of 600 seconds means that’s the maximum amount of time Scrutinizer will tolerate waiting for the code coverage report to arrive.
触发构建过程时(由于Webhook,这将自动发生),Travis将运行PHPUnit命令并在完成报告后发送覆盖报告。 600秒的超时意味着Scrutinizer可以等待代码覆盖率报告到达的最长时间。
runs is useful for when you have your PHPUnit tests split up into several suites, each producing its own coverage report – specifying runs as X means the last X coverage reports sent to Scrutinizer will be merged together and treated as one. This is also useful when you’re testing for several environments on Travis – e.g. PHP 5.5, 5.6, and 7.0 – specifying a runs value of 3 will merge these reports. If runs is omitted, only the first coverage report Scrutinizer receives will be taken into account for code coverage and build success status.
当您将PHPUnit测试分为多个套件时, runs会很有用,每个套件都会生成自己的覆盖率报告-将运行指定为X意味着发送到Scrutinizer的最后X个覆盖率报告将合并在一起并视为一个 。 当您在Travis上测试多个环境(例如PHP 5.5、5.6和7.0)时,此功能也很有用。将runs值指定为3将合并这些报告。 如果省略runs则代码覆盖率和构建成功状态将仅考虑Scrutinizer收到的第一个覆盖率报告。
文件配置 (File Configuration)
File based configuration is read from a .scrutinizer.yml file from your project’s root folder. It can contain the exact same values as all other configurations, but takes priority over them – i.e., values in the file will overwrite values in repo configuration, which will overwrite those in global configuration.
从项目的根文件夹中的.scrutinizer.yml文件读取基于文件的配置。 它可以包含与所有其他配置完全相同的值,但具有比它们更高的优先级–即,文件中的值将覆盖存储库配置中的值,这将覆盖全局配置中的值。
The League Skeleton has one such file, and as such is ready for Scrutinizer testing by default. Feel free to use their file as an example on how to build your own.
League Skeleton有一个这样的文件,因此默认情况下可以进行Scrutinizer测试。 随意使用他们的文件作为如何构建自己的示例。
本地配置 (Local Configuration)
Local configuration can be defined per-run, by clicking “Schedule Inspection”, which will allow one to punch in custom config values to be applied immediately before the run, and only on that one run:
可以通过单击“计划检查”在每次运行中定义本地配置,这将允许一个人在运行前即刻打入仅在该运行中应用的自定义配置值:

Local configuration is also one which you pass in via API calls as parameters.
本地配置也是您通过API调用作为参数传递的一种。
This configuration overwrites all others before it while merging.
合并时,此配置将覆盖所有其他配置。
For a handy reference to these overwrites and the configuration hierarchy, as well as helpful hints for when to use which configuration type, see this handy chart.
有关这些覆盖和配置层次结构的方便参考,以及有关何时使用哪种配置类型的有用提示,请参见此便捷图表 。
报告书 (Reports)
Now that configuration is out of the way, let’s inspect an actual project. For an example, I’ll use a past version of my Diffbot client which we’ve built in a previous series. After adding it to Travis, configuring everything as mentioned above (using the identical configuration settings), the Scrutinizer build triggers.
现在,配置已不复存在,让我们检查一个实际项目。 例如,我将使用我们在上一个系列中构建的Diffbot客户端的旧版本。 将其添加到Travis后,按上述方式配置所有内容(使用相同的配置设置),然后触发Scrutinizer构建。
仪表板 (Dashboard)
After completion, the project dashboard changes:
完成后,项目仪表板将更改:
The build process was considered failed originally due to a configuration misstep on my end, hence the error.
最初由于我的配置错误而导致构建过程失败,因此出现了错误。
We can see that we have a very good rating in code quality, 100% test coverage, and 4 detected issues. Let’s see what those are.
我们可以看到,我们在代码质量,100%的测试覆盖率和4个已检测到的问题上获得了很高的评价。 让我们看看它们是什么。
问题 (Issues)
Clicking on either the “4 issues” link, or the issues icon in the left-hand side menu, we’re taken to the issues list:
单击“ 4个问题”链接或左侧菜单中的问题图标,我们将转到问题列表:
Scrutinizer offers handy tags for issue categorization by type and severity. Oddly enough, the “Last Found” column reads “2 months ago” in spite of the project just having been added to Scrutinizer and the first inspection running just mere minutes ago. In some regard, this interface leaves something to be desired – it’d be nice, for example, if bugs were color coded per severity, and if there were an “expand” option to glance at the errors without going to a whole new screen for a minor issue.
Scrutinizer提供了方便的标签,用于按类型和严重性对问题进行分类。 奇怪的是,尽管该项目刚刚添加到Scrutinizer中,并且仅在几分钟前运行了第一次检查,但“ Last Found”列仍显示为“ 2个月前”。 在某些方面,该界面尚待改进–例如,如果按严重性对错误进行了颜色编码,并且是否存在“扩展”选项即可浏览错误而无需进入整个新屏幕,那就更好了一个小问题。
Alright then, let’s see what the problem is. I chose to inspect the second entry: Entity.php:
好吧,让我们看看问题出在哪里。 我选择检查第二个条目: Entity.php :
Besides the fact that it would be nice to have the full file path printed at the top instead of just the file name, this interface is clean and very direct in pointing out one’s mistakes. In this particular case, it actually inspected the docblock of an interface’s method signature and warned me about not respecting it.
除了最好在顶部打印完整的文件路径而不是仅在文件名这一事实外,该界面还很干净并且很直接地指出了自己的错误。 在这种特殊情况下,它实际上检查了接口方法签名的docblock,并警告我不要尊重它。
Indeed, once I changed this:
确实,一旦我改变了这一点:
to this:
对此:
and fixed a similar Api.php bug as well, I committed, pushed, and the analysis was re-run, producing a positive output:
并修复了类似的Api.php错误,我提交,推送并重新运行分析,产生了正输出:

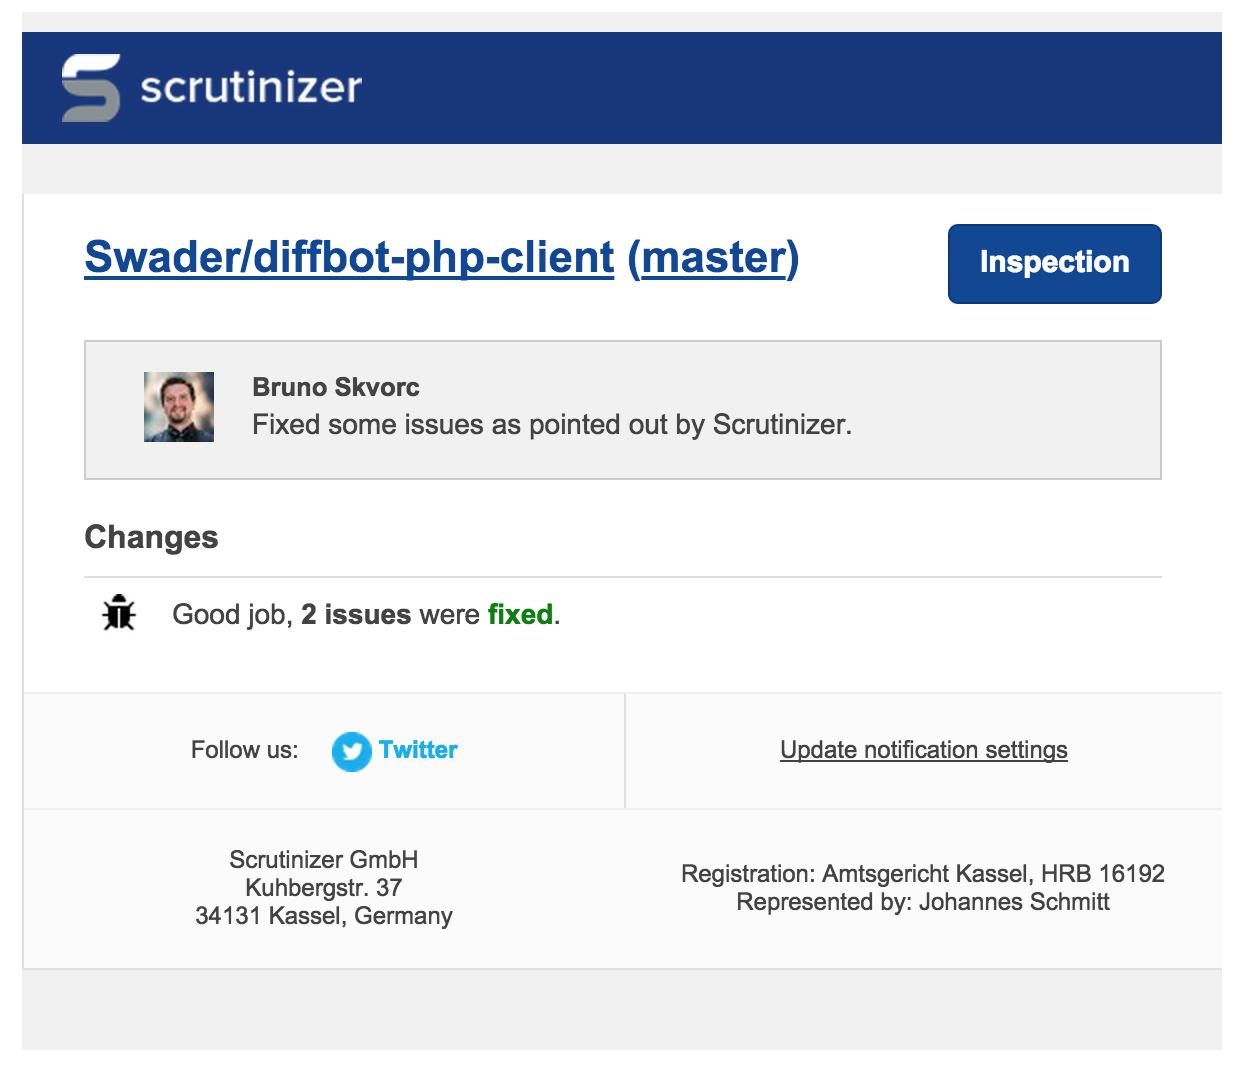
It even let me know via email:
它甚至通过电子邮件通知我:
The remaining two issues were unfixable due to an issue with Scrutinizer’s analyzer. Due to their unfixable nature, ignoring these issues was the logical approach:
由于Scrutinizer的分析仪出现问题,其余两个问题无法修复 。 由于其不可修复的性质,因此忽略这些问题是合乎逻辑的方法:
This doesn’t really resolve them, but it does hide them from the issues list so they don’t stand out in future inspections.
这并不能真正解决问题 ,但是确实将它们隐藏在问题列表中,因此它们在以后的检查中不会脱颖而出。
码 (Code)
Clicking on the “Code” menu option, we’re taken to the code analysis screen which tells us about the quality of our classes.
单击“代码”菜单选项,将转到代码分析屏幕,该屏幕告诉我们有关类质量的信息。
The Product class seems problematic. Let’s see what Scrutinizer is complaining about.
Product类似乎有问题。 让我们看看Scrutinizer在抱怨什么。
Uh huh. So it’s the complexity that’s causing the problem? Hmm, let’s see “How to fix”.
嗯。 那么是造成问题的复杂性吗? 嗯,让我们看看“如何修复”。
Now, while I absolutely love this approach of giving advice with followup links, there’s just nothing that can be done for this class. The file is just one big collection of getters, and there’s no way to extract a class, subclass, or interface out of it. Sadly, there’s no way to ignore just this one inspection like there is on issues.
现在,尽管我绝对喜欢这种通过后续链接提供建议的方法,但对于本堂课来说,什么也做不了。 该文件只是一大堆吸气剂,无法从中提取类,子类或接口。 可悲的是,就像存在问题一样,我们无法无视这一检查。
There is another link on the “Code” screen, one perhaps less obvious: “Hot Spots”.
“代码”屏幕上还有另一个链接,可能不太明显:“热点”。
Hot spots displays the most “optimizable” areas of the code – those that Scrutinizer assumes would yield the greatest quality increase with the least amount of work:
热点显示代码中“最可优化”的区域– Scrutinizer认为这些区域将以最少的工作量带来最大的质量提升:
In my case, those were the aformentioned (unfixable) Product class, and two methods in the Api abstract class. Interesting. Let’s have a look at the buildUrl method’s problems.
在我的情况下,这些是前面提到的(不可修复的) Product类,以及Api抽象类中的两个方法。 有趣。 让我们看一下buildUrl方法的问题。
Hmm. Too many conditions? The buildUrl method takes various options from the API that calls it and builds a URL from them, so it’s only natural that it has “many” control structures. One could extract the loops into methods like buildFieldString and buildOptionsString, but what for? This is the only method that needs this string building, so introducing additional unnecessary overhead to fix this is not something I’m interested in.
嗯 条件太多? buildUrl方法从调用它的API中获取各种选项,并从它们中构建一个URL,因此,它具有“许多”控制结构是很自然的。 可以将循环提取到诸如buildFieldString和buildOptionsString类的方法中,但是这样做是为了什么呢? 这是唯一需要此字符串构建的方法,因此引入额外的不必要开销来解决此问题不是我感兴趣的事情。
The other method, __construct definitely leaves something to be desired. Let’s improve it somewhat and change it from this:
另一种方法__construct肯定有一些不足之处。 让我们对其进行一些改进并对此进行更改:
public function __construct($url)
    {
        if (!is_string($url)) {
            throw new \InvalidArgumentException('URL param must be a string.');
        }
        $url = trim($url);
        if (strlen($url) < 4) {
            throw new \InvalidArgumentException('URL must be at least four characters in length');
        }
        if ($parts = parse_url($url)) {
            if (!isset($parts["scheme"])) {
                $url = "http://$url";
            }
        }
        $filtered_url = filter_var($url, FILTER_VALIDATE_URL);
        if (false === $filtered_url) {
            throw new \InvalidArgumentException('You provided an invalid URL: ' . $url);
        }
        $this->url = $filtered_url;
    }
to this:
对此:
public function __construct($url)
    {
        $url = trim((string)$url);
        if (strlen($url) < 4) {
            throw new \InvalidArgumentException(
                'URL must be a string of at least four characters in length'
            );
        }

        $url = (isset(parse_url($url)['scheme'])) ? $url : "http://$url";

        $filtered_url = filter_var($url, FILTER_VALIDATE_URL);
        if (!$filtered_url) {
            throw new \InvalidArgumentException(
                'You provided an invalid URL: ' . $url
            );
        }

        $this->url = $filtered_url;
    }
Now if we trigger a rebuild by committing and pushing, we get this:
现在,如果我们通过提交和推送触发重建,我们将获得以下信息:
The quality has increased from a B rating to A for the __construct method – success!
__construct方法的质量从B级提高到A级–成功!
检验统计 (Inspections and Statistics)
The two remaining screens are Inspections, which lists all the inspections done so far and their outcome, and Statistics and Trends, a dashboard of graphs displaying visual cues as to how the quality of your code progresses (or regresses) over time – I’ll leave those up to you to explore.
剩下的两个屏幕是“检查”,其中列出了到目前为止进行的所有检查以及结果;以及“统计信息和趋势”,这是一个图形仪表板,显示有关代码质量随时间的进展(或下降)情况的可视提示。让那些由您自己去探索。
结论 (Conclusion)
Scrutinizer is a powerful tool in making sure your PHP code quality is top notch. It’s very easy to set up, and once it’s up and running requires minimal interaction to stay active and up to date. While the pricing tiers aren’t all too accessible to individuals and solo developers with private projects (starting at 50 Euro rather than 19 Euro as stated on the landing page), they’re very approachable to companies, and the free tier is more than enough for an open source project.
Scrutinizer是确保您PHP代码质量一流的强大工具。 设置非常容易,一旦启动并运行,只需很少的交互即可保持活动状态和最新状态。 虽然定价层并不太适合个人和具有私人项目的单独开发人员(起价为50欧元,而不是登录页面上所述的19欧元),但对于公司而言,定价层很容易接近,而免费层不仅限于此一个开源项目就足够了。
Have you tried Scrutinizer? Which code quality services do you use? Maybe their competition, Code Climate? Let us know.
您尝试过Scrutinizer吗? 您使用哪些代码质量服务? 也许他们的竞争对手是Code Climate? 让我们知道
翻译自: https://www.sitepoint.com/inspecting-php-code-quality-scrutinizer/


 1515
1515

 被折叠的 条评论
为什么被折叠?
被折叠的 条评论
为什么被折叠?
 到【灌水乐园】发言


