


Amongst the many templating systems out there, most work in pretty much the same way; variables are “injected” using some syntax or another, be it curly braces, percentage signs or whatever that library’s convention happens to be. They’ll usually have basic control structures, such as if...then and, of course, iteration.
在许多模板系统中,大多数系统的工作方式几乎相同。 变量使用某种语法“注入”,无论是花括号,百分号还是该库的约定。 它们通常具有基本的控制结构,例如if...then ,当然还有迭代。
FigDice, however, takes an altogether different approach. Inspired by PHPTAL – the subject of a future article – it gives the view layer the reponsibility of “pulling” in the data it requires, rather than relying on controllers to assemble and “push” it into the templates.
然而, FigDice采用了完全不同的方法。 受PHPTAL (以后的文章的主题)的启发,它赋予视图层“拉入”所需数据的责任,而不是依靠控制器将其组装并“推入”到模板中。
In this two-part series, I’m going to take a more detailed look at it, at how it works and how to use it.
在这个由两部分组成的系列文章中,我将更详细地介绍它,以及它的工作方式和使用方法。
安装 (Installation)
You can get the code from the website, Github or, better still, Composer:
您可以从网站 Github或Composer获得更好的代码:
"figdice/figdice": "dev-master"The library is also available as a .phar; you can download the latest version (direct link) or generate it yourself using figdice-make-phar.php, available in the Github repository.
该库也可以作为.phar ; 您可以下载最新版本 (直接链接),也可以使用Github存储库中提供的figdice-make-phar.php自己生成最新版本 。
基本用法 (Basic Usage)
Let’s first look at FigDice at its most basic – creating and rendering a view.
让我们首先看一下FigDice的最基本概念-创建和渲染视图。
To begin, create a new instance of the view:
首先,创建视图的新实例:
$view = new \figdice\View();Obviously, you’ll need to ensure the library is available – using Composer provides a suitable autoloader.
显然,您需要确保该库可用–使用Composer提供合适的自动加载器。
Next, you need to load in the appropriate template, relative to the current path:
接下来,您需要相对于当前路径加载适当的模板:
$view->loadFile( '../templates/home.html' );To render the template, call render():
要渲染模板,请调用render() :
$view->render(); // returns the HTML content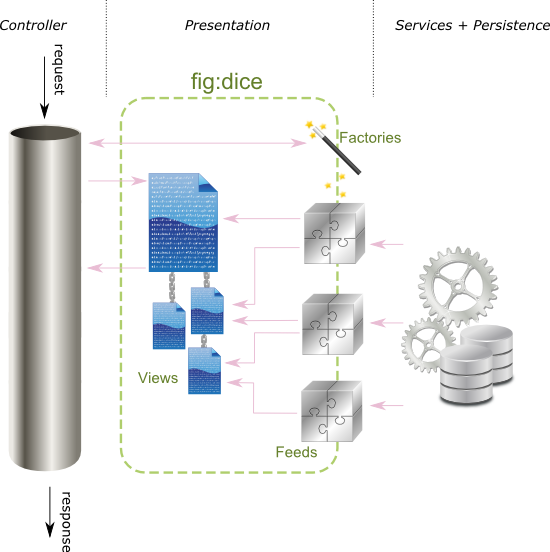
With that in mind, let’s start building some templates.
考虑到这一点,让我们开始构建一些模板。
骨架应用 (A Skeleton Application)
I’ve created a simple application containing all the code from this article, which also better illustrates how it all fits together. It uses Silex, but you shouldn’t need a particularly thorough knowledge of it in order to understand what’s going on.
我创建了一个简单的应用程序,其中包含本文中的所有代码,还更好地说明了它们如何组合在一起。 它使用Silex ,但是您不需要特别了解它就可以了解发生了什么。
You’ll find it on Github, and you can see it in action here. Note that the demo includes functionality we’re going to add later in Part Two.
您可以在Github上找到它,并在这里看到它的运行情况 。 请注意,该演示包含了我们将在第二部分稍后添加的功能。
创建布局 (Creating a Layout)
The first thing to point out is that FigDice is largely XML-based. As such, it relies on a few custom XML elements and crucially. requires that your HTML tags are properly closed.
首先要指出的是,FigDice主要基于XML。 因此,它非常依赖于一些自定义XML元素。 要求您HTML标记已正确关闭。
Let’s start by creating a simple, two-columned page layout.
让我们从创建一个简单的两列页面布局开始。
<!-- file: layout.html -->
<html>
	<head>
		<title fig:slot="docTitle" />

		<link rel="stylesheet" href="//netdna.bootstrapcdn.com/bootstrap/3.1.1/css/bootstrap.min.css" />
		<link rel="stylesheet" href="//netdna.bootstrapcdn.com/bootstrap/3.1.1/css/bootstrap-theme.min.css" />
	</head>
	<body>
		<div class="container">
			<header class="header">
			<fig:include file="menu.html" />
				<h3 class="text-muted">FigDice Example</h3>
			</header>

			<div class="row">

				<div class="col-sm-12 col-md-9 col-lg-9">

					<div class="content">
						<h1 fig:slot="pageTitle" />
						<div fig:slot="pageContent" />
					</div>

				</div>

				<div class="col-sm-12 col-md-3 col-lg-3">

					<fig:include file="tweets.html" />

				</div>

			</div>

			<footer id="footer">
				<fig:include file="footer.html" />
			</footer>

		</div>

	</body>
</html>
Let’s go over a few things.
让我们来看一些事情。
<title fig:slot="docTitle" /> is used to generate the <title> tag, by defining a “slot” for the value to go into. We’ll look at how this data gets “plugged in” to a slot shortly.
<title fig:slot="docTitle" />用于通过定义要输入的值的“槽”来生成<title>标签。 我们将研究如何很快将这些数据“插入”到插槽中。
Note how the <link> tags are closed. This is very important; because FigDice makes extensive use of XML, it must validate accordingly.
请注意<link>标记如何关闭。 这个非常重要; 由于FigDice广泛使用XML,因此必须进行相应的验证。
<fig:include file="menu.html" /> is self-explanatory – FigDice makes it easy to split your templates up into smaller template files. We’re doing likewise for the footer – footer.html – and for a Tweets block (tweets.html) which we’ll build shortly.
<fig:include file="menu.html" />是不言自明的– FigDice使您可以轻松地将模板拆分为较小的模板文件。 对于页脚– footer.html –以及稍后将要构建的Tweets块( tweets.html ),我们tweets.html 。
Here are the contents of menu.html:
以下是menu.html的内容:
<ul class="nav nav-pills pull-right">
	<li><a href="/">Home</a></li>
	<li><a href="/about">About</a></li>
</ul>
And footer.html:
和footer.html :
<p>© 2014 Someone or Other</p>一个简单的主页 (A Simple Homepage)
Now let’s create a homepage for our sample application. In a new file named index.html:
现在,让我们为示例应用程序创建一个主页。 在名为index.html的新文件中:
<xml fig:mute="true"> <!-- Mute because this tag should not end up in the HTML document. But the FigDice template must have an XML root node. -->

		<!-- Load the page layout -->
		<fig:include file="layout.html" />

		<!-- Set the <title> tag -->
		<title fig:plug="docTitle">Sample application homepage</title>

		<!-- Set the <h1> tag -->
		<h1 fig:plug="pageTitle">Homepage</h1>

		<!-- "Plug in" the page content -->
		<div fig:plug="pageContent">Lorem ipsum...</div>
	</xml>
This time our template is pure XML, and introduces some more FigDice tags.
这次,我们的模板是纯XML,并引入了更多的FigDice标签。
Note that the opening <xml> tag has an attribute called fig:mute, which is set to true. As the comments point out, this attribute tells FigDice not to include this element in the final HTML.
请注意,开始<xml>标记具有一个名为fig:mute的属性,该属性设置为true。 正如注释所指出的那样,该属性告诉FigDice在最终HTML中不要包含该元素。
<fig:include file="layout.html" /> tells FigDice about the layout we created a moment ago. However, that doesn’t include the file in the same way a PHP include might; that’s where slots and plugs come in.
<fig:include file="layout.html" />告诉FigDice我们刚才创建的布局。 但是,它并没有以PHP include方式包含文件。 这就是插槽和插头插入的地方。
<div fig:plug="pageContent">Lorem ipsum...</div> indicates that we should “plug” the content into a “slot” called pageContent, which you may remember we created in layout.html.
<div fig:plug="pageContent">Lorem ipsum...</div>表示我们应将内容“插入”到名为pageContent的“插槽”中,您可能还记得我们在layout.html创建的内容。
Finally, let’s define a really simple route to display the page:
最后,让我们定义一个显示页面的简单方法:
$app->get('/', function () use ($view) {

	$view->loadFile( '../templates/home.html' );

	return $view->render();
});
处理数据 (Working with Data)
In the traditional MVC approach the controller retrieves, assembles and then “injects” data into the views. By implication this means that the controller must be aware of what data is required and which views are interested in it.
在传统的MVC方法中,控制器检索,组合然后将数据“注入”到视图中。 这意味着控制器必须知道需要哪些数据以及哪些视图对此感兴趣。
FigDice takes a different approach. Instead of relying on the controller to deal with the data, the views are responsible for “pulling in” the data they require.
FigDice采用了不同的方法。 视图不是依靠控制器来处理数据,而是负责“拉入”所需的数据。
To accomplish this, FigDice uses feeds. A feed is a class which extends figdice\Feed and which must contain a run() method to return the appropriate data.
为此,FigDice使用feeds 。 提要是扩展figdice\Feed的类,它必须包含run()方法以返回适当的数据。
To demonstrate this, let’s create a block which displays a user’s latest Tweets on every page.
为了演示这一点,让我们创建一个块,在每个页面上显示用户的最新推文。
If you look back to the layout, you’ll see we’ve already added the following line to include it:
如果回头看一下布局,您会看到我们已经添加了以下行来包括它:
<fig:include file="tweets.html" />Actually getting Tweets from the Twitter API is relatively straightforward, but outside the scope of this article – so let’s fake it. Here’s the feed:
实际上,从Twitter API获取推文是相对简单的,但是不在本文讨论范围之内–因此,我们来伪造一下。 这是提要:
<?php namespace Sitepoint\Feed;

	use figdice\Feed;

	class TwitterFeed extends Feed
	{

		public function run() {
			return array(
				array(
					'body' 			=> 'This is an example of a Tweet, though it isn\'t really a Tweet',
				),
				array(
					'body' 			=> 'This is another example of a Tweet, though it isn\'t really a Tweet either',
				),
				array(
					'body' 			=> 'Using REAL Tweets is left as an example, you see',
				),
			);
		}
	}
For simplicity, we’re only returning the body of the tweets.
为简单起见,我们只返回推文的正文。
Now let’s create the template which “pulls” data from the TwitterFeed class, and renders it using a simple unordered list:
现在,让我们创建一个模板,该模板从TwitterFeed类中“ TwitterFeed ”数据,并使用简单的无序列表进行呈现:
// file: twitter.html
	<?xml version="1.0" encoding="utf-8"?>
	<fig:template xmlns:fig="http://figdice.org/">

		<fig:feed class="TwitterFeed" target="tweets" />

		<ul>
			<li fig:walk="tweets" fig:text="body" />
		</ul>

	</fig:template>
The <fig:feed> declaration indicates we should create an instance of TwitterFeed, and make its data available using the key tweets.
<fig:feed>声明指示我们应该创建TwitterFeed的实例,并使用键tweets使其数据可用。
Then we’re creating a simple unordered list. Each iteration of <fig:walk> creates an <li> element as it “walks” through the data assigned to the tweets variable. The fig:text attribute indicates the <li> tag’s text content should be populated using the body of each Tweet.
然后我们创建一个简单的无序列表。 <fig:walk>每次迭代都会在其“遍历”分配给tweets变量的数据时创建一个<li>元素。 fig:text属性指示<li>标记的文本内容应使用每个Tweet的body填充。
Here’s the result:
结果如下:
<ul>
		<li>This is an example of a Tweet, though it isn't really a Tweet</li>
		<li>This is another example of a Tweet, though it isn't really a Tweet either</li>
		<li>Using REAL Tweets is left as an example, you see</li>
	</ul>
该工厂 (The Factory)
We’re not quite there yet; in order to use feeds you’ll need a factory. A factory must implement \figdice\FeedFactory, which requires that it includes a create method responsible for instantiating a given feed class.
我们还没到那儿。 为了使用提要,你需要一个工厂 。 工厂必须实现\figdice\FeedFactory ,这要求它包括一个负责实例化给定提要类的create方法。
Here’s an example, which is pretty self-explanatory:
这是一个例子,这很容易解释:
<?php namespace Sitepoint\Factory;

	use Sitepoint\Feed\TwitterFeed;

	class FeedFactory implements \figdice\FeedFactory
	{
		/**
		 * In this simple example, we did not declare additional
		 * arguments for our factory. You can experiment by yourself.
		 */
		public function __construct() {
		}

		/**
		 * In this simple example, we did not pass attributes to
		 * the fig:feed invokation.
		 * Had we specify XML attributes (in addition to class and target),
		 * they would be interpreted by the Expression engine, and passed
		 * as the $attribute argument, as key/value pairs.
		 * @see \figdice\FeedFactory::create()
		 */
		public function create($className, array $attributes) {

			if ($className == 'TwitterFeed') {
				return new TwitterFeed();
			}

			// Explicitly return null when our Factory cannot handle
			// the requested class, so that more Factories can chain
			// the lookup.
			return null;

		}
	}
By doing it this way rather than doing return new $classname, we don’t need to pollute our view code with namespace information.
通过这种方式,而不是return new $classname ,我们不需要使用命名空间信息来污染我们的视图代码。
Because we’re using dummy data stored in an array, this is all we need. However, in reality your factory will probably do some additional initialization, such as registering database connections or passing in some configuration parameters.
因为我们使用的是存储在数组中的伪数据,所以这就是我们所需要的。 但是,实际上,您的工厂可能会进行一些附加的初始化,例如注册数据库连接或传递一些配置参数。
Finally in order to get this to work, you need to register it with your View:
最后,为了使它起作用,您需要在View中注册它:
$view->registerFeedFactory(new FeedFactory());If you browse to the application’s homepage, you should now see a list of Tweets.
如果浏览到应用程序的主页,现在应该看到推文列表。
摘要 (Summary)
Our dummy application now has a basic structure, and we’ve looked at pulling in data by implementing a simple Twitter stream, albeit one which uses dummy data.
我们的虚拟应用程序现在具有基本的结构,我们已经研究了通过实现一个简单的Twitter流(尽管其中使用的是虚拟数据)来引入数据。
In the next part, we’ll build upon our simple website by adding a blog, which allows us to look in more detail at data feeds in Figdice. We’ll also provide a language selector, examining Figdice’s localization feature.
在下一部分中,我们将通过添加一个博客来构建简单的网站,该博客使我们能够更详细地查看Figdice中的数据馈送。 我们还将提供语言选择器,以检查Figdice的本地化功能。


 2341
2341

 被折叠的 条评论
为什么被折叠?
被折叠的 条评论
为什么被折叠?
 到【灌水乐园】发言


