


Vagrant has changed the way I work. In this article I discuss how Vagrant, a tool for creating and managing virtual environments, helps me work more efficiently. I will then introduce Varying Vagrant Vagrants (VVV), an evolving Vagrant configuration purpose-built for WordPress developers.
流浪汉改变了我的工作方式。 在本文中,我将讨论Vagrant(一种用于创建和管理虚拟环境的工具)如何帮助我更有效地工作。 然后,我将介绍Varying Vagrant Vagrants(VVV),这是一种为WordPress开发人员专门构建的不断发展的Vagrant配置。
您还在使用WAMP / MAMP吗? (Are You Still Using WAMP/MAMP?)
If you’re reading this, there is a high chance that you have used local development in the past. We all have gone through this. WAMP/WampServer, LAMP or MAMP, we’ve all had nightmares developing with them. Most of the time I was developing using WAMP (Windows), then I changed my development environment to Linux. It was the best thing I have ever done.
如果您正在阅读本文,那么您过去使用本地开发程序的可能性很大。 我们都经历了这个。 WAMP / WampServer,LAMP或MAMP,我们一起经历着噩梦。 大多数时候,我使用WAMP(Windows)进行开发,然后将开发环境更改为Linux。 这是我做过的最好的事情。
If you’ve ever worked in a team, you have probably come across the scenario where someone says “It works on my machine”. Or perhaps you’ve lost time losing your development environment when you’ve switched computers or bought a new laptop.
如果您曾经在团队中工作过,那么您可能会遇到有人说“在我的机器上可以工作”的情况。 或者,当您更换计算机或购买新笔记本电脑时,您可能已经失去了失去开发环境的时间。
Working on different projects, often requires different PHP versions, and different extensions. Sometimes there are conflicts with extensions. Things may break. Let’s not even talk about differences in the operating system, that’s another level of nightmare.
在不同的项目上工作,通常需要不同PHP版本和不同的扩展名。 有时与扩展名会有冲突。 事情可能会破裂。 我们什至不谈论操作系统的差异,这是另一个噩梦。
But what I hate the most, is messing with my primary system. I don’t want to my system to become dirty. I don’t want to install something and to forget that it is there. Projects finish but (usually) extensions and configurations stay there, and then you have to reconfigure everything.
但是我最讨厌的是弄乱了我的主系统。 我不想让我的系统变得肮脏。 我不想安装某些东西,而忘了它在那里。 项目完成了,但是(通常)扩展和配置都保留在那里,然后您必须重新配置所有内容。
But don’t worry, I think those days are over. I’ve been experimenting with Vagrant for a while and it has permanently changed the way I work.
但是不用担心,我认为那些日子已经过去了。 我已经在Vagrant进行了一段时间的试验,它永久性地改变了我的工作方式。
向流浪汉问好 (Say Hello to Vagrant)
So why use Vagrant? Vagrant is a tool that makes it easier to configure virtual systems. You can also use a single configuration when collaborating to make sure all of your team has the same development environment. This way you can spend more time building things, rather than fixing systems. After all we are developers, not System Administrators.
那么为什么要使用流浪汉呢? Vagrant是一种工具,可让您更轻松地配置虚拟系统。 进行协作时,您也可以使用单个配置,以确保您的所有团队都具有相同的开发环境。 这样,您可以花费更多的时间来构建事物,而不是修复系统。 毕竟,我们是开发人员,而不是系统管理员。
As we know, every project has it’s own libraries, dependencies and it’s own configurations. With Vagrant we can build a dedicated environment for every project, and share this configuration so we’re all on the same page when developing in a team.
众所周知,每个项目都有自己的库,依赖项和自己的配置。 使用Vagrant,我们可以为每个项目构建专用的环境,并共享此配置,因此在团队开发中,我们都在同一页面上。
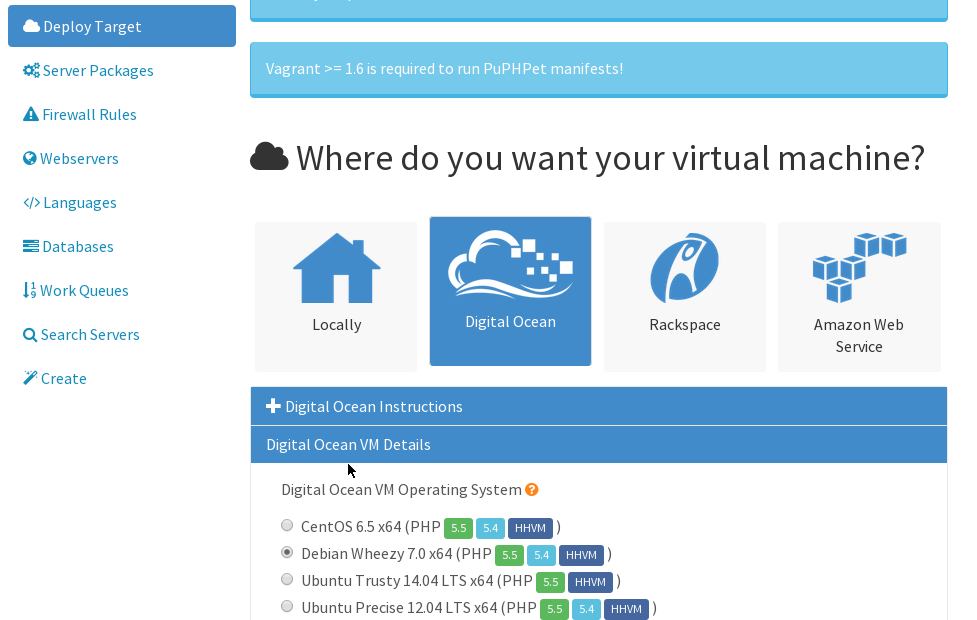
Vagrant is mature. You are free to create a configuration from scratch or use one that’s predefined. There are lots of tools and scripts to help you create and manage your Vagrant configurations, one of which is PuPHPet. With PuPHPet, you can configure environments for a local system, Digital Ocean, AWS and Rackspace. I’m not a System Administrator, but I’ve been able to create configurations for these environments with great success.
流浪汉是成熟的。 您可以从头开始创建配置,也可以使用预定义的配置。 有很多工具和脚本可帮助您创建和管理Vagrant配置,其中之一就是PuPHPet 。 使用PuPHPet,您可以为本地系统,Digital Ocean,AWS和Rackspace配置环境。 我不是系统管理员,但是我能够为这些环境创建配置取得了巨大的成功。
There are many configurations specifically for WordPress too. The most well known is Varying Vagrant Vagrants or (VVV) for short.
也有许多专门针对WordPress的配置。 最著名的是变种无业游民或简称( VVV )。
什么是VVV? (What Is VVV?)
VVV is a Vagrant configuration for WordPress developers. The environment is flexible, easy to edit and focused on high traffic, production environments. By using VVV, you get production ready configurations to work with on your own systems, right away.
VVV是WordPress开发人员的Vagrant配置。 该环境灵活,易于编辑,并专注于高流量的生产环境。 通过使用VVV,您可以立即进行生产准备配置,以在自己的系统上使用。
VVV附带什么? (What Comes with VVV?)
Here are all the goodies you get when you install VVV:
以下是安装VVV时获得的所有好处:
- Ubuntu 14.04 LTS (Trusty Tahr) Ubuntu 14.04 LTS(Trusty Tahr)
- WordPress Develop WordPress开发
- WordPress Stable WordPress稳定
- WordPress Trunk WordPress的树干
- WP-CLI WP-CLI
- nginx 1.6.x nginx 1.6.x
- mysql 5.5.x MySQL 5.5.x
- php-fpm 5.5.x php-fpm 5.5.x
- memcached 1.4.13 记忆快取1.4.13
- PHP memcache extension 3.0.8 PHP Memcache扩展3.0.8
- PHP xdebug extension 2.2.5 PHP xdebug扩展2.2.5
- PHP imagick extension 3.1.2 PHP imagick扩展3.1.2
- PHPUnit 4.0.x PHPUnit 4.0.x
- ack-grep 2.04 ack-grep 2.04
- git 1.9.x git 1.9.x
- subversion 1.8.x 颠覆1.8.x
- ngrep ngrep
- dos2unix dos2unix
- Composer 作曲家
- phpMemcachedAdmin phpMemcachedAdmin
- phpMyAdmin 4.1.14 (multi-language) phpMyAdmin 4.1.14(多国语言)
- Opcache Status 操作缓存状态
- Webgrind Webgrind
- NodeJs Current Stable Version NodeJs当前稳定版本
- grunt-cli Current Stable Version grunt-cli当前稳定版本
You can use many different sites on one VVV configuration. It’s the perfect environment to develop themes and plugins on, but that’s not all, it makes contributing to WordPress core easier. It also has Composer and Grunt preinstalled to help you work faster and smarter.
您可以在一种VVV配置上使用许多不同的站点。 这是开发主题和插件的理想环境,但这还不是全部,它使对WordPress核心的贡献更加容易。 它还预装了Composer和Grunt,以帮助您更快,更智能地工作。
VVV helps you develop for WordPress in the right way, using best practices.
VVV使用最佳实践帮助您以正确的方式为WordPress开发。
安装VVV (Installing VVV)
To install VVV you need to have VirtualBox and Vagrant installed on your machine:
要安装VVV,您需要在计算机上安装VirtualBox和Vagrant:
After installing Vagrant, you can then use it from your terminal. I’m using Debian here, it should be the same on Windows and Mac.
安装Vagrant后,您可以在终端上使用它。 我在这里使用Debian,在Windows和Mac上应该相同。
You can now grab VVV from the GitHub repository:
您现在可以从GitHub存储库中获取VVV:
git clone https://github.com/Varying-Vagrant-Vagrants/VVV.git wordpress-vvvNext, navigate to wordpress-vvv folder and execute vagrant up:
接下来,导航到wordpress-vvv文件夹并执行vagrant up :
cd wordpress-vvv
vagrant up
This command will read the configuration and build the entire system for you. The first time it will download the “Ubuntu 14.04 Trusty 64 bit” image from vagrantcloud. Next time you execute vagrant up for another project that depends on this image, it will load it from the cache. You can check your cached images by executing:
该命令将读取配置并为您构建整个系统。 它将首次从vagrantcloud下载“ Ubuntu 14.04 Trusty 64位”映像。 下次您为依赖此映像的另一个项目执行vagrant up ,它将从缓存中加载它。 您可以通过执行以下操作检查缓存的图像:
vagrant box listIf the installation process gets a bit slow, don’t worry, give it time.
如果安装过程有点慢,请不要担心,请花些时间。

As mentioned above, VVV installs a lot of components. git, composer, wp-cli, grunt-cli, nodeJs and a lot of other tools. But what caught my eye is that VVV included a lot of debugging and profiling tools. By default, it installs Webgrind, Opcache Status and xdebug. VVV also uses nginx by default.
如上所述,VVV安装了许多组件。 git , composer , wp-cli , grunt-cli , nodeJs和许多其他工具。 但是引起我注意的是VVV包含许多调试和配置工具。 默认情况下,它将安装Webgrind , Opcache Status和xdebug。 默认情况下,VVV还使用nginx。
After the successful installation, navigate to the default IP address 192.168.50.4 in your web browser. You’ll be greeted with a simple interface that gives us access to various tools and different WordPress installations.
成功安装后,在Web浏览器中导航到默认IP地址192.168.50.4 。 您将获得一个简单的界面,该界面使我们可以访问各种工具和不同的WordPress安装。
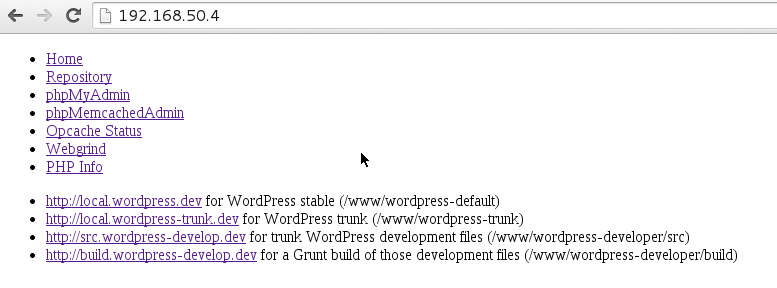
You can now go to any of the installations and experiment. You can find all of these files in the www directory. There are many folders within www, but just focus on wordpress-default and wordpress-develop. Usually, you’ll want to work with the wordpress-default folder. If you’re feeling a bit geeky or adventurous, you might be interested in trying out the latest development version, wordpress-trunk.
现在,您可以转到任何安装和实验。 您可以在www目录中找到所有这些文件。 www内有许多文件夹,但仅关注wordpress-default和wordpress-develop 。 通常,您将需要使用wordpress-default文件夹。 如果您感到有点怪异或喜欢冒险,可能会对尝试使用最新的开发版本wordpress-trunk感兴趣。
The wordpress-default installation is what you will use if you want to create a new theme or plugin. To log in to the Administration Dashboard, the default username is admin and the password is password. Head over to VVV docs for more information on default MySQL accounts and database names for each installation. Finally, the wordpress-develop installation is the folder that you will use if you want to contribute to the WordPress core.
如果要创建新主题或插件,将使用wordpress-default安装。 要登录管理控制台,默认用户名是admin ,密码是password 。 请转到VVV文档 ,以获取有关每个安装的默认MySQL帐户和数据库名称的更多信息。 最后,如果您想为WordPress核心做贡献,则将使用wordpress-develop安装文件夹。
额外的插件 (Extra Plugins)
There is a Vagrant plugin that I recommend installing to help make managing your hosts much easier. The plugin is called vagrant-hostsupdater and it updates your hosts file when you execute vagrant up, reload and resume.
我建议安装一个Vagrant插件,以帮助您更轻松地管理主机。 该插件称为vagrant-hostsupdater ,当您执行vagrant up , reload和resume时,它将更新您的主机文件。
This plugin reads the configuration for the IP address of the virtual machine and for the hostname and updates the host file accordingly. To install this plugin, execute:
该插件读取虚拟机IP地址和主机名的配置,并相应地更新主机文件。 要安装此插件,请执行:
vagrant plugin install vagrant-hostsupdater组态 (Configuration)
When Vagrant starts the installation, it firstly looks at the Vagrantfile. This file contains all of the configuration. I’m not going to cover every line, just a couple of values that I think are important.
Vagrant开始安装时,首先查看Vagrantfile 。 该文件包含所有配置。 我不会讲所有内容,仅列出一些我认为很重要的价值观。
The first value is the RAM of the VM. By default it’s 512 MB. If you want more, just change this value to a higher one:
第一个值是VM的RAM。 默认情况下为512 MB。 如果需要更多,只需将此值更改为更高的值即可:
v.customize ["modifyvm", :id, "--memory", 512]The second value that I found important is the IP configuration. This is the IP address that the VM will use by default. If you experience any networking issues, here’s where you can change the default value of the IP address:
我发现重要的第二个值是IP配置。 这是VM默认使用的IP地址。 如果遇到任何网络问题,可以在此处更改IP地址的默认值:
config.vm.network :private_network, ip: "192.168.50.4"The last value is the config folder. This config maps 2 folders, the config folder is on host and /srv/config is on the VM:
最后一个值是config文件夹。 此配置映射2个文件夹, config文件夹位于主机上, / srv / config位于VM上:
config.vm.synced_folder "config/", "/srv/config"In the config folder you’ll find the configuration of PHP, WordPress, MySQL, nginx and more. After updating the Vagrantfile, make sure to provision this with vagrant provision. This way all of the changes will be applied.
在config文件夹中,您将找到PHP,WordPress,MySQL,nginx等的配置。 更新Vagrantfile之后,请确保使用vagrant provision 。 这样,所有更改都将被应用。
进一步阅读 (Further Reading)
If you’re interested in learning more about Vagrant and VVV, here are few links for further reading:
如果您有兴趣了解有关Vagrant和VVV的更多信息,请点击以下链接以进一步阅读:
结论 (Conclusion)
As you can see, Varying Vagrant Vagrants is focused on providing the perfect development environment for theme and plugin developers, as well as WordPress core contributors. The tools that VVV offers are powerful and geared towards building high performance sites.
如您所见,Varying Vagrant Vagrants致力于为主题和插件开发人员以及WordPress核心贡献者提供理想的开发环境。 VVV提供的工具功能强大,可用于构建高性能站点。
VVV might be a bit overwhelming for beginners, but the time it can save WordPress developers makes it well worth learning.
VVV对于初学者来说可能有点不知所措,但是它可以节省WordPress开发人员的时间使其值得学习。
What do you think about VVV? Do you have experience using it? Do you recommend another Vagrant configuration? Let us know in the comments below.
您如何看待VVV? 您有使用经验吗? 您是否推荐其他Vagrant配置? 在下面的评论中让我们知道。


 被折叠的 条评论
为什么被折叠?
被折叠的 条评论
为什么被折叠?
 到【灌水乐园】发言


