


javascript进度条
A problem that has plagued web developers for years is how to add real-time information to their applications, such as a progress bar for file uploads. Users are impatient; they don’t want to sit and wait while the browser is doing something and wonder whether it has frozen or if they have a slow connection. Providing a progress indicator gives users useful information and lets them know exactly what’s going on.
困扰Web开发人员多年的问题是如何向其应用程序添加实时信息,例如文件上传的进度条。 用户不耐烦; 他们不想坐下来等浏览器正在做某事时想知道它是否已冻结或连接速度是否很慢。 提供进度指示器可为用户提供有用的信息,并让他们确切地了解正在发生的事情。
At first thought, you might think accomplishing this can be done easily by first obtaining the file’s size from the user’s computer and then performing some simple calculations against the directory on the server where the file is being uploaded to. On second thought, you’d find things aren’t quite that simple.
乍一看,您可能会认为可以很容易地做到这一点,方法是先从用户计算机上获取文件的大小,然后对要上传文件的服务器上的目录执行一些简单的计算。 细想一下,您会发现事情并不是那么简单。
JavaScript can access a file’s name, type, and even the width and height of a local image, but it wasn’t until HTML5 that it could access a file’s size. Unfortunately, HTML5 still isn’t a completed standard yet and isn’t uniformly supported across all browsers. An alternate solution is to rely on a Flash, Java, or ActiveX plugin; no thanks, I’ll pass. Yet another solution is to install the Alternative PHP Cache extension, but that may not be available depending on your hosting environment and it seems like overkill for such a small task such as this.
JavaScript可以访问文件的名称,类型,甚至可以访问本地图像的宽度和高度,但是直到HTML5才可以访问文件的大小 。 不幸的是,HTML5仍不是一个完整的标准,并且并非所有浏览器都统一支持。 另一种解决方案是依靠Flash,Java或ActiveX插件。 不用了,我会过去的。 还有另一种解决方案是安装Alternative PHP Cache扩展,但是可能无法使用,具体取决于您的托管环境,对于这样的小任务来说似乎有些过头了。
It would seem as though all the options are fraught with nuisances and the task has quickly become a headache. But in the words of Yoda, “No… There is another.”
似乎所有的选择都充满了麻烦,任务很快就变得头疼。 但是用尤达的话来说,“不……还有另一个。”
One of the many reasons I love PHP is that it makes seemingly difficult tasks easy. As of PHP 5.4, they’ve done it again with a new set of configuration directives, session.upload_progress.
我喜欢PHP的许多原因之一是它使看似困难的任务变得容易。 从PHP 5.4开始,他们使用一组新的配置指令session.upload_progress再次进行了此操作。
In this article I’ll show you how this feature can be used to create a simple upload progress bar without any external libraries or browser dependencies. I’ll first discuss how it works, and then I’ll walk you through creating the four files needed to accomplish the task (an upload form, some JavaScript, a little CSS, and a file to return the status of the upload).
在本文中,我将向您展示如何使用此功能来创建简单的上传进度栏,而无需任何外部库或浏览器依赖性。 我将首先讨论它的工作原理,然后引导您创建完成任务所需的四个文件(一个上载表单,一些JavaScript,一些CSS和一个用于返回上载状态的文件)。
会话上传进度 (Session Upload Progress)
Besides the usual requirements to allow file uploads, there are two more to track the progress. The session.upload_progress.enabled directive must be enabled and there must be a hidden field in your web form with the name specified by the session.upload_progress.name directive. When session.upload_progress.enabled is true (as it is by default in PHP 5.4 and presumably beyond) and $_POST[session.upload_progress.name] is sent during an upload, information about the file transfer is made available in the $_SESSION superglobal array.
除了允许文件上传的通常要求之外,还有两个其他条件可以跟踪进度。 必须启用session.upload_progress.enabled指令,并且您的Web表单中必须有一个隐藏字段,其名称由session.upload_progress.name指令指定。 如果session.upload_progress.enabled为true(在PHP 5.4中默认是默认值,并且可能是更高版本)并且在上载期间发送了$_POST[ session.upload_progress.name ]则有关文件传输的信息将在$_SESSION超级全局变量中提供。数组。
The print_r() output of the $_SESSION array will look similar to the following during a file transfer:
在文件传输期间, $_SESSION数组的print_r()输出将类似于以下内容:
Array
(
    [upload_progress_myForm] => Array
        (
            [start_time] => 1323733740
            [content_length] => 721127769
            [bytes_processed] => 263178326
            [done] =>
            [files] => Array
                (
                    [0] => Array
                        (
                            [field_name] => userfile
                            [name] => ubuntu-10.04.3-desktop-i386.iso
                            [tmp_name] =>
                            [error] => 0
                            [done] =>
                            [start_time] => 1323733740
                            [bytes_processed] => 263178026
                        )
                )
        )
)
When you are developing either locally or on a fast network and upload small files, you won’t be able to visually observe the progress because the transfer happens so fast. In this case, you might want to try transferring a large file. Make sure the settings in your php.ini file allow large uploads, specifically the post_max_size and upload_max_filesize directives, and then verify they are sane values when you go to production.
当您在本地或快速网络上进行开发并上传小文件时,由于传输如此之快,您将无法直观地观察进度。 在这种情况下,您可能想要尝试传输大文件。 确保php.ini文件中的设置允许进行较大的上传,特别是post_max_size和upload_max_filesize指令,然后在进行生产时验证它们是否是合理的值。
创建表格 (Create the Form)
The first file I’ll present is the upload form. Just to keep things as simple as possible, the example will post to itself and only handle one file upload at a time. Additionally, I won’t bother saving the file after it has been uploaded.
我要提交的第一个文件是上传表单。 为了使事情尽可能简单,该示例将发布到其自身,并且一次仅处理一个文件上传。 此外,上传文件后,我将不会再保存文件。
Here’s the code for form.php:
这是form.php :
<?php
if ($_SERVER["REQUEST_METHOD"] == "POST" && !empty($_FILES["userfile"])) {
    // move_uploaded_file()
}
?>
<html>
 <head>
  <title>File Upload Progress Bar</title>
  <link rel="stylesheet" type="text/css" href="style.css">
 </head>
 <body>
  <div id="bar_blank">
   <div id="bar_color"></div>
  </div>
  <div id="status"></div>
  <form action="<?php echo $_SERVER["PHP_SELF"]; ?>" method="POST"
   id="myForm" enctype="multipart/form-data" target="hidden_iframe">
   <input type="hidden" value="myForm"
    name="<?php echo ini_get("session.upload_progress.name"); ?>">
   <input type="file" name="userfile"><br>
   <input type="submit" value="Start Upload">
  </form>
  <iframe id="hidden_iframe" name="hidden_iframe" src="about:blank"></iframe>
  <script type="text/javascript" src="script.js"></script>
 </body>
</html>
In the example the code to actually process the file has been omitted to keep things simple. If you’re interested in what such code should look like, check out the article File Uploads with PHP by Timothy Boronczyk.
在此示例中,省略了实际处理文件的代码,以使事情保持简单。 如果您对此类代码的外观感兴趣,请查看 Timothy Boronczyk的文章PHP的文件上传 。
After the head section which provides the page’s title and includes the stylesheet, you’ll notice a small collection of div elements. The div with the ID “bar_blank” is the container for the progress bar. The div with the ID “bar_color” will be dynamically updated as the file upload progresses. The “status” div will display the numeric value of the percent uploaded.
在提供页面标题并包括样式表的标题部分之后,您会注意到一小部分div元素集合。 ID为“ bar_blank”的div是进度条的容器。 ID为“ bar_color”的div将随着文件上传的进行动态更新。 “状态” div将显示上载百分比的数值。
The form is set to submit to the same URL and its target attribute points to a hidden iframe element. Submitting a form to a hidden frame allows you to keep the visitor on the same page while the work is being done in the background. In fact, this is a common practice when doing “Ajax file uploads” since it isn’t possible to send the contents of a file directly using JavaScript’s XmlHttpRequest object.
表单设置为提交到相同的URL,并且其target属性指向隐藏的iframe元素。 将表单提交到隐藏的框架后,您可以在后台进行工作时将访问者保持在同一页面上。 实际上,这是“ Ajax文件上传”时的一种常见做法,因为不可能直接使用JavaScript的XmlHttpRequest对象发送文件的内容。
Within the form, the special hidden field needed to populate the $_SESSION array appears, followed by a file upload input and submit button. Submitting the form will trigger a JavaScript function named startUpload() which will be defined by the included JavaScript file.
在表单中,将显示填充$_SESSION数组所需的特殊隐藏字段,然后显示文件上载输入和提交按钮。 提交表单将触发一个名为startUpload()JavaScript函数,该函数将由包含JavaScript文件定义。
At the bottom of the page is the hidden frame to which the form will post and the import of the script.js file.
页面底部是表单将发布到的隐藏框架以及script.js文件的导入。
添加一些样式 (Add Some Style)
The next file, style.css, is pretty straight-forward. I’ve defined the size of the progress bar container and given it a 1px black border, the color of the progress bar as it’s loading, and both the iframe and the progress bar are hidden.
下一个文件style.css非常简单。 我已经定义了进度条容器的大小,并为其指定了1px的黑色边框,进度条在加载时的颜色以及iframe和进度条都被隐藏了。
#bar_blank {
  border: solid 1px #000;
  height: 20px;
  width: 300px;
}

#bar_color {
  background-color: #006666;
  height: 20px;
  width: 0px;
}

#bar_blank, #hidden_iframe {
  display: none;
}
客户端功能 (Client-Side Functionality)
The script.js file is the largest of the group of files. It contains six functions which I will discuss below. Many people like to use jQuery to provide some of the functionality here, and you are certainly free to do so if you wish, but I personally prefer the old-school approach. Similar to how the Japanese place a higher value on hand crafted goods, I just feel more passionate about the code if it is my own.
script.js文件是文件组中最大的文件。 它包含六个功能,我将在下面讨论。 许多人喜欢使用jQuery在此处提供某些功能,如果您愿意,您当然可以这样做,但是我个人更喜欢老式的方法。 与日本人如何在手工制品上赋予更高的价值类似,如果代码是我自己的,我只会对代码更感兴趣。
function toggleBarVisibility() {
    var e = document.getElementById("bar_blank");
    e.style.display = (e.style.display == "block") ? "none" : "block";
}

function createRequestObject() {
    var http;
    if (navigator.appName == "Microsoft Internet Explorer") {
        http = new ActiveXObject("Microsoft.XMLHTTP");
    }
    else {
        http = new XMLHttpRequest();
    }
    return http;
}

function sendRequest() {
    var http = createRequestObject();
    http.open("GET", "progress.php");
    http.onreadystatechange = function () { handleResponse(http); };
    http.send(null);
}

function handleResponse(http) {
    var response;
    if (http.readyState == 4) {
        response = http.responseText;
        document.getElementById("bar_color").style.width = response + "%";
        document.getElementById("status").innerHTML = response + "%";

        if (response < 100) {
            setTimeout("sendRequest()", 1000);
        }
        else {
            toggleBarVisibility();
            document.getElementById("status").innerHTML = "Done.";
        }
    }
}

function startUpload() {
    toggleBarVisibility();
    setTimeout("sendRequest()", 1000);
}

(function () {
    document.getElementById("myForm").onsubmit = startUpload;
})();
The toggleBarVisibility() function sets an appropriate style on the “bar_blank” div to show or hide the progress bar as needed. Initially it starts out hidden, but will be displayed once an upload starts and hidden again when an upload finishes.
toggleBarVisibility()函数在“ bar_blank” div上设置适当的样式,以根据需要显示或隐藏进度条。 最初它最初是隐藏的,但是一旦上传开始就会显示,并在上传完成后再次隐藏。
The createRequestObject() function creates an XMLHttpRequest or ActiveXObject object based on the user’s browser. This is probably the function most people would look to jQuery or some other JavaScript framework to provide.
createRequestObject()函数基于用户的浏览器创建XMLHttpRequest或ActiveXObject对象。 这可能是大多数人希望jQuery或其他JavaScript框架提供的功能。
The sendRequest() function requests the progress.php file with a GET request, and then invokes the handleResponse() function to handle the returned data.
sendRequest()函数使用GET请求来请求progress.php文件,然后调用handleResponse()函数来处理返回的数据。
The handleResponse() function handles the response from progress.php which will be a number between 1-100 depending on the file upload progress. I also update the “status” div with the appropriate value. If the current percent is below 100 then I call JavaScript’s native setTimeout() function to send another request for an update after 1 second (you may want to adjust this value as appropriate), otherwise I hide the progress bar again and set the status to “Done.”
handleResponse()函数处理来自progress.php的响应,该响应的范围为1-100,具体取决于文件的上传进度。 我还使用适当的值更新了“状态” div。 如果当前百分比低于100,则我调用JavaScript的本机setTimeout()函数在1秒后发送另一个更新请求(您可能希望适当地调整此值),否则我再次隐藏进度栏并将状态设置为“完成。”
The startUpload() function makes the upload bar visible and sends a request for an update after a delay of 1 second. This small delay is needed in order to give the upload time to start.
startUpload()函数使上传栏可见,并在延迟1秒后发送更新请求。 为了给上载时间开始,需要这个小的延迟。
The final function is a self-executing anonymous function which registers startUpload() with the form’s submit event.
最后一个函数是一个自执行的匿名函数,该函数将startUpload()与表单的startUpload()事件一起注册。
实时进度 (Real-Time Progress)
The last file that brings everything together is the progress.php file:
将所有内容组合在一起的最后一个文件是progress.php文件:
<?php
session_start();

$key = ini_get("session.upload_progress.prefix") . "myForm";
if (!empty($_SESSION[$key])) {
    $current = $_SESSION[$key]["bytes_processed"];
    $total = $_SESSION[$key]["content_length"];
    echo $current < $total ? ceil($current / $total * 100) : 100;
}
else {
    echo 100;
}
The script performs some simple math on the current number of bytes transferred divided by the total file size, multiplied by 100 and rounded off to give a percent.
该脚本对当前传输的字节数除以文件总大小,再乘以100并四舍五入得到百分比,执行一些简单的数学运算。
Information about the transfer is keyed with a concatenation of the session.upload_progress.prefix directive’s value and the hidden session.upload_progress.name field’s value. Because my form passed “myForm”, the session’s key is determined with ini_get("session.upload_progress.prefix") . "myForm".
有关传输的信息以session.upload_progress.prefix指令的值和隐藏的session.upload_progress.name字段的值的串联键输入。 因为我的表单通过了“ myForm”,所以会话的键由ini_get("session.upload_progress.prefix") . "myForm" ini_get("session.upload_progress.prefix") . "myForm" 。
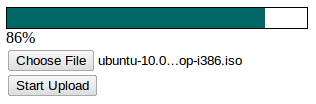
Here’s a screenshot of the progress bar in action:
这是进度条的屏幕截图:
微调行为 (Fine-Tuning the Behavior)
PHP provides some additional directives to help fine-tune the behavior of session uploads you should be aware of. For example, session.upload_progress.cleanup, which is set to 1 by default, cleans up the extra session data immediately after the upload has finished. You need to be careful to avoid a potential race condition.
PHP提供了一些其他指令,以帮助微调您应注意的会话上传行为。 例如, session.upload_progress.cleanup (默认设置为1)在上载完成后立即清除多余的会话数据。 您需要注意避免潜在的比赛情况。
Take a look again at the code in progress.php and you’ll notice that I check to see if $_SESSION[$key] is empty or not before proceeding. My JavaScript functions fire off every second as long as the result returned from progress.php is less than 100. If session.upload_progress.cleanup is enabled and my script fetches 99% of the upload and a 1/2-second later the upload finishes, $_SESSION[$key] would not exist for the next check. If I didn’t take that into consideration then my JavaScript function might keep firing, even after the upload finished.
再看一下progress.php中的代码,您会注意到在继续之前,我检查了$_SESSION[$key]是否为空。 只要从progress.php返回的结果小于100,我JavaScript函数就会每秒触发一次。如果启用了session.upload_progress.cleanup ,并且我的脚本提取了99%的上传内容,并且1/2秒后上传完成,下一次检查将不存在$_SESSION[$key] 。 如果我不考虑这一点,那么即使上传完成后,我JavaScript函数也可能会继续触发。
Another two directives are session.upload_progress.freq and session.upload_progress.min_freq which both determine how often the session should be updated. The value of freq can be given in either bytes (i.e., 100) or the percentage of total bytes (i.e., 2%). The value of min_freq is given in seconds and indicates the minimum number of seconds between updates. Obviously if min_freq was set to update every 1 second, it would be pointless for your JavaScript to check every 100 milliseconds.
另外两个指令是session.upload_progress.freq和session.upload_progress.min_freq ,它们都确定应该多久更新一次会话。 freq的值可以字节(即100)或总字节数(即2%)的形式给出。 min_freq的值以秒为单位,表示min_freq更新之间的最小秒数。 显然,如果将min_freq设置为每1秒更新一次,则JavaScript每100毫秒检查一次将毫无意义。
摘要 (Summary)
You should now have a solid grasp on how to create a progress bar for file uploads using the session upload progress feature. Moving forward, I encourage you to experiment with uploading multiple files, giving the option to cancel an upload in progress using $_SESSION[$key]["cancel_upload"], or whatever other ideas your mind can muster. Please share in the comments your experiences and improvements you’ve made for others to benefit from and enjoy as well!
现在,您应该掌握如何使用会话上载进度功能为文件上载创建进度条的扎实知识。 展望未来,我鼓励您尝试上载多个文件,并提供使用$_SESSION[$key]["cancel_upload"]或其他任何想法可以取消正在进行的上载的选项。 请在评论中分享您的经验和改进,让其他人从中受益并享受!
Image via file404 / Shutterstock
翻译自: https://www.sitepoint.com/tracking-upload-progress-with-php-and-javascript/
javascript进度条


 3231
3231

 被折叠的 条评论
为什么被折叠?
被折叠的 条评论
为什么被折叠?
 到【灌水乐园】发言


