phing
Phing is a PHP project build tool based on Apache Ant. A build system helps you to perform a group of actions using a single command. If you’re wondering why PHP needs a build tool, consider a work flow where you write code and unit tests on your local machine, and if the tests pass you upload the code to staging/production server and make any changes to the production database. Without a build file, you’ll need to go through each step manually. If you are doing continuous integration, you’ll be doing the same steps over and over again. It’s too easy to accidentally omit something in the process and end up with serious problem in production. Phing helps overcome such issues by automating tasks like running unit tests, applying database changes, deploying application code, etc. In this article I’ll show you some of the basics of working with Phing.
Phing是一个基于Apache AntPHP项目构建工具。 构建系统可帮助您使用单个命令执行一组操作。 如果您想知道为什么PHP需要构建工具,请考虑在本地计算机上编写代码和单元测试的工作流程,如果测试通过,则将代码上传到登台/生产服务器并对生产数据库进行任何更改。 如果没有构建文件,则需要手动完成每个步骤。 如果您要进行持续集成,则将一遍又一遍地执行相同的步骤。 在过程中意外遗漏某些东西并最终导致生产中的严重问题太容易了。 Phing通过自动执行诸如运行单元测试,应用数据库更改,部署应用程序代码等任务来帮助克服此类问题。在本文中,我将向您展示使用Phing的一些基础知识。
If you don’t have it already, you can install Phing using PEAR:
如果还没有,可以使用PEAR安装Phing:
shameer@yukon:~$ sudo pear channel-discover pear.phing.info
shameer@yukon:~$ sudo pear install phing/phing
If you wish to use tasks like PHPUnit or PhpDocumentor then you’ll also need to install the dependent packages.
如果您想使用PHPUnit或PhpDocumentor之类的任务,那么您还需要安装相关的软件包 。
Phing Hello World (Phing Hello World)
To show you how easy it is to create build files for Phing, let’s start with a “Hello World” build file. First create your project directory, and then inside it create a file named build.xml with the following contents:
为了向您展示为Phing创建构建文件有多么容易,让我们从“ Hello World”构建文件开始。 首先创建您的项目目录,然后在其中创建一个名为build.xml的文件,其中包含以下内容:
<?xml version="1.0" encoding="UTF-8"?>
<project name="HelloWorld" default="welcome" basedir="." description="a demo project">
 <property name="message" value="Hello World!"/>
 <target name="welcome">
  <echo msg="${message}"/>
 </target>
</project>
From the command line, navigate into the directory and run phing.
在命令行中,导航到目录并运行phing 。
shameer@yukon:~/HelloWorld$ phing
Buildfile: /home/shameer/HelloWorld/build.xml

HelloWorld > welcome:

     [echo] Hello World!

BUILD FINISHED

Total time: 0.2275 seconds
The <project> element is the root element of the build file. The attribute default is required and specifies the default target to invoke if one isn’t supplied on the command line. Apart from that, you can also specify the project name, project base directory, and a description to help keep things organized.
<project>元素是构建文件的根元素。 该属性default是必需的,它指定如果命令行上未提供默认目标,则调用该默认目标。 除此之外,还可以指定项目名称,项目基本目录和描述,以帮助保持组织。
The <target> element represents a named group of tasks that can be performed. For example, different targets might be defined to perform a backup or to update the database. A target can also be dependent upon another targets which must be performed before executing.
<target>元素代表可以执行的命名任务组。 例如,可能定义了不同的目标来执行备份或更新数据库。 一个目标还可以依赖于在执行之前必须执行的另一个目标。
The <echo> element is a task, a single action that can be performed. There are number of core tasks in Phing which range from simple tasks like creating a directory to more complex tasks like performing XSLT transformations. You’re not limited to the tasks Phing provides, though; you can also create custom tasks.
<echo>元素是一项任务,可以执行一个动作。 Phing中有许多核心任务,范围从创建目录的简单任务到执行XSLT转换的更复杂的任务。 您不仅限于Phing提供的任务; 您还可以创建自定义任务。
The <property> element defines named values which can be used later throughout the build file. To reference the value of a property, specify it’s name between “${” and “}“. Keep in mind property names are case sensitive in Phing.
<property>元素定义命名的值,以后可在整个构建文件中使用。 要引用属性的值,请在“ ${ ”和“ } ”之间指定其名称。 请记住,属性名称在Phing中区分大小写。
It’s not mandatory that you name your build file build.xml, but Phing will look for this name by default. If you use another name then you’ll need to specify the build file as an argument to the phing command, for example:
将构建文件命名为build.xml并不是强制性的,但是Phing默认会寻找该名称。 如果使用其他名称,则需要将构建文件指定为phing命令的参数,例如:
shameer@yukon:~/HelloWorld$ phing hello.xml
You can also invoke targets other than just the default by providing one or more target names in command line:
您还可以通过在命令行中提供一个或多个目标名称来调用默认目标以外的目标:
shameer@yukon:~/HelloWorld$ phing hello.xml target1
多个目标 (Multiple Targets)
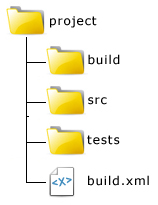
Let’s amend the build script and add additional targets. For the sake of example, I’ll assume the following directory structure is in place for the project:
让我们修改构建脚本并添加其他目标。 为了举例说明,我将为项目准备以下目录结构:

Update build.xml so it now looks like this:
更新build.xml ,使其现在如下所示:
<?xml version="1.0" encoding="UTF-8"?>
<project name="HelloWorld" default="welcome" basedir="." description="a demo project">
 <property name="message" value="Hello World!"/>
 <property name="buildDir" value="build"/>
 <property name="srcDir" value="src"/>
 <property name="ftp.host" value="ftp.example.com"/>
 <property name="ftp.port" value="21"/>
 <property name="ftp.username" value="user"/>
 <property name="ftp.password" value="password"/>
 <property name="ftp.dir" value="/public_html/"/>
 <property name="ftp.mode" value="ascii"/>

 <target name="welcome">
  <echo msg="${message}"/>
 </target>

 <target name="test">
  <phpunit printsummary="true" haltonfailure="true">
   <batchtest>
    <fileset dir="./tests">
     <include name="*Test.php"/>
    </fileset>
   </batchtest>
  </phpunit>
 </target>

 <fileset id="srcfiles">
  <include name="*"/>
  <exclude name="*.tmp"/>
 </fileset>

 <target name="build" depends="test">
  <echo msg="Copying to build directory..."/>
  <copy todir="${buildDir}">
  <fileset refid="srcfiles"/>
  </copy>
 </target>

 <ftpdeploy
  host="${ftp.host}"
  port="${ftp.port}"
  username="${ftp.username}"
  password="${ftp.password}"
  dir="${ftp.dir}"
  mode="${ftp.mode}">
  <fileset refid="srcfiles"/>
 </ftpdeploy>
</project>
Two targets have been added, test and build, and the default target has been changed to build. Now when you run Phing from the project directory it will call the build target and, since this target depends on the test target, Phing will run the test target first. The <phpunit> task invokes PHPUnit. Because the build process should not continue if any of the unit tests fail, its
haltonfailure attribute has been set true.
<batchtest> gets the files to be included from any number of nested
<fileset> elements.
添加了两个目标,即测试和构建,并且默认目标已更改为构建。 现在,当您从项目目录运行Phing时,它将调用build目标,并且由于该目标取决于test目标,因此Phing将首先运行test目标。 <phpunit>任务调用PHPUnit。 因为如果任何单元测试都失败,则构建过程不应继续,因此
haltonfailure属性已设置为true。
<batchtest>从任意数量的嵌套
<fileset>元素中获取要包含的
<fileset> 。
After the unit tests run successfully, the build target copies files specified in its <fileset> to the destination directory using <copy>. Notice that instead of giving the filenames here a refid is used. This references the <fileset> declared earlier with the ID srcfiles. It’s helpful to define a file set and reference it like this when you have complex regular expressions or need to refer to the same files in several places.
单元测试成功运行后,构建目标使用<copy>在其<fileset>指定的<fileset> <copy>到目标目录。 请注意,这里使用的是refid而不是文件名。 这引用了先前用ID srcfiles声明的<fileset> 。 当您具有复杂的正则表达式或需要在多个位置引用相同的文件时,定义文件集并像这样引用它很有帮助。
The <ftpdeploy> task connects to a remote server using FTP with the given credentials and transfers the files specified by the file set.
<ftpdeploy>任务使用给定的凭据使用FTP连接到远程服务器,并传输文件集指定的文件。
摘要 (Summary)
In this article I introduced you to the PHP build tool Phing. There is much more to Phing than what I discussed here, for example you can use it to help with database migrations. I recommend reading Phing’s excellent documentation to see all of what this powerful tool can do.
在本文中,我向您介绍了PHP构建工具Phing。 除了我在这里讨论的内容外,Phing还有很多其他功能,例如,您可以使用它来帮助数据库迁移 。 我建议阅读Phing的出色文档,以了解此功能强大的工具可以完成的所有工作。
Image via Dino O / Shutterstock
图片来自Dino O / Shutterstock
phing


 5614
5614


 被折叠的 条评论
为什么被折叠?


