


This article was originally published in February 2015, and was updated in 2018 to adjust the version, as well as other minor edits and additions.
本文最初发表于2015年2月,并于2018年进行了更新以调整版本以及其他较小的修改和补充。
网页图标 (Web Icons)
Users arriving at a website are focused as much on the visual design of a website as they are on the content they are hoping to find there.
到达网站的用户将注意力集中在网站的视觉设计上,而将注意力集中在希望在网站上找到的内容上。
Traditionally, designers and developers have used individual images/sprite-sheets for their icons; these graphics were a series of pixel-perfect images that would be used in specific parts of the site (such as in the search bar, on navigational elements, as loading icons, etc).
传统上,设计人员和开发人员使用单独的图像/精灵表作为图标。 这些图形是一系列像素完美的图像,将在网站的特定部分使用(例如,在搜索栏中,在导航元素上,作为加载图标等)。
Displaying icons with images/sprites worked well for a long time (and many websites will still use them). However, with the focus on responsive design more important than ever, the challenge has been providing stunning iconography that looks great regardless of your device.
长时间显示带有图像/精灵的图标效果很好(许多网站仍会使用它们)。 但是,由于对响应式设计的关注比以往更加重要,因此面临的挑战是提供令人惊叹的图像,无论您使用哪种设备,该图像看起来都很棒。
什么是字体图标? (What Are Font Icons?)
Font icons are a way in which we can display fully responsive, customizable icons on our website without the use of additional images or sprite-sheets.
字体图标是一种我们可以在我们的网站上显示完全响应的,可自定义的图标的方式,而无需使用其他图像或子图形表。
Font icons are exactly what they sound like, a font made up entirely of icons.
字体图标完全像它们的声音一样,完全由图标组成的字体。
Where a normal font defines characters such as ‘a’, ‘b’, ‘c’, an icon font defines characters that are symbols, such as the search symbol, the menu toggle symbol, and a whole heap of others — all in one font.
普通字体定义了诸如“ a”,“ b”,“ c”之类的字符,而图标字体则定义了作为符号的字符,例如搜索符号,菜单切换符号以及其他所有符号-全部合而为一字体。
为什么要使用字体图标? (Why Would I Use Font Icons?)
Traditional images have worked well historically, but icon fonts give us a greater amount of flexibility and let us more easily manage our icons, and do so with responsiveness and ease.
传统图像在历史上一直运行良好,但是图标字体为我们提供了更大的灵活性,并让我们更轻松地管理图标,并且做到了响应Swift和轻松。
字体图标完全响应 (Font Icons are Fully Responsive )
- These icons are vectors and can be scaled to any size without any loss of quality. 这些图标是矢量,可以缩放到任意大小而不会降低质量。
- Traditional images are raster images and created at a set size/dimension (usually based on a grid such as 48×48) These images can look awful when resized or when viewed on a high resolution device. 传统图像是光栅图像,并以设置的大小/尺寸(通常基于诸如48×48的网格)创建。这些图像在调整大小或在高分辨率设备上查看时可能看起来很糟糕。
可以设置字体图标的样式,位置和操作 (Font Icons can be styled, positioned and manipulated)
- Font icons can be controlled as if they were typical fonts; you can set their color, background color, text alignment, line height and other attributes to style them using CSS. 可以将字体图标视为典型字体进行控制。 您可以设置它们的颜色,背景颜色,文本对齐方式,行高和其他属性,以使用CSS设置样式。
- Traditional images don’t give you fine control. If you want an image to be slightly different in color or size, you will need to upload a different image. 传统图像无法很好地控制您。 如果您希望图像的颜色或大小略有不同,则需要上传其他图像。
字体图标可跨浏览器使用,并且数量众多 (Font Icons are Cross-Browser and Abundantly Available)
- Font Icons have deep compatibility all the way back to ancient browsers (I’m looking at you, IE6) 字体图标具有与旧版浏览器的高度兼容性(我正在看着您,IE6)
- There are dozens of great icon fonts that designers have spent countless hours on; these fonts are usually updated frequently and refined to provide the best experience. 设计师花了无数小时来使用数十种出色的图标字体。 这些字体通常会经常更新和完善以提供最佳体验。
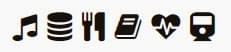
Here is a random example of an icon font; no images required.
这是图标字体的随机示例; 不需要图像。
With all the great free icon fonts out there, very little reason exists to use traditional images for icons anymore. However, there are still some debatable downsides to icon fonts.
有了所有出色的免费图标字体,现在几乎没有理由再使用传统图像作为图标了。 但是,图标字体仍有一些值得商bat的缺点。
Browser and OS differences – Because these are fonts, it’s up to the browser how it renders the icons (there are subtle variations between each OS, between browsers, and even between different versions of the same browser). Traditional images, however, look the same regardless of what they are viewed on.
浏览器和操作系统的差异 –因为它们是字体,所以由浏览器决定图标的呈现方式(每个操作系统之间,浏览器之间,甚至同一浏览器的不同版本之间都有细微的差异)。 但是,无论观看什么图像,传统图像看起来都一样。
Not every icon exists – Designers have covered most of the icons you will need in your projects; however, not all icons imaginable have been created, and so you may find yourself having to rely on images in some situations.
并非每个图标都存在 –设计师已经涵盖了您项目中所需的大多数图标。 但是,并非可以想象的所有图标都已创建,因此在某些情况下您可能会发现自己不得不依赖图像。
使真棒字体进入您的WordPress项目 (Getting Font Awesome into Your WordPress Project)
Font Awesome is included in thousands of projects across the Internet, including WordPress themes (such as SitePoint’s own Base Theme) and plugins. Integrating Font Awesome with WordPress, be it a theme or plugin, is exceptionally easy and requires just a few steps to get up and running.
Font Awesome包含在Internet上的数千个项目中,包括WordPress主题(例如SitePoint自己的Base Theme )和插件。 将Font Awesome与WordPress集成在一起,无论是主题还是插件,都非常容易,并且仅需几个步骤即可启动和运行。
There are dozens of icon fonts to use, but for this tutorial I will be using Font Awesome as they have hundreds of really amazing icons. We will be using version 5.4 of Font Awesome.
有数十种图标字体可以使用,但是在本教程中,我将使用“ 真棒字体”,因为它们有数百个非常惊人的图标。 我们将使用Font Awesome的5.4版。
使用很棒的字体的本地或外部副本 (Use a Local or External Copy of Font Awesome)
There are two main options for getting Font Awesome in your project; you can either load the files on your web server or just link to the externally hosted stylesheet on a CDN.
在您的项目中有两个主要选项可用于获取“真棒字体”; 您可以将文件加载到Web服务器上,也可以仅链接到CDN上的外部托管样式表。
下载真棒字体并手动添加字体/ CSS (Download Font Awesome and Include the Fonts/CSS Manually)
Click the download link on the Font Awesome home page and get the zip file. Inside the zip file, you will see the fonts and the required CSS file (there are also LESS/Sass files but we are not going to be using them).
单击Font Awesome主页上的下载链接,并获取zip文件。 在zip文件中,您会看到字体和所需CSS文件(也有LESS / Sass文件,但我们不会使用它们)。
Your zip file should have the following resources that you will need to move over to your project (move them into their own applicable directories via FTP). Create a directory in your theme or plugin called ‘fonts’ and another called ‘css’ and move the files into these directories.
您的zip文件应具有以下资源,您需要将这些资源移到您的项目中(通过FTP将其移至它们自己的适用目录中)。 在主题或插件中创建一个名为“ fonts”的目录,然后再创建一个名为“ css”的目录,然后将文件移动到这些目录中。
Go into your theme’s functions.php and create a new function that we will use to load our stylesheet. Create a function and attach it to the wp_enqueue_scripts action. Once you have this function call the wp_enqueue_style function and load your stylesheet.
进入主题的functions.php并创建一个新函数,我们将使用该函数来加载样式表。 创建一个函数并将其附加到wp_enqueue_scripts操作。 使用此函数后,请调用wp_enqueue_style函数并加载样式表。
//enqueues our locally supplied font awesome stylesheet
function enqueue_our_required_stylesheets(){
	wp_enqueue_style('font-awesome', get_stylesheet_directory_uri() . '/css/font-awesome.css');
}
add_action('wp_enqueue_scripts','enqueue_our_required_stylesheets');
链接到托管CDN (Link to a Hosted CDN)
Hosting with a third party CDN makes the process that much easier; all you need to do is create a function inside your functions.php file and attach that function to the wp_enqueue_scripts action. Inside this function you will just enqueue the stylesheet (except this time you will reference the externally hosted link):
与第三方CDN托管使该过程变得更加容易。 您需要做的就是在functions.php文件中创建一个函数,并将该函数附加到wp_enqueue_scripts操作。 在此函数内,您将只排队样式表(除了这次,您将引用外部托管的链接):
//enqueues our external font awesome stylesheet
function enqueue_our_required_stylesheets(){
	wp_enqueue_style('font-awesome', '//maxcdn.bootstrapcdn.com/font-awesome/5.4.0/css/font-awesome.min.css');
}
add_action('wp_enqueue_scripts','enqueue_our_required_stylesheets');
如何使用真棒字体(和一般的图标字体) (How to Use Font Awesome (and Icon Fonts in General))
Font Awesome can be used in two different ways. Which way you implement it is completely up to you, and the needs of your project.
可以使用两种不同的方式来使用Font Awesome。 哪种实现方式完全取决于您以及项目的需求。
伪元素(一种CSS方法) (A Pseudo Element (a CSS Method))
Using a pseudo method for adding your icon involves using the :before or:after pseudo CSS selectors to style your desired HTML element.
使用伪方法添加图标需要使用伪CSS选择器:before或:after来设置所需HTML元素的样式。
What you do is determine the element you want to apply your icon to and create a CSS style either before or after the element and manually set the icon that will be used (along with its style and design).
您要做的就是确定要向其应用图标的元素,并在该元素之前或之后创建CSS样式,然后手动设置将要使用的图标(以及其样式和设计)。
Each font in an icon font set has a unique code that represents the icon; this code is Unicode and tells the browser that you want to display the character that corresponds to this code. You would create your pseudo element and set its font to use your font icon family, and you would then set its content value.
图标字体集中的每种字体都有代表图标的唯一代码。 该代码是Unicode,它告诉浏览器您要显示与此代码相对应的字符。 您将创建伪元素并将其字体设置为使用字体图标系列,然后设置其内容值。
The main properties you need to set are content and font-family to their respective values (so that the pseudo element will appear).
您需要设置的主要属性是content和font-family为其各自的值(以便出现伪元素)。
按钮示例 (Button Example)
<!-- Here is the styling -->
<style>

.my-button{
	display: inline-block;
	padding: 8px 12px;
	background: #eee;
	border: solid 1px #D5D5D5;
}
.my-button span{
	display: inline-block;
}
.my-button span:before{
	font-family: 'FontAwesome';
	content: '\f085';
	position: relative;
	margin-right: 5px;
	font-size: 110%;
}

</style>

<!-- Here is the HTML markup -->
<div class="my-button">
	<span class="text"> Settings Menu </span>
</div>
Here is a sample of the output:
这是输出示例:
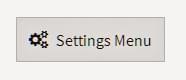
Since we wanted to display the multi gear icon we used to Unicode for that icon. Each of the Font Awesome pages will show the Unicode reference you need to include; this example the Unicode is \f085 as indicated on its sample page.
由于我们想显示多齿轮图标,因此我们习惯于对该图标进行Unicode编码。 每个Font Awesome页面都会显示您需要包含的Unicode参考。 在此示例中,Unicode是\f085 ,如其示例页面所示 。
伪元素优点 (Pseudo-Element Pros)
- You can be very specific with your designs; you set the sizing, line height, colours and styles you exactly want 您可以对自己的设计非常具体; 您可以设置所需的大小,线条高度,颜色和样式
- You don’t need to use an extra HTML element just to generate an icon (you can apply this directly to another element such as a H1 or div and then position it around the element) 您不需要仅使用额外HTML元素即可生成图标(可以将其直接应用于其他元素,例如H1或div,然后将其放置在该元素周围)
缺点 (Cons)
- Need to set everything up manually (you can’t just use a predefined Font Awesome class to make everything bigger, or rotated, or other changes) 需要手动设置所有内容(不能仅使用预定义的Font Awesome类来使所有内容变大,旋转或其他更改)
- Difficult to target with JavaScript/jQuery (since you are using a CSS method on an element, if you wanted to target an element and change an icon / swap it can’t be done; this is because you can’t target pseudo elements) 很难使用JavaScript / jQuery定位(因为您正在元素上使用CSS方法,所以如果您想定位元素并更改图标/交换,则无法完成;这是因为您无法定位伪元素)
- If Font Awesome updates their Unicode references and you update the stylesheet you might need to re-enter the Unicode values) 如果Font Awesome更新了其Unicode参考,并且您更新了样式表,则可能需要重新输入Unicode值)
内联元素(HTML方法) (An Inline Element (an HTML Method))
The simplest way to use Font Awesome is to assign the Font Awesome classes to an element.
使用Font Awesome的最简单方法是将Font Awesome类分配给元素。
When you use a font icon this way it will generate a pseudo element before/after the targeted element and generate the styling for the icon.
当您以这种方式使用字体图标时,它将在目标元素之前/之后生成一个伪元素,并生成图标的样式。
If you want to display an icon you need to assign the fa class to an item (generally elements such as i and span work the best). This class connects your item to the Font Awesome font.
如果要显示图标,则需要将fa类分配给某个项目(通常,诸如i和span这样的元素效果最好)。 此类将您的项目连接到Font Awesome字体。
Once your item has the base fa class you can then add the class name that corresponds to the icon you are trying to display; for example, if you wanted to display the camera icon you would also add the fa-camera-retro class. Choosing this corresponding icon class will look up the icon font and display its unicode character (its glyph).
一旦您的商品具有基础fa类,您就可以添加与您要显示的图标相对应的类名称; 例如,如果要显示相机图标,则还可以添加fa-camera-retro类。 选择此对应的图标类将查找图标字体并显示其unicode字符(其字形)。
<!--outputs a camera icon-->
<i class="fa fa-camera-retro"></i>
Which would render something like this:
这将导致如下所示:
Once you have your icon rendering you can create more fancy elements using additional Font Awesome classes to apply sizing, rotations, colours and styles.
渲染完图标后,您可以使用其他Font Awesome类创建更多花式元素,以应用大小,旋转,颜色和样式。
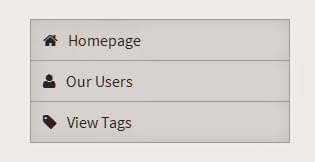
导航菜单示例 (Navigation Menu Example)
You could build a simple navigation menu using the predefined Font Awesome classes and styles:
您可以使用预定义的Font Awesome类和样式构建一个简单的导航菜单:
<!-- CSS for the menu -->
/*Base styles for a drop down*/
.nav-list .nav-item{
	display: block;
}
.nav-item .nav-link:first-child{
	border-top: solid 1px #ccc;
}
.nav-item .nav-link{
	display: block;
	padding: 8px 12px;
	background: #eee;
	border: solid 1px #ccc;
	border-top: 0px;
	color: #333;
}
.nav-link > i {
	margin-right: 10px;
}
<!--HTML for the menu -->
<nav class="menu">
<div class="nav-list">
<li class="nav-item">
<a href="/" class="nav-link">
<i class="fa fa-home fa-fw"></i>
<span>Homepage</span>
</a>
<a href="/users" class="nav-link">
<i class="fa fa-user fa-fw"></i>
<span>Our Users</span>
</a>
<a href="/tags" class="nav-link">
<i class="fa fa-tag fa-fw"></i>
<span>View Tags</span>
</a>
</li>
</ul>
</nav>This would generate a simple vertical navigation menu as shown below:
这将生成一个简单的垂直导航菜单,如下所示:
堆叠图标示例 (Stacking Icons Example)
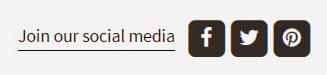
You can also stack icons together to create different looks. As an example, here is a series of social media buttons:
您还可以将图标堆叠在一起以创建不同的外观。 例如,以下是一系列社交媒体按钮:
<!--Basic CSS styling -->
.social-bar {
	text-align: center;
}
.social-bar .header{
	display: inline-block;
	margin: 0px 7px 0px 0px;
	border-bottom: solid 1px;
	font-size: 110%;
}
/*holds the front and back icons*/
.social-bar .icon{
	display: inline-block;
}
/*back (square) of the stack*/
.social-bar .icon > .back{
	background: #333;
}
/*Front (icon) of the stack*/
.social-bar .icon > .front{
	color: #fff;
}
<!--HTML for the social media elements -->
<div class="social-bar">
<p class="header">Join our social media </p>
<a href="https://www.facebook.com/">
<span class="icon fa-stack fa-lg">
<i class="back fa fa-square fa-stack-2x"></i>
<i class="front fa fa-facebook fa-stack-1x"></i>
</span>
</a>
<a href="https://twitter.com/">
<span class="icon fa-stack fa-lg">
<i class="back fa fa-square fa-stack-2x"></i>
<i class="front fa fa-twitter fa-stack-1x"></i>
</span>
</a>
<a href="https://www.pinterest.com/">
<span class="icon fa-stack fa-lg">
<i class="back fa fa-square fa-stack-2x"></i>
<i class="front fa fa-pinterest fa-stack-1x"></i>
</span>
<a>
</div>You should see a series of social media icons that look like this:
您应该看到一系列社交媒体图标,如下所示:
Stacked icons work by wrapping your icons around another element and applying the fa-stack class to it.
堆叠图标的工作原理是将图标包裹在另一个元素周围,然后将fa-stack类应用于该元素。
The icons that you want to stack will need to use the fa-stack class also. You can specify the sizing you need by using the size classes such as fa-stack-1x and fa-stack-2x so that they stack correctly together.
您要堆叠的图标也将需要使用fa-stack类。 您可以使用大小类(例如fa-stack-1x和fa-stack-2x指定所需的大小调整,以便它们正确堆叠在一起。
内联元素优点 (Inline Element Pros)
- Very simple to use. Apply the Font Awesome classes you want and then you will see your icon 使用非常简单。 应用所需的Font Awesome类,然后您将看到图标
- You can target the element itself with JavaScript/jQuery, meaning you can then add classes or remove classes to change and alter the icon displayed 您可以使用JavaScript / jQuery定位元素本身,这意味着您可以添加类或删除类来更改和更改显示的图标
- Many different styles and actions to choose from, including stacked icons, animation, sizing and positioning. All of these have been tested to ensure they work well and are cross browser complaint (you don’t have the headache of testing it all yourself) 您可以选择许多不同的样式和动作,包括堆叠的图标,动画,大小和位置。 所有这些都已经过测试,以确保它们能正常运行,并且可以跨浏览器投诉(您不必自己进行全部测试)
- Easy visual representation in the HTML to show that you are using an icon (pseudo elements can be overlooked if they are just defined in the CSS) HTML中的简单视觉表示以显示您正在使用图标(如果伪元素只是在CSS中定义,则可以忽略它们)
缺点 (Cons)
- If you require more precise control you need to apply additional styles / override the Font Awesome Classes 如果需要更精确的控制,则需要应用其他样式/覆盖“真棒字体”类
结论 (Conclusion)
Now that you know the fundamentals of getting icon fonts to work in your project, you can expand your designs and hopefully remove older image/sprite based icons in favor of these new fully responsive techniques!
现在,您已经知道使图标字体在项目中工作的基本知识,可以扩展设计并希望删除旧的基于图像/精灵的图标,而采用这些新的完全响应技术!
翻译自: https://www.sitepoint.com/using-font-awesome-with-wordpress/


 802
802

 被折叠的 条评论
为什么被折叠?
被折叠的 条评论
为什么被折叠?
 到【灌水乐园】发言


