


laravel scout
In this tutorial, we will create a minimal lyrics web site using Laravel Scout and Algolia. To do so, we need a CRUD app to work with our data, and a search interface to let users search through the content. However, instead of creating the full app from scratch, let’s just install the finished CRUD app that we’ve created for this tutorial.
在本教程中,我们将使用Laravel Scout和Algolia创建一个最小的歌词网站。 为此,我们需要一个CRUD应用程序来处理我们的数据,并需要一个搜索界面来让用户搜索内容。 但是,让我们安装从本教程创建的完成的CRUD应用程序,而不是从头开始创建完整的应用程序。
Algolia is a hosted search engine API, providing us with all the tools and resources we’ll ever need to create products with awesome search capabilities.
Algolia是一个托管的搜索引擎API,为我们提供了创建具有出色搜索功能的产品所需的所有工具和资源。

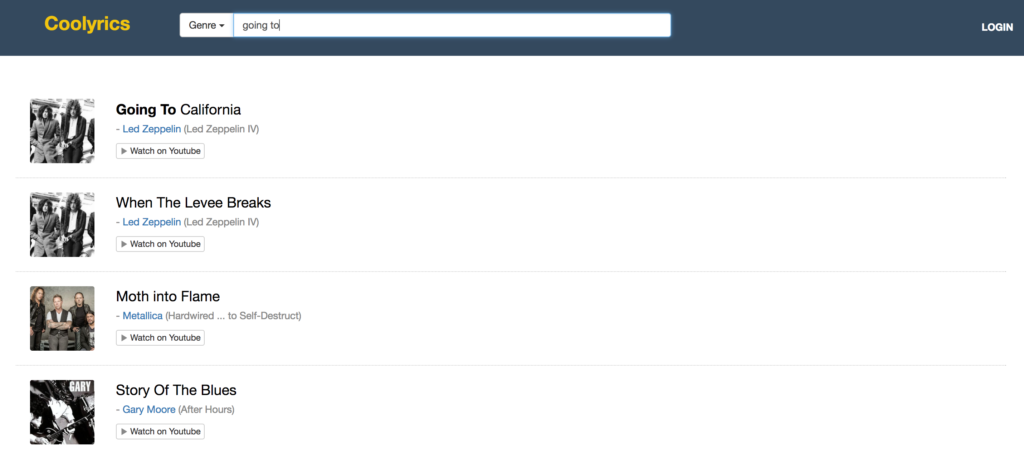
By the end of the tutorial, we’ll have a product like this:
在本教程结束时,我们将提供如下产品:
引导应用程序 (Bootstrapping the Application)
I assume you already have your development environment up and running. However, If you need a good development environment to get into action right away, you should use Homestead Improved.
我假设您已经建立并运行了开发环境。 但是,如果您需要一个良好的开发环境来立即采取行动,则应使用Homestead Enhanced 。
Stranger to Vagrant? Read this. Want to go more in depth? Buy our book on PHP Environments!
陌生人无所事事? 阅读此 。 想进一步深入吗? 购买有关PHP环境的书!
Feel free to skip this part if you already have a similar application or you have enough experience to build one relatively quickly.
如果您已经有一个类似的应用程序,或者您有足够的经验来相对快速地构建一个应用程序,则可以跳过这一部分。
CRUD申请 (CRUD Application)
The most convenient way to download the pre-built CRUD project is to clone it:
下载预构建的CRUD项目最方便的方法是克隆它:
git clone git@github.com:lavary/lyrics-crud.git coolyrics
cd coolyrics
composer install
设置数据库 (Setting up the Database)
Now, let’s create a MySQL database. The settings below apply to the Homestead Improved environment mentioned above. Change as needed.
现在,让我们创建一个MySQL数据库。 以下设置适用于上述的Homestead Improvementd环境。 根据需要进行更改。
mysql -h localhost -u homestead -psecret
mysql> CREATE DATABASE lyrics
After the database has been created, we make a copy of .env.example (located in our project’s root directory) and name it .env. This is where we put our database credentials:
创建数据库后,我们将复制.env.example (位于项目的根目录中)并将其命名为.env 。 这是我们放置数据库凭据的位置:
#...

DB_CONNECTION=mysql
DB_HOST=127.0.0.1
DB_PORT=3306
DB_DATABASE=lyrics
DB_USERNAME=root
DB_PASSWORD=password

# ...
Again, apply to your own preferences as needed.
同样,根据需要应用自己的偏好。
Now, we run the migration command to create the tables:
现在,我们运行migration命令来创建表:
php artisan migrate用样本数据填充数据库 (Filling up the Database with Sample Data)
A lyrics website contains information about musicians and their work, and, of course, their songs’ lyrics. To make a bare minimum data structure, we have created only two Eloquent models for this project, namely Artist and Song. The Artist model has a one-to-many relationship with the the Song model. This means each artist can have many songs and each song belongs to an artist in our database.
歌词网站包含有关音乐家及其作品的信息,当然还包括有关他们歌曲的歌词的信息。 为了建立一个最小的数据结构,我们仅为该项目创建了两个Eloquent模型,即Artist和Song 。 Artist模型与Song模型具有一对多关系。 这意味着每位歌手可以拥有多首歌曲,并且每首歌曲都属于我们数据库中的一位歌手。
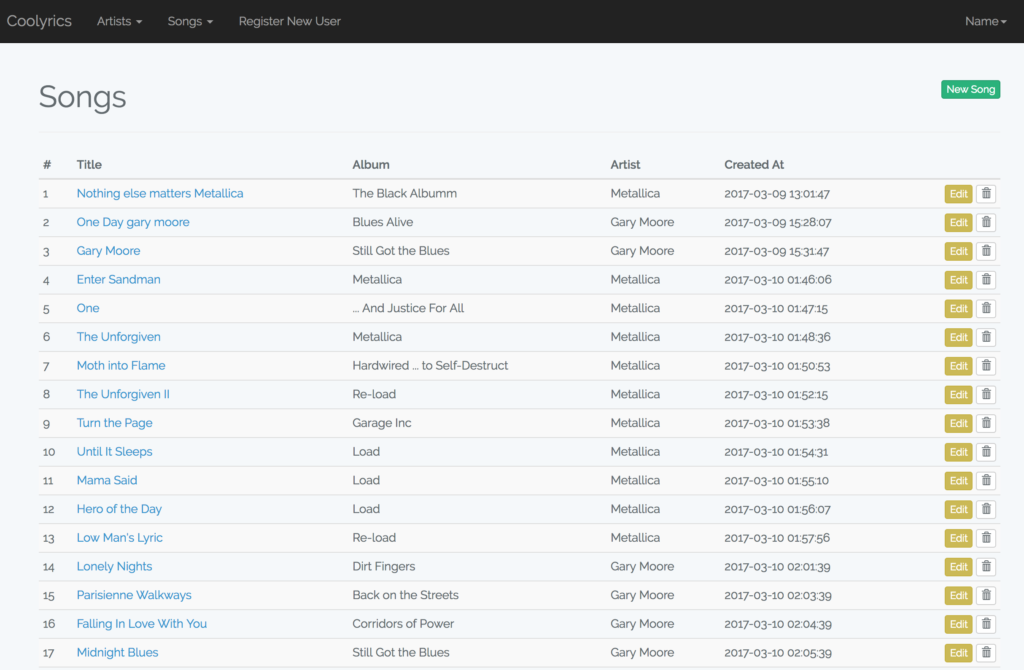
Before moving forward to the next section, you may go ahead and insert a few records into the database, starting with your favorite artists and then adding a few songs for each.
在继续进行下一部分之前,您可以继续将一些记录插入数据库,从您最喜欢的艺术家开始,然后为每个艺术家添加一些歌曲。
This is what we have so far:
到目前为止,这是我们所拥有的:
You can also use the SQL file included with the project files and dump it into your database with the following command:
您还可以使用项目文件随附的SQL文件,并通过以下命令将其转储到数据库中:
mysql -h localhost -u {USERNAME} -p{PASSWORD} lyrics < /path/to/the/sql/fileYou can also import the file by using your favorite MySQL management application, like Sequel Pro, MySQL Workbench or PHPMyAdmin.
您也可以使用喜欢MySQL管理应用程序(例如Sequel Pro,MySQL Workbench或PHPMyAdmin)导入文件。
安装侦察员 (Installing Scout)
Let’s continue by installing Scout:
让我们继续安装Scout:
composer require laravel/scoutThen, we add the service provider to $providers in the config/app.php file:
然后,将服务提供者添加到config/app.php文件中的$providers :
Laravel\Scout\ScoutServiceProvider::class,Now we need to generate the Scout’s configuration file using the publish:config artisan command:
现在,我们需要使用publish:config artisan命令生成Scout的配置文件:
php artisan vendor:publish --provider="Laravel\Scout\ScoutServiceProvider"As a result, a configuration file named scout.php is generated inside the config directory. We’ll edit this file later.
结果,在config目录中生成了一个名为scout.php的config文件。 我们稍后将编辑此文件。
To make a data model searchable, we need to use the Laravel\Scout\Searchable trait inside the respective model class. That’s the Song model in our case:
为了使数据模型可搜索,我们需要在各个模型类内部使用 Laravel\Scout\Searchable特性。 在我们的案例中就是Song模型:
<?php

namespace App;

use Illuminate\Database\Eloquent\Model;
use Laravel\Scout\Searchable;

class Song extends Model
{
    use Searchable;

    protected $fillable = ['title', 'album', 'lyrics', 'youtube_link'];

    public function artist()
    {
        return $this->belongsTo('App\Artist');
    }
}
设置阿尔及利亚 (Setting up Algolia)
As planned, we’ll use Algolia as our search engine API.
按照计划,我们将使用Algolia作为我们的搜索引擎API。
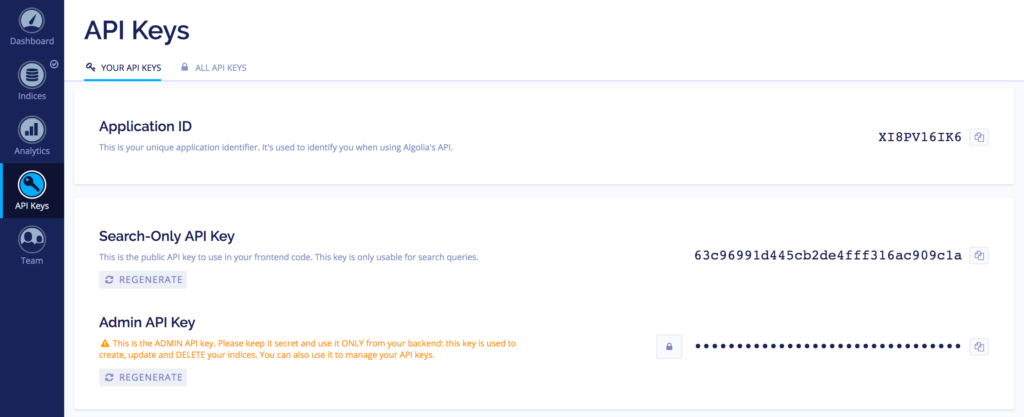
First, let’s create an account to obtain our application ID. Scout requires Application ID and Admin API Key to operate. After the registration is complete, we can find our credentials under API Keys in the left menu.
首先,让我们创建一个帐户以获取我们的应用程序ID 。 侦察员需要应用程序ID和Admin API密钥才能运行。 注册完成后,我们可以在左侧菜单的API密钥下找到我们的凭据。
Now, we open the config/scout.php configuration file and put our credentials there:
现在,我们打开config/scout.php配置文件,并将我们的凭据放在此处:
<?php
'algolia' => [
        'id' => env('ALGOLIA_APP_ID', ''),
        'secret' => env('ALGOLIA_SECRET', ''),
    ],
It’s a good practice to keep the keys in .env and load them into scout.php using the env() or getenv() functions.
将密钥保留在.env并使用env()或getenv()函数将其加载到scout.php是一个好习惯。
To use the Algolia’s API, we need to install Algolia’s SDK for PHP, which is also available as a Composer package:
要使用Algolia的API,我们需要安装适用于PHP的Algolia的SDK,该SDK也可以作为Composer软件包提供:
composer require algolia/algoliasearch-client-php索引我们的数据 (Indexing Our Data)
At this point, we need to create our index on Algolia. Each record in the index is a schema-less JSON object (each one represents a record in our database) with a set of attributes that can be used for searching, displaying, ranking and filtering data.
在这一点上,我们需要在Algolia上创建索引。 索引中的每条记录都是一个无模式的JSON对象(每个对象代表我们数据库中的一条记录),具有一组可用于搜索,显示,排名和过滤数据的属性。
Rather than indexing the whole record, we only need to index the data needed for the above operations. This helps keep our index clean and optimized.
无需索引整个记录,我们只需要索引上述操作所需的数据。 这有助于保持索引的清洁和优化。
Apart from that, the index is not a relational database, meaning when searching through the index, we cannot use complex where clauses or SQL joins. To work around this limitation, we should define a custom structure for our index records. On the other hand, we should join all the needed tables, preparing a customized JSON object before indexing.
除此之外,索引不是关系数据库,这意味着在搜索索引时,我们不能使用复杂的where子句或SQL连接。 要解决此限制,我们应该为索引记录定义一个自定义结构。 另一方面,我们应该联接所有需要的表,在建立索引之前准备一个自定义的JSON对象。
To do this, we override the toSearchableArray() method in the Song model (this method is added to the class by the Laravel\Scout\Searchable trait). By default, the toSearchableArray() method returns the $this->toArray() output as our index object (when sending the index record to Algolia), whereas we need additional data, like artist’s name, genres and the image URL, which reside in another table – the artists table.
为此,我们覆盖Song模型中的toSearchableArray()方法(此方法通过Laravel\Scout\Searchable特性添加到类中)。 默认情况下, toSearchableArray()方法将$this->toArray()输出作为索引对象返回(将索引记录发送到Algolia时),而我们需要其他数据,例如艺术家的姓名 , 流派和图像URL ,在另一个表– artists表中。
Here’s how we do it:
这是我们的方法:
<?php

namespace App;

use Illuminate\Database\Eloquent\Model;
use Laravel\Scout\Searchable;

class Song extends Model
{
    use Searchable;

    protected $fillable = ['title', 'album', 'lyrics', 'youtube_link'];

    public function toSearchableArray()
    {
        $genres = array_map(function($item) {
            return trim($item);
        }, explode(',', $this->artist->genres));

        return array_merge( $this->toArray(), ['artist' => $this->artist->name, 'photo' => $this->artist->photo, 'genres' => $genres]);
    }

    public function artist()
    {
        return $this->belongsTo('App\Artist');
    }
}
Since the genres field may contain a comma-separated value in our database (it has a simple text field in our CRUD app), we separate genres using explode. Then, we iterate over the results, stripping off any unwanted spaces before and after each part – using the map() function:
由于genres字段在我们的数据库中可能包含逗号分隔的值(在CRUD应用程序中具有一个简单的文本字段),因此我们使用explode分隔体裁。 然后,我们遍历结果,使用map()函数删除每个部分之前和之后的多余空间:
<?php

// ...

$genres = array_map(function($item) {
            return trim($item);
        }, explode(',', $this->artist->genres));

// ...
Finally, we merge the output of $this->toArray() with our desired attributes, returning the final array.
最后,我们将$this->toArray()的输出与所需属性合并,返回最终数组。
<?php

// ...

return array_merge( $this->toArray(), ['artist' => $this->artist->name, 'photo' => $this->artist->photo, 'genres' => $genres]);

// ...
Why do we need to index a randomly generated string like image URL you may be wondering. We’ll get to this shortly.
为什么我们需要索引一个随机生成的字符串,例如您可能想知道的图像URL。 我们将尽快解决。
For the existing records in the database, we can import the index at once with the scout:import artisan command, like this:
对于数据库中的现有记录,我们可以使用scout:import artisan命令立即导入索引,如下所示:
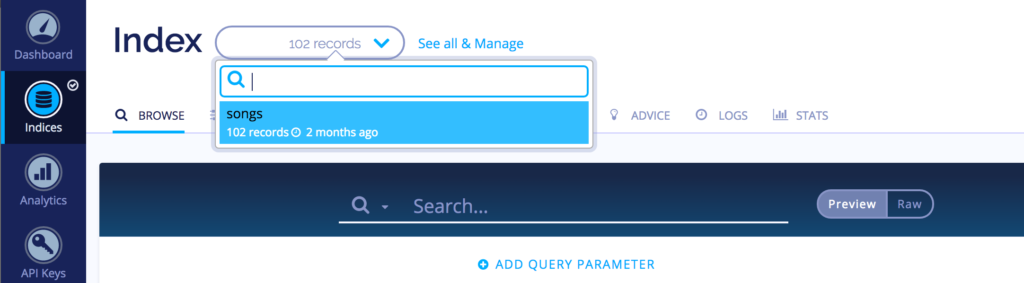
php artisan scout:import "App\Song"When the indexing process is completed, we can see the index on Algolia by going to Indices and choosing our index name from the drop-down menu:
当完成索引过程中,我们可以通过进入指数 ,并从下拉菜单中选择我们的索引名见Algolia指数:
Indexing is not a one-off task. After the initial import, the index needs to be kept in sync with the database. Since we’re using Scout, everything is already taken care of. From now on, any time a record is inserted, updated, or deleted from the database, the respective index record will be affected accordingly – thanks to Laravel’s model observers.
索引编制不是一项一次性的任务。 初始导入后,索引需要与数据库保持同步。 由于我们使用的是Scout,因此一切都已得到处理。 从现在开始,每当从数据库中插入,更新或删除记录时,由于Laravel的模型观察者,相应的索引记录都会受到相应的影响。
To learn more about how Scout manages the indexing process, have a look at the documentation.
要了解有关Scout如何管理索引编制过程的更多信息,请参阅文档 。
配置Algolia (Configuring Algolia)
The next thing to do is to configure our Algolia index for optimal operation. These settings can be modified either from the dashboard or programmatically using Algolia’s API.
接下来要做的是配置我们的Algolia索引以实现最佳操作。 这些设置可以从仪表板进行修改,也可以使用Algolia的API以编程方式进行修改。
The most important configuration options are the Searchable attributes and the Custom Ranking Attributes.
最重要的配置选项是可搜索属性和自定义排名属性 。
The Searchable attributes setting defines which record attributes are used for searching. The order of these attributes also matters as those at the top are considered more important and control the ranking.
可搜索属性设置定义了用于搜索的记录属性。 这些属性的顺序也很重要,因为顶部的那些被认为更重要并控制排名。
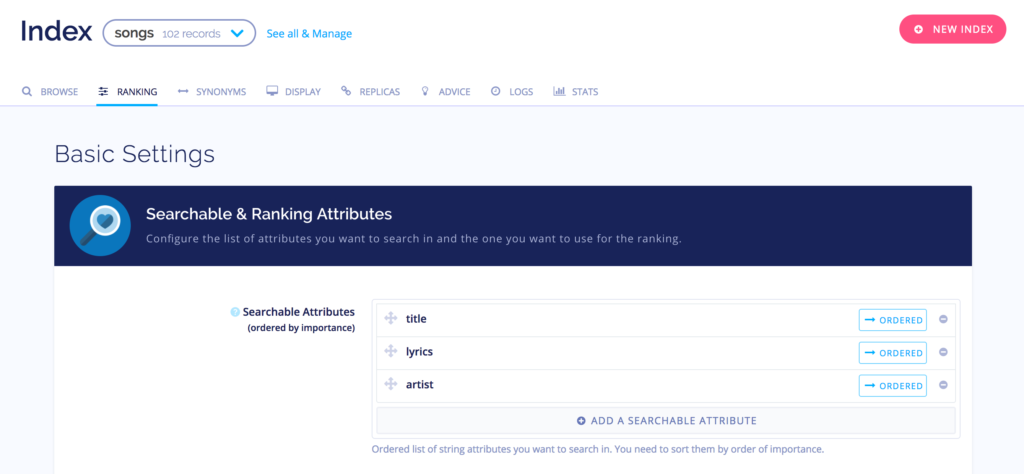
The Custom Ranking Attributes option indicates the popularity of each record which also affects the ranking. They can be anything from the number of likes, views, downloads, to comments. That said, we need to include this information in the index.
“自定义排名属性”选项指示每个记录的受欢迎程度,这也会影响排名。 从喜欢,观看,下载到评论的数量,它们可以是任何东西。 也就是说,我们需要将此信息包括在索引中。

Algolia comes with plenty of configuration options. Going through each setting is beyond the scope of this tutorial. To learn more about the configuration options, you should have a look at Algolia’s FAQ on configuration and relevance.
Algolia带有大量配置选项。 进行每个设置都超出了本教程的范围。 要了解有关配置选项的更多信息,您应该查看有关配置和相关性的Algolia常见问题 。
网站 (The Website)
The last thing to do is to implement the search interface within our lyrics website. The good thing about Algolia is that it doesn’t restrict us to any interface implementation.
最后要做的是在我们的歌词网站中实现搜索界面。 Algolia的好处是它不会将我们限制在任何接口实现上。
Traditional search implementations tend to have the search logic on the backend. To achieve this, we can use Eloquent to search through the records, using the search() method (provided by the Searchable trait). This method is a bit slower as the search request goes through different levels of abstraction. It can be done like this:
传统的搜索实现往往在后端具有搜索逻辑。 为此,我们可以使用Eloquent通过search()方法(由Searchable特征提供search()记录。 当搜索请求经过不同的抽象级别时,此方法会稍慢一些。 可以这样完成:
<?php

// ...
use Illuminate\Http\Request;

Route::get('/search', function (Request $request) {
    return App\Song::search($request->search)->get();
});

// ...
The other way is to directly issue the search requests from the user’s browser to Algolia’s search API, providing a find-as-you-type experience for our users. This method is much faster than the former as there’s no interface involved. This means every attribute we want in our search results should be present in the index itself.
另一种方法是直接从用户浏览器向Algolia的搜索API发出搜索请求,从而为我们的用户提供“按需输入”的体验。 这种方法比前一种方法快得多,因为它不涉及任何接口。 这意味着我们在搜索结果中想要的每个属性都应该出现在索引本身中。
In this tutorial, we’ll take the second approach. We use Scout for indexing and keeping our index synced with our database, then we use Algolia’s API to do the searching.
在本教程中,我们将采用第二种方法。 我们使用Scout进行索引并保持索引与数据库同步,然后使用Algolia的API进行搜索。
By taking the second approach, we will have many options to display the results. We can use AngularJS, Vue.js, or Algolia’s two popular libraries, namely Autocomplete and Instantsearch.js.
通过第二种方法,我们将有许多显示结果的选项。 我们可以使用AngularJS,Vue.js或Algolia的两个流行的库,即Autocomplete和Instantsearch.js 。
For this project, we’ll use Instantsearch.js, which is a library of UI widgets based on React that makes creating search interfaces a breeze.
在此项目中,我们将使用Instantsearch.js ,这是一个基于React的UI小部件库,可轻松创建搜索界面。
Our lyrics website consists of two pages, the main searching page, and a single page to display the details of a song.
我们的歌词网站包括两页,主要搜索页面,和一个显示歌曲详细信息的页面。
First, let’s create the routes and the controllers for these two pages. Then we’ll create the views.
首先,让我们为这两个页面创建路由和控制器。 然后,我们将创建视图。
File: routes/web.php
文件: routes/web.php
<?php

//...

Route::get('/',          'LyricsController@search');
Route::get('song/{id}',  'LyricsController@lyric');

// ...
And the controller:
和控制器:
php artisan make:controller LyricsControllerFile: app/Http/Controllers/LyricsController.php
文件: app/Http/Controllers/LyricsController.php
<?php


namespace App\Http\Controllers;

use Illuminate\Http\Request;
use App\Song;

class LyricsController extends Controller
{
    public function search()
    {
        return view('search');
    }

    public function song(Request $request, $id)
    {
        $song = Song::find($id);

        return view('lyrics', compact('song'));
    }
}
The song() and search() methods render our website pages.
song()和search()方法呈现我们的网站页面。
First, let’s create a master layout template for our pages. Inside resources/views/layouts, create a file named basic.blade.php with the following content:
首先,让我们为页面创建一个主布局模板。 在resources/views/layouts内部,创建一个名为basic.blade.php的文件,其内容如下:
File: resources/views/layouts/basic.blade.php
文件: resources/views/layouts/basic.blade.php
<!DOCTYPE html>
<html lang="{{ config('app.locale') }}">
<head>
    <meta charset="utf-8">
    <meta http-equiv="X-UA-Compatible" content="IE=edge">
    <meta name="viewport" content="width=device-width, initial-scale=1">

    <title>{{ config('app.name', 'Coolyrics') }}</title>

    <!-- Latest compiled and minified CSS -->
    <link rel="stylesheet" href="https://maxcdn.bootstrapcdn.com/bootstrap/3.3.7/css/bootstrap.min.css" integrity="sha384-BVYiiSIFeK1dGmJRAkycuHAHRg32OmUcww7on3RYdg4Va+PmSTsz/K68vbdEjh4u" crossorigin="anonymous">

    <!-- Styles -->
    <link rel="stylesheet" type="text/css" href="{{ asset('css/styles.css') }}">

</head>
<body>


@yield('content')

@section('javascript')
@show

</body>
</html>
Having individual Blade sections for the CSS and JavaScript files allows us to have better control over global and page-specific assets as well as internal Javascript code for child templates.
CSS和JavaScript文件具有单独的Blade部分,使我们可以更好地控制全局和特定于页面的资产以及子模板的内部Javascript代码。
There’s also a CSS file loaded into the page – to make the website a little bit more customized. Please feel free to change the styles if you don’t like the look and feel of it.
页面中还加载了一个CSS文件-使网站更具自定义性。 如果您不喜欢它的外观,请随时更改样式。
For the time being, let’s create a file named styles.css under public/css with the following content:
现在,让我们在public/css下创建一个名为styles.css的文件,其内容如下:
File: public/css/styles.css
文件: public/css/styles.css
html, body {
  height: 100%;
}

h2 {
  color: #888;
  font-size: 30pt;
}

#header {
  background: #34495e;
  color: #f1c40f;
  height: 80px;
}

#header .input-group {
  margin-top: 20px;
}

#header h1 {
  margin-left: 50px;
  font-size: 20pt;
  font-weight: bold;
}

#header h1 sup {
  font-size: 8pt;
  font-weight: normal;
  display: inline-block;
}

.dropdown-menu .ais-menu {
  padding: 5px 5px;
}

.dropdown-menu .ais-menu--item {
  border-bottom: #ccc 1px dotted;
  padding: 5px 25px 5px 15px;
}

.dropdown-menu .ais-menu--item:last-child {
  border: 0;
}

.container {
  padding: 35px;
}

.container-fluid {
  padding: 40px;
}

#hits-container {
}

.ais-hits__empty {
  height: 100%;
  font-size: 15pt;
  font-weight: bold;
  color: #888;
}

.ais-hits__empty p {
  font-size: 12pt;
  font-weight: normal;
  color: #999;
  padding-top: 5px;
}

.song {
  border-bottom: #ccc 1px dotted;
  padding: 20px;
}

.song a.song-link {
  color: #000;
  font-size: 15pt;
  display: block;
}

.song a.song-link em {
  font-style: normal;
  color: #000;
  font-weight: bold;
}

.song span {
  color: #888;
  display: block;
}

.song span.song-artist {
  margin: 3px 0;
}

.song-youtube-link {
  margin-top: 10px;
}

#pagination-container {
  text-align: center;
  font-size: 11pt;
  margin: 20px 0;
}

#login-link {
  font-weight: bold;
  text-transform: uppercase;
  line-height: 80px;
}

#login-link a {
  color: #fff;
}

/*
  to control the size of the thumbnail adjust the .thumbnail width and height
*/
.band-thumbnail {
  width: 90px;
  height: 90px;
  background-position: center;
  background-size: cover;
  margin-right: 30px;
  border-radius: 3px;
}

#lyrics-container {

}

#lyrics-container p {
  font-size: 13pt ;
}

h1 { font-size: 30pt;  }

#lyrics-container h1 span {
  color: #000;
}

#lyrics-header {
  background: #f5f5f5;
  padding: 60px 0;
}

#lyrics-album-details {
  font-size: 11pt;
  font-weight: normal;
  display: block;
  color: #888;
  margin-bottom: 20px;
}

#lyrics-album-details .glyphicon {
  color: #ccc;
  margin-right: 5px;
}

#lyrics-youtube-link {
  position: absolute;
  left: 0; bottom: 0;
  background: #cc181e;
  width: 100%;
  height: 30px;
  line-height: 30px;
}

#lyrics-youtube-link a {
  color: #fff;
}

#lyrics-thumbnail {
  position: relative;
  width: 370px;
  height: 220px;
  margin: 0 auto;
}

#post-meta {
  margin: 15px 0;
}

#post-meta span {
  color: #ccc;
  font-size: 10pt;
  font-weight: normal;
  margin: 5px 0;
}

#lyrics-content {
  background-color: #f1f1f1;
  padding: 40px 0;
}

.btn-xs .glyphicon {
  color: #888;
  font-size: 8pt;
}
歌词页面 (The Lyrics Page)
Now, we create a file named song.blade.php inside resources/views with the following content:
现在,我们在resources/views创建一个名为song.blade.php的文件,其内容如下:
File: resources/views/song.blade.php
文件: resources/views/song.blade.php
@extends('layouts.basic')
<div id="lyrics-container" class="text-center">
<div id="lyrics-header">
<h1>{{$song->title}}</h1>
<span id="lyrics-album-details">
{{$song->artist->name}} - {{$song->album}} Album
</span>
<div id="lyrics-thumbnail">
<img src="{{Storage::url('artists/' . $song->artist->photo)}}">
<div id="lyrics-youtube-link">
<a href="{{$song->youtube_link}}"><i class="glyphicon glyphicon-play"></i> Watch on Youtube</a>
</div>
</div><!--/#lyrics-thumbnail-->
</div><!--/#lyrics-header-->
<div id="lyrics-content">
<p><strong>"{{$song->title}}"</strong></p>
<p>{!! nl2br($song->lyrics) !!}</p>
</div><!--/#lyrics-content-->
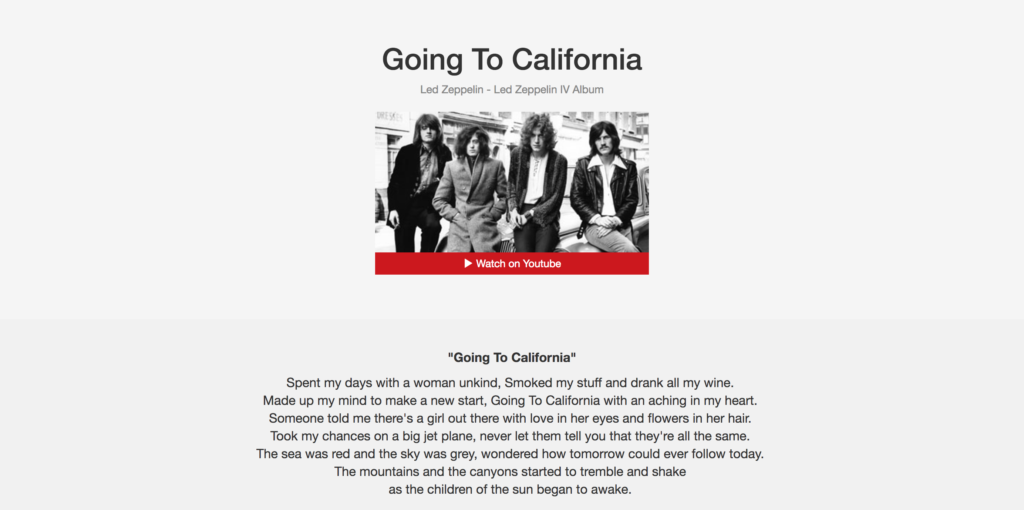
</div>This page is rendered and controlled in the backend – by Laravel.
该页面由Laravel在后端呈现和控制。
In this template, we extend the layout and echo out the lyrics’ attributes. This is how it should look:
在此模板中,我们扩展了布局并回显了歌词的属性。 这是它的外观:
搜索界面 (The Search Interface)
Now we get to the main part for which we’ve created everything so far, the search interface.
现在,我们进入到目前为止已经创建的所有内容的主要部分,即搜索界面。
To create the search interface, we need to combine several widgets of Instantsearch.js and configure each widget to fit our needs.
要创建搜索界面,我们需要组合几个Instantsearch.js小部件,并配置每个小部件以满足我们的需求。
Our search interface will consist of three widgets:
我们的搜索界面将包含三个小部件:
A search field (SearchBox widget)
搜索字段( SearchBox小部件)
A section to display the results (Hits widget)
显示结果的部分(“ 命中”小部件)
Pagination (Pagination widget)
分页( 分页小部件)
All the widgets are wired together out of the box and require no extra development on our side. That is to say, whenever a user enters a value into the search box, all the widgets (search box, hits, pagination, etc.) will respond accordingly.
所有小部件都开箱即用地连接在一起,不需要我们方面的额外开发。 也就是说,每当用户在搜索框中输入一个值时,所有窗口小部件(搜索框,匹配,分页等)都将相应地响应。
Create a new file named search.blade.php inside the resources/views directory with the following content:
在resources/views目录中创建一个名为search.blade.php的新文件,其内容如下:
File: resources/views/search.blade.php
文件: resources/views/search.blade.php
@extends('layouts.basic')

@section('content')

<div id="header">
    <div class="col-md-2"><h1>Coolyrics</h1></div>
    <div class="col-md-6">

          <div id="search-box"></div>

    </div>
</div>

<div class="container-fluid">
    <div id="hits-container"></div>
    <div id="pagination-container"></div>
</div>

@endsection

@section('scripts')
<!-- Scripts -->
@parent
<script language="javascript" src="https://cdn.jsdelivr.net/jquery/3.1.1/jquery.min.js"></script>
<script src="https://cdn.jsdelivr.net/instantsearch.js/1/instantsearch.min.js"></script>
@endsection

@section('javascript')
@endsection
In the content section, we have a container with id search-box where we’re going to place our searchBox widget. We also have containers for hits and pagination widgets.
在content部分,我们有一个ID为search-box的容器,我们将在其中放置searchBox小部件。 我们也有用于hits和pagination小部件的容器。
In the scripts section, first, we load the master layout’s scripts using the @parent directive. Then, we add the scripts specific to this template, namely jQuery and Instantsearch.js.
在scripts部分,首先,我们使用@parent指令加载主布局的脚本。 然后,我们添加特定于此模板的脚本,即jQuery和Instantsearch.js 。
We also have a section (javascript) for our template’s internal Javascript code. This is where we instantiate Instantsearch.js and add our widgets.
我们还为模板的内部Javascript代码提供了( javascript )部分。 在这里我们实例化Instantsearch.js并添加我们的小部件。
设置InstantSearch.Js (Setting up InstantSearch.Js)
We can use Bower or NPM to install Instantsearch.js, or simply use the CDN like so:
我们可以使用Bower或NPM来安装Instantsearch.js,也可以像这样简单地使用CDN:
File: resources/views/search.blade.php
文件: resources/views/search.blade.php
@section('css')
<link rel="stylesheet" type="text/css" href="https://cdn.jsdelivr.net/instantsearch.js/1/instantsearch.min.css" />
@endsection
And the Javascript file:
和Javascript文件:
File: resources/views/search.blade.php
文件: resources/views/search.blade.php
@section('scripts')
@parent
<script language="javascript" src="https://cdn.jsdelivr.net/jquery/3.1.1/jquery.min.js"></script>
<script src="https://cdn.jsdelivr.net/instantsearch.js/1/instantsearch.min.js"></script>
@endsection
初始化 (Initialization)
Now, we need to create a search object with our given Application Id and API Key. In the resources/views/search.blade.php file, add the following JavaScript code inside the javascript section.
现在,我们需要使用给定的Application Id和API Key创建一个搜索对象。 在resources/views/search.blade.php文件中,在javascript部分内添加以下JavaScript代码。
File: resources/views/search.blade.php
文件: resources/views/search.blade.php
...

section('javascript')
var search = instantsearch({
    // You should put your keys here:
    appId: 'XXXX',
    apiKey: 'XXX',
    indexName: 'songs'
  });
@endsection

...
In the above code, we need to provide three values to instantiate the search object: appId, ApiKey, and indexName.
在上面的代码中,我们需要提供三个值来实例化搜索对象: appId , ApiKey和indexName 。
Since we’re doing the initialization in a Javascript environment, the keys are visible to everyone. Knowing this, we must use our Search-Only API Key, which is limited to search operations only. You can find it under API Keys in your Algolia profile.
由于我们在Javascript环境中进行初始化,因此密钥对所有人都是可见的。 知道这一点,我们必须使用我们的仅搜索API密钥 ,该密钥仅限于搜索操作。 您可以在Algolia个人资料中的“ API密钥”下找到它。
The indexName attribute is the name of the index we want to search through, which is songs in our case.
indexName属性是我们要搜索的索引的名称,在本例中为songs 。
添加搜索框 (Adding the Search Box)
The searchBox widget creates a smart text field to enter the search keyword.
searchBox小部件创建一个智能文本字段以输入搜索关键字。
To add the widget, we call the addWidget method on the search object (that we just created), passing an instance of searchBox to it:
要添加小部件,我们在search对象(我们刚刚创建的)上调用addWidget方法,并将searchBox的实例searchBox给它:
File: resources/views/search.blade.php
文件: resources/views/search.blade.php
...

search.addWidget(
    instantsearch.widgets.searchBox({
      container: '#search-box',
      placeholder: 'Search by artist, song, or lyrics',
      wrapInput: false,
      cssClasses: {
        input: 'form-control'
      }
    })
  );

@endsection

...
As you can see in the above code, we pass a configuration object when instantiating a widget. This object is used to adjust the widget’s behavior.
如您在上面的代码中看到的,我们在实例化窗口小部件时传递一个配置对象。 该对象用于调整小部件的行为。
The container is the place where our searchBox widget sits. The placeholder is an ordinary HTML placeholder for the text field.
container是我们的searchBox小部件所在的位置。 placeholder是文本字段的普通HTML占位符。
If wrapInput is set to true, the text field itself is wrapped by another <div> element with a class named ais-search-box.
如果将wrapInput设置为true ,则文本字段本身将被另一个名为ais-search-box <div>元素ais-search-box 。
Finally, the cssClasses option specifies the additional classes to be added to the widget. In the above settings, we just add a class to the text field itself. We can add classes to the wrapping element as well.
最后, cssClasses选项指定要添加到窗口小部件的其他类。 在以上设置中,我们仅向文本字段本身添加了一个类。 我们也可以向包装元素中添加类。
To learn about the other available options for searchBox, you should have a look at the documentation.
要了解searchBox的其他可用选项,您应该看一下文档 。
添加点击小部件 (Adding the Hits Widget)
The hits widget displays the search results based on a set of defined templates.
命中小部件基于一组定义的模板显示搜索结果。
Add the following code right after the code for searchBox:
在searchBox的代码之后添加以下代码:
File: resources/views/search.blade.php
文件: resources/views/search.blade.php
...

search.addWidget(
    instantsearch.widgets.hits({
      container: '#hits-container',
      templates: {
        item: $('#hits-temp').html(),
        empty: 'No lyrics was found! <p>We will be adding more lyrics to the database.</p>',
        header: '<h2>Lyrics</h2>'
      }
    })
 );

@endsection

...
Again, we have an object of settings to adjust the widget’s behavior. The templates option defines the templates used for rendering different parts of the hits (results) section. In the above code, we define a template for item, which is rendered for each item in the result set. We also define a template for any time the search has no results. There’s also another template for the hits header section.
同样,我们有一个设置对象来调整小部件的行为。 templates选项定义用于呈现匹配(结果)部分不同部分的模板。 在上面的代码中,我们为item定义了一个模板,该模板针对结果集中的每个项目呈现。 我们还会为搜索没有结果的任何时间定义模板。 Hits 标头部分还有另一个模板。
These templates can be either a Mustache template or just a string, returned by an anonymous Javascript function.
这些模板可以是Moustache模板,也可以是由匿名Javascript函数返回的字符串。
In our case, the item template is a mustache template stored within a <script> tag, which we fetch with jQuery:
在我们的例子中, item模板是存储在<script>标记中的胡子模板,我们使用jQuery来获取该模板:
// ...
item: $('#hits-temp').html(),
// ...
This is our Mustache template. You can place it any where in the search.blade.php template:
这是我们的小胡子模板。 您可以将其放在search.blade.php模板中的任何位置:
File: resources/views/search.blade.php
文件: resources/views/search.blade.php
<script type="text/javascript" id="hits-temp">

    <div class="row song">
        <div class="pull-left band-thumbnail" style="background-image: url(/storage/artists/@{{photo}});"></div>
        <a class="song-link" href="song/@{{objectID}}">@{{{_highlightResult.title.value}}}</a>
        <span class="song-artist">- <a href="?q=@{{artist}}&hPP=20&idx=songs&p=0&is_v=1">@{{artist}}</a> (@{{album}})</span>
        <span class="song-youtube-link"><a href="@{{youtube_link}}" class="btn btn-default btn-xs"><i class="glyphicon glyphicon-play"></i> Watch on Youtube</a></span>
    </div>

</script>
In this template, we have access to the attributes of each row within the index, like objectID, artist, title, photo, youtube_link, etc.
在此模板中,我们可以访问索引中每一行的属性,例如objectID , artist , title , photo , youtube_link等。
To prevent Blade from rendering mustache directives, we put a @ before each curly brace set, letting Blade know that this expression should be remained untouched and is handled by Instantsearch.js later on.
为了防止Blade呈现胡须指令,我们在每个花括号集之前添加一个@ ,以使Blade知道此表达式应保持不变,并在稍后由Instantsearch.js处理。
Additionally, Algolia provides an object for each item called _highlightResult. This object contains highlighted text for each attribute based on the search keyword. This is useful to show which part of the results are matched by the searched keyword.
此外,Algolia为每个项目提供了一个名为_highlightResult的对象。 该对象包含基于搜索关键字的每个属性的突出显示的文本。 这对于显示搜索结果的哪些部分与搜索的关键字匹配非常有用。
<a class="song-link" href="song/@{{objectID}}">@{{{_highlightResult.title.value}}}</a>Please note that we link each item to its details page.
请注意,我们将每个项目链接到其详细信息页面。
添加分页 (Adding Pagination)
The pagination widget generates the pagination links:
分页小部件将生成分页链接:
File: resources/views/search.blade.php
文件: resources/views/search.blade.php
...

search.addWidget(
    instantsearch.widgets.pagination({
      container: '#pagination-container'
    })
  );

...
To see all the available options for this widget, you should have a look at the documentation.
要查看此小部件的所有可用选项,请查看文档 。
Finally, we start the search object:
最后,我们开始search对象:
File: resources/views/search.blade.php
文件: resources/views/search.blade.php
// ...

 search.start();

// ...
The full code should look like this now:
现在完整的代码应如下所示:
File: resources/views/search.blade.php
文件: resources/views/search.blade.php
@extends('layouts.basic')

@section('content')

<div id="header">
    <div class="col-md-2"><h1>Coolyrics</h1></div>
    <div class="col-md-6">

          <div class="input-group" id="search-box">
             <div class="input-group-btn">
              <button type="button" class="btn btn-default dropdown-toggle" data-toggle="dropdown" aria-haspopup="true" aria-expanded="false">
              <span>Genre</span>
              <span class="caret"></span></button>
              <ul id="genres" class="dropdown-menu">

              </ul>
            </div><!-- /btn-group -->
          </div>

    </div>
    <div  id="login-link" class="col-md-4 text-right">
            <a href="{{route('login')}}">Login</a>
    </div>
</div>

<div class="container-fluid">
    <div id="hits-container"></div>
    <div id="pagination-container"></div>
</div>

@endsection

@section('scripts')

<!-- Scripts -->
@parent
<script language="javascript" src="https://cdn.jsdelivr.net/jquery/3.1.1/jquery.min.js"></script>
<script src="https://cdn.jsdelivr.net/instantsearch.js/1/instantsearch.min.js"></script>
@endsection

@section('javascript')

<script type="text/javascript" id="hits-temp">

    <div class="row song">
        <div class="pull-left band-thumbnail" style="background-image: url(/storage/artists/@{{photo}});"></div>
        <a class="song-link" href="song/@{{objectID}}">@{{{_highlightResult.title.value}}}</a>
        <span class="song-artist">- <a href="?q=@{{artist}}&hPP=20&idx=songs&p=0&is_v=1">@{{artist}}</a> (@{{album}})</span>
        <span class="song-youtube-link"><a href="@{{youtube_link}}" class="btn btn-default btn-xs"><i class="glyphicon glyphicon-play"></i> Watch on Youtube</a></span>
    </div>

</script>

<span></span>


<script>
  var search = instantsearch({
    appId: 'XI8PV16IK6',
    apiKey: '63c96991d445cb2de4fff316ac909c1a',
    indexName: 'songs',
    urlSync: true
  });

  search.addWidget(
    instantsearch.widgets.searchBox({
      container: '#search-box',
      placeholder: 'Search by artist, song, or lyrics',
      wrapInput: false,
      cssClasses: {
        input: 'form-control'
      }
    })
  );

  search.addWidget(
    instantsearch.widgets.hits({
      container: '#hits-container',
      templates: {
        item: $('#hits-temp').html(),
        empty: 'No lyrics was found! <p>We will be adding more lyrics to the database.</p>',
        header: '<h2>Lyrics</h2>'
      }
    })
  );

  search.addWidget(
    instantsearch.widgets.hits({
      container: '#hits-container',
      templates: {
        item: $('#hits-temp').html(),
        empty: 'No lyrics was found! <p>We will be adding more lyrics to the database.</p>',
        header: '<h2>Lyrics</h2>'
      }
    })
  );

  search.addWidget(
    instantsearch.widgets.menu({
      container: '#genres',
      attributeName: 'genres',
      limit: 10,
      templates: {
          header: '',
          footer: '',
          item: '<li><a href="@{{url}}">@{{name}}</></li>'
      }
    })
  );


  search.addWidget(
    instantsearch.widgets.pagination({
      container: '#pagination-container'
    })
  );

  search.start();
</script>

@endsection
Now, if we reload the page, we should see an awesome search interface which works right out of the box. No extra coding, no hassle.
现在,如果我们重新加载页面,我们应该会看到一个很棒的搜索界面,它可以直接使用。 没有额外的编码,没有麻烦。
Feel free to play with the interface. Search for different terms and open the links to see how it looks. You can also make some typos on purpose while searching, to see the response. Algolia’s typo tolerance algorithms will automatically detect what your users are searching for and return the correct results.
随意使用界面。 搜索不同的术语并打开链接以查看其外观。 您也可以在搜索时故意打错一些字,以查看响应。 Algolia的错字容限算法将自动检测您的用户正在搜索的内容并返回正确的结果。
Alright, I think that does it to get started with Scout and Algolia. You can find the full code on Github in case you want to try it for yourself.
好吧,我认为这样做是为了开始使用Scout和Algolia。 如果您想自己尝试,可以在Github上找到完整的代码。
To see a working demo of what we built in this tutorial click here.
要查看我们在本教程中构建的内容的工作演示,请单击此处 。
结语 (Wrapping Up)
We created our minimal lyrics website with the help of Laravel Scout and Algolia.
我们在Laravel Scout和Algolia的帮助下创建了最小的歌词网站。
Please note that this project was just for educational purposes, implemented in the most basic form possible, and hence should not be used in a production environment. Please feel free to modify the code in any way you want.
请注意,该项目仅用于教育目的,以可能的最基本形式实施,因此不应在生产环境中使用。 请随时以所需的任何方式修改代码。
To move even further, you may go to your Algolia profile, and change the settings and see the results. You can also add synonyms for each term, in case you don’t have that term in your database.
要进一步移动,您可以转到Algolia个人资料,然后更改设置并查看结果。 您还可以为每个术语添加同义词,以防数据库中没有该术语。
If you have any questions on the topic or if we’ve missed anything, let us know in the comments below!
如果您对此主题有任何疑问,或者我们有任何遗漏,请在下面的评论中告诉我们!
翻译自: https://www.sitepoint.com/build-lyrics-website-laravel-scout-algolia/
laravel scout


 474
474

 被折叠的 条评论
为什么被折叠?
被折叠的 条评论
为什么被折叠?
 到【灌水乐园】发言


