


This article was peer reviewed by Wern Ancheta. Thanks to all of SitePoint’s peer reviewers for making SitePoint content the best it can be!
本文由Wern Ancheta进行同行评审。 感谢所有SitePoint的同行评审人员使SitePoint内容达到最佳状态!
This popular article was updated on May 21st 2017 to provide a more comprehensive introduction into an essential, modern tool.
这篇颇受欢迎的文章已于2017年5月21日更新,以对基本的现代工具进行更全面的介绍。
In this article, we will tackle the basics of Composer, and what makes it such a powerful and useful tool.
在本文中,我们将介绍Composer的基础知识以及如何使其成为如此强大而有用的工具。
Before we go into detail, there are two things that we need to have in mind:
在详细介绍之前,我们需要牢记两件事:
What Composer is:
什么是作曲家:
As we can see on their website: “Composer is a tool for dependency management in PHP. It allows you to declare the libraries your project depends on and it will manage (install/update) them for you.”
正如我们在他们的网站上看到的: “ Composer是用于PHP中的依赖项管理的工具。 它使您可以声明项目所依赖的库,并将为您管理(安装/更新)它们。”
What Composer is not:
什么不是作曲家:
Composer is not a package manager. It deals with packages but in a “per project” way. While it provides a global installation option, it does not install anything globally by default.
Composer不是软件包管理器。 它以“每个项目”的方式处理软件包。 尽管它提供了全局安装选项,但默认情况下不会全局安装任何内容。
Essentially, Composer allows you to declare and manage every dependency of your PHP projects.
本质上,Composer允许您声明和管理PHP项目的每个依赖项。
Let’s now install Composer so we can see it in action.
现在让我们安装Composer,以便我们可以实际使用它。

安装 (Installation)
There are two ways of installing Composer: locally and globally. Because Composer is such a useful and widespread tool, I always recommend installing it globally, as you’ll probably be working on more than one project at once.
有两种安装Composer的方法:本地和全局。 因为Composer是一种有用且广泛使用的工具,所以我总是建议在全球范围内安装它,因为您可能会同时处理多个项目。
Note that if you use an environment like Homestead Improved, it’s installed globally by default. If you’re unfamiliar with Vagrant and Homestead, this post will clear things up, and if you’d like to dive deeper, this book will reveal some wild mysteries to you.
请注意,如果您使用Homestead Improvement之类的环境,则默认情况下会全局安装该环境。 如果您不熟悉Vagrant和Homestead, 这篇文章将使您的事情变得清晰,而如果您想更深入地学习,则这本书将为您揭示一些荒诞的奥秘 。
To install Composer, follow the instructions for your operating system.
要安装Composer,请按照您操作系统的说明进行操作。
If you’re on a Unix system, after installing it you can run the command:
如果您在Unix系统上,则在安装后可以运行以下命令:
mv composer.phar /usr/local/bin/composerThis moves the composer.phar file to a directory that’s on your path (the location of your filesystem where the OS looks for executable files by default). This way, you can use just the composer command instead of composer.phar.
这会将composer.phar文件移动到您路径上的目录(操作系统默认情况下OS在其中查找可执行文件的文件系统位置)。 这样,您可以只使用composer命令而不是composer.phar 。
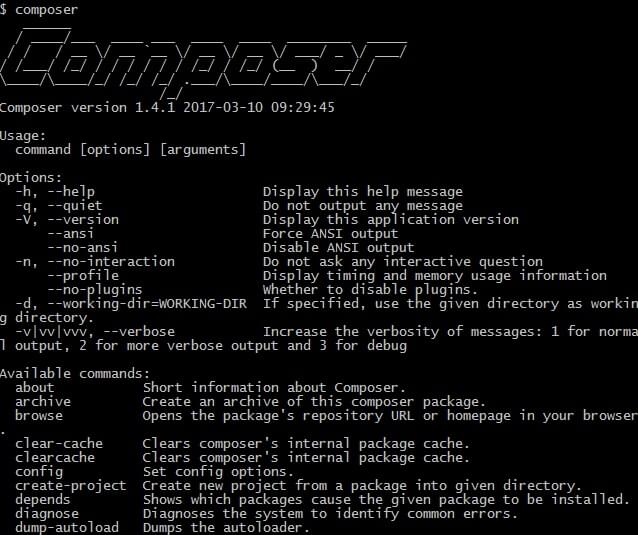
Running the composer command shows the information page:
运行composer命令将显示信息页面:
Some of Composer’s more useful commands are:
Composer的一些更有用的命令是:
composer help <command>– will show the help page for a given command.composer help <command>–将显示给定命令的帮助页面。composer self update– Updates composer to the latest available version.composer self update–将composer更新到最新的可用版本。composer search– Searches for packages.composer search–搜索软件包。composer status– Shows a list of dependencies that have been modified locally. If we install something from the source (using the--prefer-sourceoption), we will end up with a clone of that package in the/vendorfolder. If we make some changes to that package, thecomposer statuscommand will show us a git status for those changes.composer status–显示已在本地修改的依赖项列表。 如果我们从源代码安装了某些东西(使用--prefer-source选项),那么最终将在/vendor文件夹中得到该软件包的一个克隆。 如果我们对该软件包进行了一些更改,composer status命令将为我们显示这些更改的git状态。composer diagnose– Diagnoses the system for common errors. This is especially useful for debugging, as it checks for things like connectivity to Packagist, free disk space, and git settings.composer diagnose–诊断系统中的常见错误。 这对于调试非常有用,因为它会检查与Packagist的连接性,可用磁盘空间和git设置等内容。
We will focus our attention on composer init, composer create-project and composer require.
我们将专注于composer init , composer create-project和composer require 。
使用作曲家 (Using Composer)
To manage dependencies in a project, Composer uses a json file. This file describes all the dependencies, and holds some metadata as well.
为了管理项目中的依赖关系,Composer使用json文件。 该文件描述了所有依赖关系,并且还保存了一些元数据。
In this example we will create a new PHP project in which we will need PHPUnit for our unit testing. There are several ways to use Composer to manage this dependency.
在此示例中,我们将创建一个新PHP项目,在该项目中,我们将需要PHPUnit进行单元测试。 有多种使用Composer来管理此依赖性的方法。
composer initwill launch the wizard. The wizard will guide us through the generation of ourcomposer.jsonfile.composer init将启动向导。 该向导将指导我们完成composer.json文件的生成。composer search phpunitwill search for all packages available that have the keywordphpunit. After we choose the package we want, we can then usecomposer require <package>. This command will not only create thecomposer.jsonfile, it will also download all the dependencies specified.composer search phpunit将搜索所有具有关键字phpunit可用软件包。 选择所需的软件包后,可以使用composer require <package>。 该命令不仅将创建composer.json文件,还将下载指定的所有依赖项。Manually write the
composer.jsonfile (not recommended – easy to slip up with syntax and brings no apparent benefits). Here’s an example:手动编写
composer.json文件(不推荐使用-易于使用语法,没有明显的好处)。 这是一个例子:
{
    "require": {
        "phpunit/phpunit": "^4.8"
    }
}
The
requirekey takes objects that map package names (e.g.phpunit/phpunit) to version constraints (e.g.4.8). Composer uses this information to search for the right set of files in package “repositories” that you register using therepositorieskey (more info here) or on Packagist, the default package repository which we’ll discuss a little later.require键采用将软件包名称(例如phpunit/phpunit)映射到版本约束(例如4.8)的对象。 Composer使用这些信息来寻找正确的一组文件在包您注册使用“资源库”repositories钥匙(更多信息点击这里 )或Packagist ,默认软件包仓库,我们将在以后讨论一点。
If you used composer init or the manual method, you need to run composer install. This will download all the dependencies needed for the packages described in the composer.json file.
如果您使用composer init或手动方法,则需要运行composer install 。 这将下载composer.json文件中描述的软件包所需的所有依赖项。
Note that writing the file manually and then running composer install is the same as running composer require <package>.
请注意,手动编写文件然后运行composer install与运行composer require <package> 。
Using the
composer require <package>approach is a recommended best practice.使用
composer require <package>方法是推荐的最佳实践 。
The first time you run the composer install command, the dependencies are downloaded and their installed versions are registered in the composer.lock file. The next time someone runs composer install on the project, it will not get the latest available package versions, but the ones that are registered in the composer.lock file. This way, Composer ensures that your project doesn’t break due to unexpected code changes in newer versions of the packages.
首次运行composer install命令时,将下载依赖项,并将其安装版本注册在composer.lock文件中。 下次有人在项目上运行composer install时,它将不会获得最新的可用软件包版本,而是获得在composer.lock文件中注册的软件包版本。 这样,Composer可以确保您的项目不会由于新版本软件包中的意外代码更改而中断。
更新您的包裹 (Updating Your Packages)
The composer.lock file ensures that everyone in the project uses the same version of the packages by not allowing newer versions to be downloaded.
composer.lock文件通过不允许下载较新版本来确保项目中的每个人都使用相同版本的软件包。
If for any reason we want to stick to a particular version, than we should mention the appropriate version in the composer.json file. For example:
如果出于任何原因我们要坚持使用特定版本,则应在composer.json文件中提及适当的版本。 例如:
{
      "require": {
          "phpunit/phpunit": "4.8"
      }
  }
But what if we want to update our dependencies to the latest versions?
但是,如果我们想将依赖关系更新为最新版本,该怎么办?
To update dependencies, Composer provides the composer update command. This command will not only download the latest versions of our dependencies, it will also update the composer.lock file to the new versions. Running composer update is actually the same as deleting composer.lock and then re-running composer install.
要更新依赖关系,Composer提供了composer update命令。 该命令不仅将下载我们依赖关系的最新版本,还将composer.lock文件更新为新版本。 运行composer update实际上与删除composer.lock然后重新运行composer install 。
It is generally recommended to commit the
composer.lockfile into the version control system when working on a project (app) and to ignore it when working on a package. A package should always strive to use the latest version of its dependencies, while an app is generally more fragile. More discussion about this and alternative approaches here.通常建议在处理项目(应用程序)时将
composer.lock文件提交到版本控制系统中,而在处理软件包时将其忽略。 程序包应始终努力使用其依赖项的最新版本,而应用程序通常更脆弱。 这个和替代更多的讨论接近这里 。
供应商文件夹 (The Vendor Folder)
Composer downloads all dependencies into the /vendor folder, which it creates if it doesn’t exist. It also creates a vendor/autoload.php file which looks something like this:
Composer会将所有依赖项下载到/vendor文件夹,如果不存在,它将创建该文件夹。 它还会创建一个vendor/autoload.php文件,看起来像这样:
<?php

// autoload.php @generated by Composer

require_once __DIR__ . '/composer/autoload_real.php';

return ComposerAutoloaderInit7a731d2067108a4739c3dd65be722f17::getLoader();
Once you include or require this file in your code, you can use all the functionality provided by your dependencies. This is as simple as adding the following snippet to your code:
一旦在代码中include或require此文件,就可以使用依赖项提供的所有功能。 这就像将以下代码片段添加到您的代码中一样简单:
require __DIR__ . '/vendor/autoload.php';自动加载 (Autoloading)
The autoloading provided by Composer to access the project’s dependencies is very useful, and can also be used to access our own application’s code. To do this, we need to register our code in the composer.json file using the autoload key.
Composer提供的自动加载功能用于访问项目的依赖项非常有用,也可以用于访问我们自己的应用程序的代码。 为此,我们需要使用autoload键将代码注册在composer.json文件中。
{
    "autoload": {
        "psr-4": {"Foo\\": "src/"}
    }
}
First, Composer will register a PSR-4 autoloader for the Foo namespace.
首先,Composer将为Foo名称空间注册PSR-4自动加载器 。
Then, we map the Foo namespace to the /src folder. The /src folder should be at the same level as the /vendor folder (root of the project). After this, we need to re-generate the vendor/autoload.php file. Composer provides a command for this: composer dump-autoload.
然后,我们将Foo名称空间映射到/src文件夹。 /src文件夹应与/vendor文件夹(项目的根目录)处于同一级别。 之后,我们需要重新生成vendor/autoload.php文件。 Composer为此提供了一个命令: composer dump-autoload 。
Pro-tip: composer du would also work, because composer runs any command which is uniquely identified by its first few letters. In dump-autoload‘s case, there’s no other command in the Composer namespace that starts with du, so Composer knows that’s the one we want. This works with all Composer commands.
提示: composer du也可以工作,因为composer运行的任何命令都由其前几个字母唯一标识。 在dump-autoload的情况下,Composer名称空间中没有其他命令以du开头,因此Composer知道这就是我们想要的命令。 这适用于所有Composer命令。
This way we are adding our own code to the autoloader. In addition to PSR-4 autoloading, Composer also supports PSR-0, classmap, and files autoloading. Check out the documentation for more information on autoloading with Composer.
这样,我们将自己的代码添加到自动加载器中。 除了PSR-4自动加载外,Composer还支持PSR-0,类映射和文件自动加载。 请查阅文档以获取有关使用Composer自动加载的更多信息。
配置值和最小稳定性 (Configuration Values and Minimum Stability)
Sometimes, your project will depend on packages that don’t have a stable version released. Composer defaults to preventing unstable packages from being installed.
有时,您的项目将依赖于没有发布稳定版本的软件包。 Composer的默认设置是防止安装不稳定的软件包。
In those cases, it’s easy to add the minimum-stability flag into the composer.json file, and Composer will allow their installation.
在这种情况下,可以将minimum-stability标志添加到composer.json文件中,Composer将允许其安装。
composer config minimum-stability devAlmost all configuration values can be edited from the command line, as explained in this section of the docs.
如文档本节所述,几乎所有配置值都可以从命令行进行编辑。
全球套餐 (Global Packages)
Some packages can come in handy if installed globally. Case in point, tools like Spress and Laravel can have command line tools for generating new projects, re-running some common commands, etc. Likewise, a test suite like PHPUnit can benefit from being runnable from any part of the system, and makes the project it’s testing much lighter.
如果在全球范围内安装,某些软件包可能会派上用场。 举例来说,诸如Spress和Laravel之类的工具可以具有用于生成新项目,重新运行一些常见命令等的命令行工具。同样,诸如PHPUnit之类的测试套件可以从系统的任何部分运行,从而受益匪浅。项目它的测试要轻得多。
In general, packages can be installed globally with the global option, like so:
通常,可以使用global选项在global范围内安装软件包,如下所示:
composer global require phpunit/phpunitHowever, according to some, this is considered harmful. Your mileage may vary – we’ve generally found that when a professional and modern approach of developing in an isolated environment is followed, global require is 100% safe to use.
但是, 据一些人说 ,这被认为是有害的。 您的工作量可能会有所不同–我们通常发现,如果遵循在孤立环境中进行开发的专业和现代方法, global require就可以100%安全地使用。
包装专家 (Packagist)

Packagist is Composer’s main repository. This is where all the Composer packages are aggregated, which means that when we execute composer search <package> we are actually searching Packagist. The Packagist website also has information on all the packages and a useful search and sort engine. This way, PHP developers don’t have to spend days searching for packages on Github.
Packagist是Composer的主要存储库。 这是所有Composer软件包的聚集位置,这意味着当我们执行composer search <package> ,实际上是在搜索Packagist。 Packagist网站还提供了有关所有包装的信息以及有用的搜索和排序引擎。 这样,PHP开发人员不必花几天时间在Github上搜索软件包。
Not only does Packagist aggregate PHP packages, it also encourages PHP developers to submit their own packages, strengthening the community.
Packagist不仅聚合PHP软件包,而且还鼓励PHP开发人员提交自己的软件包,从而增强社区。
将包装提交给Packagist (Submitting a Package to Packagist)
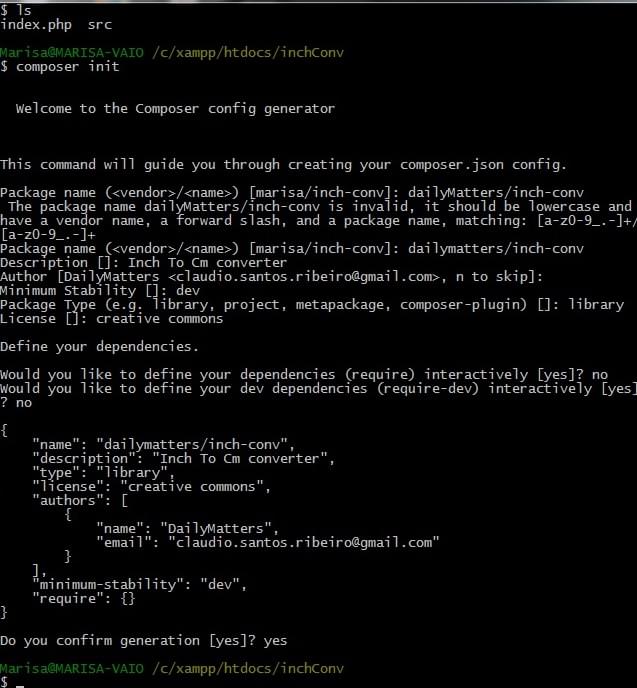
Let’s create a simple PHP package so we can see how easy it is to submit it to Packagist. We are going to create a simple class that converts inches to centimetres and centimetres to inches. Let’s create a /src/Converter/Converter.php file. Inside this file, we are going to have the following code:
让我们创建一个简单PHP软件包,以便我们可以轻松地将其提交给Packagist。 我们将创建一个简单的类,将英寸转换为厘米,将厘米转换为英寸。 让我们创建一个/src/Converter/Converter.php文件。 在此文件中,我们将具有以下代码:
<?php

namespace Converter;

class Converter
{
    public function convertToCm($value)
    {
        return $value * 0.3937;
    }

    public function convertToInch($value)
    {
        return $value * 2.54;
    }
}
As you can see, a very simple class. The second step is to navigate to the root of our project and run the composer init command to run the wizard and generate the composer.json file.
如您所见,这是一个非常简单的类。 第二步是导航到项目的根目录并运行composer init命令以运行向导并生成composer.json文件。
The last thing we need to do is add the autoload key to our composer.json file. The final file should look like this:
我们需要做的最后一件事是将自动加载密钥添加到我们的composer.json文件中。 最终文件应如下所示:
{
    "name": "dailymatters/inch-conv",
    "description": "Inch To Cm converter",
    "type": "library",
    "license": "creative commons",
    "authors": [
        {
            "name": "DailyMatters",
            "email": "email@gmail.com"
        }
    ],
    "minimum-stability": "dev",
    "require": {},
    "autoload": {
        "psr-0": {
            "Converter": "src/"
        }
    }
}
Let’s now run composer install so that our autoloader can be created. Then, let’s test our package. In the root of our project, let’s create an index.php file.
现在让我们运行composer install以便创建我们的自动加载器。 然后,让我们测试一下我们的程序包。 在我们项目的根目录中,我们创建一个index.php文件。
<?php

require_once '/vendor/autoload.php';

use Converter\Converter;

$conv = new Converter;

$result = $conv->convertToCm(1);
echo $result;

$result = $conv->convertToInch(1);
echo $result;
As you can see, we are using the require_once '/vendor/autoload.php'; line to autoload our class and then using it to do some conversions.
如您所见,我们正在使用require_once '/vendor/autoload.php'; 行以自动加载我们的课程,然后使用它进行一些转换。
Testing it on the command line with php index.php should produce the desired result.
使用php index.php在命令行上对其进行测试应该会产生所需的结果。
To submit this package to Packagist, we need to push it to a Github repo. Then, we sign in to Packagist using our Github account, hit Submit, and point to our newly created Github repo.
要将这个包提交给Packagist,我们需要将其推送到Github仓库中。 然后,我们使用我们的Github帐户登录Packagist,点击Submit ,然后指向我们新创建的Github存储库。
Remember to update Packagist whenever you update your repo in Github! You can either configure Packagist to do it automatically, or you can access your package on Packagist and click the
Updatebutton. This way, your package in Packagist will always mirror your package’s Github state.记住,每当在Github中更新仓库时,都要更新Packagist! 您可以将Packagist配置为自动执行,也可以在Packagist上访问软件包并单击“
Update按钮。 这样,您在Packagist中的软件包将始终镜像您的软件包的Github状态。
结论 (Conclusion)
Composer has revolutionized the way PHP developers work, and promises to continue doing so. It’s a powerful and essential tool for any PHP developer’s tool belt, and the cornerstone of many modern PHP applications.
Composer彻底改变了PHP开发人员的工作方式,并承诺将继续这样做。 对于任何PHP开发人员的工具带来说,它都是一个功能强大且必不可少的工具,并且是许多现代PHP应用程序的基石。
Are you using Composer? Is anything about it unclear? Let us know in the comments below.
您在使用Composer吗? 不清楚吗? 在下面的评论中让我们知道。


 1568
1568

 被折叠的 条评论
为什么被折叠?
被折叠的 条评论
为什么被折叠?
 到【灌水乐园】发言


