


git 拉取项目分支代码
This article was created in partnership with Buddy. Thank you for supporting the partners who make SitePoint possible.
本文是与Buddy合作创建的。 感谢您支持使SitePoint成为可能的合作伙伴。
In this article, you will learn how to set up continuous integration/deployment pipelines for your branching workflow. We will be using Buddy CI/CD services to set up the pipelines. We’ll use a basic JavaScript project where we’ll set up a couple of development branches. I’ll show you how to automate testing on each type of branch. I’ll also be introducing the concept of branching workflows, and show a few examples you can adopt in your projects.
在本文中,您将学习如何为分支工作流设置连续的集成/部署管道。 我们将使用Buddy CI / CD服务来建立管道。 我们将使用一个基本JavaScript项目,在那里我们将建立几个开发分支。 我将向您展示如何在每种类型的分支上自动化测试。 我还将介绍分支工作流的概念,并展示一些您可以在项目中采用的示例。
先决条件 (Prerequisites)
To follow along with this tutorial, you only need basic Node.js skills. You also need to be conversant with Git. Here are a couple of articles to help you out:
要继续学习本教程,您只需要基本的Node.js技能。 您还需要熟悉Git。 以下几篇文章可以为您提供帮助:
Our book, Jump Start Git
我们的书《快速入门Git》
In order to set up our pipelines, we will need to write a few tests using Jest. You don’t need to learn Jest if you are new to it — the focus for this article is to learn how to set up pipelines that will automatically pick new branches and build them for you. Before we get to that, we should look into various branch strategies we can use.
为了建立我们的管道,我们将需要使用Jest编写一些测试。 如果您不了解Jest,则不需要学习它-本文的重点是学习如何建立管道,该管道将自动选择新分支并为您构建它们。 在此之前,我们应该研究可以使用的各种分支策略。
零分支战略 (Zero Branch Strategy)
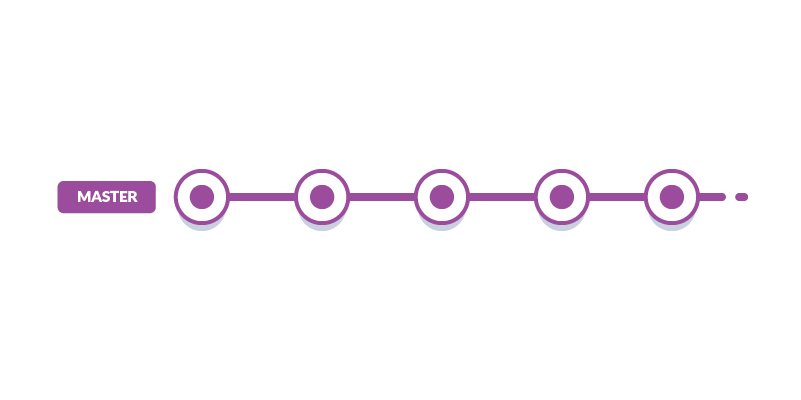
The Zero Branch Strategy is simply a fancy way of saying “you are not using any branch strategy.” It’s also known as a basic workflow. You only have a master branch where you directly commit and build your releases. This strategy is convenient and good if the project is:
零分支策略只是说“您没有使用任何分支策略”的一种奇特的方式。 也称为基本工作流程。 您只有一个master分支,您可以在其中直接提交和构建发行版。 如果项目为:此策略既方便又好:
- Small and simple 小而简单
- Hardly requires updates 几乎不需要更新
- Managed by a solo developer 由独立开发者管理
Such projects include tutorials, demos, prototypes, starter project templates and personal projects. However, there are several cons to this approach:
这些项目包括教程,演示,原型,入门项目模板和个人项目。 但是,此方法有几个缺点:
- Multiple merge conflicts will likely occur if more than one person is working on the project 如果一个以上的人在项目上工作,可能会发生多个合并冲突
- You won’t be able to develop multiple features and fix issues concurrently 您将无法同时开发多种功能并修复问题
- Removing and restoring features will be a difficult task 删除和还原功能将是一项艰巨的任务
- Your team will spend too much time dealing with version control issues instead of working on new features 您的团队将花费太多时间来处理版本控制问题,而不是着手开发新功能
All these issues can be resolved by adopting a branch strategy. This should give you:
所有这些问题都可以通过采用分支策略来解决。 这应该给您:
- Ability to work independently and push changes to the shared repository without affecting your team members 能够独立工作并将更改推送到共享存储库,而不会影响团队成员
- Ability to merge your teammates’ code with your changes and quickly resolve any conflicts that may come up 能够将您队友的代码与您的更改合并,并快速解决可能出现的任何冲突
- Assurance that code standards are maintained and collaboration efforts run smoothly regardless of the size of your team 确保代码标准得到维护,协作工作顺利进行,无论团队规模如何
Do note that there are many types of branch workflows you are free to pick. You can also create your own custom branch workflow that works best for you. Let’s start with the simplest branch strategy.
请注意,您可以自由选择多种类型的分支工作流程。 您还可以创建自己的最适合您的自定义分支工作流程。 让我们从最简单的分支策略开始。
制定分支机构战略 (Develop Branch Strategy)
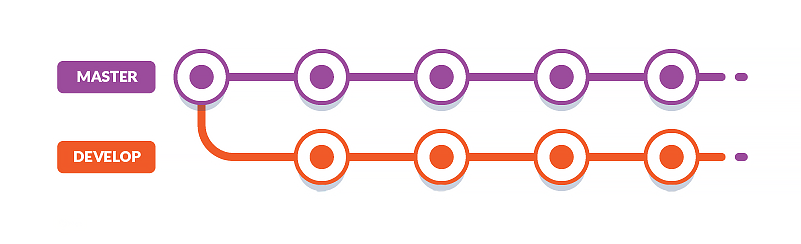
In this strategy, you set up a long-living branch called develop that runs alongside the master branch. All work is committed first to the develop branch. This is a safe place where you can introduce new code that might break your project. You’ll need a testing strategy in place in order to ensure that you don’t introduce bugs to the master branch when you merge the changes.
在此策略中,您建立了一个与master分支一起运行的长期分支,称为develop 。 所有工作都首先提交到develop部门。 这是一个安全的地方,您可以在其中引入可能会破坏项目的新代码。 您需要适当的测试策略 ,以确保合并更改时不会将错误引入master分支。
The pros of this workflow are:
此工作流程的优点是:
- Simple to implement 易于实施
The
masterbranch remains stable and healthy as long as experimental work is done on thedevelopbranch只要在
develop分支上完成实验工作,master分支就保持稳定和健康A hotfix can be implemented at any time on the
masterbranch while a feature is currently being implemented当前正在实施某个功能时,可以随时在
master分支上实施该修补程序
Cons of this workflow are:
此工作流程的缺点是:
- Multiple features can’t be developed concurrently 不能同时开发多个功能
- Only one developer (max two) can actively work on the project 只有一名开发人员(最多两名)可以积极从事该项目
Removing and restoring features using just the
developbranch is a challenge仅使用
develop分支来删除和恢复功能是一个挑战
Let’s look at another workflow that could mitigate these challenges.
让我们看一下可以减轻这些挑战的另一个工作流程。
功能分支策略 (Feature Branch Strategy)
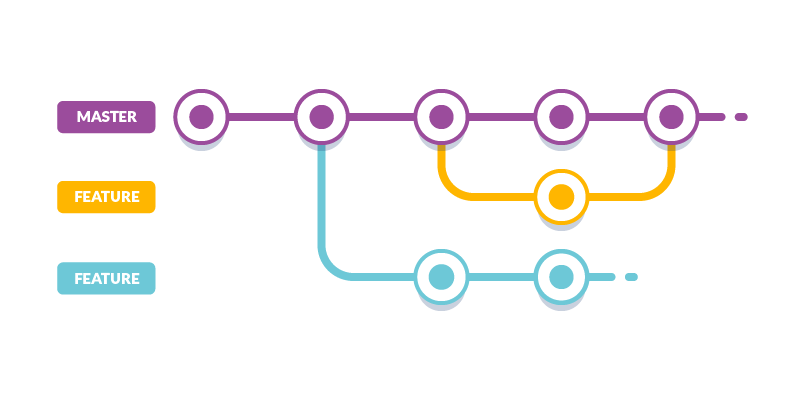
In this workflow, you setup a new feature branch every time you want to develop a new feature. You can apply a hotfix at anytime on the master branch in case a problem arises. Developers will need to pull in the latest fixes from the master branch first before they can merge their feature branch into master.
在此工作流程中,每次要开发新功能时都设置一个新feature分支。 如果出现问题,您可以随时在master分支上应用hotfix 。 开发人员必须先从master分支获取最新的修补程序,然后才能将其feature分支合并到master。
You will need a naming convention for your branches in order to track features and bug fixes that are currently under development. Here are some of the format suggestions you can find on the internet:
您需要为分支机构使用命名约定,以便跟踪当前正在开发的功能和错误修复。 以下是您可以在互联网上找到的一些格式建议:
users/username/descriptionusers/username/descriptionusers/username/workitemusers/username/workitembugfix/descriptionbugfix/descriptionfeatures/feature-namefeatures/feature-namefeatures/feature-area/feature-namefeatures/feature-area/feature-namefeatures/id(the ‘id’ is generated by a project management tool)features/id(“ ID”由项目管理工具生成)hotfix/descriptionhotfix/description
The pros of this strategy are:
该策略的优点是:
- You can have large number of developers on your project working on multiple features concurrently 您的项目中可以有大量的开发人员同时使用多个功能
- It’s easy to remove features and restore them later if you change your mind 如果您改变主意,很容易删除功能并在以后还原它们
- You can easily track what each developer is working on 您可以轻松跟踪每个开发人员的工作
The cons of this strategy are:
此策略的缺点是:
- Developing features concurrently is not always feasible for situations where implementing a feature is dependent on another feature yet to be developed. This means the features can’t be pushed to the master until all dependent features are complete 对于同时实现功能的开发,对于实现功能依赖于尚待开发的另一功能的情况,并非总是可行的。 这意味着,直到所有相关功能都完成后,才能将功能推送到主服务器
Let’s look at the next strategy and see how we can mitigate this problem.
让我们看一下下一个策略,看看如何减轻这个问题。
Gitflow分支策略 (Gitflow Branch Strategy)

If you can combine the “Develop” and “Feature” branch workflows, you get a solution that cancels each other’s cons. Vincent Driessen wrote a blog post where he describes an advance git branching model that helps large teams collaborate efficiently on complex projects with minimal version control issues.
如果您可以将“开发”和“功能”分支工作流程结合在一起,那么您将获得一个消除彼此弊端的解决方案。 Vincent Driessen在博客上发表了一篇文章,他描述了一种先进的git分支模型,该模型可以帮助大型团队在复杂的项目上高效地协作,而将版本控制问题降至最低。
Gitflow is a customizable model that allows you to pick the features that will work best for your project and your team. If you are using Gitflow, you can adopt Daniel Kummer’s git-flow git extensions. These are tools that allow developers execute high-level repository operations based on Vincent’s model. I won’t go much into this but here is what you need to know.
Gitflow是一个可定制的模型,使您可以选择最适合您的项目和团队的功能。 如果您使用的是Gitflow,则可以采用Daniel Kummer的 git-flow git扩展。 这些工具使开发人员可以根据Vincent模型执行高级存储库操作。 我不会对此做太多介绍,但这是您需要知道的。
Pros:
优点:
- Suitable for large teams working on a complex project 适用于从事复杂项目的大型团队
- Easy to track active features and organize releases 易于跟踪活动功能并组织发布
Cons:
缺点:
- Overkill for small projects 小项目的过度杀伤力
Let’s now look at how we can automate tasks on our branches using Buddy CI services.
现在让我们看一下如何使用Buddy CI服务在分支机构上自动执行任务。
分支模型管道 (Branch Model Pipelines)
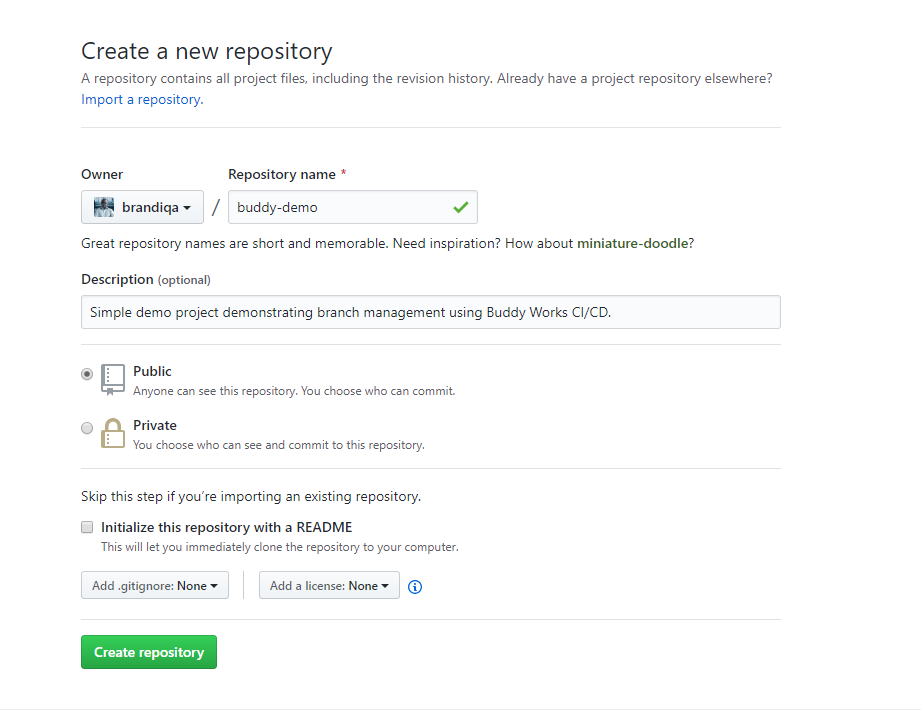
We need to set up a simple project first, and use it to set up our pipelines. We’ll create pipelines that only pull changes automatically and run tests. First, create a new GitHub repository. Call it buddy-demo.
我们需要首先建立一个简单的项目,并使用它来建立我们的管道。 我们将创建仅自动提取更改并运行测试的管道。 首先,创建一个新的GitHub存储库。 称其为buddy-demo 。
Next, download the following starter project and push it to your repo:
接下来,下载以下入门项目并将其推送到您的仓库中:
$ git clone git@github.com:brandiqa/react-parcel-starter.git buddy-demo
$ git remote rm origin
# Replace `username` with yours
$ git remote add origin git@github.com:username/buddy-demo.git
$ git config master.remote origin
$ git config master.merge refs/heads/master
$ git push -u origin master
The project is a bare-bones React project built using Parcel. You can run the following commands to ensure its running:
该项目是使用Parcel构建的一个简单的React项目。 您可以运行以下命令以确保其运行:
$ npm install
$ npm start
If you are using Visual Studio Code, press F5 to launch the browser. Otherwise, open a browser page and navigate to localhost:1234.
如果您使用的是Visual Studio Code,请按F5键启动浏览器。 否则,请打开浏览器页面并导航到localhost:1234 。
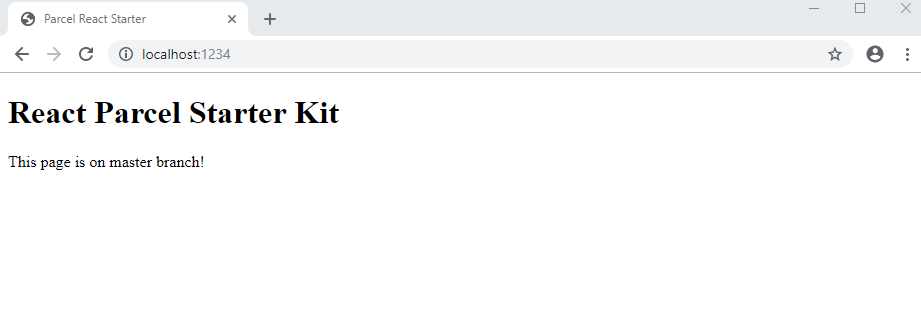
As you can see, there’s nothing fancy. Before we can deploy it to our Buddy CI, we need to write a test. We’ll use Jest Testing Framework for this:
如您所见,没有任何幻想。 在将其部署到Buddy CI之前,我们需要编写测试。 我们将为此使用Jest测试框架 :
$ npm install -D jestUpdate the package.json script section to run jest when npm test command is executed.
更新package.json脚本部分以在执行npm test命令时运行jest 。
"scripts": {
   //...
    "test": "jest"
  },
Let’s update src\App.jsx a bit:
让我们更新src\App.jsx :
<div>
<h1>React Parcel Starter Kit</h1>
<p>This page is on master branch!</p>
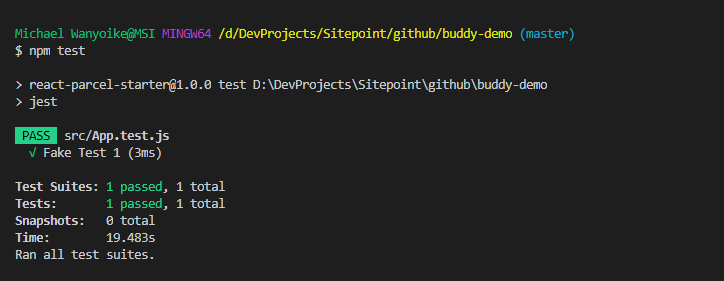
</div>Next, let’s write a fake test that passes. Create the file App.test.js and insert this code:
接下来,让我们编写一个通过的假测试。 创建文件App.test.js并插入以下代码:
test("Fake Test 1", () => {
  expect(true).toBeTruthy();
});
Execute the command npm test to confirm that our test is passing.
执行命令npm test以确认我们的测试通过了。
Commit your changes and push it to your GitHub repo. Next we’ll set up our CI pipeline at Buddy. if you are new to the platform, simply sign up for a free account using your GitHub account. Do note that Buddy does support a number of remote repository services other than GitHub:
提交您的更改并将其推送到您的GitHub存储库。 接下来,我们将在Buddy建立CI管道。 如果您不熟悉该平台,只需使用GitHub帐户注册一个免费帐户即可。 请注意,除了GitHub,Buddy还支持许多远程存储库服务:
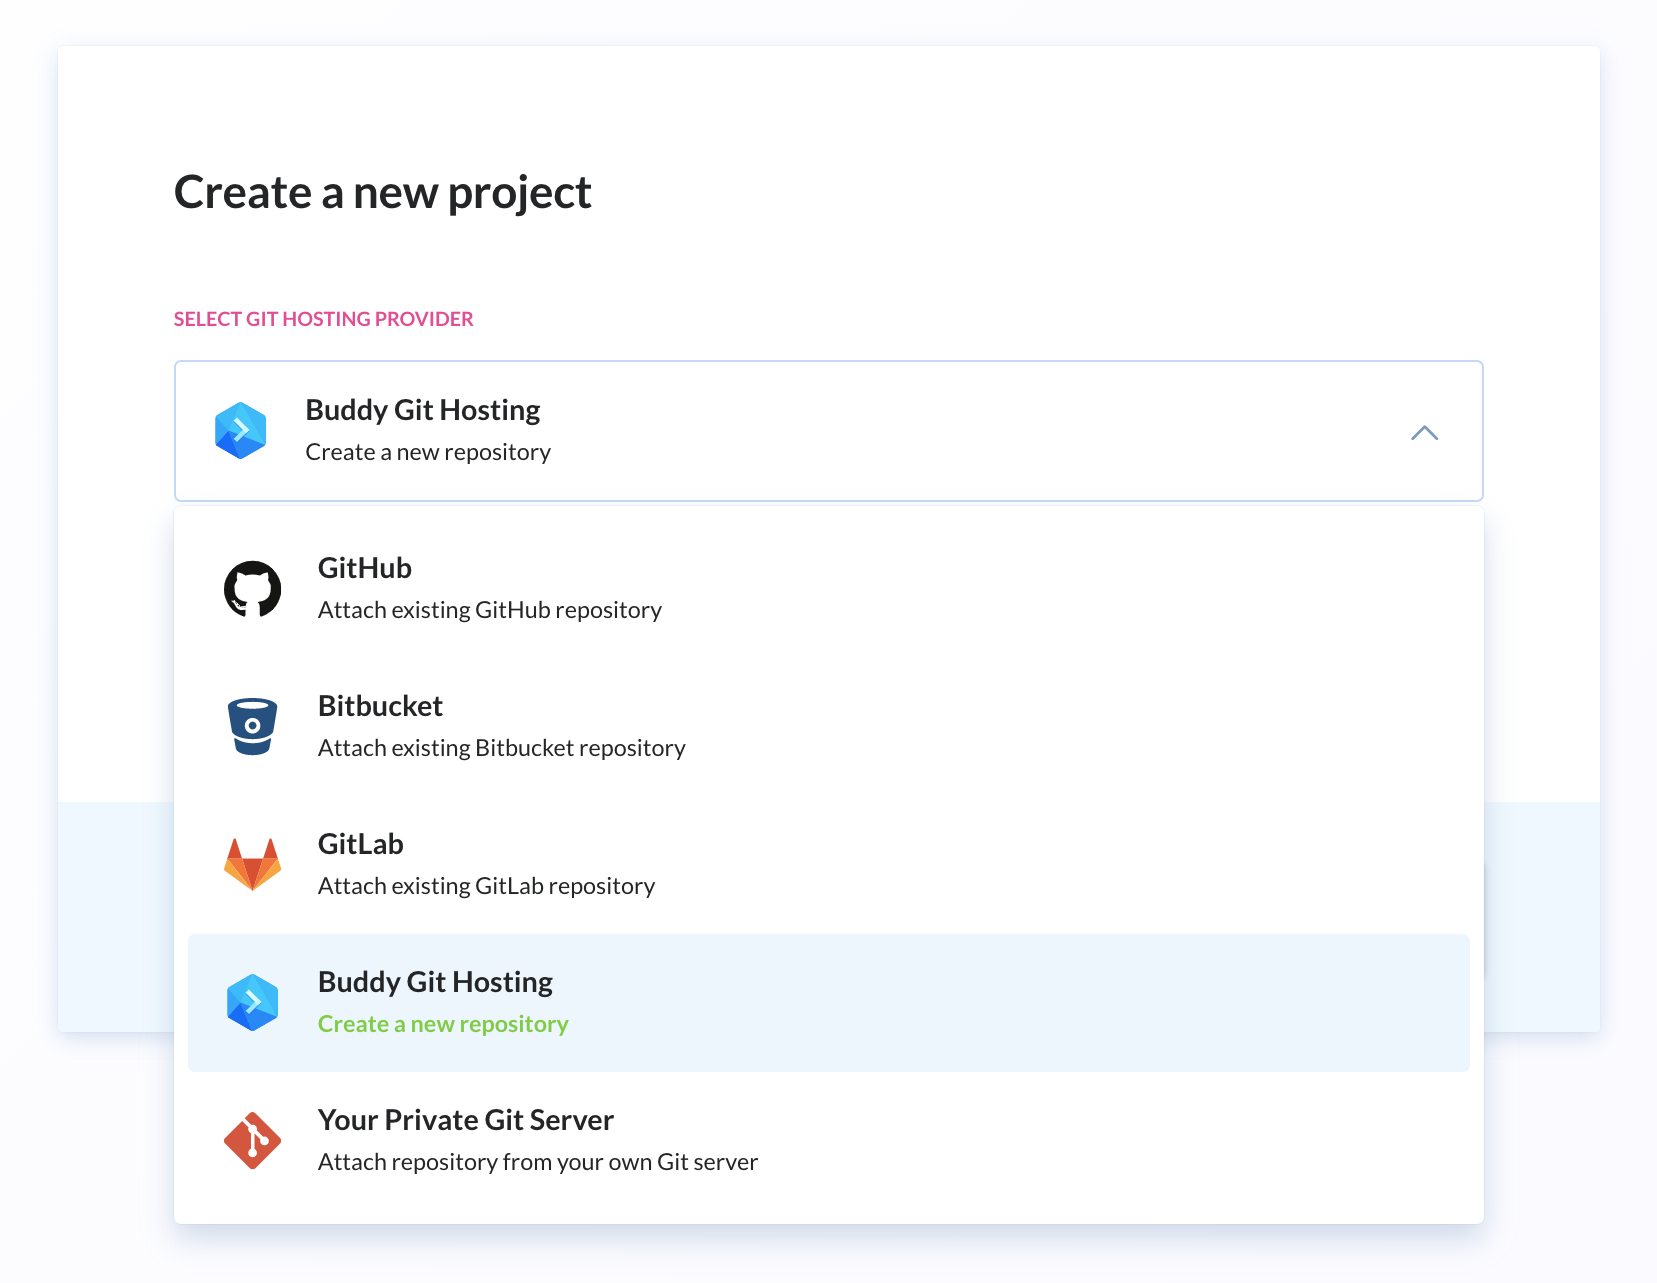
Whichever service provider you pick, Buddy will list the repositories you can set up automation for. In our case, we’ll select the buddy-demo project. Click the Add a new pipeline button then fill in the next page with the following details:
无论您选择哪种服务提供商,Buddy都会列出您可以为其设置自动化的存储库。 在本例中,我们将选择buddy-demo项目。 单击Add a new pipeline按钮,然后在下一页中填写以下详细信息:
Name – Master
名字 –硕士
Trigger Mode – On push
触发模式 –按下
Branch – Single branch : master
分支机构 –单个分支机构:主
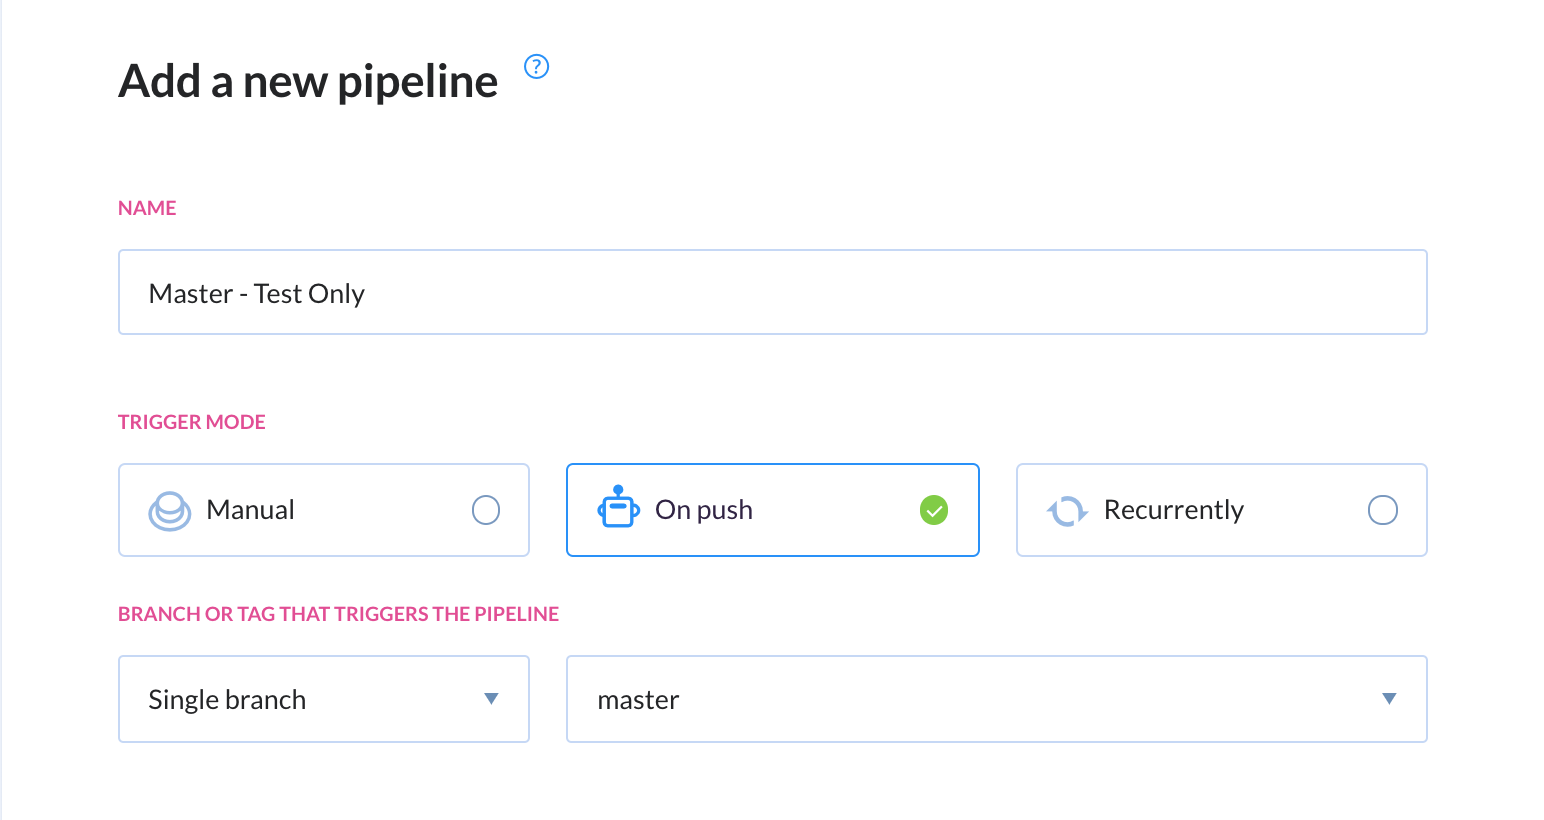
In our master pipeline, we will set up actions for:
在主管道中,我们将为以下各项设置操作:
- Running tests 运行测试
- Bundling app 捆绑应用
- Deploying to web server 部署到Web服务器
In the next page, you’ll be presented with different methods of defining an action. Pick Node.js and on the next page, ensure the following commands have been specified:
在下一页中,将向您介绍定义动作的不同方法。 选择Node.js然后在下一页上,确保已指定以下命令:
npm install
npm test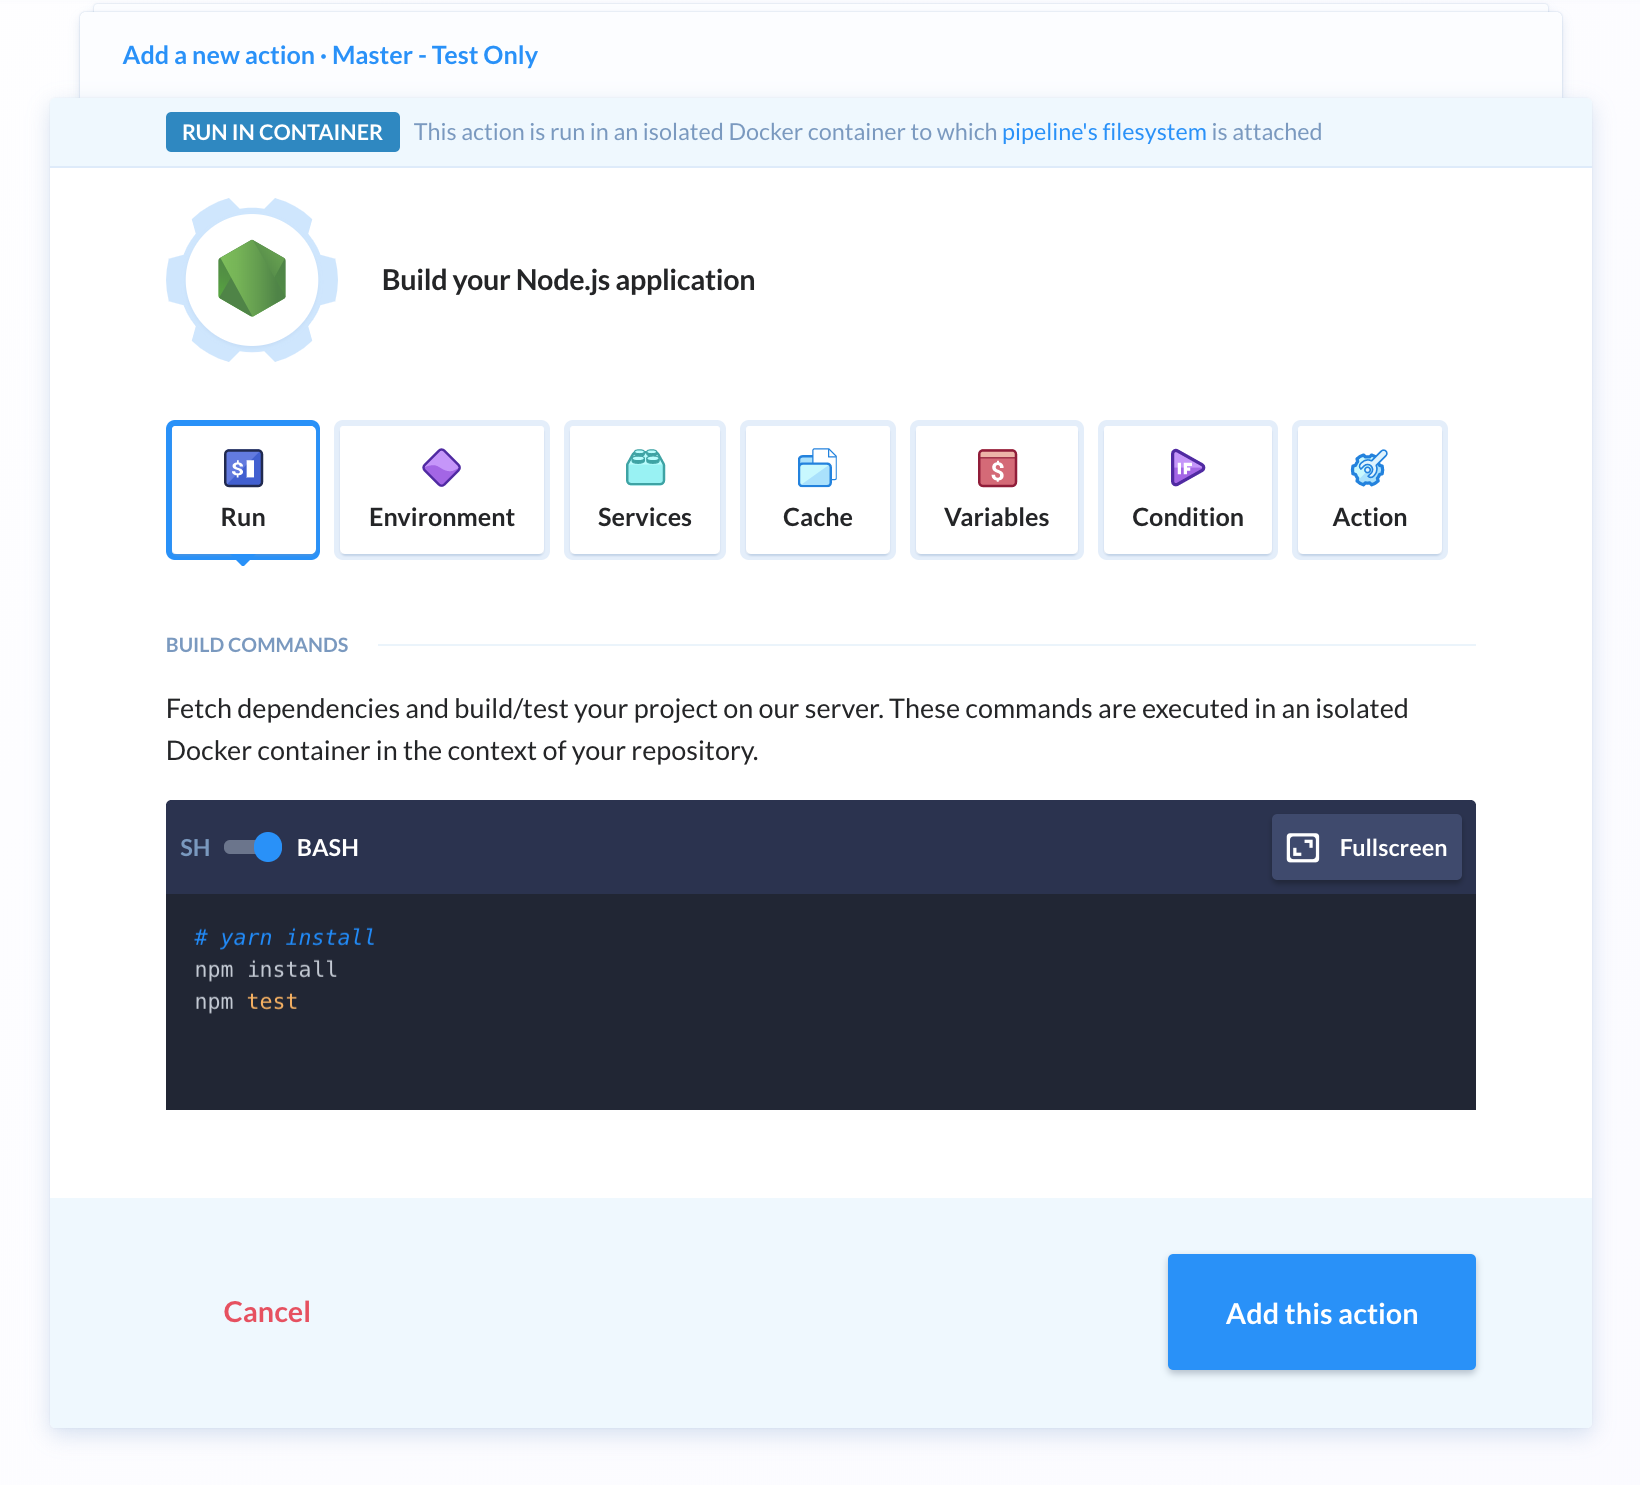
You can rename the action name to “Run Tests” on the Action tab. I would like to point out that if your tests require a database service, you can set up one via the Services tab:
您可以在“ Action选项卡上将操作名称重命名为“运行测试”。 我想指出的是,如果您的测试需要数据库服务,则可以通过“ Services选项卡进行设置:
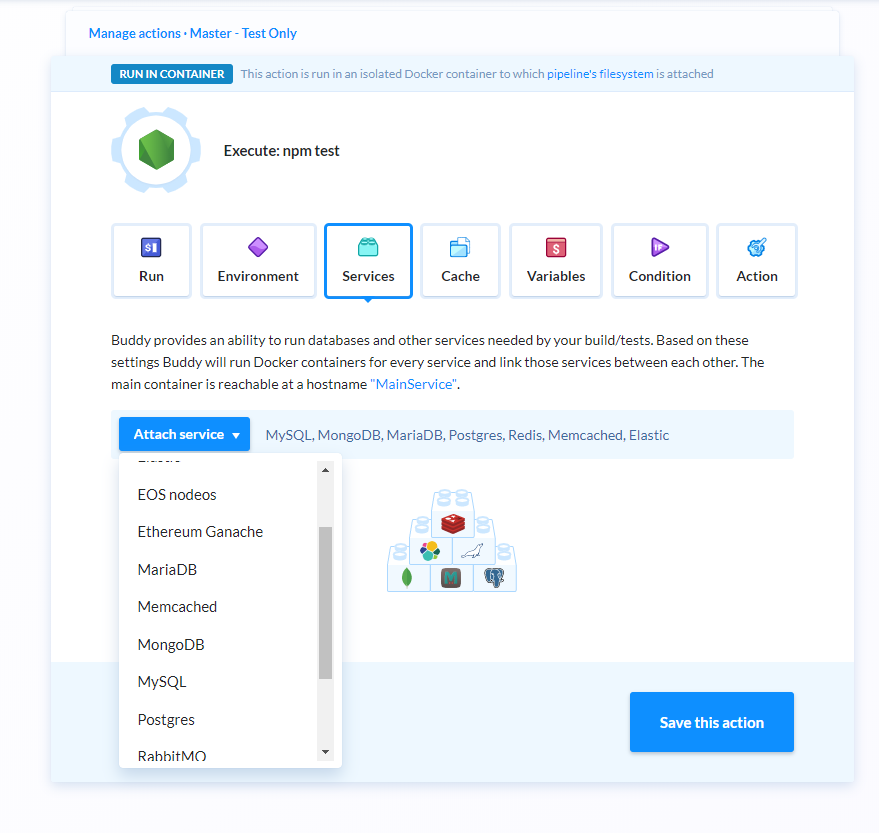
Most popular databases are already supported. Simply select a database type and provide the connection details and credentials. Click the Add this Action button when done. On the next page, click the plus button at the bottom to add the “Bundle Assets” action. Pick Node.js again and enter the following command in the next page:
已经支持大多数流行的数据库。 只需选择数据库类型并提供连接详细信息和凭据。 完成后,单击“ Add this Action按钮。 在下一页上,单击底部的plus按钮以添加“捆绑资产”操作。 再次选择Node.js ,然后在下一页中输入以下命令:
npm run buildRename the action as Bundle Assets in the Action tab. Click Add this Action when done. Click the plus symbol again to add the “Deploy to Production” action. Buddy natively supports deploying projects to different types of hosting vendors:
在“ Action选项卡中将Action重命名为“ Bundle Assets Action 。 完成后,单击“ Add this Action 。 再次单击plus以添加“部署到生产”操作。 Buddy本机支持将项目部署到不同类型的托管供应商:
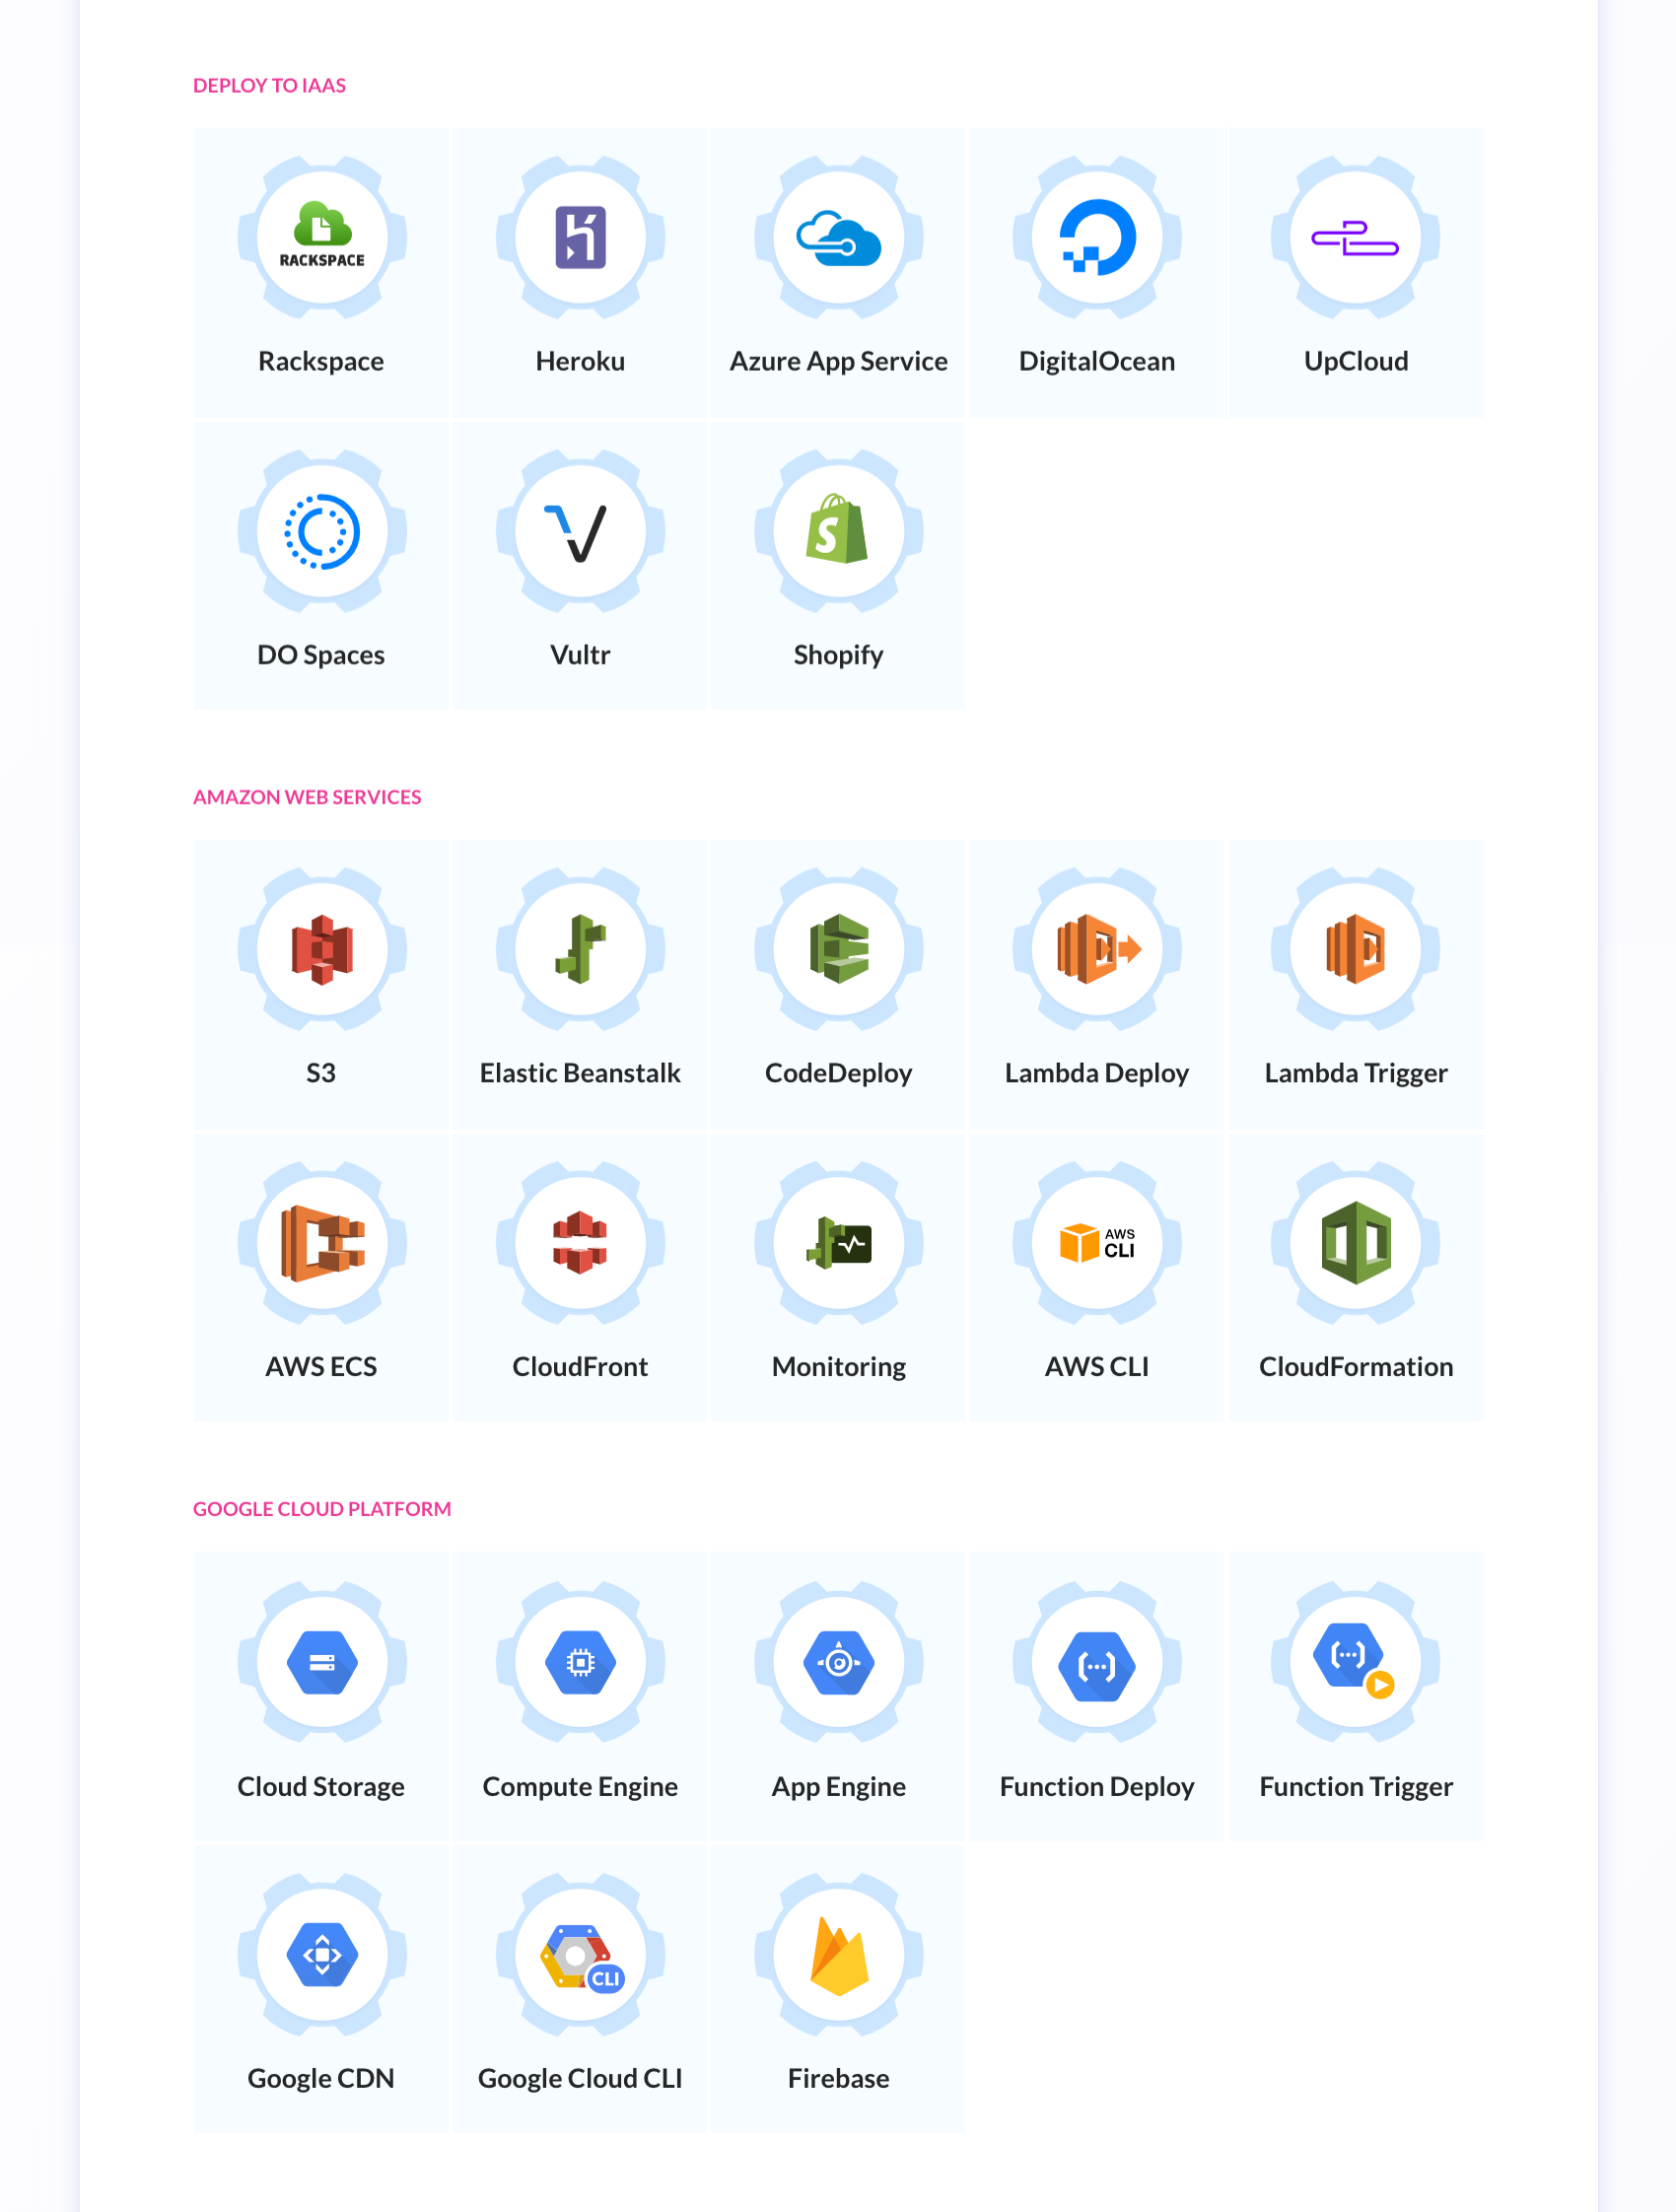
Feel free to use any of the deployment options if you have an account with any of those services. If you don’t, choose a provider that allows you to set up a free account to deploy your app. In my case, I already have a shared web hosting plan account I can use. Normally, you will have your main website, www.domainname.com to host your live production version of your project.
如果您拥有这些服务中的任何一个,请随意使用任何部署选项。 如果不这样做,请选择一个提供程序,允许您设置一个免费帐户来部署您的应用程序。 就我而言,我已经有一个共享的虚拟主机计划帐户可以使用。 通常,您将拥有主网站www.domainname.com来托管项目的实时生产版本。
You’ll need to have a separate staging site (usually hidden from public) that is deployed from your develop or integration branch pipeline. The staging site can simply be a subdomain that should not be indexable by search engines. The staging site will allow developers, project managers and beta testers to confirm that new features are working correctly before pushing to the live production site.
您需要有一个单独的暂存站点(通常对公众隐藏),该站点从develop或integration分支管道中进行部署。 登台站点可以只是一个子域,不应由搜索引擎索引。 暂存站点将允许开发人员,项目经理和Beta测试人员在将新功能推送到实时生产站点之前确认新功能是否正常工作。
To deploy your app to a shared or dedicated web hosting server (with CPanel), simply use the FTP method. Buddy also provides a sFTP method which will encrypt your project assets bundle when uploading to your server. Here is an example of how I’ve set up mine:
要将您的应用程序部署到共享或专用的Web托管服务器(使用CPanel),只需使用FTP方法。 Buddy还提供了sFTP方法,该方法将在上传到您的服务器时加密您的项目资产捆绑包。 这是我如何设置我的示例:
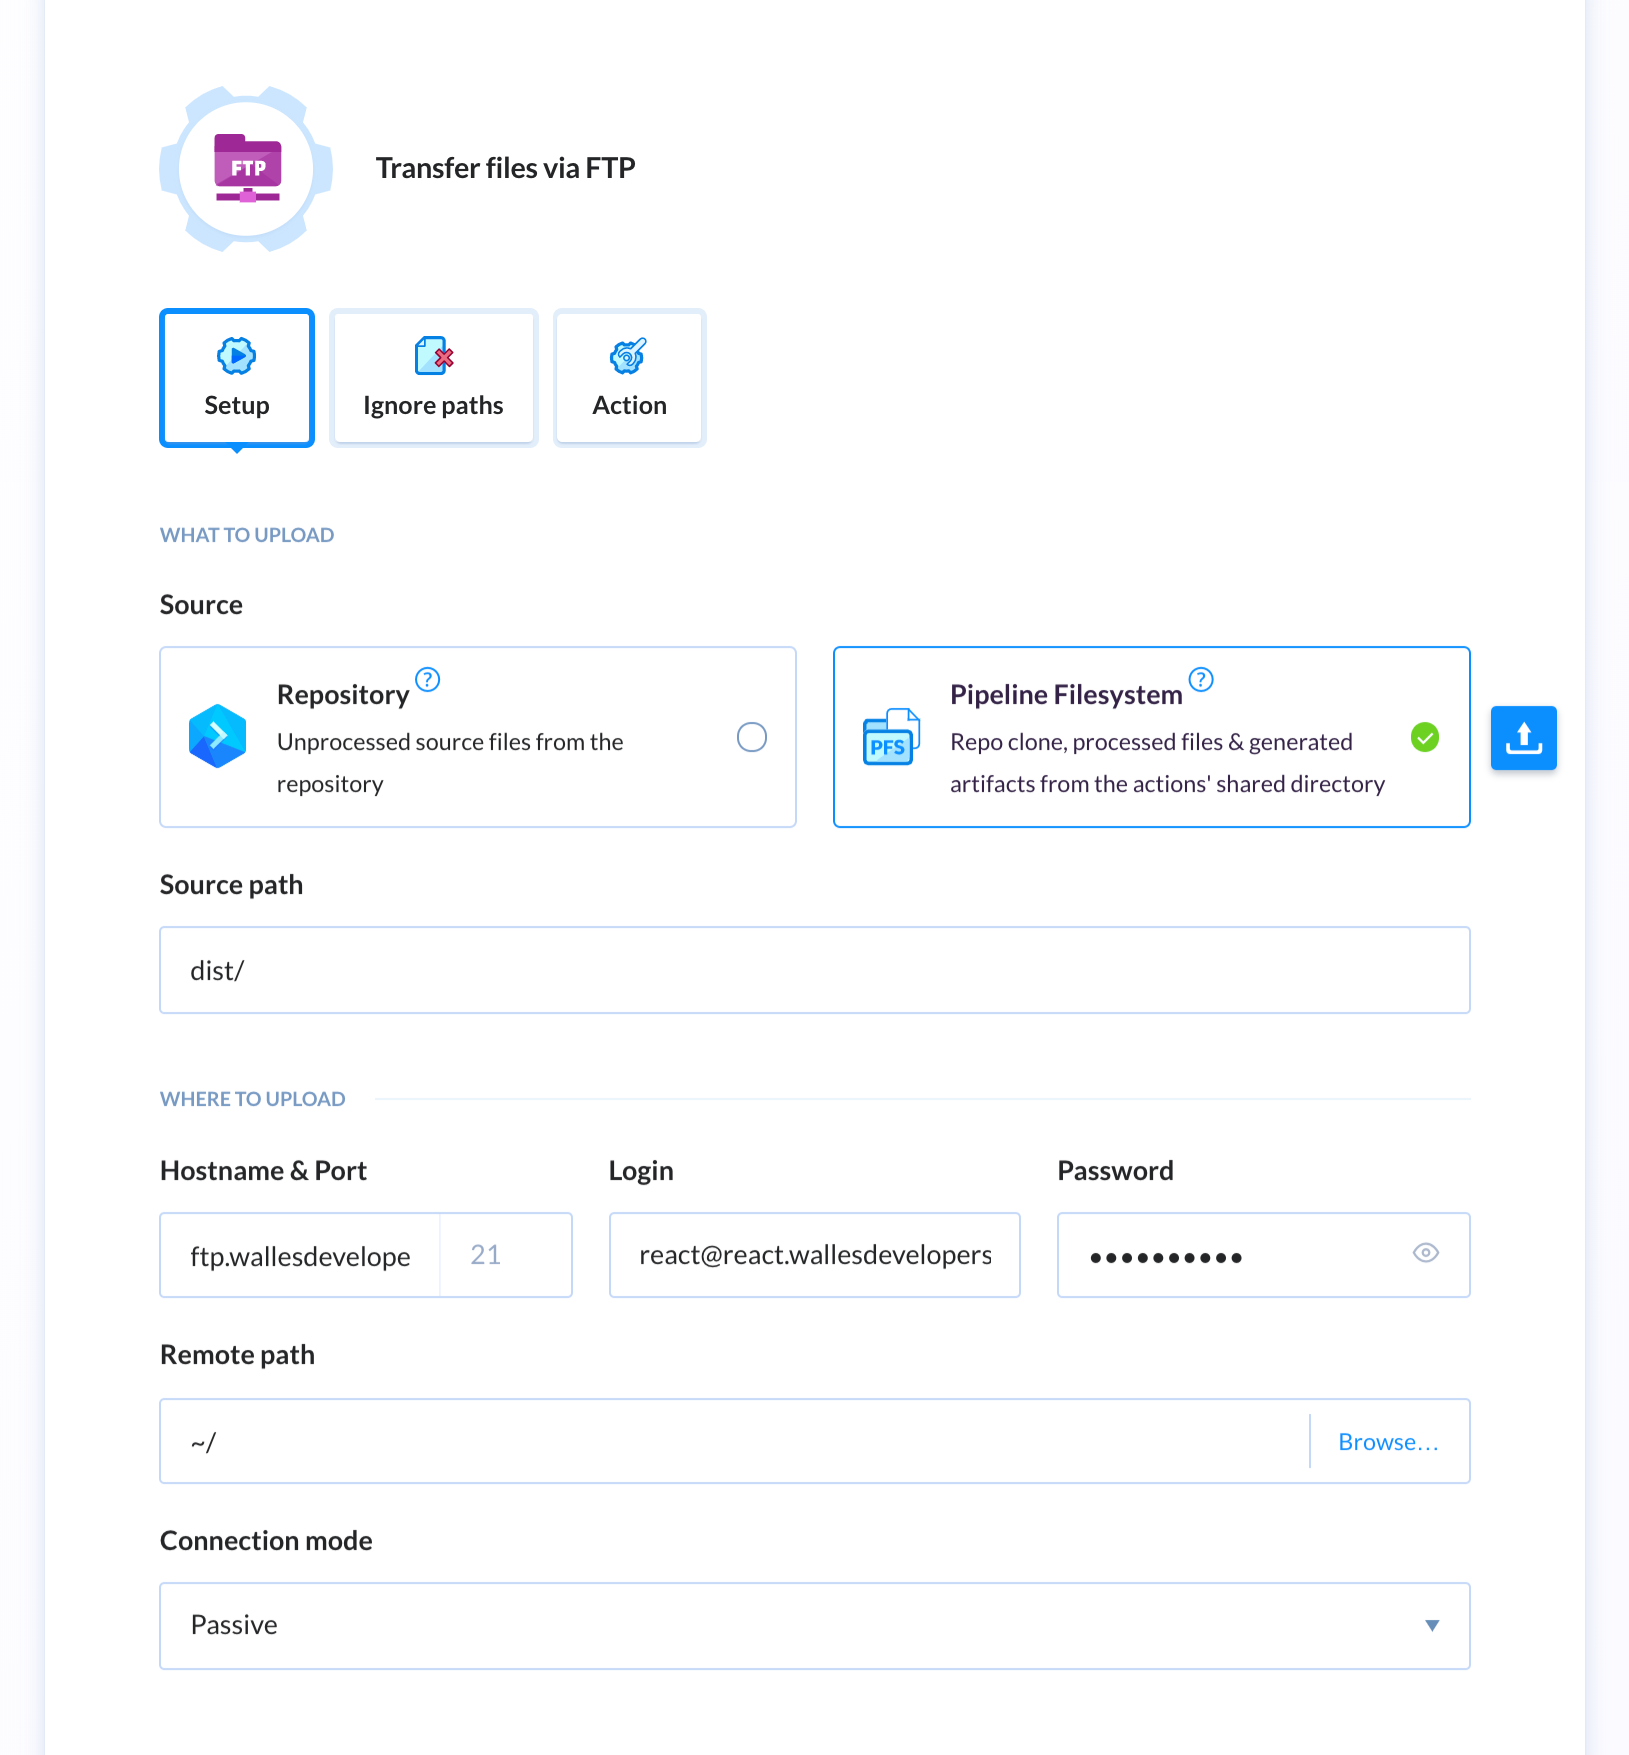
You’ll need to setup a new FTP account using your CPanel. Make sure the home directory for your new FTP user account points directly to the www or sub-domain folder. Otherwise, you may not be able to access the right hosting directory via FTP. Once you have set up all three actions in your pipeline, you can:
您需要使用CPanel设置一个新的FTP帐户。 确保新的FTP用户帐户的主目录直接指向www或sub-domain文件夹。 否则,您可能无法通过FTP访问正确的托管目录。 在管道中设置了所有三个操作后,您可以:
- Run your pipeline manually 手动运行管道
- Push new code to your remote repo and Buddy will automatically run it for you 将新代码推送到您的远程仓库中,Buddy将自动为您运行
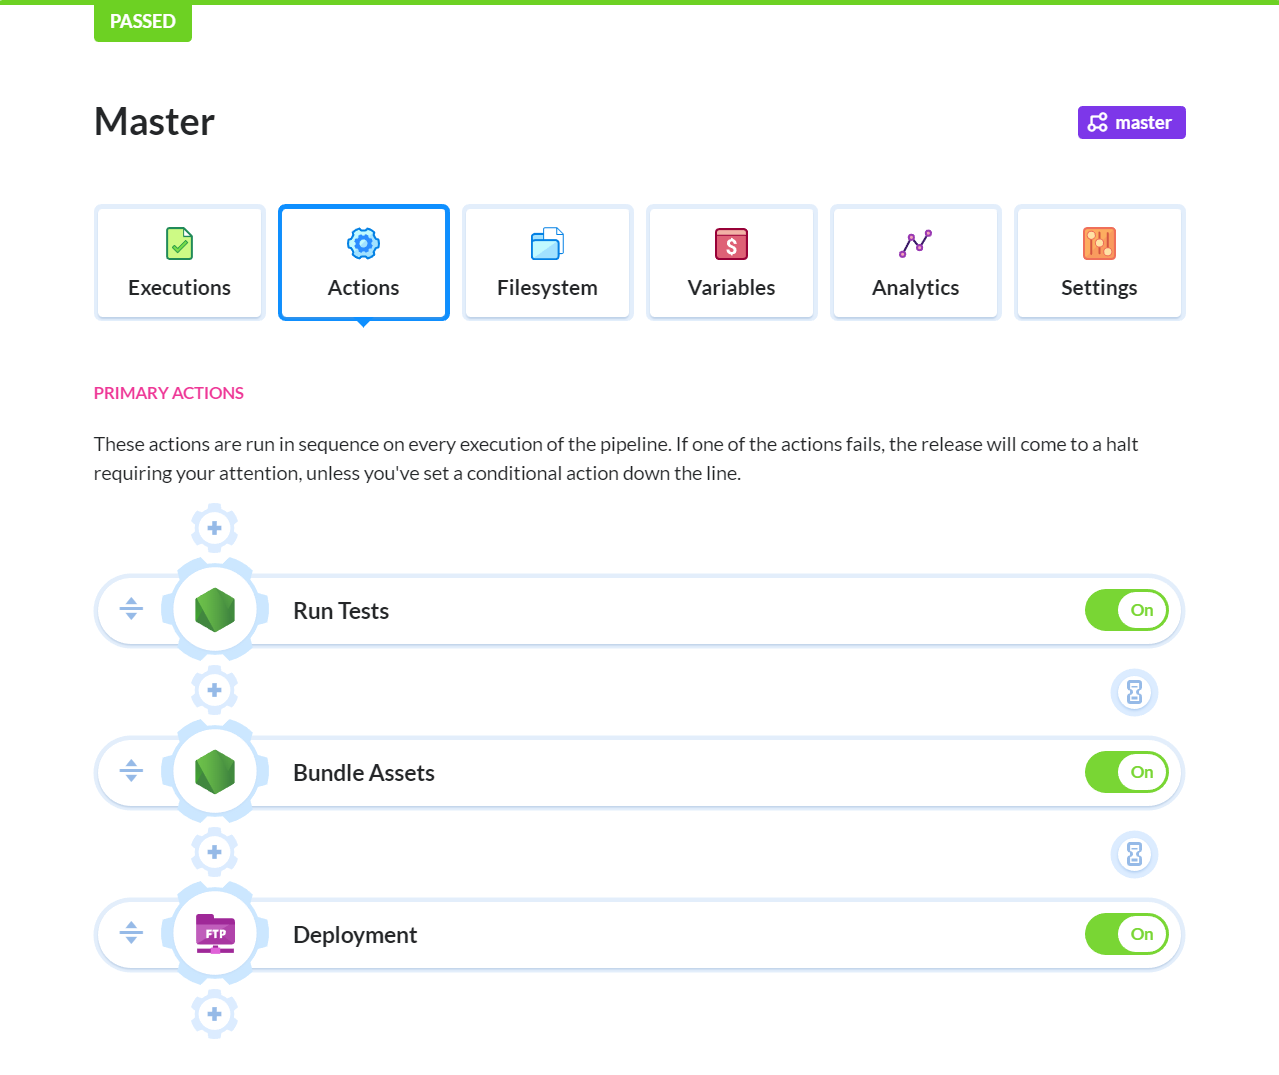
Once you’re done, this is how the complete pipeline should look:
完成后,这就是完整管道的外观:
Assuming you are using the Gitflow workflow or something similar, you’ll probably need to setup additional pipelines for:
假设您正在使用Gitflow工作流程或类似的工具,则可能需要为以下目的设置其他管道:
- Develop/Integration branch 开发/集成部门
- Feature branches 功能分支
- Hotfix branches 修补程序分支
The develop branch pipeline will almost be identical to the master branch pipeline. You’ll need to provide different configuration for the deployment though such that the code is deployed to a staging site. The Feature and Hotfix branch pipelines will only need to have at least the testing action configured. You probably would want to limit the number of tests you can run in the Feature branch pipeline. You can do this easily in Jest by simply appending this to the test command: jest --coverage --changedSince=master. This will test only new code that has not yet been pushed into the master branch.
develop分支管道将几乎与master分支管道相同。 尽管您需要为部署提供不同的配置,以便将代码部署到暂存站点。 Feature和Hotfix分支管道仅需要至少配置testing操作。 您可能希望限制可以在Feature分支管道中运行的测试数量。 您可以在Jest中轻松完成此操作,只需将其附加到测试命令即可: jest --coverage --changedSince=master 。 这将仅测试尚未推送到master分支中的新代码。
Since there will be multiple feature and hotfix branches, you may be wondering how one can set up a pipeline for such a situation. Simple — just use the wildcard option:
由于将有多个feature和hotfix分支,因此您可能想知道如何为这种情况设置管道。 简单-只需使用通配符选项:

To confirm that your develop/feature*/hotfix* pipeline is working, simply create the branch on your computer. Let’s create a random feature branch in this case:
要确认您的develop / feature* / hotfix*管道正在运行,只需在计算机上创建分支即可。 在这种情况下,让我们创建一个随机feature分支:
git checkout -b feature/task-1Then create a new test in App.test.js:
然后在App.test.js创建一个新测试:
test("Fake Test 2 for Fake Feature", () => {
  expect(true).toBeTruthy();
});
Next, commit the changes and push the branch to your GitHub repo:
接下来,提交更改并将分支推送到您的GitHub存储库:
$ git add .
$ git commit -m "Added first feature branch"
$ git push -u origin feature/task-1
[feature/task-1 049bef2] Added first feature branch
 1 file changed, 4 insertions(+)
If you quickly switch to your Buddy account dashboard, you should see your pipeline picking up your new branch and running the actions that you defined. That is how we set up pipelines for any branch strategy workflow you have adopted for your project.
如果您快速切换到Buddy帐户的仪表板,则应该会看到管道选择了新分支并运行了您定义的操作。 这就是我们为您的项目采用的任何分支策略工作流建立管道的方式。
摘要 (Summary)
As a final note, if you plan on having long-living branches, it’s a good idea to set them up on your shared repo first. This way, when you start creating new pipelines, you can simply use the Select Branch option to select your long-living branch.
最后要注意的是,如果您打算建立长期存在的分支机构,则最好先在共享存储库中设置它们。 这样,当您开始创建新管道时,只需使用“ Select Branch选项来选择您的长期分支。
We have now come to the end of the tutorial. As a challenge, go ahead and set up pipelines for hotfix and develop. Create some branches and write some failing tests to see what happens. You can also go ahead and research more about Git branching strategies. If you are up to it, you can even install git-flow and customize your own branching workflow using the tool. Then, set up your Buddy pipeline to support your custom git branching workflow.
现在我们到了教程的结尾。 作为挑战,请继续并建立hotfix和develop管道。 创建一些分支并编写一些失败的测试以查看会发生什么。 您也可以继续研究有关Git分支策略的更多信息。 如果您愿意的话,甚至可以使用该工具安装git-flow并自定义自己的分支工作流程。 然后,设置您的Buddy管道以支持您的自定义git分支工作流程。
git 拉取项目分支代码


 8827
8827

 被折叠的 条评论
为什么被折叠?
被折叠的 条评论
为什么被折叠?
 到【灌水乐园】发言


