stream !
In the previous post, we saw how to add the follow functionality to a Laravel app. We also looked at how to configure our app to use Stream. This part will focus on:
在上 一篇 文章中 ,我们看到了如何向Laravel应用程序添加关注功能。 我们还研究了如何配置我们的应用程序以使用Stream 。 本部分将重点关注:
- configuring our models in order to make it possible to track activities. 配置我们的模型,以便可以跟踪活动。
- the different types of feeds that Stream provides. Stream提供的不同类型的供稿。
- getting feeds from Stream. 从Stream获取Feed。
- rendering the different types of feeds in a view. 在视图中呈现不同类型的提要。

活动领域 (Activity Fields)
When using Stream, models are stored in feeds as activities. An activity is composed of at least the following data fields: actor, verb, object, time. You can also add more custom data if needed.
使用Stream时,模型作为活动存储在feed中。 活动至少由以下数据字段组成: actor , verb , object , time 。 如果需要,您还可以添加更多自定义数据。
object is a reference to the model instance itself
对象是对模型实例本身的引用
actor is a reference to the user attribute of the instance
actor是对实例的user属性的引用
verb is a string representation of the class name
动词是类名称的字符串表示形式
Let’s define the activity verb inside our Post model:
让我们在Post模型中定义活动动词:
[...]
class Post extends Model
{
    [...]
    /**
    * Stream: Change activity verb to 'created':
    */
    public function activityVerb()
    {
        return 'created';
    }
}
饲料经理 (Feed Manager)
We’ll leverage the FeedManager to make our app lively. Stream Laravel comes with a FeedManager class that helps with all common feed operations. We can get an instance of the manager with FeedManager which we set as the facade alias earlier inside the config/app.php file.
我们将利用FeedManager使我们的应用程序更加生动。 Stream Laravel带有FeedManager类,该类可帮助所有常见的提要操作。 我们可以使用FeedManager来获得管理器的实例,该实例之前已在config/app.php文件中设置为Facade别名。
预先捆绑的Feed (Pre-Bundled Feeds)
To get us started, the manager has feeds pre-configured. We could also add more feeds if our app needed them. The three feeds are divided into three categories: User Feed, News Feed and Notification Feed. The User feed, for example, stores all activities for a user. Let’s think of it as our personal Facebook page. We can easily get this feed from the manager.
为了让我们开始使用,经理已预先配置了Feed。 如果我们的应用需要它们,我们还可以添加更多的供稿。 这三个提要分为三类: User Feed , News Feed和Notification Feed 。 例如, User feed存储了用户的所有活动。 让我们将其视为我们的个人Facebook页面。 我们可以轻松地从经理那里获取此提要。
For this application, however, we are more interested in getting notifications for posts created by people we follow and also notifications for new follows, thus we’ll just stick to the News Feed and the Notification Feed. For more information on the other types of feeds and how to use them visit this link.
但是,对于此应用程序,我们更感兴趣的是获取我们关注的人创建的帖子的通知以及新关注的人的通知,因此,我们将坚持使用News Feed和Notification Feed 。 有关其他类型的提要以及如何使用它们的更多信息,请访问此链接 。
关注/取消关注功能–使用FeedManager (Follow / Unfollow Functionality – Using FeedManager)
We need to update the follow and unfollow methods inside the FollowController, to take note of the FeedManager:
我们需要更新follow和unfollow内部方法FollowController ,采取的注FeedManager :
app/Http/Controllers/FollowController.php
app / Http / Controllers / FollowController.php
[...]
public function follow(User $user)
{
    if (!Auth::user()->isFollowing($user->id)) {
        // Create a new follow instance for the authenticated user
        Auth::user()->follows()->create([
            'target_id' => $user->id,
        ]);
        \FeedManager::followUser(Auth::id(), $user->id);

        return back()->with('success', 'You are now friends with '. $user->name);
    } else {
        return back()->with('error', 'You are already following this person');
    }

}

public function unfollow(User $user)
{
    if (Auth::user()->isFollowing($user->id)) {
        $follow = Auth::user()->follows()->where('target_id', $user->id)->first();
        \FeedManager::unfollowUser(Auth::id(), $follow->target_id);
        $follow->delete();

        return back()->with('success', 'You are no longer friends with '. $user->name);
    } else {
        return back()->with('error', 'You are not following this person');
    }
}
[...]
This code inside the follow method lets the current user’s timeline and timeline_aggregated feeds follow another user’s personal feed. Inside the unfollow method, we unsubscribe from another user’s personal feed.
follow方法中的这段代码可让当前用户的timeline和timeline_aggregated feeds跟随另一个用户的个人feed。 在取消关注方法内部,我们取消订阅另一个用户的个人供稿。
显示不同类型的Feed (Displaying the Different Types of Feed)
To display the different types of feed, let’s start by creating a FeedsController:
为了显示不同类型的提要,让我们首先创建一个FeedsController :
php artisan make:controller FeedsControllerWhen reading data from feeds, activities come back in a format that is not suitable for use in our views. For example, a post creation activity will look like this:
从提要中读取数据时,活动以不适合在我们的视图中使用的格式返回。 例如,创建后的活动将如下所示:
{'actor': 'User:1', 'verb': 'created', 'object': 'Post:1'}
{'actor': 'User:1', 'verb': 'created', 'object': 'Post:1'}
This is far from ready for usage in our templates. We call the process of loading the references from the database enrichment. We’ll enrich our activities before displaying them in the views.
这远未准备好在我们的模板中使用。 我们称其为从数据库扩充中加载引用的过程。 在将其显示在视图中之前,我们将丰富我们的活动。
新闻饲料 (NewsFeed)
Let’s create a newsFeed method inside this controller for getting this type of feed. We should also create a private method within this controller responsible for instantiating the Enricher class:
让我们在此控制器内创建一个newsFeed方法,以获取这种类型的提要。 我们还应该在此控制器内创建一个私有方法,用于实例化Enricher class :
[...]
use GetStream\StreamLaravel\Enrich;
[...]
class FeedsController extends Controller
{
    public function newsFeed(Request $request)
    {
        // Timeline feed:
        $feed = \FeedManager::getNewsFeeds($request->user()->id)['timeline'];

        //  get 25 most recent activities from the timeline feed:
        $activities = $feed->getActivities(0,25)['results'];
        $activities = $this->enrich()->enrichActivities($activities);

        return view('feed.newsfeed', [
            'activities' => $activities,
        ]);
    }

    private function enrich()
    {
        return new Enrich;
    }
}
In the code block above, we are calling the getNewsFeeds method from the FeedManager (It’s important to specify the format we want to get back. In our case, we want the feed in a timeline format). After that, we get the 25 most recent activities from the feed and then enrich them. These activities should be displayed in the newsfeed view which we’ll be creating shortly.
在上面的代码块中,我们从FeedManager调用getNewsFeeds方法( 重要的是指定要获取的格式。在本例中,我们希望Feed以时间轴格式显示 )。 之后,我们从Feed中获取了25个最新活动,然后对其进行了充实。 这些活动应显示在我们即将创建的newsfeed视图中。
Next, let’s create a route mapping to the newsFeed method, which when visited will take us to a view with the newsfeed. This route also falls inside the route group with the auth middleware since users have to be authenticated for the feed to load:
接下来,让我们创建一个映射到newsFeed方法的路由,该方法在被访问时将带我们进入新闻newsFeed的视图。 由于必须对用户进行身份验证才能加载Feed,因此该路由也属于auth中间件,它属于路由组内:
[...]
Route::group(['middleware' => ['auth']], function () {
    [...]
    Route::get('/feed', 'FeedsController@newsFeed');
});
[...]
模板化 (Templating)
We can now render the enriched activities in a view:
现在,我们可以在视图中呈现丰富的活动:
resources/views/feed/newsfeed.blade.php
资源/视图/提要/newsfeed.blade.php
@extends('layouts.app')

@section('content')
    <div class="container">
        @if ($activities)
            <div class="panel panel-default">
                <div class="panel-heading">
                    News Feed
                </div>

                <div class="panel-body">
                    @foreach ($activities as $activity)
                        @include('stream-laravel::render_activity', array('activity'=>$activity))
                    @endforeach
                </div>
            </div>
        @else
        <p>You are not following anyone.Follow other users <a href="/users">here</a> in order to see their activities</p>
        @endif
    </div>
@endsection
The stream-laravel::render_activity view tag will render the view activity.$activity["verb"] view with the activity as context. To make things work, we need to create an activity folder inside of views. After doing that, we can create a partial for the post creation activity. The name of the partial should correspond to the activity verb:
stream-laravel::render_activity视图标记将以活动为上下文来呈现视图activity.$activity["verb"]视图。 为了使工作正常,我们需要在视图内部创建一个活动文件夹。 之后,我们可以为后期创建活动创建局部。 部分的名称应与活动动词相对应:
resources/views/activity/created.blade.php
资源/视图/活动/created.blade.php
<div class="well well-sm">
    <p><small class="text-muted">{{ date('F j, Y, g:i a', strtotime($activity['time'])) }}</small></p>

    <p><strong>{{ $activity['actor']['name'] }}</strong> created a new post titled <strong>{{ $activity['object']['title'] }}</strong></p>
</div>
By visiting the URL \feed, we should be able to see our newsfeed. Initially, we’ll see the text “You are not following anyone” as we had not yet integrated Stream into our app at the time when we were testing the different button variations based on the follow status. Also note that had we not removed the very first activity from the stream dashboard, the page would error complaining about a missing [.app.\user] view.
通过访问URL \feed ,我们应该能够看到我们的新闻\feed 。 最初,我们将看到文本“您没有关注任何人”,因为在根据关注状态测试不同的按钮变化时,我们尚未将Stream集成到我们的应用程序中。 还请注意,如果我们没有从流仪表板中删除第一个活动,则该页面将抱怨缺少[.app.\user]视图,从而出错。
Let’s go ahead create a new post from our account. If we follow ourselves from a different account, this post creation activity should show up in the feed of this other account like so:
让我们继续从我们的帐户创建一个新帖子。 如果我们从其他帐户关注自己,则此创建帖子的活动应显示在该其他帐户的供稿中,如下所示:
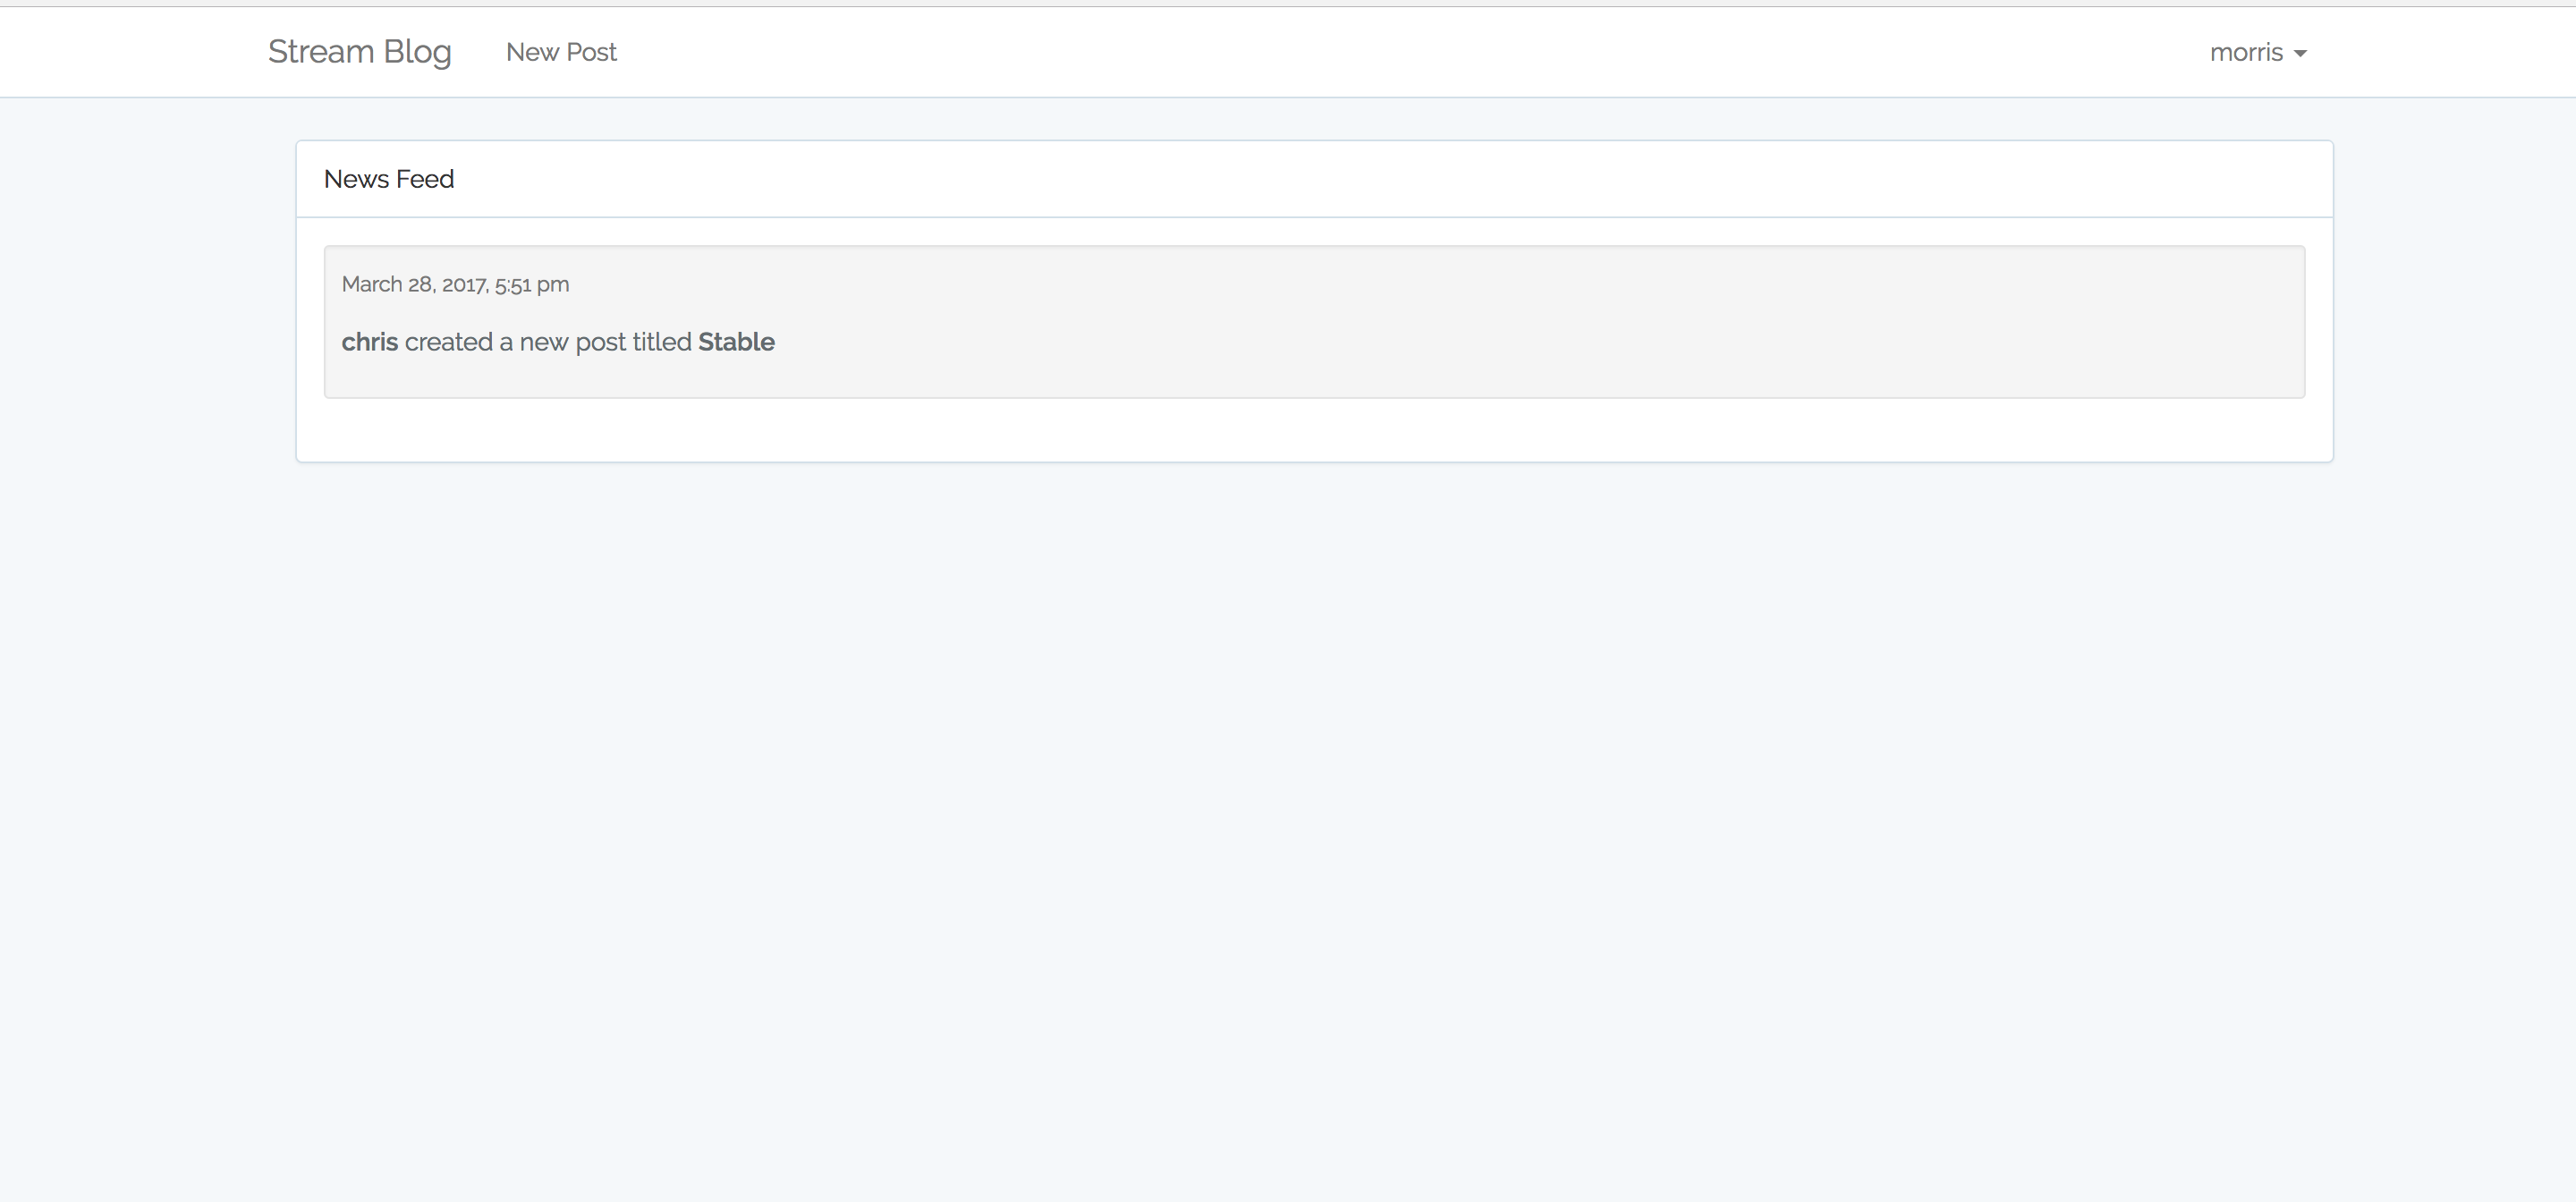
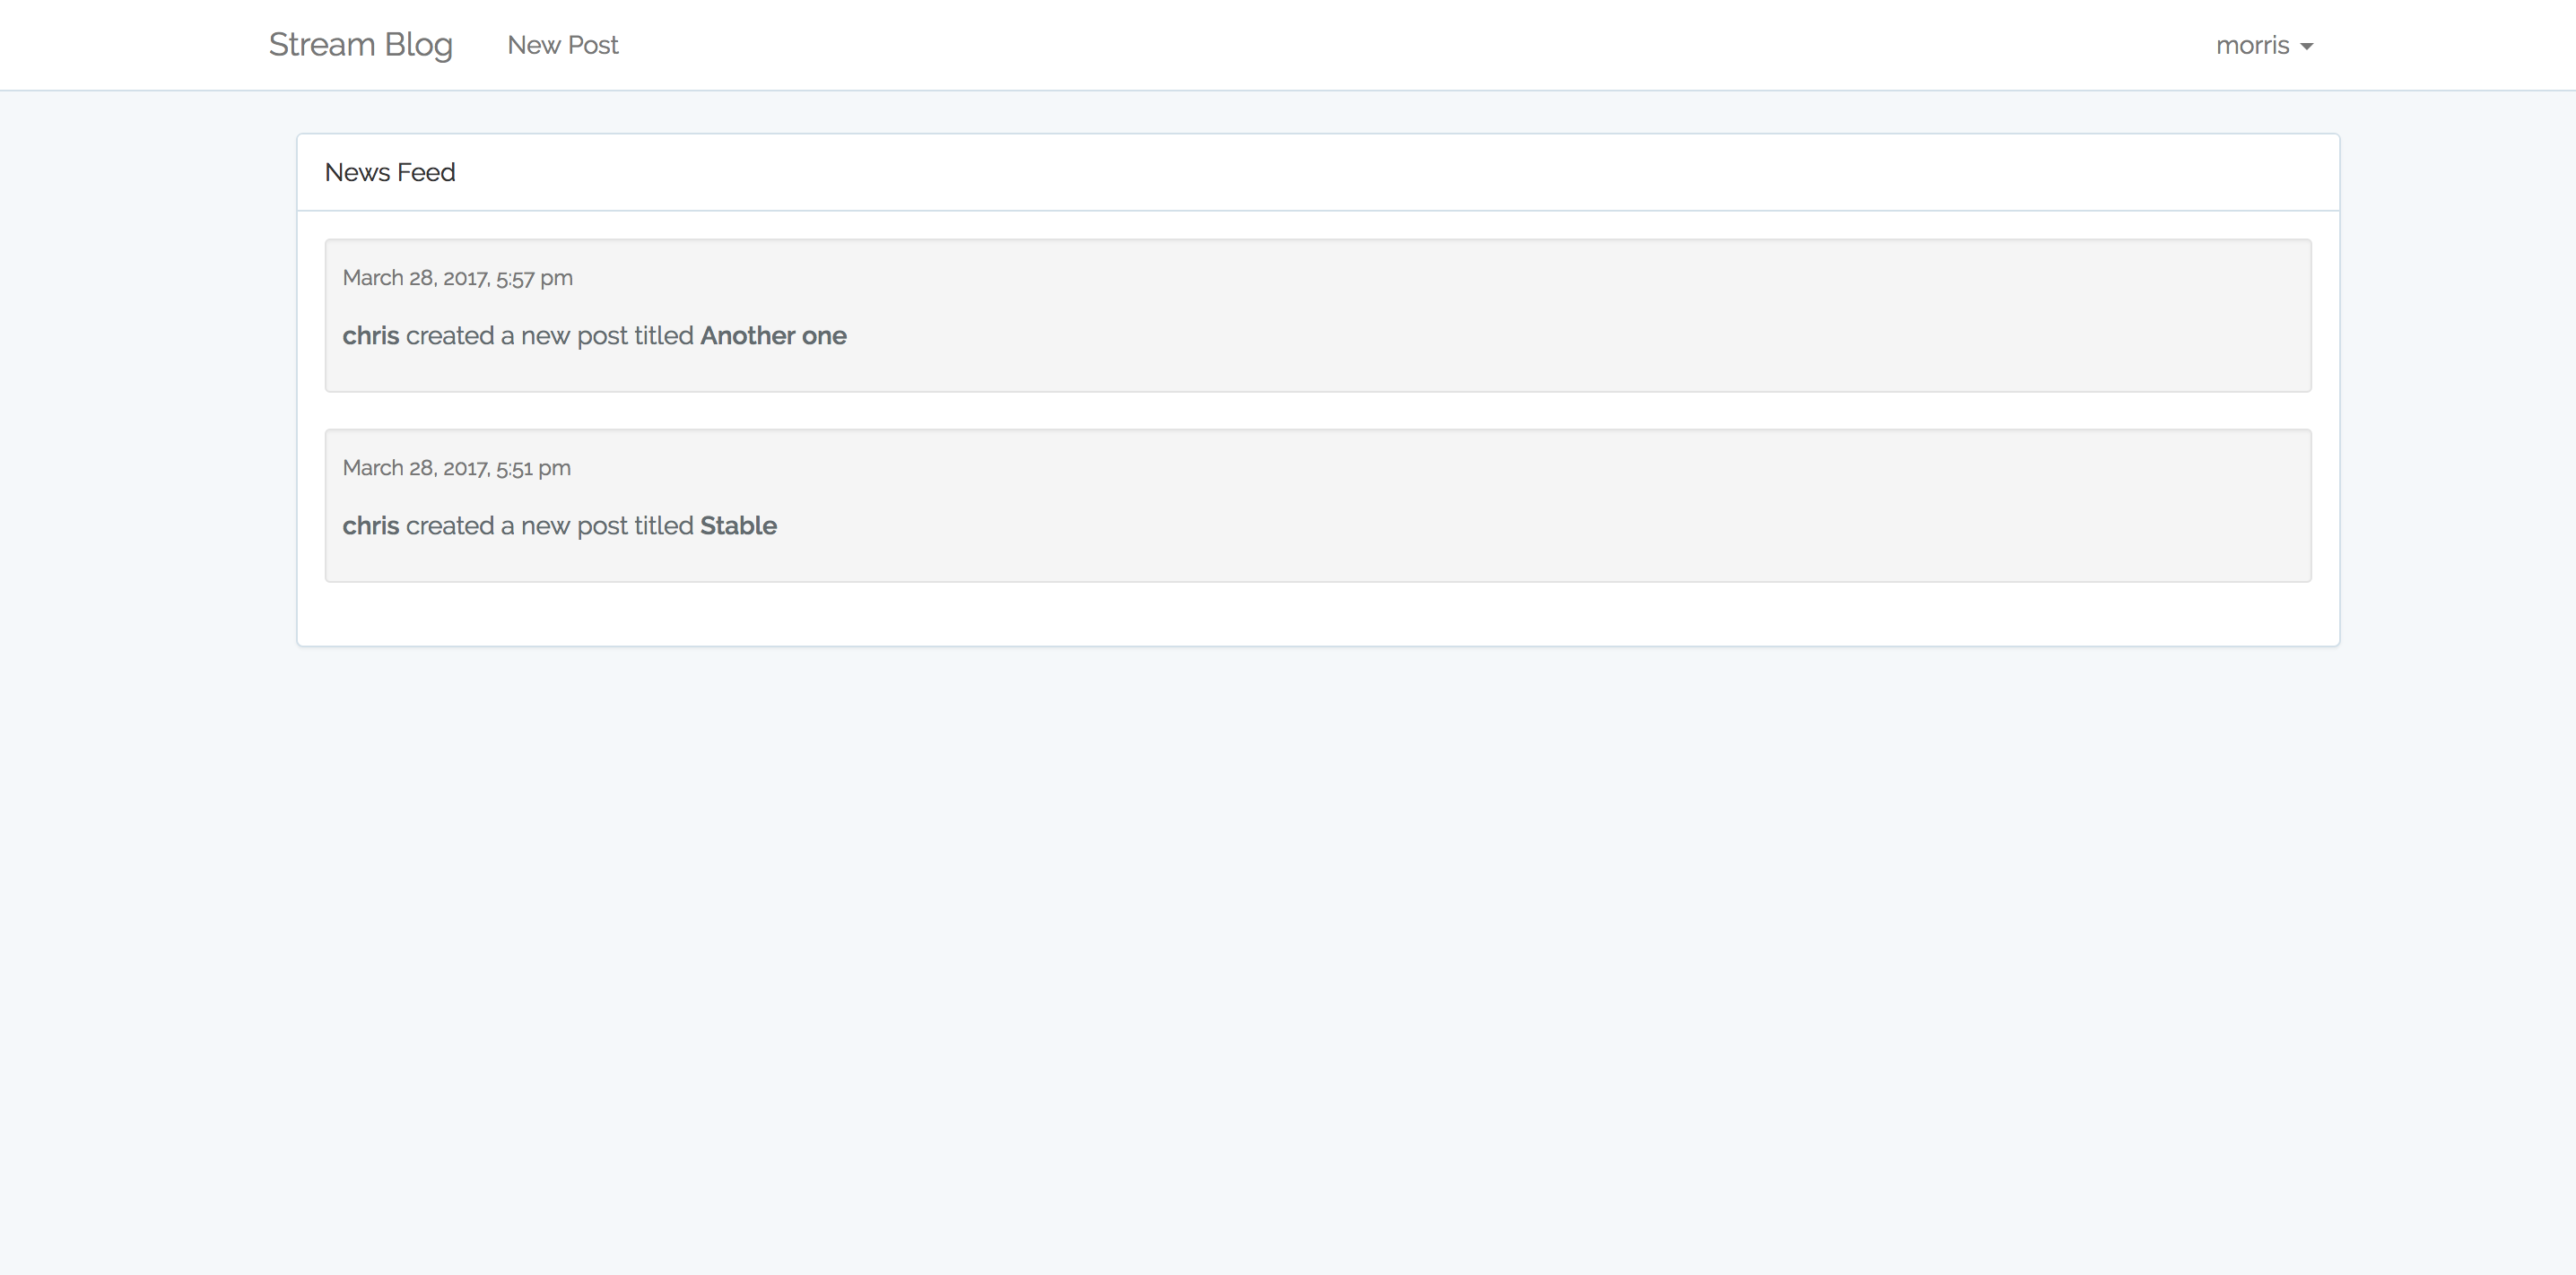
From the screenshot above, if the user called chris creates another post, the new post creation activity from chris will show up on morris' feed:
从上面的截图,如果被叫用户chris创建另一篇文章,从新造后活动chris将显示在morris'饲料:
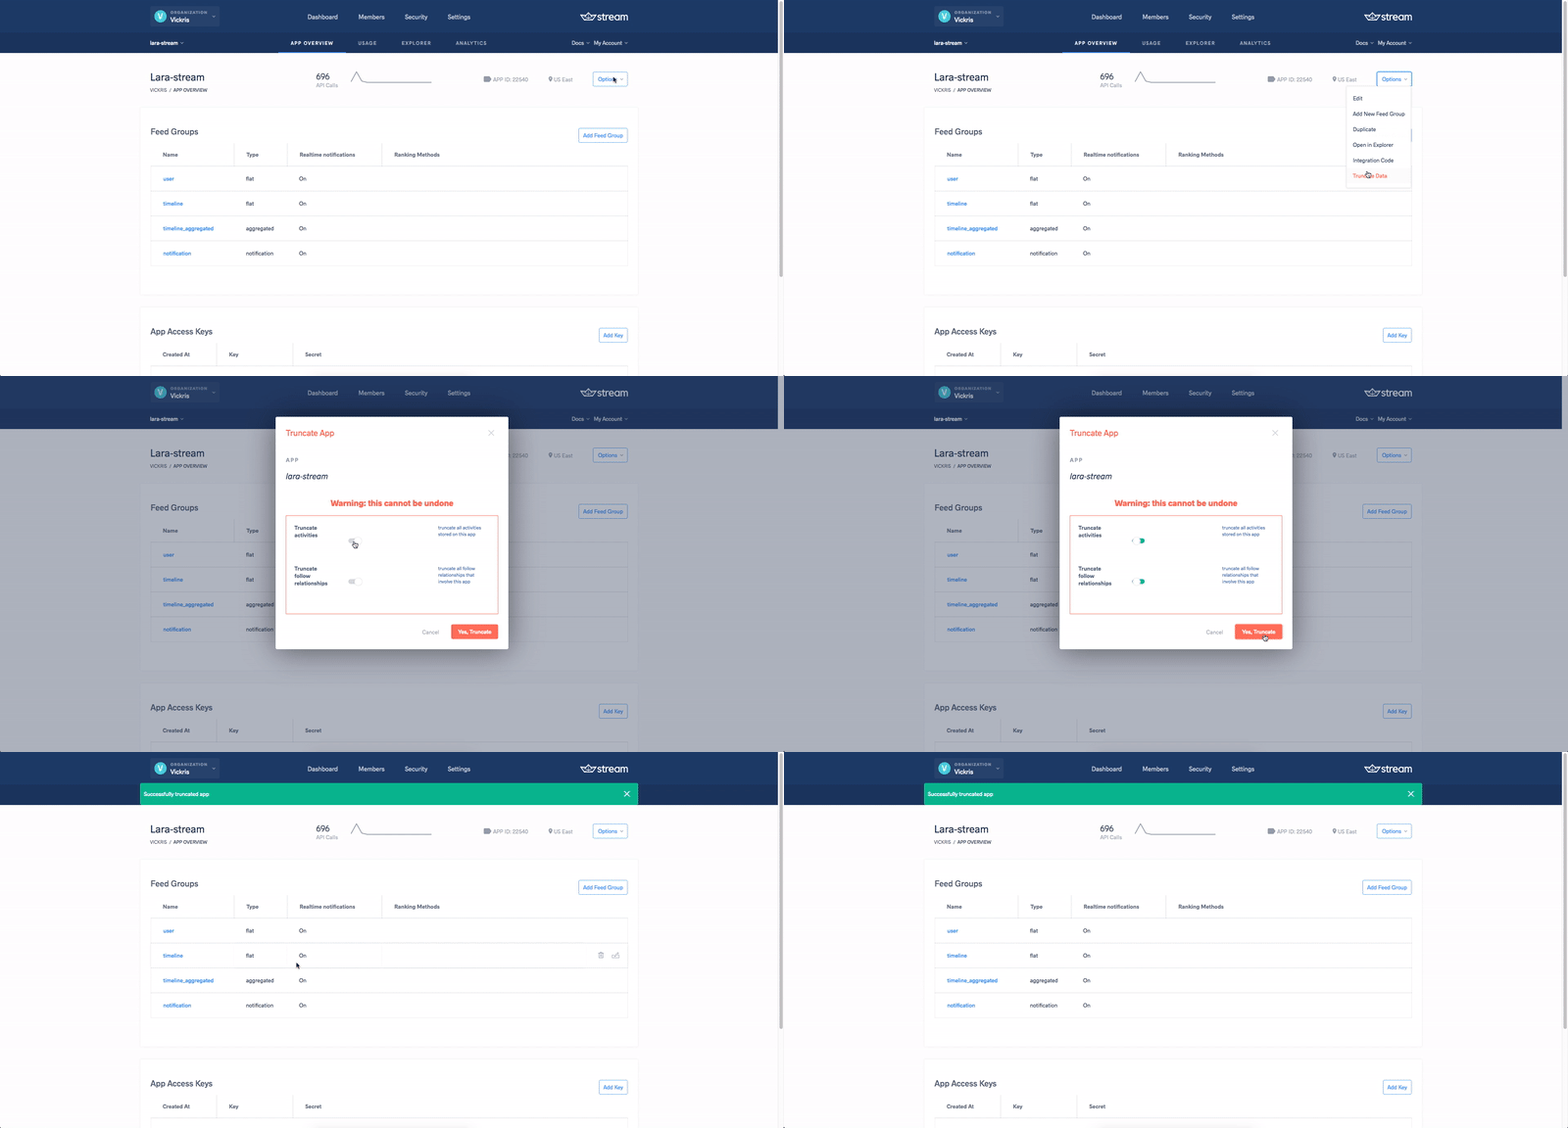
Alternatively, instead of creating new accounts and posts to test out this behavior, we can truncate the data in our app from Stream’s dashboard then pre-populate our database again with seed data. The gif below illustrates how to truncate data:
另外,除了创建新的帐户和帖子以测试这种行为,我们还可以从Stream的仪表板截断应用程序中的数据,然后再次使用种子数据预填充数据库。 下面的gif说明了如何截断数据:
When we seed our database this time around, the post creation activity will be noted on Stream:
当我们这次为数据库添加种子时,将在Stream上记录创建后的活动:
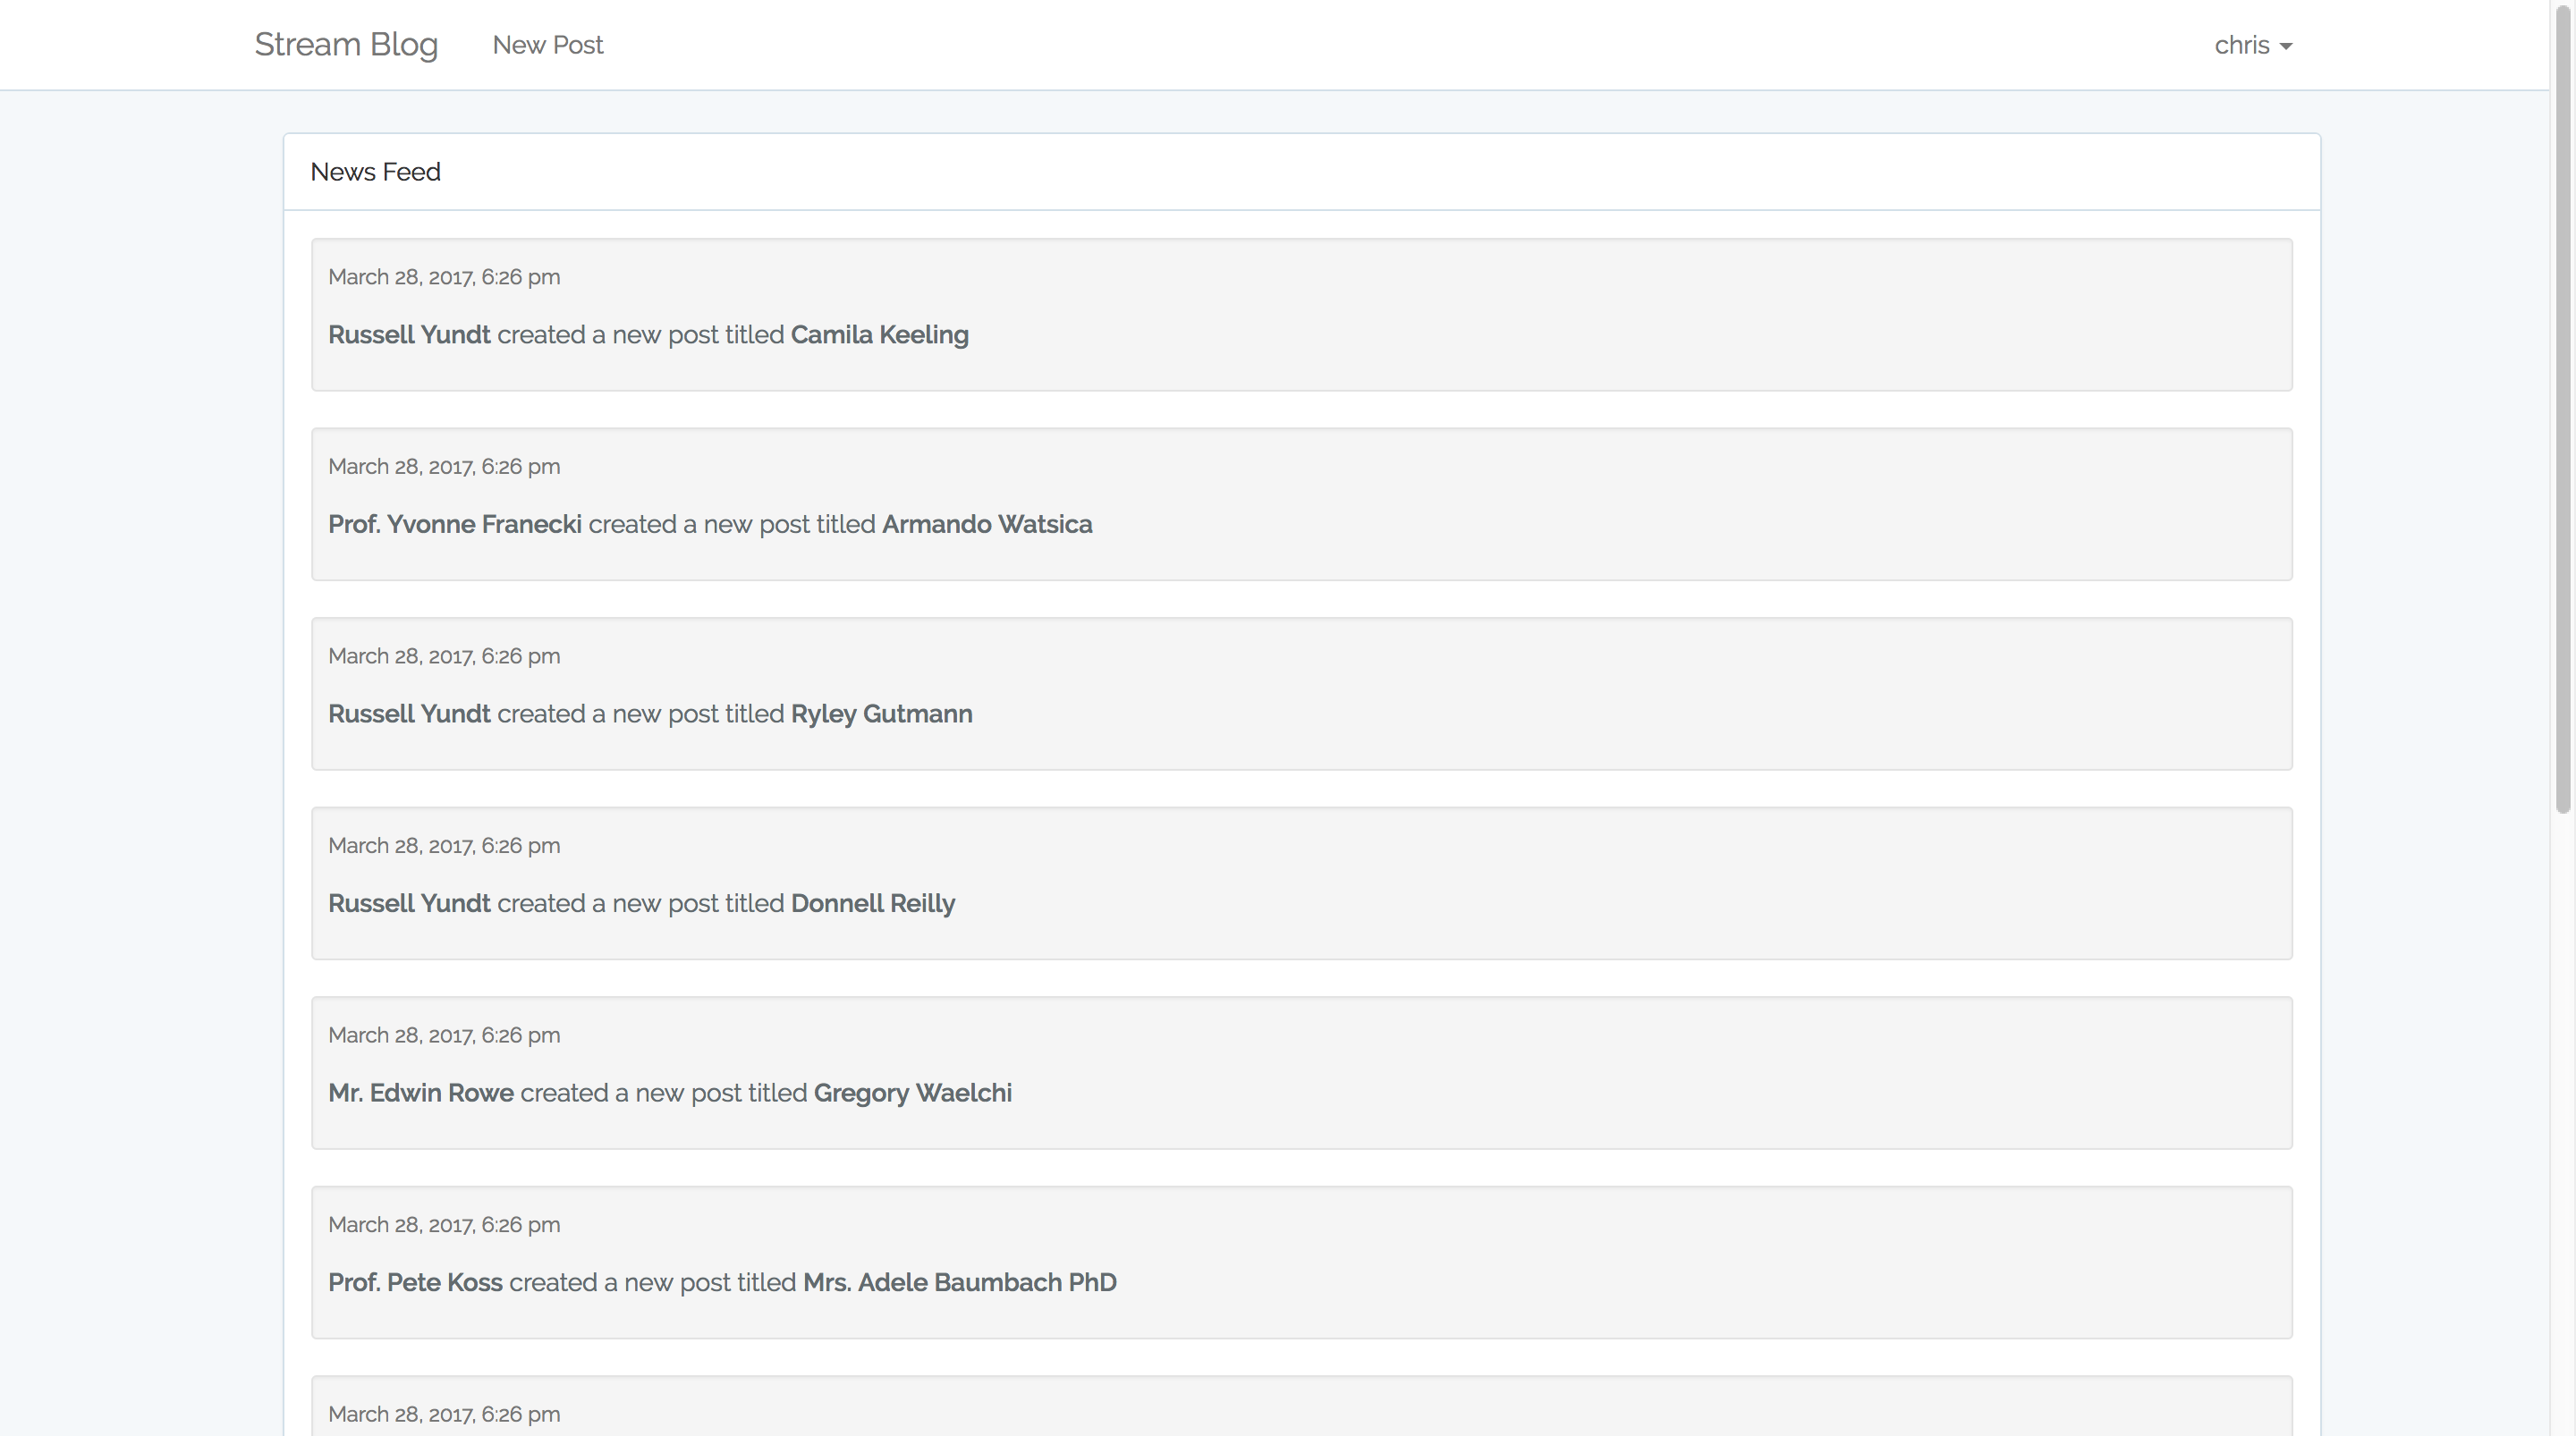
php artisan migrate:refresh --seedWe can then follow some of the users who were created upon seeding the database. If we now visit the URL \feed, we’ll see their activities:
然后,我们可以跟踪在播种数据库时创建的一些用户。 如果现在访问URL \feed ,我们将看到其活动:
Right now, we can only get notifications for new posts created by people we follow. We also want to make it so that we get notifications for new follows.
目前,我们只能收到我们关注的人创建的新帖子的通知。 我们还希望做到这一点,以便我们收到有关新关注者的通知。
通知提要 (Notification Feed)
For this, let’s start by updating our Follow model to take note of follow activities
为此,让我们首先更新Follow模型以记录关注活动
app/Follow.php
app / Follow.php
class Follow extends Model
{
    use \GetStream\StreamLaravel\Eloquent\ActivityTrait;

    [...]
    public function target()
    {
        return $this->belongsTo(User::class);
    }

    public function activityNotify()
    {
        $targetFeed = \FeedManager::getNotificationFeed($this->target_id);
        return array($targetFeed);
    }

    public function activityVerb()
    {
        return 'follow';
    }

    public function activityExtraData()
    {
        return array('followed' => $this->target, 'follower' => $this->user);
    }
The activityNotify method is used to build the notification feed. This type of feed is useful to notify certain users about an action. In our case, we are notifying a user that someone has followed them. The activityExtraData() method lets us store more data than just the basic fields. In our case, we want to store the target for a new follow and also the person who followed the target.
activityNotify方法用于构建通知提要。 此类供稿可用于通知某些用户有关操作的信息。 在我们的情况下,我们正在通知用户有人已关注他们。 activityExtraData()方法使我们不仅可以存储基本字段,还可以存储更多数据。 在我们的案例中,我们要存储目标以进行新的关注,也要存储关注目标的人。
Let’s go ahead and create the controller action, the route, and the view to display the notification feed:
让我们继续创建控制器动作,路线和视图以显示通知提要:
app/Http/Controllers/feedController
app / Http / Controllers / feedController
[...]
class FeedsController extends Controllers
{
    [...]
    public function notification(Request $request)
    {
        //Notification feed:
        $feed = \FeedManager::getNotificationFeed($request->user()->id);
        $activities = $feed->getActivities(0,25)['results'];
        $activities = $this->enrich()->enrichActivities($activities);

        return view('feed.notifications', [
            'activities' => $activities,
        ]);
    }
}
We get this feed the same way we got the newsfeed, the only difference is we are calling the getNotificationFeed method on the FeedManager instead of the getNewsFeeds method.
我们以与获取新闻提要相同的方式获取此提要,唯一的区别是我们在FeedManager上调用了getNotificationFeed方法,而不是getNewsFeeds方法。
Let’s now create the route mapping to this controller action:
现在让我们创建到该控制器动作的路由映射:
Route::group(['middleware' => 'auth'], function () {
    [...]
    Route::get('/notifications', 'FeedsController@notification');
});
模板化 (Templating)
When displaying the notification feed, we will follow the same procedure as when displaying the newsfeed, i.e create a partial with the information we want to display, then render the partial in a view. We’ll start by creating the view:
在显示通知源时,我们将按照与显示新闻源时相同的步骤进行操作,即使用我们要显示的信息创建部分,然后在视图中呈现该部分。 我们将从创建视图开始:
resources/views/feed/notifications.blade.php
资源/视图/提要/notifications.blade.php
@extends('layouts.app')

@section('content')
    <div class="container">
        @if ($activities)
            <div class="panel panel-default">
                <div class="panel-heading">
                    Notification feed
                </div>

                <div class="panel-body">
                    @foreach ($activities as $activity)
                        @foreach ($activity['activities'] as $activity)
                            @include('stream-laravel::render_activity', array('aggregated_activity'=>$activity, 'prefix'=>'notification'))
                        @endforeach
                    @endforeach
                </div>
            </div>
        @else
        <p>You don't have any follow activities</p>
        @endif
    </div>
@endsection
Notice we have to go two levels deep in our view to access the notification feed? This is because of the data format we get back after calling the getNotificationFeed method. Also, note the line of code to render the partial has a prefix key the value of which is set to notification. Let me explain what’s going on. For this app, we want two different templates for the same activity i.e. the follow activity. To achieve this with Stream, we send a third parameter to change the view selection. In this case we’ll create a partial called notification_follow.blade.php inside the activity folder:
注意,我们必须深入两个视图才能访问通知供稿? 这是因为数据格式在调用getNotificationFeed方法后返回。 另外,请注意呈现部分代码的代码行具有一个前缀key其值设置为notification 。 让我解释一下发生了什么。 对于此应用,我们希望针对同一活动(即跟随活动)使用两个不同的模板。 为了使用Stream实现此目的,我们发送了第三个参数来更改视图选择。 在这种情况下,我们将在活动文件夹内创建一个名为notification_follow.blade.php的部分文件:
resources/views/activity/notification_follow.blade.php
资源/视图/活动/notification_follow.blade.php
<div class="well well-sm">
    <p><small class="text-muted">{{ date('F j, Y, g:i a', strtotime($activity['time'])) }}</small></p>
    <p>You are now friends with <strong>{{ $activity['follower']['name'] }}</strong></p>
</div>
If we visit the /notifications URL, we should see feed for every follow we received and the name of the person who followed us:
如果我们访问/notifications URL,则应该看到收到的每个关注的feed和关注我们的人的姓名:
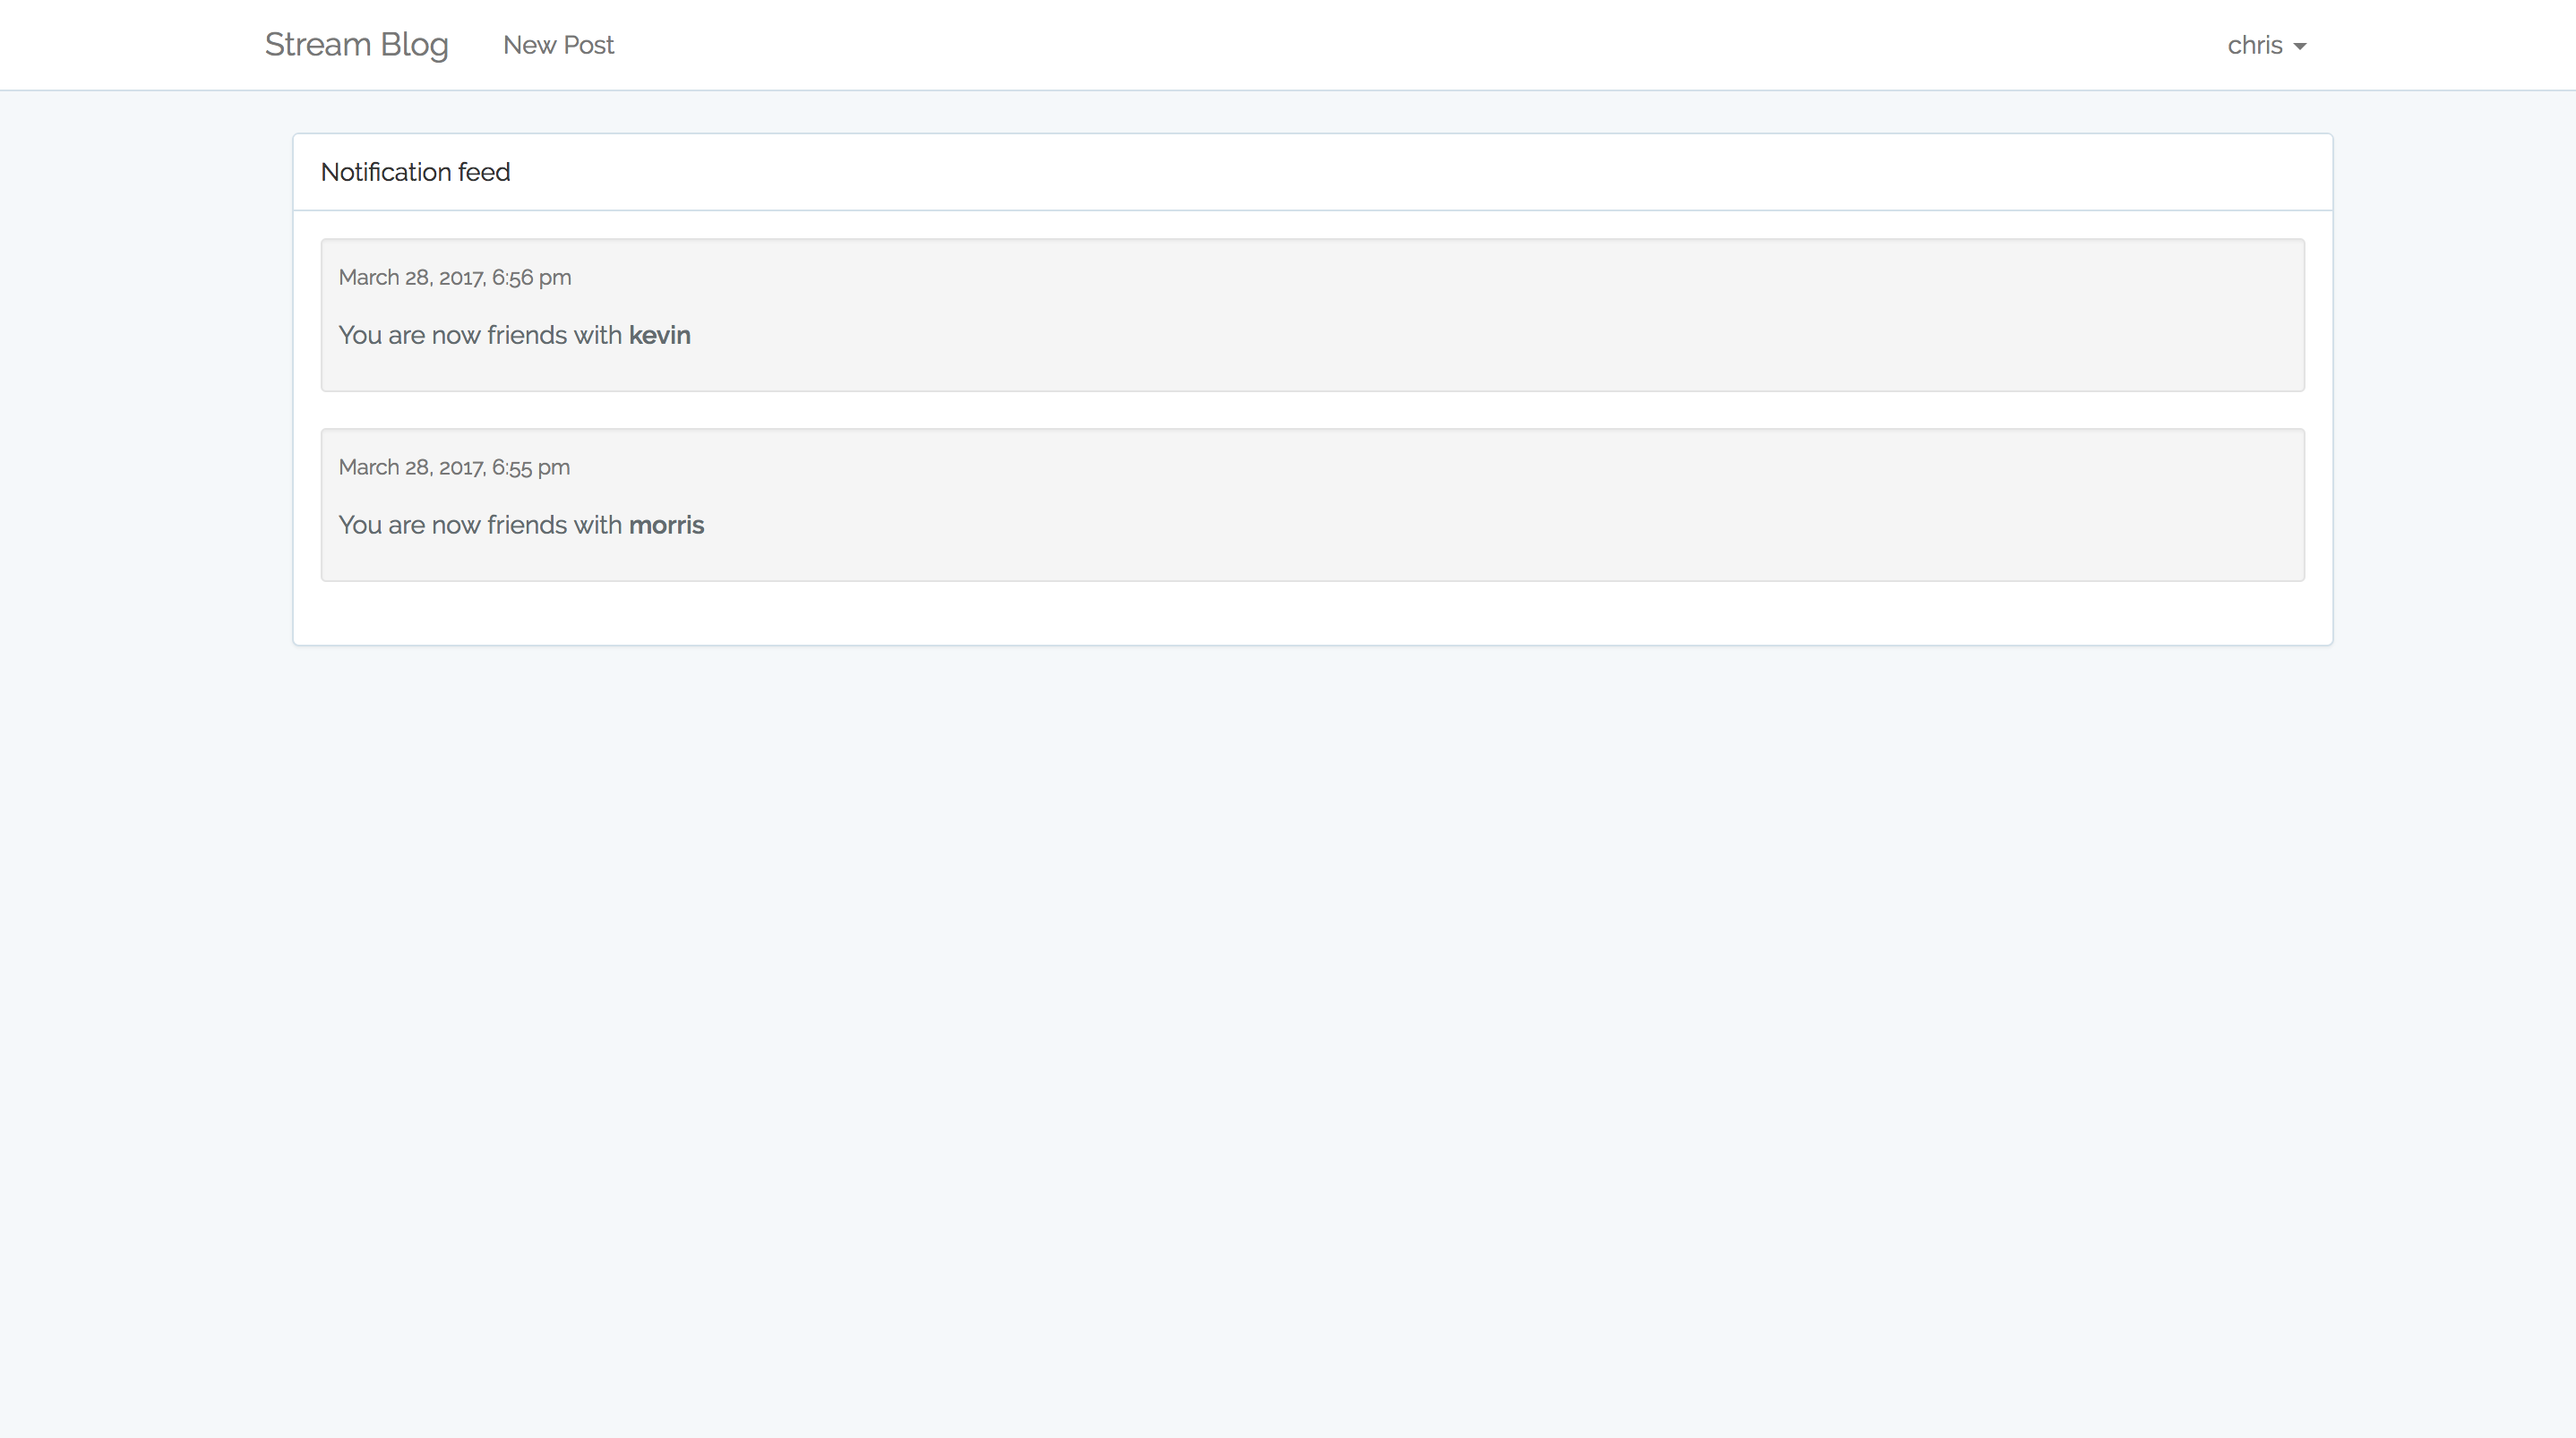
From the screenshot, both Morris and Kevin followed me.
从屏幕截图中,莫里斯和凯文都跟着我。
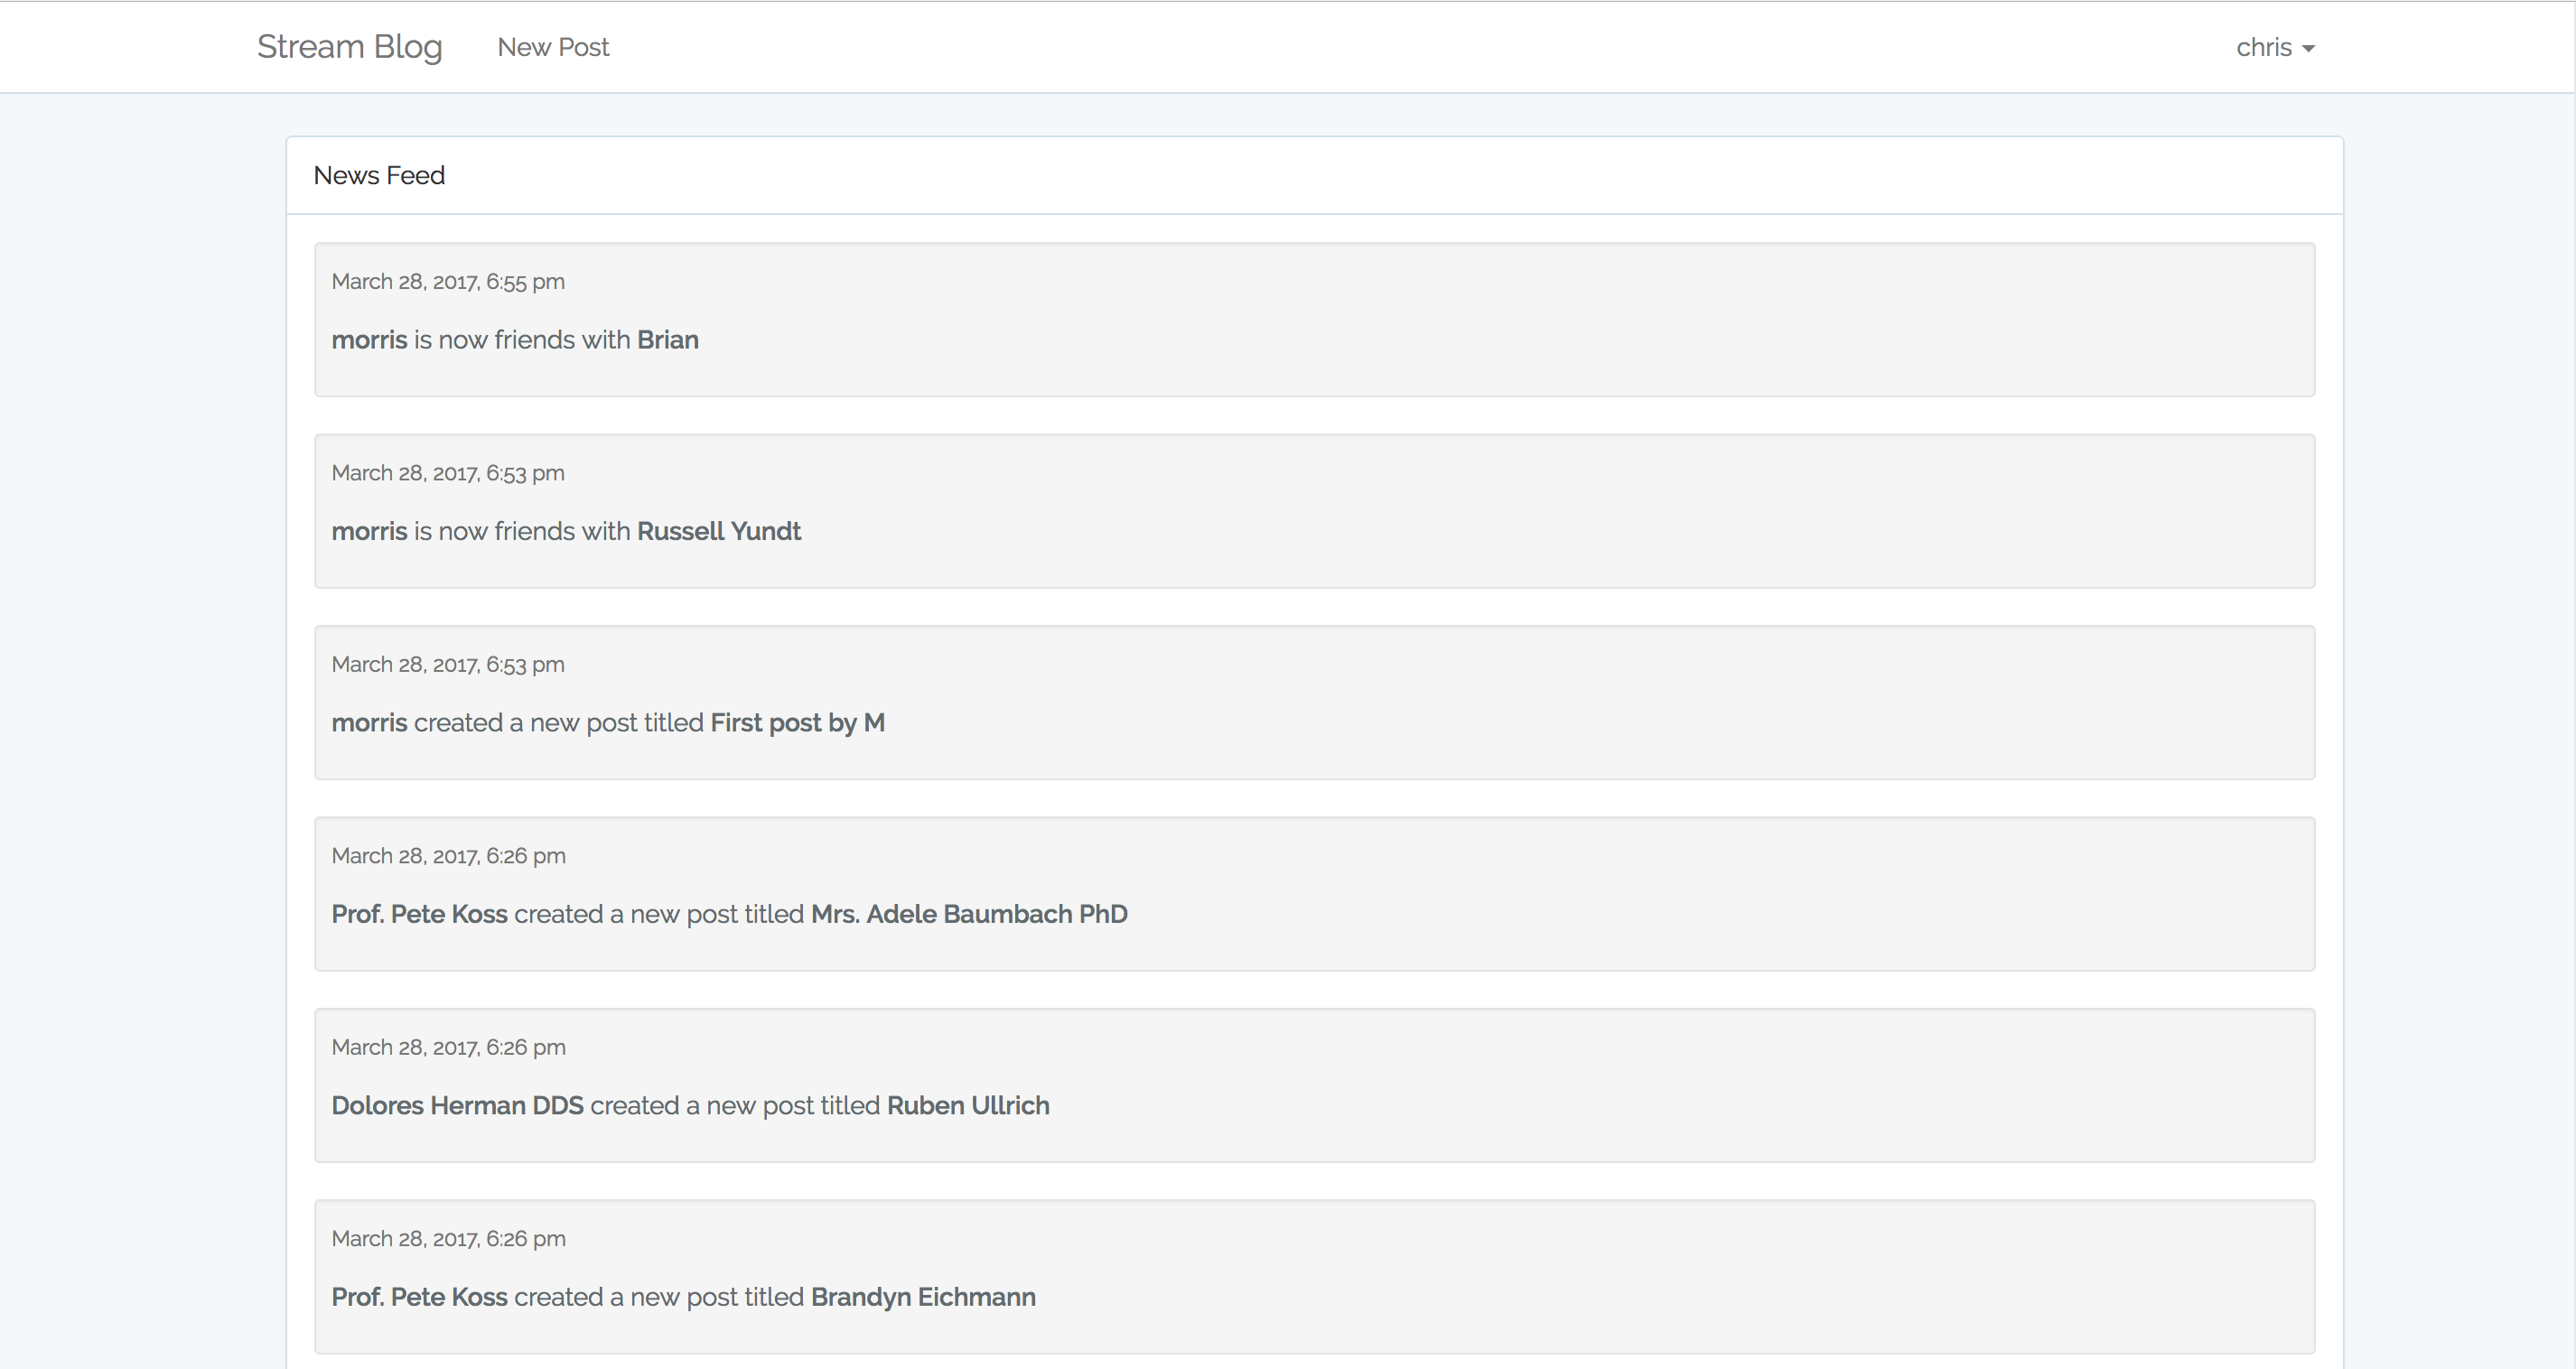
We also want the feed for follow activities to show up in our NewsFeed page. However, when displaying this, we want to say who became friends with whom. This is the reason we had to come up with different partials for the follow activity. More information on templating is available on Streams GitHub Page:
我们还希望将跟踪活动的供稿显示在我们的NewsFeed页面上。 但是,在显示此内容时,我们想说谁与谁成为朋友。 这就是我们必须为跟随活动提供不同部分的原因。 Streams GitHub页面上提供了有关模板的更多信息:
resources/views/activity/follow.blade.php
资源/视图/活动/follow.blade.php
<div class="well well-sm">
    <p><small class="text-muted">{{ date('F j, Y, g:i a', strtotime($activity['time'])) }}</small></p>
    <p><strong>{{ $activity['actor']['name'] }}</strong> is now friends with <strong>{{ $activity['followed']['name'] }}</strong></p>
</div>
Let’s now visit the /feed URL. Follow activities should also show up:
现在访问/feed URL。 后续活动也应显示:
To make navigation easier, we can add links to access the newsfeed and the notification feeds in the navbar next to the New Post link:
为了使导航更轻松,我们可以在“ New Post链接旁边的导航栏中添加访问新闻源和通知源的链接:
resources/views/layouts/app.blade.php
资源/视图/布局/app.blade.php
<ul class="nav navbar-nav">

    <li><a href="{{ url('/posts/create') }}">New Post</a></li>
    <li><a href="{{ url('/users') }}">Users</a></li>
    <li><a href="{{ url('/feed') }}">News Feed</a></li>
    <li><a href="{{ url('/notifications') }}">Notification Feed</a></li>
</ul>
结论 (Conclusion)
Stream makes it extremely easy to add feeds to any app compared to coding the logic from scratch.
与从头开始编写逻辑相比,使用Stream可以极其轻松地将提要添加到任何应用程序。
We can track just about anything in an app, even liking or commenting on posts. I’ll leave that as a homework assignment so that you get to play around with the API. Stream also provides a low-level API access for PHP projects that don’t use Laravel. More information on how to use the low-level PHP client API directly is available here.
我们可以跟踪应用程序中的几乎所有内容,甚至可以对帖子进行评论或评论。 我将其留作家庭作业,以便您可以使用API。 Stream还为不使用LaravelPHP项目提供了低级API访问。 此处提供了有关如何直接使用低级PHP客户端API的更多信息。
If you found this tutorial helpful, please hit the like button and don’t forget to share with your friends and colleagues!
如果您认为本教程有帮助,请点击“赞”按钮,不要忘记与您的朋友和同事分享!
翻译自: https://www.sitepoint.com/building-social-network-laravel-stream-easy/
stream !


 被折叠的 条评论
为什么被折叠?


