


calendar 日历
In this article, you’ll learn how to work with the Google Calendar API in PHP. You’ll do it by building a calendar app that allows users to add new calendars, add events, and sync calendars to Google Calendar. If you want to follow along, I recommend you to set up Homestead so you can easily get an environment for running the app.
在本文中,您将学习如何在PHP中使用Google Calendar API。 您可以通过构建日历应用程序来做到这一点,该应用程序允许用户添加新日历,添加事件以及将日历同步到Google日历。 如果您想继续,我建议您设置Homestead,以便您可以轻松获得运行该应用程序的环境。

设置Google控制台项目 (Setting up a Google Console Project)
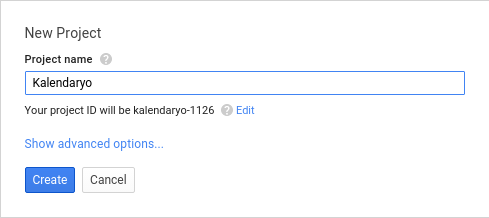
The first thing that you need to do is to create a new project in the Google Developers Console.
您需要做的第一件事是在Google Developers Console中创建一个新项目。
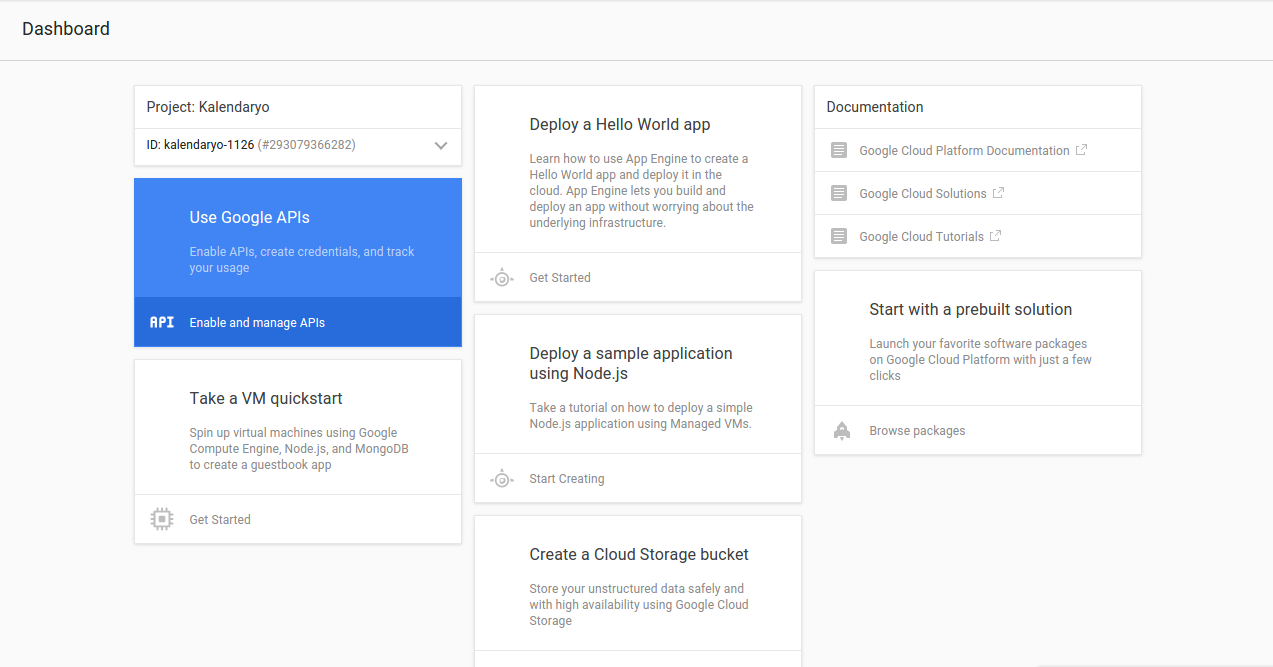
Once the project is created, click on the enable and manage APIs link on the dashboard.
创建项目后,单击仪表板上的启用和管理API链接。
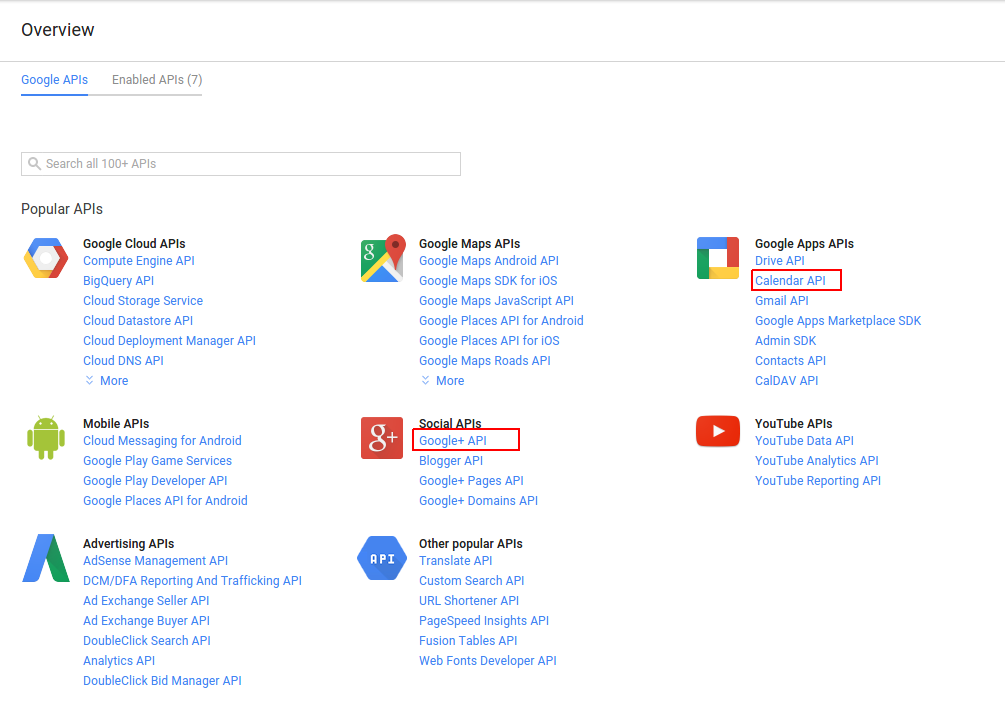
On the google APIs page, select and enable the Calendar API and Google+ API.
在google API页面上,选择并启用Calendar API和Google+ API。
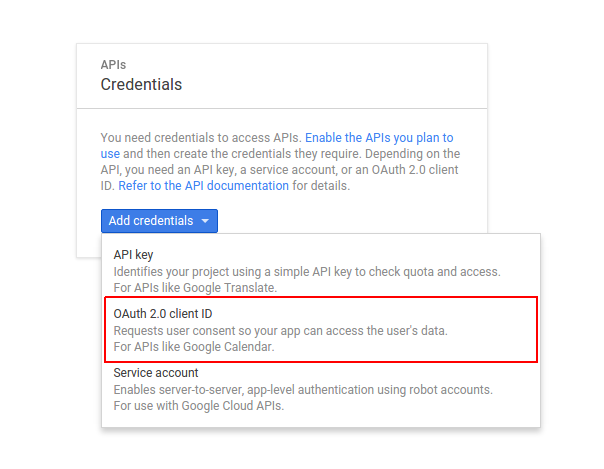
Once enabled, go back to the Google APIs page and click the Credentials link, then the add credentials button and select OAuth 2.0 client ID.
启用后,请返回Google API页面,然后单击“ 凭据”链接,然后单击“ 添加凭据”按钮,然后选择OAuth 2.0客户端ID 。
This will ask you to configure the consent screen. Click the configure consent screen to do so.
这将要求您配置同意屏幕。 单击配置同意屏幕以执行此操作。
Select your preferred email address, add the product name, then click save.
选择您喜欢的电子邮件地址,添加产品名称,然后点击保存 。
Create a Web Application.
创建一个Web应用程序 。
This will give you the client ID and client secret
这将为您提供客户端ID和客户端密码
构建应用 (Building the App)
We’ll use Laravel via Composer.
我们将通过Composer使用Laravel。
安装依赖项 (Installing Dependencies)
composer create-project --prefer-dist laravel/laravel kalendaryoThis will create a new folder named kalendaryo which will serve as your project’s directory.
这将创建一个名为kalendaryo的新文件夹,它将作为您项目的目录。
Let’s install some other dependencies:
让我们安装其他一些依赖项:
composer require nesbot/carbon google/apiclientYou will be using the Google Client for talking with the Google+ API for the sign in process, and the Google Calendar API for working with Google Calendar.
您将使用Google客户端与Google+ API进行登录过程,并使用Google Calendar API与Google Calendar一起使用。
配置应用 (Configuring the App)
Open the .env file at the root of the project directory and supply the lacking details, like so:
打开项目目录根目录下的.env文件,并提供缺少的详细信息,如下所示:
APP_ENV=local
APP_DEBUG=true
APP_KEY=base64:iZ9uWJVHemk5wa8disC8JZ8YRVWeGNyDiUygtmHGXp0=
APP_URL=http://localhost

DB_CONNECTION=mysql
DB_HOST=127.0.0.1
DB_PORT=3306
DB_DATABASE=kalendaryo
DB_USERNAME=root
DB_PASSWORD=secret

SESSION_DRIVER=file

APP_TITLE=Kalendaryo
APP_TIMEZONE="Asia/Manila"

GOOGLE_CLIENT_ID="YOUR GOOGLE CLIENT ID"
GOOGLE_CLIENT_SECRET="YOUR GOOGLE CLIENT SECRET"
GOOGLE_REDIRECT_URL="http://kalendaryo.dev/login"
GOOGLE_SCOPES="email,profile,https://www.googleapis.com/auth/calendar"
GOOGLE_APPROVAL_PROMPT="force"
GOOGLE_ACCESS_TYPE="offline"
The configuration values that you need to add are DB_DATABASE, DB_USERNAME, DB_PASSWORD, APP_TIMEZONE, GOOGLE_CLIENT_ID, GOOGLE_CLIENT_SECRET, and GOOGLE_REDIRECT_URL.
您需要添加的配置值为DB_DATABASE , DB_USERNAME , DB_PASSWORD , APP_TIMEZONE , GOOGLE_CLIENT_ID , GOOGLE_CLIENT_SECRET和GOOGLE_REDIRECT_URL 。
For APP_TIMEZONE, you can use any value from the PHP timezones page.
对于APP_TIMEZONE ,可以使用PHP时区页面中的任何值。
For the database details, create a new MySQL database and use the database name as value for DB_DATABASE. DB_USERNAME and DB_PASSWORD are the login credentials for that database. If on Homestead Improved, you can just use the pre-created DB homestead with the credentials homestead / secret.
有关数据库的详细信息,请创建一个新MySQL数据库,并将数据库名称用作DB_DATABASE值。 DB_USERNAME和DB_PASSWORD是该数据库的登录凭据。 如果在“ 改进的Homestead”上 ,您可以仅使用具有凭据homestead / secret的预先创建的DB homestead 。
For the Google config, replace the value for the GOOGLE_CLIENT_ID, GOOGLE_CLIENT_SECRET and GOOGLE_REDIRECT_URL with the credentials that you got from Google console earlier. GOOGLE_SCOPES are the permissions that your app is going to need. What you put in there will show up in the consent screen. The user has to agree in order for the app to have access to the specific data that you’re asking for.
对于Google配置,将GOOGLE_CLIENT_ID , GOOGLE_CLIENT_SECRET和GOOGLE_REDIRECT_URL的值替换为您先前从Google控制台获得的凭据。 GOOGLE_SCOPES是您的应用所需的权限。 您在其中输入的内容将显示在同意屏幕中。 用户必须同意才能使应用访问您所要求的特定数据。
If you’re wondering where I got those, you can check out oauthplayground and select the Google+ API and Google Calendar API. The URLs that show up in the dropdown are basically the permissions. email and profile are just shorthand for https://www.googleapis.com/auth/userinfo.email and https://www.googleapis.com/auth/userinfo.profile. Each permission is separated by a comma because you will be converting it into an array later on.
如果您想知道我从哪里买到的 ,可以查看oauthplayground并选择Google+ API和Google Calendar API。 下拉菜单中显示的URL基本上是权限。 email和profile只是https://www.googleapis.com/auth/userinfo.email和https://www.googleapis.com/auth/userinfo.profile简写。 每个权限都用逗号分隔,因为稍后您将把它转换成数组。
为Google客户端创建服务容器 (Creating a Service Container for the Google Client)
Next, take a look at the service container for the Google client. Create an app/Googl.php file and add the following:
接下来,查看Google客户端的服务容器 。 创建一个app/Googl.php文件并添加以下内容:
<?php
namespace App;

class Googl
{
    public function client()
    {
        $client = new \Google_Client();
        $client->setClientId(env('GOOGLE_CLIENT_ID'));
        $client->setClientSecret(env('GOOGLE_CLIENT_SECRET'));
        $client->setRedirectUri(env('GOOGLE_REDIRECT_URL'));
        $client->setScopes(explode(',', env('GOOGLE_SCOPES')));
        $client->setApprovalPrompt(env('GOOGLE_APPROVAL_PROMPT'));
        $client->setAccessType(env('GOOGLE_ACCESS_TYPE'));
        return $client;
    }
}
In the above code, you set the client ID, client secret, redirect URL, scopes (permissions), approval prompt and access type. You are loading all those values from the .env file that you created earlier. Once everything is set, return the new instance. Later on, you’ll just call the client method to initialize the Google client.
在上面的代码中,您设置了客户端ID,客户端密码,重定向URL,范围(权限),批准提示和访问类型。 您正在从之前创建的.env文件中加载所有这些值。 设置完所有内容后,返回新实例。 稍后,您只需调用client方法来初始化Google客户端。
路线 (Routes)
Open the app/Http/routes.php file then add the routes for the different pages in the app:
打开app/Http/routes.php文件,然后在app/Http/routes.php添加不同页面的路由:
Route::group(
    ['middleware' => ['admin']],
    function(){

        Route::get('/dashboard', 'AdminController@index');

        Route::get('/calendar/create', 'AdminController@createCalendar');
        Route::post('/calendar/create', 'AdminController@doCreateCalendar');

        Route::get('/event/create', 'AdminController@createEvent');
        Route::post('/event/create', 'AdminController@doCreateEvent');

        Route::get('/calendar/sync', 'AdminController@syncCalendar');
        Route::post('/calendar/sync', 'AdminController@doSyncCalendar');

        Route::get('/events', 'AdminController@listEvents');

        Route::get('/logout', 'AdminController@logout');
});

Route::get('/', 'HomeController@index');
Route::get('/login', 'HomeController@login');
In the above code, you’re using a custom route middleware called admin. You’ll be creating it shortly. Using middleware in a route group means that it’s going to be activated for every route in the group.
在上面的代码中,您正在使用名为admin的自定义路由中间件 。 您很快就会创建它。 在路由组中使用中间件意味着将为该组中的每个路由激活中间件。
Route::group(
    ['middleware' => ['admin']],
    function(){
        ...
    }
);
Inside the callback function, you have the different routes that belong to the group. They’re all self-explanatory. The route that respond to POST requests are used to perform write operations, while GET routes are read-only.
在回调函数中,您拥有属于该组的不同路由。 他们都是不言自明的。 响应POST请求的路由用于执行写操作,而GET路由是只读的。
Route::get('/dashboard', 'AdminController@index');

Route::get('/calendar/create', 'AdminController@createCalendar');
Route::post('/calendar/create', 'AdminController@doCreateCalendar');

Route::get('/event/create', 'AdminController@createEvent');
Route::post('/event/create', 'AdminController@doCreateEvent');

Route::get('/calendar/sync', 'AdminController@syncCalendar');
Route::post('/calendar/sync', 'AdminController@doSyncCalendar');

Route::get('/events', 'AdminController@listEvents');

Route::get('/logout', 'AdminController@logout');
管理员路由中间件 (Admin Route Middleware)
As mentioned earlier, route middlewares is used to execute code when a specific route is accessed. In the case of the admin middleware, it is used to check whether or not a user is currently logged in.
如前所述, 路由中间件用于在访问特定路由时执行代码。 对于admin中间件,它用于检查用户当前是否登录。
Create the admin middleware at app/Http/Middleware/AdminMiddleware.php and add the following:
在app/Http/Middleware/AdminMiddleware.php创建管理中间件,并添加以下内容:
<?php
namespace App\Http\Middleware;

use Closure;

class AdminMiddleware
{
    public function handle($request, Closure $next)
    {
        if ($request->session()->has('user')) {
            return $next($request);
        }

        return redirect('/')
            ->with(
                'message',
                ['type' => 'danger', 'text' => 'You need to login']
            );
    }
}
Most route middleware has one thing in common: they have a handle method used for handling the request. This is executed before any method for responding to a route. Inside the method, you check if a user has been set in the current session. If it has, proceed with processing the request.
大多数路由中间件有一个共同点:它们具有用于处理请求的handle方法。 这是在任何用于响应路由的方法之前执行的。 在方法内部,您检查当前会话中是否设置了user 。 如果有,请继续处理请求。
if ($request->session()->has('user')) {
    return $next($request);
}
Otherwise, redirect the user to the home page and pass on a message to the session saying that they need to login.
否则,将用户重定向到主页,并向会话传递一条消息,告知他们需要登录。
return redirect('/')
            ->with(
                'message',
                ['type' => 'danger', 'text' => 'You need to login']
            );
Make the middleware available for use by adding it to the app/Http/Kernel.php file under the $routeMiddleware array:
通过将中间件添加到$routeMiddleware数组下的app/Http/Kernel.php文件,使其$routeMiddleware :
'admin' => \App\Http\Middleware\AdminMiddleware::class数据库 (Database)
The app uses three tables: user, calendar and event. To save time, you can just grab the migrations from the repository, and paste them into the same path in your own project. Execute php artisan migrate in the root of your project to actually create the tables in the database.
该应用程序使用三个表: user , calendar和event 。 为了节省时间,您只需从存储库中获取迁移 ,然后将其粘贴到您自己项目中的相同路径中即可。 在项目的根目录中执行php artisan migrate ,以实际在数据库中创建表。
After that, copy the contents of User.php, Calendar.php, and Event.php into the app directory. These files are the models that you will use later on to talk to the database.
之后,将User.php , Calendar.php和Event.php的内容复制到app目录中。 这些文件是您稍后将用于与数据库对话的模型。
主页 (Home Pages)
Create an app/Http/Controllers/HomeController.php file and add the following:
创建一个app/Http/Controllers/HomeController.php文件并添加以下内容:
<?php
namespace App\Http\Controllers;

use App\Googl;
use App\User;
use App\Calendar;
use Illuminate\Http\Request;

class HomeController extends Controller
{
   public function index()
   {
        return view('login');
   }

   public function login(Googl $googl, User $user, Request $request)
   {
        $client = $googl->client();
        if ($request->has('code')) {

            $client->authenticate($request->get('code'));
            $token = $client->getAccessToken();

            $plus = new \Google_Service_Plus($client);

            $google_user = $plus->people->get('me');

            $id = $google_user['id'];

            $email = $google_user['emails'][0]['value'];
            $first_name = $google_user['name']['givenName'];
            $last_name = $google_user['name']['familyName'];

            $has_user = $user->where('email', '=', $email)->first();

            if (!$has_user) {
                //not yet registered
                $user->email = $email;
                $user->first_name = $first_name;
                $user->last_name = $last_name;
                $user->token = json_encode($token);
                $user->save();
                $user_id = $user->id;

                //create primary calendar
                $calendar = new Calendar;
                $calendar->user_id = $user_id;
                $calendar->title = 'Primary Calendar';
                $calendar->calendar_id = 'primary';
                $calendar->sync_token = '';
                $calendar->save();
            } else {
                $user_id = $has_user->id;
            }

            session([
                'user' => [
                    'id' => $user_id,
                    'email' => $email,
                    'first_name' => $first_name,
                    'last_name' => $last_name,
                    'token' => $token
                ]
            ]);

            return redirect('/dashboard')
                ->with('message', ['type' => 'success', 'text' => 'You are now logged in.']);

        } else {
            $auth_url = $client->createAuthUrl();
            return redirect($auth_url);
        }
   }
}
Breaking down the code above, you have the index method which returns the login view.
分解上面的代码,您可以使用index方法返回登录视图。
public function index()
{
    return view('login');
}
You can create the login view in the resources/views/login.blade.php file:
您可以在resources/views/login.blade.php文件中创建登录视图:
@extends('layouts.default')

@section('content')
<form method="GET" action="/login">
    <button>Login with Google</button>
</form>
@stop
The login view is a form with a login button that’s used for logging into Google. This view extends the default template (resources/views/layouts/default.blade.php) which contains the following:
登录视图是带有登录按钮的表单,用于登录Google。 此视图扩展了默认模板( resources/views/layouts/default.blade.php ),该模板包含以下内容:
<!DOCTYPE html>
<html lang="en">
<head>
    <meta charset="UTF-8">
    <title>{{ env('APP_TITLE') }}</title>
    <link rel="stylesheet" href="{{ url('assets/lib/picnic/picnic.min.css') }}">
    <link rel="stylesheet" href="{{ url('assets/lib/picnic/plugins.min.css') }}">

    <link rel="stylesheet" href="{{ url('assets/css/style.css') }}">
</head>
<body>
    <div class="container">
        <header>
            <h1>{{ env('APP_TITLE') }}</h1>
        </header>
        @include('partials.alert')
        @yield('content')
    </div>
</body>
</html>
In the above template, picnic CSS is used to beautify things. The stylesheets are stored under the public/assets directory. Install it manually or with something nice like BowerPHP.
在上面的模板中, 野餐CSS用于美化事物。 样式表存储在public/assets目录下。 手动安装或使用类似BowerPHP的工具安装 。
The part which has @yield('content') is where the login form is shown.
登录表单显示在具有@yield('content')的部分。
You’re also including the partials.alert, which you can define in the resources/views/partials/alert.blade.php file. This is used to display messages and form validation errors to the user:
您还将包括partials.alert ,可以在resources/views/partials/alert.blade.php文件中对其进行定义。 这用于向用户显示消息和形成验证错误:
@if(session('message'))
    <div class="alert alert-{{ session('message.type') }}">
        {{ session('message.text') }}
    </div>
@endif

@if($errors->any())
    <div class="alert alert-danger">
        <ul>
            @foreach($errors->all() as $error)
                <li>{{ $error }}</li>
            @endforeach
        </ul>
    </div>
@endif
Going back to the HomeController, next is the login method. Type-hinting is used so that you can use the service container for the Google client. The same is done with the User model.
回到HomeController ,接下来是login方法。 使用类型提示,以便您可以将服务容器用于Google客户端。 User模型也是如此。
public function login (Googl $googl, User $user)
{
    ...
}
Inside the login method, create a new instance of the Google client, then check if a code is passed in as a query parameter to the URL.
在login方法中,创建Google客户端的新实例,然后检查是否将代码作为查询参数传递给URL。
If you haven’t implemented OAuth in any of your projects before, the way it works is that the user has to click a link which leads to the login page of the service. In this case, it’s Google, so the user is redirected to Google’s login page. Once logged in, the user is asked for specific permissions. Once the user agrees, they are redirected back to the website with a unique code in the URL. This is then used to acquire an access token which can be used by the app to perform requests to the API.
如果您之前从未在任何项目中实现OAuth,则其工作方式是用户必须单击一个链接,该链接会指向该服务的登录页面。 在这种情况下,它是Google,因此用户被重定向到Google的登录页面。 登录后,将要求用户提供特定权限。 用户同意后,将使用URL中的唯一代码将其重定向回网站。 然后,它用于获取访问令牌,应用可以使用该访问令牌执行对API的请求。
The code that you’re checking here is the code used to exchange for an access token. If it doesn’t exist, then redirect the user to the Google login page:
您在此处检查的代码是用于交换访问令牌的代码。 如果不存在,则将用户重定向到Google登录页面:
$client = $googl->client();
if ($request->has('code')) {
    ...
} else {
    $auth_url = $client->createAuthUrl();
    return redirect($auth_url);
}
If it exists, authenticate the user with that code:
如果存在,请使用该代码验证用户身份:
$client->authenticate($request->get('code'));This allows you to get the access token and initialize the request to the Google+ service:
这使您可以获取访问令牌并初始化对Google+服务的请求:
$token = $client->getAccessToken();
$plus = new \Google_Service_Plus($client);
Next, get the currently logged in user and extract their info:
接下来,获取当前登录的用户并提取其信息:
$google_user = $plus->people->get('me');
$id = $google_user['id'];

$email = $google_user['emails'][0]['value']; //email
$first_name = $google_user['name']['givenName']; //first name
$last_name = $google_user['name']['familyName']; //last name
Check if the user already exists in the database:
检查用户是否已经存在于数据库中:
$has_user = $user->where('email', '=', $email)->first();If the user doesn’t exist, create a new user and save the entry to the database. Also create the default calendar for the user. This is the primary calendar in Google calendar. You’re basically making a copy so that the events (appointments) will have a container once you begin syncing the data from the Google calendar service.
如果该用户不存在,请创建一个新用户并将条目保存到数据库。 同时为用户创建默认日历。 这是Google日历中的主要日历。 您基本上是在进行复制,以便一旦您开始同步来自Google日历服务的数据,事件(约会)将具有一个容器。
if (!$has_user) {
    //not yet registered
    $user->email = $email;
    $user->first_name = $first_name;
    $user->last_name = $last_name;
    $user->token = $token;
    $user->save();
    $user_id = $user->id;

    //create primary calendar
    $calendar = new Calendar;
    $calendar->user_id = $user_id;
    $calendar->title = 'Primary Calendar';
    $calendar->calendar_id = 'primary';
    $calendar->sync_token = '';
    $calendar->save();
}
If the user already exists, assign a value to the $user_id so that you can set it in the session:
如果用户已经存在,请为$user_id分配一个值,以便您可以在会话中进行设置:
$user_id = $has_user->id;Save the user details into the session:
将用户详细信息保存到会话中:
session([
    'user' => [
        'id' => $user_id,
        'email' => $email,
        'first_name' => $first_name,
        'last_name' => $last_name,
        'token' => $token
    ]
]);
Finally, redirect the user to the admin dashboard page:
最后,将用户重定向到管理仪表板页面:
return redirect('/dashboard')
                ->with('message', ['type' => 'success', 'text' => 'You are now logged in.']);
管理员页面 (Admin Pages)
Next, create the controller for the admin pages in the app/Http/Controllers/AdminController.php file:
接下来,在app/Http/Controllers/AdminController.php文件中为管理页面创建控制器:
<?php
namespace App\Http\Controllers;

use App\Googl;
use App\User;
use App\Calendar;
use App\Event;
use Carbon\Carbon;
use Illuminate\Http\Request;

class AdminController extends Controller
{

   private $client;

   public function __construct(Googl $googl)
   {
        $this->client = $googl->client();
        $this->client->setAccessToken(session('user.token'));
   }


   public function index(Request $request)
   {
        return view('admin.dashboard');
   }


   public function createCalendar(Request $request)
   {
        return view('admin.create_calendar');
   }


   public function doCreateCalendar(Request $request, Calendar $calendar)
   {
        $this->validate($request, [
            'title' => 'required|min:4'
        ]);

        $title = $request->input('title');
        $timezone = env('APP_TIMEZONE');

        $cal = new \Google_Service_Calendar($this->client);

        $google_calendar = new \Google_Service_Calendar_Calendar($this->client);
        $google_calendar->setSummary($title);
        $google_calendar->setTimeZone($timezone);

        $created_calendar = $cal->calendars->insert($google_calendar);

        $calendar_id = $created_calendar->getId();

        $calendar->user_id = session('user.id');
        $calendar->title = $title;
        $calendar->calendar_id = $calendar_id;
        $calendar->save();

        return redirect('/calendar/create')
            ->with('message', [
                'type' => 'success', 'text' => 'Calendar was created!'
            ]);
   }


   public function createEvent(Calendar $calendar, Request $request)
   {
        $user_id = session('user.id');
        $calendars = $calendar
            ->where('user_id', '=', $user_id)->get();
        $page_data = [
            'calendars' => $calendars
        ];
        return view('admin.create_event', $page_data);
   }


   public function doCreateEvent(Event $evt, Request $request)
   {
        $this->validate($request, [
            'title' => 'required',
            'calendar_id' => 'required',
            'datetime_start' => 'required|date',
            'datetime_end' => 'required|date'
        ]);

        $title = $request->input('title');
        $calendar_id = $request->input('calendar_id');
        $start = $request->input('datetime_start');
        $end = $request->input('datetime_end');

        $start_datetime = Carbon::createFromFormat('Y/m/d H:i', $start);
        $end_datetime = Carbon::createFromFormat('Y/m/d H:i', $end);

        $cal = new \Google_Service_Calendar($this->client);
        $event = new \Google_Service_Calendar_Event();
        $event->setSummary($title);

        $start = new \Google_Service_Calendar_EventDateTime();
        $start->setDateTime($start_datetime->toAtomString());
        $event->setStart($start);
        $end = new \Google_Service_Calendar_EventDateTime();
        $end->setDateTime($end_datetime->toAtomString());
        $event->setEnd($end);

        //attendee
        if ($request->has('attendee_name')) {
            $attendees = [];
            $attendee_names = $request->input('attendee_name');
            $attendee_emails = $request->input('attendee_email');

            foreach ($attendee_names as $index => $attendee_name) {
                $attendee_email = $attendee_emails[$index];
                if (!empty($attendee_name) && !empty($attendee_email)) {
                    $attendee = new \Google_Service_Calendar_EventAttendee();
                    $attendee->setEmail($attendee_email);
                    $attendee->setDisplayName($attendee_name);
                    $attendees[] = $attendee;
                }
            }

            $event->attendees = $attendees;
        }

        $created_event = $cal->events->insert($calendar_id, $event);

        $evt->title = $title;
        $evt->calendar_id = $calendar_id;
        $evt->event_id = $created_event->id;
        $evt->datetime_start = $start_datetime->toDateTimeString();
        $evt->datetime_end = $end_datetime->toDateTimeString();
        $evt->save();

        return redirect('/event/create')
                    ->with('message', [
                        'type' => 'success',
                        'text' => 'Event was created!'
                    ]);
   }


   public function syncCalendar(Calendar $calendar)
   {
        $user_id = session('user.id');
        $calendars = $calendar->where('user_id', '=', $user_id)
            ->get();

        $page_data = [
            'calendars' => $calendars
        ];
        return view('admin.sync_calendar', $page_data);
   }


   public function doSyncCalendar(Request $request)
   {
        $this->validate($request, [
            'calendar_id' => 'required'
        ]);

        $user_id = session('user.id');
        $calendar_id = $request->input('calendar_id');

        $base_timezone = env('APP_TIMEZONE');

        $calendar = Calendar::find($calendar_id);
        $sync_token = $calendar->sync_token;
        $g_calendar_id = $calendar->calendar_id;

        $g_cal = new \Google_Service_Calendar($this->client);

        $g_calendar = $g_cal->calendars->get($g_calendar_id);
        $calendar_timezone = $g_calendar->getTimeZone();

        $events = Event::where('id', '=', $calendar_id)
            ->lists('event_id')
            ->toArray();

        $params = [
            'showDeleted' => true,
            'timeMin' => Carbon::now()
                ->setTimezone($calendar_timezone)
                ->toAtomString()
        ];

        if (!empty($sync_token)) {
            $params = [
                'syncToken' => $sync_token
            ];
        }

        $googlecalendar_events = $g_cal->events->listEvents($g_calendar_id, $params);


        while (true) {

            foreach ($googlecalendar_events->getItems() as $g_event) {

                $g_event_id = $g_event->id;
                $g_event_title = $g_event->getSummary();
                $g_status = $g_event->status;

                if ($g_status != 'cancelled') {

                    $g_datetime_start = Carbon::parse($g_event->getStart()->getDateTime())
                        ->tz($calendar_timezone)
                        ->setTimezone($base_timezone)
                        ->format('Y-m-d H:i:s');

                    $g_datetime_end = Carbon::parse($g_event->getEnd()->getDateTime())
                        ->tz($calendar_timezone)
                        ->setTimezone($base_timezone)
                        ->format('Y-m-d H:i:s');

                    //check if event id is already in the events table
                    if (in_array($g_event_id, $events)) {
                        //update event
                        $event = Event::where('event_id', '=', $g_event_id)->first();
                        $event->title = $g_event_title;
                        $event->calendar_id = $g_calendar_id;
                        $event->event_id = $g_event_id;
                        $event->datetime_start = $g_datetime_start;
                        $event->datetime_end = $g_datetime_end;
                        $event->save();
                    } else {
                        //add event
                        $event = new Event;
                        $event->title = $g_event_title;
                        $event->calendar_id = $g_calendar_id;
                        $event->event_id = $g_event_id;
                        $event->datetime_start = $g_datetime_start;
                        $event->datetime_end = $g_datetime_end;
                        $event->save();
                    }

                } else {
                    //delete event
                    if (in_array($g_event_id, $events)) {
                        Event::where('event_id', '=', $g_event_id)->delete();
                    }
                }

            }

            $page_token = $googlecalendar_events->getNextPageToken();
            if ($page_token) {
                $params['pageToken'] = $page_token;
                $googlecalendar_events = $g_cal->events->listEvents('primary', $params);
            } else {
                $next_synctoken = str_replace('=ok', '', $googlecalendar_events->getNextSyncToken());

                //update next sync token
                $calendar = Calendar::find($calendar_id);
                $calendar->sync_token = $next_synctoken;
                $calendar->save();

                break;
            }

        }

        return redirect('/calendar/sync')
            ->with('message',
                [
                    'type' => 'success',
                    'text' => 'Calendar was synced.'
                ]);

   }


   public function listEvents()
   {
        $user_id = session('user.id');
        $calendar_ids = Calendar::where('user_id', '=', $user_id)
            ->lists('calendar_id')
            ->toArray();

        $events = Event::whereIn('calendar_id', $calendar_ids)->get();

        $page_data = [
            'events' => $events
        ];

        return view('admin.events', $page_data);
   }


   public function logout(Request $request)
   {
        $request->session()->flush();
        return redirect('/')
            ->with('message', ['type' => 'success', 'text' => 'You are now logged out']);
   }

}
Let’s break down the above code.
让我们分解上面的代码。
Inside the controller, the $client variable stores the reference to the new Google client that you initialized in the constructor. This way, you don’t need to initialize it every time you need it.
在控制器内部, $client变量存储对在构造函数中初始化的新Google客户端的引用。 这样,您无需每次都需要对其进行初始化。
private $client;

public function __construct(Googl $googl)
{
    $this->client = $googl->client();
    $this->client->setAccessToken(session('user.token'));
}
The index method returns the admin dashboard (resources/views/admin/dashboard.blade.php) view.
index方法返回管理仪表盘( resources/views/admin/dashboard.blade.php )视图。
public function index(){
    return view('admin.dashboard');
}
The admin dashboard contains the links to the different pages which allow the user to perform various operations:
管理控制台包含指向不同页面的链接,这些链接允许用户执行各种操作:
@extends('layouts.admin')

@section('content')
<h3>What do you like to do?</h3>
<ul>
    <li><a href="/calendar/create">Create Calendar</a></li>
    <li><a href="/event/create">Create Event</a></li>
    <li><a href="/calendar/sync">Sync Calendar</a></li>
    <li><a href="/events">Events</a></li>
    <li><a href="/logout">Logout</a></li>
</ul>
@stop
This view extends the followingt admin layout (resources/views/layouts/admin.blade.php):
该视图扩展了以下管理员布局( resources/views/layouts/admin.blade.php ):
<!DOCTYPE html>
<html lang="en">
<head>
    <meta charset="UTF-8">
    <title>{{ env('APP_TITLE') }}</title>
    <link rel="stylesheet" href="{{ url('assets/lib/picnic/picnic.min.css') }}">
    <link rel="stylesheet" href="{{ url('assets/lib/picnic/plugins.min.css') }}">

    @yield('jquery_datetimepicker_style')

    <link rel="stylesheet" href="{{ url('assets/css/style.css') }}">
</head>
<body>
    <div class="container">
        <header>
            <h1>{{ env('APP_TITLE') }}</h1>
        </header>
        @include('partials.alert')
        @yield('content')
    </div>

    @yield('attendee_template')

    @yield('jquery_script')

    @yield('handlebars_script')

    @yield('jquery_datetimepicker_script')

    @yield('create_event_script')

</body>
</html>
In the above code, you’re yielding a few templates aside from the main content. These templates are passed in from different views. It simply returns nothing if a view hasn’t defined the section that it’s yielding.
在上面的代码中,除了主要内容之外,您还生成了一些模板。 这些模板是从不同的视图传入的。 如果视图尚未定义要产生的部分,则它仅不返回任何内容。
创建日历 (Creating a Calendar)
Going back to the AdminController, here’s the method that returns the view for creating a new calendar:
回到AdminController ,这是返回用于创建新日历的视图的方法:
public function createCalendar(Request $request)
{
    return view('admin.create_calendar');
}
The create calendar view contains a form which asks for the title of the calendar. There’s also a hidden field used for preventing CSRF (Cross-site Request Forgery).
创建日历视图包含一个要求日历标题的表单。 还有一个用于防止CSRF(跨站请求伪造)的隐藏字段。
@extends('layouts.admin')

@section('content')
<form method="POST">
    <input type="hidden" name="_token" value="{{{ csrf_token() }}}" />
    <p>
        <label for="title">Title</label>
        <input type="text" name="title" id="title" value="{{ old('title') }}">
    </p>
    <button>Create Calendar</button>
</form>
@stop
Once the form is submitted, the doCreateCalendar method is called. Inside the method, validate if there’s a value supplied to the title field and if it has a minimum of 4 characters.
提交表单后,将调用doCreateCalendar方法。 在方法内部,验证是否在标题字段中提供了一个值,并且该值至少包含4个字符。
$this->validate($request, [
    'title' => 'required|min:4'
]);
Initialize the Google calendar client:
初始化Google日历客户端:
$cal = new \Google_Service_Calendar($this->client);Create a new calendar. Set the title to the title supplied by the user and the timezone to the default app timezone:
创建一个新的日历。 将标题设置为用户提供的标题,并将时区设置为默认应用程序时区:
$google_calendar = new \Google_Service_Calendar_Calendar($this->client);
$google_calendar->setSummary($title);
$google_calendar->setTimeZone($timezone);

$created_calendar = $cal->calendars->insert($google_calendar);
Get the ID of the calendar:
获取日历的ID:
$calendar_id = $created_calendar->getId();Save the newly created calendar to the database:
将新创建的日历保存到数据库中:
$calendar->user_id = session('user.id');
$calendar->title = $title;
$calendar->calendar_id = $calendar_id;
$calendar->save();
Redirect the user back to the page for creating a new calendar:
将用户重定向回页面以创建新日历:
return redirect('/calendar/create')
            ->with('message', [
                'type' => 'success', 'text' => 'Calendar was created!'
            ]);
建立活动 (Creating an Event)
Next comes the method that returns the view for creating a new event. Here you’re passing in the calendars that the user has already created because the user has to pick which calendar to add the event to.
接下来是返回用于创建新事件的视图的方法。 在这里,您传递的是用户已经创建的日历,因为用户必须选择要将事件添加到的日历。
public function createEvent(Calendar $calendar, Request $request)
{
    $user_id = session('user.id');
    $calendars = $calendar
        ->where('user_id', '=', $user_id)->get();
    $page_data = [
        'calendars' => $calendars
    ];
    return view('admin.create_event', $page_data);
}
The admin.create_event (resources/views/admin/create_event.blade.php) view includes jQuery, handlebars and the jQuery datetimepicker styles and scripts.
admin.create_event ( resources/views/admin/create_event.blade.php )视图包括jQuery,车把以及jQuery datetimepicker样式和脚本。
You’re using jQuery to listen for events in the DOM, handlebars for creating new HTML and the jQuery datetimepicker to turn the date fields into date and time pickers. Inside the form, you have a field for entering the title of the event, selecting the calendar in which to add the event, the start and end date and time, and the fields for entering the attendee’s name and email. Below the form, you have the handlebars template for the attendee row. This row would be appended to the attendees container (<div id="attendees">...</div>).
您正在使用jQuery来侦听DOM中的事件,使用把手来创建新HTML,并使用jQuery datetimepicker将日期字段转换为日期和时间选择器。 在表单内部,您有一个用于输入事件标题,选择要添加事件的日历,开始和结束日期和时间的字段,以及用于输入与会者姓名和电子邮件的字段。 在表单下方,您有与会者行的把手模板。 此行将附加到与会者容器( <div id="attendees">...</div> )。
@extends('layouts.admin')

@section('jquery_datetimepicker_style')
<link rel="stylesheet" href="{{ url('assets/lib/jquery-datetimepicker/jquery.datetimepicker.min.css') }}">
@stop

@section('content')
<form method="POST">
    <input type="hidden" name="_token" value="{{{ csrf_token() }}}" />
    <p>
        <label for="title">Title</label>
        <input type="text" name="title" id="title" value="{{ old('title') }}">
    </p>
    <p>
        <label for="calendar_id">Calendar</label>
        <select name="calendar_id" id="calendar_id">
            @foreach($calendars as $cal)
            <option value="{{ $cal->calendar_id }}">{{ $cal->title }}</option>
            @endforeach
        </select>
    </p>
    <p>
        <label for="datetime_start">Datetime Start</label>
        <input type="text" name="datetime_start" id="datetime_start" class="datetimepicker" value="{{ old('datetime_start') }}">
    </p>
    <p>
        <label for="datetime_end">Datetime End</label>
        <input type="text" name="datetime_end" id="datetime_end" class="datetimepicker" value="{{ old('datetime_end') }}">
    </p>
    <div id="attendees">
        Attendees
        <div class="attendee-row">
            <input type="text" name="attendee_name[]" class="half-input name" placeholder="Name">
            <input type="text" name="attendee_email[]" class="half-input email" placeholder="Email">
        </div>
    </div>
    <button>Create Event</button>
</form>
@stop


@section('attendee_template')
<script id="attendee-template" type="text/x-handlebars-template">
    <div class="attendee-row">
        <input type="text" name="attendee_name[]" class="half-input name" placeholder="Name">
        <input type="text" name="attendee_email[]" class="half-input email" placeholder="Email">
    </div>
</script>
@stop

@section('jquery_script')
<script src="{{ url('assets/lib/jquery.min.js') }}"></script>
@stop

@section('handlebars_script')
<script src="{{ url('assets/lib/handlebars.min.js') }}"></script>
@stop

@section('jquery_datetimepicker_script')
<script src="{{ url('assets/lib/jquery-datetimepicker/jquery.datetimepicker.min.js') }}"></script>
@stop

@section('create_event_script')
<script src="{{ url('assets/js/create_event.js') }}"></script>
@stop
In the template above, you’re also including the create_event.js file. This file is responsible for making the date fields into datetime pickers and also listening for the blur event on the attendee email text field. Once the blur event is fired and the attendee name and email for that row are filled by the user, it will generate a new row in which the user can enter another attendee.
在上面的模板中,您还将包括create_event.js文件。 此文件负责将日期字段设置为日期时间选择器,还负责监听与会者电子邮件文本字段上的模糊事件。 触发模糊事件并由用户填写该行的与会者名称和电子邮件后,它将生成一个新行,用户可以在其中输入另一个与会者。
var attendee_template = Handlebars.compile($('#attendee-template').html());

$('.datetimepicker').datetimepicker();

$('#attendees').on('blur', '.email', function(){

    var attendee_row = $('.attendee-row:last');
    var name = attendee_row.find('.name').val();
    var email = attendee_row.find('.email').val();

    if(name && email){
        $('#attendees').append(attendee_template());
    }
});
Next is the method that will be executed once the create event form is submitted:
接下来是提交创建事件表单后将执行的方法:
public function doCreateEvent(Event $evt, Request $request)
{
    ...
}
Inside the method, validate the form and get the data from the fields:
在方法内部,验证表单并从字段中获取数据:
$this->validate($request, [
    'title' => 'required',
    'calendar_id' => 'required',
    'datetime_start' => 'required|date',
    'datetime_end' => 'required|date'
]);

$title = $request->input('title');
$calendar_id = $request->input('calendar_id');
$start = $request->input('datetime_start');
$end = $request->input('datetime_end');
Convert the start and end datetime to date objects so it can be easily formatted:
将开始和结束日期时间转换为日期对象,以便可以轻松设置其格式:
$start_datetime = Carbon::createFromFormat('Y/m/d H:i', $start);
$end_datetime = Carbon::createFromFormat('Y/m/d H:i', $end);
Create a new Google Calendar event and set its summary to the title entered by the user:
创建一个新的Google日历活动,并将其摘要设置为用户输入的标题:
$event = new \Google_Service_Calendar_Event();
$event->setSummary($title);
Set the start and end datetime. Note that the Google Calendar API expects the date and time to be formatted as an atom string so you’re using the toAtomString() method provided by Carbon to format the $start_datetime and $end_datetime.
设置开始和结束日期时间。 请注意,Google Calendar API希望将日期和时间格式化为原子字符串,因此您使用的是Carbon提供的toAtomString()方法来格式化$start_datetime和$end_datetime 。
$start = new \Google_Service_Calendar_EventDateTime();
$start->setDateTime($start_datetime->toAtomString());
$event->setStart($start);

$end = new \Google_Service_Calendar_EventDateTime();
$end->setDateTime($end_datetime->toAtomString());
$event->setEnd($end);
Check if the user has added any attendees:
检查用户是否添加了任何与会者:
if ($request->has('attendee_name')) {
    ...
}
If so, ssign them to variables:
如果是这样,请将它们分配给变量:
$attendees = [];
$attendee_names = $request->input('attendee_name');
$attendee_emails = $request->input('attendee_email');
Loop through each of them and if the user has entered both name and email, create a new event attendee in Google calendar and set their email and name. Then, push the created attendee to the $attendees array.
循环浏览每个用户,如果用户输入了姓名和电子邮件,则在Google日历中创建新的活动参与者并设置其电子邮件和姓名。 然后,将创建的与会者推送到$attendees数组。
foreach ($attendee_names as $index => $attendee_name) {
    $attendee_email = $attendee_emails[$index];
    if (!empty($attendee_name) && !empty($attendee_email)) {
        $attendee = new \Google_Service_Calendar_EventAttendee();
        $attendee->setEmail($attendee_email);
        $attendee->setDisplayName($attendee_name);
        $attendees[] = $attendee;
    }
}
After looping through each of the attendees, attach the $attendees array to the event’s attendees:
遍历每个参与者后,将$attendees数组附加到事件的参与者:
$event->attendees = $attendees;Save the event to Google Calendar:
将活动保存到Google日历:
$created_event = $cal->events->insert($calendar_id, $event);Also save the event to the database:
还将事件保存到数据库:
$evt->title = $title;
$evt->calendar_id = $calendar_id;
$evt->event_id = $created_event->id;
$evt->datetime_start = $start_datetime->toDateTimeString();
$evt->datetime_end = $end_datetime->toDateTimeString();
$evt->save();
Redirect back to the event creation page:
重定向回事件创建页面:
return redirect('/event/create')
            ->with('message', [
                'type' => 'success',
                'text' => 'Event was created!'
            ]);
同步日历 (Syncing a Calendar)
Next is the function that would return the view for syncing the calendar (resources/views/admin/sync_calendar.blade.php). Here you pass in the calendars created by the user as the data for this view.
接下来是将返回用于同步日历的视图的功能( resources/views/admin/sync_calendar.blade.php )。 在这里,您传入用户创建的日历作为该视图的数据。
public function syncCalendar(Calendar $calendar)
{
    $user_id = session('user.id');
    $calendars = $calendar->where('user_id', '=', $user_id)
        ->get();

    $page_data = [
        'calendars' => $calendars
    ];
    return view('admin.sync_calendar', $page_data);
}
Below is the code for the admin.sync_calendar view. This allows the user to select which calendar to sync. What this does once submitted is add any events which haven’t been added to the database, delete cancelled events, and update the updated ones since the last sync.
以下是admin.sync_calendar视图的代码。 这允许用户选择要同步的日历。 一旦提交,此操作将添加尚未添加到数据库的所有事件,删除已取消的事件,并更新自上次同步以来的更新事件。
@extends('layouts.admin')

@section('content')
<form method="POST">
    <input type="hidden" name="_token" value="{{{ csrf_token() }}}" />
    <p>
        <label for="calendar_id">Calendar</label>
        <select name="calendar_id" id="calendar_id">
            @foreach($calendars as $cal)
            <option value="{{ $cal->id }}">{{ $cal->title }}</option>
            @endforeach
        </select>
    </p>
    <button>Sync Calendar</button>
</form>
@stop
Once the user submits the calendar sync form, the doSyncCalendar method gets executed:
用户提交日历同步表单后,将执行doSyncCalendar方法:
public function doSyncCalendar(Request $request)
{
    ...
}
Inside the function, find the calendar in the database:
在函数内部,在数据库中找到日历:
$calendar = Calendar::find($calendar_id);
$sync_token = $calendar->sync_token;
$g_calendar_id = $calendar->calendar_id;
Create a new instance of the Google calendar service and get the calendar based on its ID. Also get the timezone of the Calendar. This allows you to set in which timezone the dates and times of the events are expressed. This way, you can easily convert to the timezone used by the app.
创建Google日历服务的新实例,并根据其ID获取日历。 同时获取日历的时区。 这使您可以设置在哪个时区中表示事件的日期和时间。 这样,您可以轻松地转换为应用程序使用的时区。
$g_cal = new \Google_Service_Calendar($this->client);

$g_calendar = $g_cal->calendars->get($g_calendar_id);
$calendar_timezone = $g_calendar->getTimeZone();
Get the IDs of the events that belong to the calendar selected by the user. This will be used for checking if a specific event has already been added before. From there, you can determine what to do with the event. If it’s already in the database and the status is not cancelled, then it requires an update, otherwise delete it from the database. If it’s not yet in the database then it requires adding.
获取属于用户所选日历的事件的ID。 这将用于检查之前是否已添加特定事件。 从那里,您可以确定该事件的处理方式。 如果它已经存在于数据库中并且状态没有被取消,则它需要更新,否则请从数据库中删除它。 如果它尚未在数据库中,则需要添加。
$events = Event::where('id', '=', $calendar_id)
            ->lists('event_id')
            ->toArray();
Specify a default filter for first sync. The showDeleted option allows you to return the deleted events and the timeMin option allows you to specify the minimum datetime to be used in the request. This way, past events wouldn’t get returned.
为首次同步指定默认过滤器。 showDeleted选项允许您返回已删除的事件, timeMin选项允许您指定要在请求中使用的最小日期时间。 这样,过去的事件将不会返回。
$params = [
    'showDeleted' => true,
    'timeMin' => Carbon::now()
        ->setTimezone($calendar_timezone)
        ->toAtomString()
];
The Google Calendar sync works by making use of a sync token which changes every time a change is made to the calendar (e.g. an event is added). This token then needs to be saved in the database, so that when the token in Google’s server is the same as the token that you have, it means that nothing has changed. If it’s different, that’s the only time that you perform an update. After the update, the token also needs to be updated in the database.
Google日历同步通过使用同步令牌来工作,该同步令牌每次更改日历(例如添加事件)时都会更改。 然后,需要将该令牌保存在数据库中,以便当Google服务器中的令牌与您拥有的令牌相同时,意味着没有任何更改。 如果不同,那是您唯一执行更新的时间。 更新后,令牌也需要在数据库中更新。
If the sync token is not empty, use that instead of the default filters. This allows you to return only those events that have been updated or added.
如果同步令牌不为空,请使用该令牌代替默认过滤器。 这允许您仅返回已更新或添加的事件。
if (!empty($sync_token)) {
    $params = [
        'syncToken' => $sync_token
    ];
}
Fetch the events:
获取事件:
$googlecalendar_events = $g_cal->events->listEvents($g_calendar_id, $params);Next is an infinite loop which will only stop executing once you have fetched all the updates for the calendar that the user has selected.
接下来是一个无限循环,只有在您获取用户选择的日历的所有更新后,该循环才会停止执行。
while (true) {
    ...
}
Inside the infinite loop, loop through the events returned by the API and extract all the relevant data:
在无限循环内,循环遍历API返回的事件并提取所有相关数据:
foreach ($googlecalendar_events->getItems() as $g_event) {

    $g_event_id = $g_event->id;
    $g_event_title = $g_event->getSummary();
    $g_status = $g_event->status;
    ...
}
Check the event status. If it’s cancelled, then delete the event from the database:
检查事件状态。 如果取消,则从数据库中删除事件:
if ($g_status != 'cancelled') {
    ...
} else {
    //delete event
    if (in_array($g_event_id, $events)) {
        Event::where('event_id', '=', $g_event_id)->delete();
    }
}
If the event is not cancelled, extract the start and end datetime of the event and convert it to the timezone of the app.
如果事件未取消,请提取事件的开始和结束日期时间,并将其转换为应用程序的时区。
$g_datetime_start = Carbon::parse($g_event->getStart()
    ->getDateTime())
    ->tz($calendar_timezone)
    ->setTimezone($base_timezone)
    ->format('Y-m-d H:i:s');

$g_datetime_end = Carbon::parse($g_event->getEnd()->getDateTime())
    ->tz($calendar_timezone)
    ->setTimezone($base_timezone)
    ->format('Y-m-d H:i:s');
If the event ID is found in the array of event IDs, it means the event has been updated so you also perform an update to the database:
如果在事件ID数组中找到了事件ID,则表示该事件已更新,因此您还要对数据库进行更新:
if (in_array($g_event_id, $events)) {
    //update event
    $event = Event::where('event_id', '=', $g_event_id)->first();
    $event->title = $g_event_title;
    $event->calendar_id = $g_calendar_id;
    $event->event_id = $g_event_id;
    $event->datetime_start = $g_datetime_start;
    $event->datetime_end = $g_datetime_end;
    $event->save();

}
If it’s not yet in the array, it means it’s a new event so you add a new entry to the database:
如果它尚未出现在数组中,则意味着这是一个新事件,因此您需要向数据库添加一个新条目:
else {
    //add event
    $event = new Event;
    $event->title = $g_event_title;
    $event->calendar_id = $g_calendar_id;
    $event->event_id = $g_event_id;
    $event->datetime_start = $g_datetime_start;
    $event->datetime_end = $g_datetime_end;
    $event->save();
}
After looping through the events, get the token for the next page. Note that this isn’t the same as the sync token from earlier. The page token is used solely for pagination. Here you’re just checking if there are any more pages in the current result set.
循环浏览事件后,获取下一页的令牌。 请注意,这与之前的同步令牌不同。 页面令牌仅用于分页。 在这里,您只是检查当前结果集中是否还有更多页面。
$page_token = $googlecalendar_events->getNextPageToken();If it has a next page, set it as the pageToken for the next request and then proceed with the request for fetching events:
如果有下一页,请将其pageToken为下一个请求的pageToken ,然后继续进行获取事件的请求:
if ($page_token) {
   $params['pageToken'] = $page_token;
   $googlecalendar_events = $g_cal->events->listEvents('primary', $params);
}
If there are none, it means that you’ve got all the results, so perform a request to get the next sync token and then update the database with that value. At this point, you can exit out of the infinite loop.
如果没有,则意味着您已经获得了所有结果,因此请执行请求以获取下一个同步令牌,然后使用该值更新数据库。 此时,您可以退出无限循环。
else {
    $next_synctoken = str_replace('=ok', '', $googlecalendar_events->getNextSyncToken());

    //update next sync token
    $calendar = Calendar::find($calendar_id);
    $calendar->sync_token = $next_synctoken;
    $calendar->save();

    break; //exit out of the inifinite loop
}
Redirect to the calendar sync page and inform the user that the calendar was synced:
重定向到日历同步页面,并通知用户日历已同步:
return redirect('/calendar/sync')
        ->with('message',
            [
                'type' => 'success',
                'text' => 'Calendar was synced.'
            ]);
上市活动 (Listing Events)
Next is the method for showing all the events that the user has synced:
接下来是显示用户已同步的所有事件的方法:
public function listEvents()
{
    $user_id = session('user.id');
    $calendar_ids = Calendar::where('user_id', '=', $user_id)
        ->lists('calendar_id')
        ->toArray();

    $events = Event::whereIn('calendar_id', $calendar_ids)->get();

    $page_data = [
        'events' => $events
    ];

    return view('admin.events', $page_data);
}
The events view (resources/views/admin/events.blade.php) contains the following:
事件视图( resources/views/admin/events.blade.php )包含以下内容:
@extends('layouts.admin')

@section('content')
@if(count($events) > 0)
<table>
    <thead>
        <tr>
            <th>Title</th>
            <th>Datetime Start</th>
            <th>Datetime End</th>
        </tr>
    </thead>
    <tbody>
        @foreach($events as $event)
        <tr>
            <td>{{ $event->title }}</td>
            <td>{{ $event->datetime_start }}</td>
            <td>{{ $event->datetime_end }}</td>
        </tr>
        @endforeach
    </tbody>
</table>
@endif
@stop

@stop
注销 (Logging Out)
Finally, there’s the logout method which gets executed once the user clicks on the logout link in the admin dashboard. This deletes all session data and redirects the user back to the home page.
最后,一旦用户单击管理仪表板中的注销链接,就会执行logout方法。 这将删除所有会话数据,并将用户重定向回首页。
public function logout(Request $request)
{
    $request->session()->flush();
    return redirect('/')
        ->with('message', ['type' => 'success', 'text' => 'You are now logged out']);
}
结论 (Conclusion)
That’s it! In this tutorial, you’ve taken a look at how to build a PHP app which integrates with the Google Calendar API. By doing so, you’ve learned how to manipulate a Google calendar using PHP.
而已! 在本教程中,您已经了解了如何构建与Google Calendar API集成PHP应用程序。 通过这样做,您已经了解了如何使用PHP操作Google日历。
Have you taken advantage of Google’s APIs to build your own calendar app? Were these instruction easy/hard to follow? All feedback is welcome!
您是否利用Google的API来构建自己的日历应用程序? 这些说明容易/难于遵循吗? 欢迎所有反馈!
翻译自: https://www.sitepoint.com/calendar-as-a-service-in-php-easy-with-google-calendar-api/
calendar 日历


 4626
4626


 被折叠的 条评论
为什么被折叠?
被折叠的 条评论
为什么被折叠?
 到【灌水乐园】发言


