


git 移库
You’re building an application, and you need to share the database’s structure with your team. After all, you want everyone to be up and running as soon as possible. What do you do? SQL dumps of table structures? You could… but that’s so very primitive – and can be time consuming to import, too! More often than not, database migrations are the answer.
您正在构建应用程序,并且需要与团队共享数据库的结构。 毕竟,您希望每个人都尽快启动并运行。 你是做什么? 表结构SQL转储? 您可以…但是那太原始了–导入也可能很耗时! 数据库迁移常常是答案。
In this tutorial, we’ll go through a framework-agnostic package for building and executing database migrations called Phinx.
在本教程中,我们将介绍一个与框架无关的软件包,用于构建和执行名为Phinx的数据库迁移。
自举 (Bootstrapping)
First, let’s install Phinx into the project with Composer:
首先,让我们使用Composer将Phinx安装到项目中:
composer require robmorgan/phinx --devThe Phinx binary will be installed into the vendor/bin folder, as per Composer’s default values. It can then be executed by running:
根据Composer的默认值,Phinx二进制文件将安装到vendor/bin文件夹中。 然后可以通过运行以下命令来执行:
php vendor/bin/phinxPhinx needs a phinx.yml file from which to read the database configuration before it can do anything meaningful. To generate it, we run:
Phinx需要phinx.yml文件,该文件才能执行任何有意义的工作,然后从该文件中读取数据库配置。 要生成它,我们运行:
php vendor/bin/phinx init构型 (Configurations)
The generated file will look something like this:
生成的文件将如下所示:
paths:
    migrations: %%PHINX_CONFIG_DIR%%/db/migrations
    seeds: %%PHINX_CONFIG_DIR%%/db/seeds

environments:
    default_migration_table: phinxlog
    default_database: development
    production:
        adapter: mysql
        host: localhost
        name: production_db
        user: root
        pass: ''
        port: 3306
        charset: utf8

    development:
        adapter: mysql
        host: localhost
        name: development_db
        user: root
        pass: ''
        port: 3306
        charset: utf8

    testing:
        adapter: mysql
        host: localhost
        name: testing_db
        user: root
        pass: ''
        port: 3306
        charset: utf8
Phinx supports an arbitrary number of “databases”, though these should be considered versions of one database rather than several different ones. Sometimes, the need may arise to use a completely different database, however.
Phinx支持任意数量的“数据库”,尽管这些数据库应被视为一个数据库的版本,而不是几个不同的数据库。 但是,有时可能需要使用完全不同的数据库。
Such is the case, for example, with nofw, which in a previous version still uses Gatekeeper – a secure but clumsily developed user authorization package. Gatekeeper demands its own phinx.yml file (with a custom migration path) and does not provide an option to change which one is used, while at the same time requiring its own user database. That throws a wrench into the whole “let’s use Phinx in a project already using Gatekeeper” idea.
例如, nofw就是这种情况,在以前的版本中,它仍然使用Gatekeeper –一个安全但笨拙开发的用户授权包。 Gatekeeper需要其自己的phinx.yml文件(具有自定义迁移路径),并且不提供更改使用哪个文件的选项,而同时需要其自己的用户数据库。 这就使整个“让我们在已经使用Gatekeeper的项目中使用Phinx”的想法付诸东流。
For cases like these, Phinx offers the -c option which tells the launcher which phinx.yml file to use. Note that Phinx supports json and php file formats, too, but we’ll focus on the default yml one here and create a separate file for our example database.
对于此类情况,Phinx提供了-c选项,该选项告诉启动程序要使用哪个phinx.yml文件。 请注意,Phinx也支持json和php文件格式,但是在这里我们将重点介绍默认的yml格式,并为示例数据库创建一个单独的文件。
mv phinx.yml my-phinx.ymlThis merely renames the default file and makes room for “special” packages like Gatekeeper. It would be great if Phinx supported multiple migration paths, but we’ll take what we can get.
这仅重命名默认文件,并为诸如Gatekeeper之类的“特殊”程序包腾出了空间。 如果Phinx 支持多个迁移路径 ,那就太好了,但是我们将尽力而为。
Before we create the first migration, we need to fill out the credentials in my-phinx.yml. On Homestead Improved, the following would be quite enough:
在创建第一个迁移之前,我们需要在my-phinx.yml填写凭据。 在Homestead Improvement上 ,以下内容就足够了:
paths:
    migrations: db/migrations

environments:
    default_migration_table: phinxlog
    default_database: development
    production:
        adapter: mysql
        host: localhost
        name: production_db
        user: username
        pass: 'password'
        port: 3306
        charset: utf8

    development:
        adapter: mysql
        host: localhost
        name: homestead
        user: homestead
        pass: 'secret'
        port: 3306
        charset: utf8
第一次迁移 (The First Migration)
Let’s imagine we have an application which needs the following functionality built in:
假设我们有一个需要内置以下功能的应用程序:
- a way to send messages, app-wide, so that all users can see them 一种在整个应用范围内发送消息的方式,以便所有用户都可以看到它们
- a way to upload files into the system, and a way to attach those onto the aforementioned messages 一种将文件上传到系统中的方法,以及一种将这些文件附加到上述消息中的方法
- a way to define tags and tag the uploaded files (among other entities that should be easy to add later on), so the files can be sorted and searched. 一种定义标签并标记上载文件的方法(以及以后应易于添加的其他实体),以便可以对文件进行排序和搜索。
The model for this might look something like:
此模型可能类似于:

Converted to SQL with MySQL Workbench, this would be straightforward to import into the database:
使用MySQL Workbench转换为SQL后,可以很容易地将其导入数据库:
-- MySQL Workbench Forward Engineering

SET @OLD_UNIQUE_CHECKS=@@UNIQUE_CHECKS, UNIQUE_CHECKS=0;
SET @OLD_FOREIGN_KEY_CHECKS=@@FOREIGN_KEY_CHECKS, FOREIGN_KEY_CHECKS=0;
SET @OLD_SQL_MODE=@@SQL_MODE, SQL_MODE='TRADITIONAL,ALLOW_INVALID_DATES';

-- -----------------------------------------------------
-- Schema mydb
-- -----------------------------------------------------

-- -----------------------------------------------------
-- Schema mydb
-- -----------------------------------------------------
CREATE SCHEMA IF NOT EXISTS `mydb` DEFAULT CHARACTER SET utf8 ;
USE `mydb` ;

-- -----------------------------------------------------
-- Table `mydb`.`tag`
-- -----------------------------------------------------
CREATE TABLE IF NOT EXISTS `mydb`.`tag` (
  `id` INT UNSIGNED NOT NULL AUTO_INCREMENT,
  `name` VARCHAR(45) NOT NULL,
  `description` TEXT NULL,
  `context` VARCHAR(25) NULL,
  `created` TIMESTAMP NOT NULL DEFAULT CURRENT_TIMESTAMP,
  `created_by` INT UNSIGNED NOT NULL,
  `visibility` TINYINT(1) UNSIGNED NOT NULL DEFAULT 1,
  PRIMARY KEY (`id`),
  UNIQUE INDEX `name_creator_visibile` (`created_by` ASC, `name` ASC, `visibility` ASC),
  INDEX `context_key` (`context` ASC))
ENGINE = InnoDB;


-- -----------------------------------------------------
-- Table `mydb`.`tag_relation`
-- -----------------------------------------------------
CREATE TABLE IF NOT EXISTS `mydb`.`tag_relation` (
  `tag_id` INT UNSIGNED NOT NULL,
  `entity_id` INT UNSIGNED NOT NULL,
  `entity_type` VARCHAR(45) NOT NULL,
  `created` TIMESTAMP NOT NULL DEFAULT CURRENT_TIMESTAMP,
  `created_by` INT UNSIGNED NOT NULL,
  PRIMARY KEY (`tag_id`, `entity_id`, `entity_type`),
  INDEX `tag_key` (`tag_id` ASC),
  INDEX `entity_key` (`entity_id` ASC, `entity_type` ASC),
  CONSTRAINT `tag_id_fk`
    FOREIGN KEY (`tag_id`)
    REFERENCES `mydb`.`tag` (`id`)
    ON DELETE CASCADE
    ON UPDATE NO ACTION)
ENGINE = InnoDB;


-- -----------------------------------------------------
-- Table `mydb`.`file`
-- -----------------------------------------------------
CREATE TABLE IF NOT EXISTS `mydb`.`file` (
  `id` INT UNSIGNED NOT NULL AUTO_INCREMENT,
  `name` VARCHAR(255) NOT NULL,
  `path` TEXT NOT NULL,
  `created_by` INT UNSIGNED NOT NULL,
  `created` TIMESTAMP NOT NULL DEFAULT CURRENT_TIMESTAMP,
  `updated` TIMESTAMP NOT NULL DEFAULT CURRENT_TIMESTAMP,
  `updated_by` INT UNSIGNED NOT NULL,
  `access` VARCHAR(6) NOT NULL DEFAULT 'public',
  PRIMARY KEY (`id`),
  INDEX `creator` (`created_by` ASC))
ENGINE = InnoDB;


-- -----------------------------------------------------
-- Table `mydb`.`message`
-- -----------------------------------------------------
CREATE TABLE IF NOT EXISTS `mydb`.`message` (
  `id` INT UNSIGNED NOT NULL AUTO_INCREMENT,
  `created_by` INT UNSIGNED NOT NULL,
  `created` TIMESTAMP NOT NULL DEFAULT CURRENT_TIMESTAMP,
  `content` TEXT NOT NULL,
  `attachments` TEXT NULL,
  PRIMARY KEY (`id`))
ENGINE = InnoDB;


SET SQL_MODE=@OLD_SQL_MODE;
SET FOREIGN_KEY_CHECKS=@OLD_FOREIGN_KEY_CHECKS;
SET UNIQUE_CHECKS=@OLD_UNIQUE_CHECKS;
While this makes the first step extremely simple, it makes subsequent changes near impossible. We’ll talk about why a bit further down. When looking at things in the long term, the healthier approach would be using migrations.
尽管这使第一步变得非常简单,但使后续更改几乎变得不可能。 我们将讨论为什么要进一步下降。 从长远来看,更健康的方法是使用迁移。
最佳实践 (Best Practice)
Before proceeding, let’s talk about best practices.
在继续之前,让我们谈谈最佳实践。
The general consensus is that a migration file should only contain one change per file. When creating the tables, one migration per table. When adding columns subsequently, one set of column changes per file. When adding foreign keys even – one constraint per table.
普遍的共识是,迁移文件每个文件只能包含一个更改。 创建表时,每个表一次迁移。 随后添加列时,每个文件都会更改一组列 。 甚至添加外键时-每个表一个约束。
Likewise, while Phinx does support pure SQL statements in the migration files, so technically the Workbench output can be copied into migrations directly, it’s better to use Phinx’s own syntax to make the underlying database engine replaceable later on.
同样,虽然Phinx确实在迁移文件中支持纯SQL语句,但是从技术上讲,Workbench输出可以直接复制到迁移中,最好使用Phinx自己的语法来使基础数据库引擎稍后可替换。
With that in mind, let’s begin.
考虑到这一点,让我们开始吧。
创建迁移 (Creating Migrations)
First, we’ll create the tables.
首先,我们将创建表。
php vendor/bin/phinx create Tag
php vendor/bin/phinx create File
php vendor/bin/phinx create Message
Note that we only have one tag-related migration, even though the tags feature uses two tables, as evident from the model above. This is because in this initial stage, it is fine to create the tables that cannot function without one another at the same time. Notice also the order of features – to send messages, we need to be able to attach files. To attach files, we need to be able to tag them. Hence, it makes sense to install tags first, files second, and messages third.
请注意,即使标签功能使用了两个表,我们也只能进行一次与标签相关的迁移,从上面的模型可以明显看出。 这是因为在此初始阶段,可以创建无法同时使用的表。 还请注意功能的顺序–要发送消息,我们需要能够附加文件。 要附加文件,我们需要能够对其进行标记。 因此,首先安装标签,然后安装文件,然后再安装消息是有意义的。
After this command executes, Phinx will have created three files in db/migrations, each beginning with the date and time of creation, and ending with the migration name, e.g. 20160508205010_tag.php. The files will extend the AbstractMigration class and contain template code not unlike the following:
执行此命令后,Phinx将在db/migrations创建三个文件,每个文件以创建日期和时间开头,并以迁移名称结尾,例如20160508205010_tag.php 。 这些文件将扩展AbstractMigration类,并包含以下模板代码:
< ?php

use Phinx\Migration\AbstractMigration;

class Tag extends AbstractMigration
{
    /**
     * Change Method.
     *
     * Write your reversible migrations using this method.
     *
     * More information on writing migrations is available here:
     * http://docs.phinx.org/en/latest/migrations.html#the-abstractmigration-class
     *
     * The following commands can be used in this method and Phinx will
     * automatically reverse them when rolling back:
     *
     *    createTable
     *    renameTable
     *    addColumn
     *    renameColumn
     *    addIndex
     *    addForeignKey
     *
     * Remember to call "create()" or "update()" and NOT "save()" when working
     * with the Table class.
     */
    public function change()
    {

    }
}
Notice that, while Phinx does support the standard up and down methods you’re used to seeing in other migration tools, it defaults to change which can auto-reverse the migrations, removing the need to write separate down procedures.
请注意,虽然Phinx确实支持您在其他迁移工具中常用的标准up和down方法,但默认情况下它会change ,它可以自动撤消迁移,从而无需编写单独的down过程。
Let’s create our Tag migration now by modifying the change() method to look like this:
现在,通过将change()方法修改为如下所示,创建标签迁移:
public function change()
    {
        $tag = $this->table('tag');
        $tag
            ->addColumn('name', 'string', ['limit' => 45, 'null' => false])
            ->addColumn('description', 'text')
            ->addColumn('context', 'string', ['limit' => 25])
            ->addColumn('created', 'timestamp', ['null' => false, 'default' => 'CURRENT_TIMESTAMP'])
            ->addColumn('created_by', 'integer', ['signed' => false, 'null' => false])
            ->addColumn('visibility', 'boolean', ['null' => false, 'signed' => false, 'default' => 1])
            ;

        $tag->addIndex(['name', 'created_by', 'visibility'], ['unique' => true, 'name' => 'name_creator_visible']);
        $tag->addIndex(['context']);

        $tag->create();

        $tagRelation = $this->table('tag_relation', array('id' => false, 'primary_key' => array('tag_id', 'entity_id', 'entity_type')));
        $tagRelation
            ->addColumn('tag_id', 'integer', ['null' => false])
            ->addColumn('entity_id', 'integer', ['null' => false, 'signed' => false])
            ->addColumn('entity_type', 'string', ['limit' => 45, 'null' => false])
            ->addColumn('created', 'timestamp', ['null' => false, 'default' => 'CURRENT_TIMESTAMP'])
            ->addColumn('created_by', 'integer', ['signed' => false, 'null' => false])
        ;

        $tagRelation->addIndex(['tag_id']);
        $tagRelation->addIndex(['entity_id', 'entity_type'], ['name' => 'entity']);

        $tagRelation->addForeignKey('tag_id', 'tag', 'id', array('delete'=> 'CASCADE', 'update'=> 'NO_ACTION'));

        $tagRelation->create();
    }
Breaking it down, we first define the tag table, then add all the columns as per the documentation, and finally drop some indexes in there for good measure. Notice that there is no id column in the tag table. That’s because Phinx automatically creates an auto-incrementing primary key called id unless told to do otherwise.
分解它,我们首先定义tag表,然后根据文档添加所有列,最后在其中放置一些索引以取得良好的效果。 请注意, tag表中没有id列。 这是因为除非另行通知,否则Phinx会自动创建一个称为id的自动递增主键。
The first index of the tag table is called name_creator_visible. The order of the columns in an index matters. The second index is one placed onto the context column, allowing us to search all tags by context – something we expect to use often when selecting tags applicable to a certain entity.
标签表的第一个索引称为name_creator_visible 。 索引中各列的顺序很重要 。 第二个索引放在context列中,它使我们能够按上下文搜索所有标签-我们期望在选择适用于某个实体的标签时经常使用。
Next, we make the tag_relation table. As mentioned before, Phinx creates an auto-incrementing primary key called id, which is why we need to disable it in the table’s initial definition. In the very same line, we define an alternative primary key consisting of tag_id, entity_id and entity_type. This makes sure that a given entity can only have one copy of a single tag attached to it. Adding columns proceeds as usual, and then it’s time to create indexes again. The tag_id one lets us quickly find all entities with a given tag, and the combination of entity_id and entity_type lets us quickly list all the tags on a given entity.
接下来,我们制作tag_relation表。 如前所述,Phinx创建了一个称为id的自动递增主键,这就是为什么我们需要在表的初始定义中将其禁用。 在同一行中,我们定义了一个备用主键,该主键由tag_id , entity_id和entity_type 。 这样可以确保给定实体只能附加一个标签的一个副本。 照常添加列,然后是再次创建索引的时候了。 tag_id可以让我们快速找到具有给定标签的所有实体,而entity_id和entity_type的组合使我们可以快速列出给定实体上的所有标签。
Finally, we create a simple foreign key, binding the tag_id field to the id field of the tag table, so that the tag_relation rows corresponding to said tag_id get deleted if the tag itself is deleted from the system.
最后,我们创建一个简单的外键,将tag_id字段绑定到tag表的id字段,这样,如果从系统中删除了标签本身,则对应于该tag_id的tag_relation行将被删除。
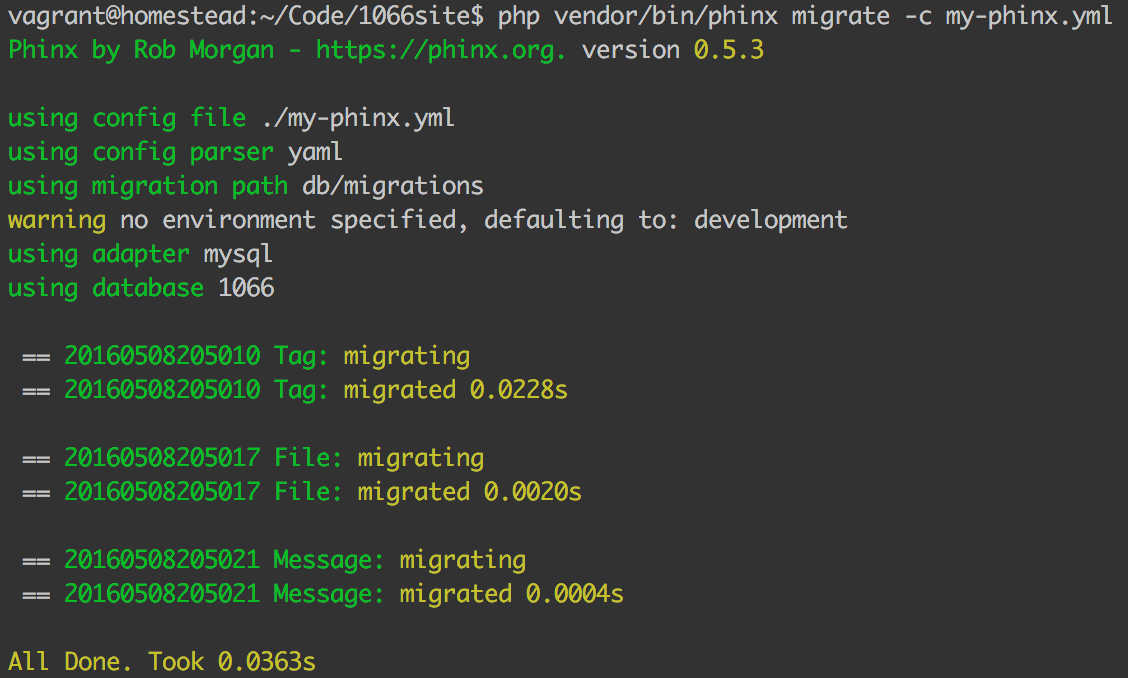
Our initial tag migration is now ready. Let’s test it out. We initiate the migration with:
我们的初始标签迁移现已准备就绪。 让我们测试一下。 我们通过以下方式启动迁移:
php vendor/bin/phinx migrate -c my-phinx.ymlOptionally, we can provide a -e X flag where X is the environment we’re targeting. In this case, it isn’t necessary because our my-phinx.yml file notes development as the default database (and thus default environment).
(可选)我们可以提供-e X标志,其中X是我们要定位的环境。 在这种情况下,没有必要,因为我们的my-phinx.yml文件将development为默认数据库(因此是默认环境)。
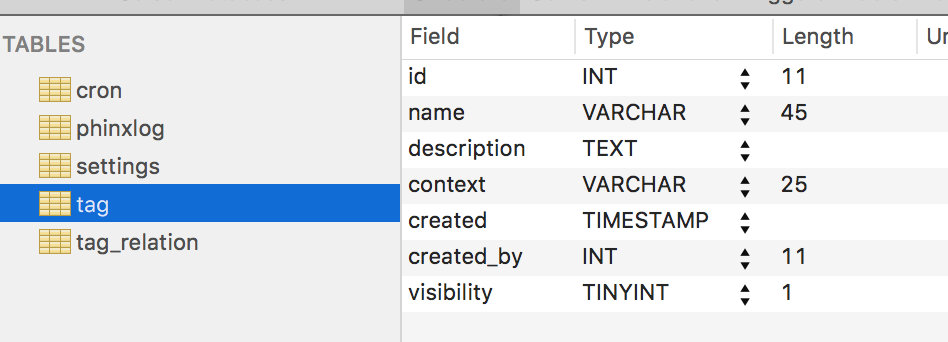
Sure enough, after execution, our tables are there:
果然,执行后,我们的表就在那里:
Let’s quickly write up the file and message migrations, too.
让我们也快速编写file和message迁移。
// File
    public function change()
    {

        $file = $this->table('file');

        $file
            ->addColumn('name', 'string', ['limit' => 255, 'null' => false])
            ->addColumn('path', 'text', ['null' => false])
            ->addColumn('access', 'string', ['limit' => 6, 'null' => false, 'default' => 'public'])
            ->addColumn('created', 'timestamp', ['null' => false, 'default' => 'CURRENT_TIMESTAMP'])
            ->addColumn('created_by', 'integer', ['signed' => false, 'null' => false])
            ->addColumn('updated', 'timestamp', ['null' => false, 'default' => 'CURRENT_TIMESTAMP'])
            ->addColumn('updated_by', 'integer', ['signed' => false, 'null' => false])
        ;

        $file->addIndex(['created_by'], ['name' => 'creator']);
        $file->addIndex(['access'], ['name' => 'accessibility']);

        $file->create();

    }
// Message
public function change()
{
$message = $this->table('message');
$message
->addColumn('content', 'text', ['null' => false])
->addColumn('attachments', 'text')
->addColumn('created', 'timestamp', ['null' => false, 'default' => 'CURRENT_TIMESTAMP'])
->addColumn('created_by', 'integer', ['signed' => false, 'null' => false])
;
$message->addIndex(['created_by'], ['name' => 'creator']);
$message->create();
}故障排除 (Troubleshooting)
If we run the migrate command now, however, we’ll notice nothing happens. No new databases appear. What gives?
但是,如果现在运行migrate命令,将不会发生任何事情。 没有新的数据库出现。 是什么赋予了?
When Phinx executed the tag migration, it made an entry in the phinxlog table in the database, noting which migration was last executed. Since the migration files for Message and File already existed at that point (but were empty), they were marked as migrated, and are thus ignored in this run, because this run is “officially” already done. First, we have to rollback. A rollback undoes the last migration.
当Phinx执行tag迁移时,它在数据库的phinxlog表中创建了一个条目,并记录了上一次执行的迁移。 由于此时Message和File的迁移文件已经存在(但为空),因此将它们标记为已迁移,因此在此运行中将被忽略,因为此运行已“正式”完成。 首先,我们必须回滚 。 回滚将撤消上一次迁移。
php vendor/bin/phinx rollback -c my-phinx.yml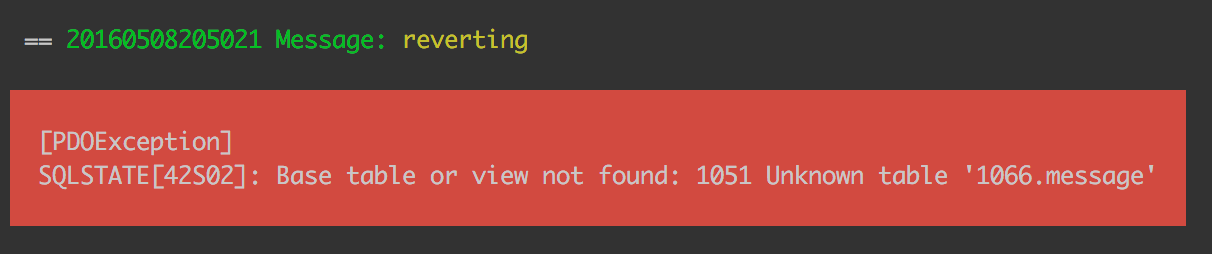
Uh oh! What now?
哦! 现在怎么办?
Well, the File and Message migration files were empty when the migration first ran. Phinx reads the change method of a migration to figure out the undo process (e.g. it turns create table into drop table), and since it now finds mention of the tables in the files where previously there was none, it is confused – there is no such table!
好了,首次运行迁移时,文件和消息迁移文件为空。 Phinx会读取迁移的change方法来确定撤消过程(例如,将create table转换为drop table ),并且由于现在可以找到文件中以前没有的表的提及,因此很困惑–没有这样的桌子!
There are several ways around this problem:
有几种方法可以解决此问题:
- Be careful when writing migrations. Either write them all at once and then migrate, or create and write one by one and migrate after each one has been completed. 编写迁移文件时要小心。 一次将它们全部写入,然后进行迁移,或者一个接一个地创建和写入,并在每个完成后进行迁移。
Comment the content of the two new
changemethods, save, run rollback, then uncomment.注释两个新
change方法的内容,保存,运行回滚,然后取消注释。Manually remove the
phinxlog,tag, andtag_relationtables since it’s the first time we’re setting things up and we can’t do any damage.手动删除
phinxlog,tag和tag_relation表,因为这是我们第一次进行设置,因此不会造成任何损坏。Use
upanddownmethods instead ofchange– this would then use thedownmethod on rollback which could either be empty, or contain a singledrop tablecommand.使用
up和down方法而不是change–然后将在回滚时使用down方法,该方法可以为空,也可以包含单个drop table命令。
We’ll go with option 2.
我们将选择选项2。
First, comment the contents of both change methods. Then, run:
首先,注释两种change方法的内容。 然后,运行:
php vendor/bin/phinx rollback -c my-phinx.yml -t XXXXXXXX… where XXXXXXXX is the number in front of the migration you want to roll back to, if you want to skip several of them. Omitting the number just rolls it back once, to the last known migration, so running it several times without -t also does the trick.
…其中XXXXXXXX是要回滚的迁移前面的数字(如果要跳过其中的几个)。 省略该数字只会将其回滚一次,直到上一次已知的迁移,因此在不使用-t情况下运行几次也可以解决问题。
Finally, we can run migrate and have it all imported. First, we uncomment the change methods. Then:
最后,我们可以运行migrate并将其全部导入。 首先,我们取消change方法的注释。 然后:
php vendor/bin/phinx migrate -c my-phinx.yml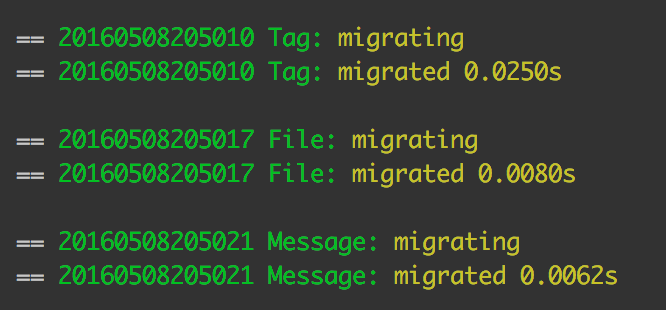
Success! All three tables have been created!
成功! 所有三个表均已创建!
随后的迁移和版本控制 (Subsequent Migrations and Versioning)
So how do we do changes and subsequent migrations now? Let’s say we want the message table to:
那么,我们现在如何进行更改和后续迁移? 假设我们希望message表:
contain a field that can register all the
user_idvalues of the user accounts who have seen the message.包含一个字段,该字段可以注册查看该消息的用户帐户的所有
user_id值。- contain a subject, too, not just a body. 也包含一个主题,而不仅仅是一个身体。
- be fast-searchable on both subject and body (a FULLTEXT index – only with MySQL) 在主题和正文上都可以快速搜索(FULLTEXT索引-仅适用于MySQL)
Writing the SQL and committing it in such a raw form still makes things simple for people setting up the app we’re working on from scratch, but when one already has the database, applying changes to table structure is where the real power of migrations begins to shine.
编写SQL并以这种原始格式提交它仍然使人们从头开始设置我们正在处理的应用程序变得很简单,但是当一个人已经拥有数据库时,对表结构进行更改是真正的迁移动力所在。闪耀。
We create a new migration:
我们创建一个新的迁移:
php vendor/bin/phinx create MessageSeen -c my-phinx.ymlIn the newly created message_seen class, we change the change method to:
在新创建的message_seen类中,我们将change方法change为:
public function change()
    {

        $message = $this->table('message');

        $message->addColumn('seen_by', 'text');
        $message->addColumn('subject', 'text');

        if ($this->getAdapter()->getAdapterType() === 'mysql') {
            $message->addIndex('subject', ['type' => 'fulltext']);
            $message->addIndex('content', ['type' => 'fulltext']);
        }

        $message->update();
    }
Notice how we first added the columns as before, when creating the table, so nothing new there. But then we used a trick to find out if our adapter is of the mysql type, meaning we have support for FullText indexes. After everything has been defined, we execute the update command on the table. If we now run the default migrate command, the changes should be applied.
请注意,在创建表时,我们是如何像以前一样首先添加列的,因此这里没有新内容。 但是,然后我们使用了一个技巧来找出适配器是否为mysql类型,这意味着我们支持FullText索引。 定义完所有内容后,我们在表上执行update命令。 如果现在运行默认迁移命令,则应应用更改。
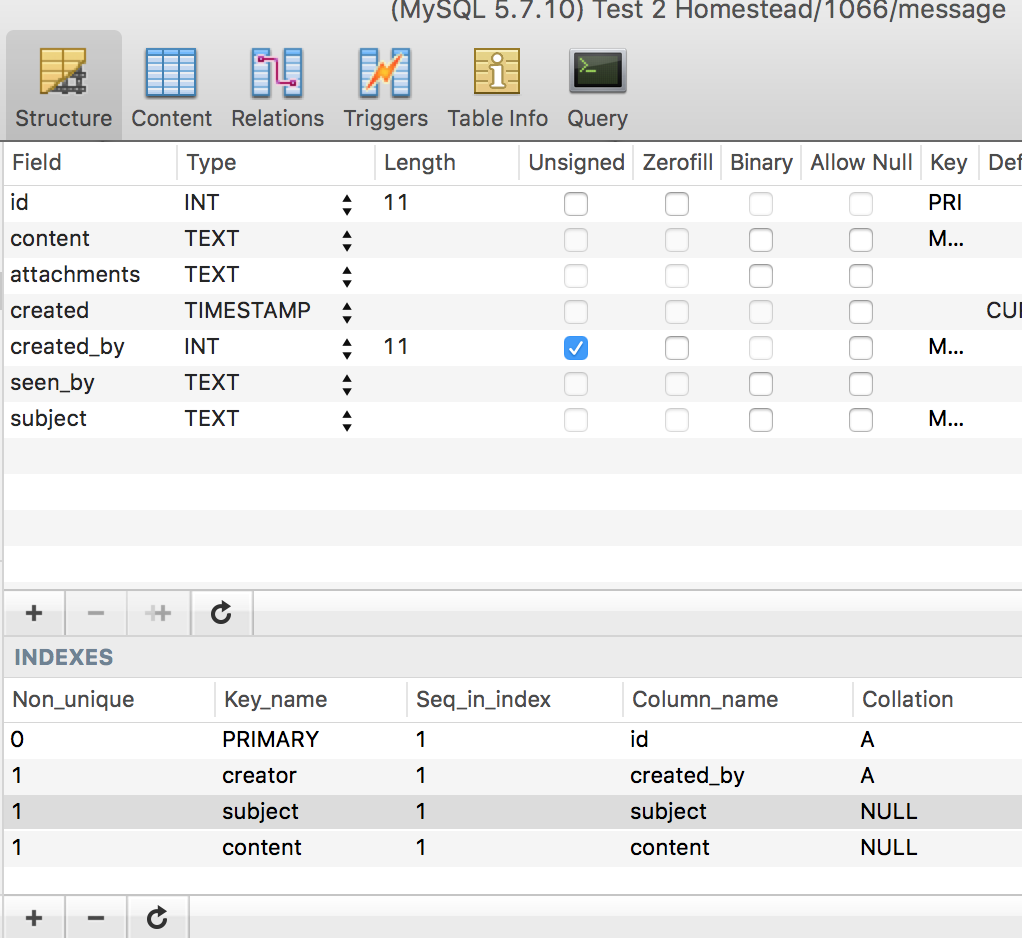
php vendor/bin/phinx migrate -c my-phinx.ymlSure enough, the changes are there:
当然,更改在那里:
结论 (Conclusion)
Phinx is a very down-to-earth and easy to use package with functionality similar to that in certain frameworks, but completely independent. It provides us with the power to create, destroy, and modify database tables without writing raw SQL which not only makes it easier to write and version the changes, but also lets us switch out the underlying database adapter later on from, say, MySQL to Postgre!
Phinx是一个非常扎实且易于使用的软件包,其功能类似于某些框架,但完全独立。 它为我们提供了创建,销毁和修改数据库表的能力,而无需编写原始SQL,这不仅使编写和版本更改更加容易,而且还使我们稍后可以将基础数据库适配器从MySQL切换到MySQL。 Postgre!
What’s the most complex migration you’ve ever written? Do you anticipate any hiccups with this approach? Let us know in the comments!
您编写过的最复杂的迁移是什么? 您预计这种方法会带来麻烦吗? 让我们在评论中知道!
翻译自: https://www.sitepoint.com/phinx-the-migration-library-you-never-knew-you-needed/
git 移库


 7万+
7万+

 被折叠的 条评论
为什么被折叠?
被折叠的 条评论
为什么被折叠?
 到【灌水乐园】发言


