


mongodb 持久化
This article was originally published on MongoDB. Thank you for supporting the partners who make SitePoint possible.
本文最初在MongoDB上发布。 感谢您支持使SitePoint成为可能的合作伙伴。
You can build your online, operational workloads atop MongoDB and still respond to events in real time by kicking off Amazon Kinesis stream processing actions, using MongoDB Stitch Triggers.
您可以在MongoDB之上构建在线,可操作的工作负载,并且仍然可以通过使用MongoDB Stitch Triggers启动Amazon Kinesis流处理操作来实时响应事件。
Let’s look at an example scenario in which a stream of data is being generated as a result of actions users take on a website. We’ll durably store the data and simultaneously feed a Kinesis process to do streaming analytics on something like cart abandonment, product recommendations, or even credit card fraud detection.
让我们看一个示例场景,在该场景中,由于用户对网站采取的操作而生成了数据流。 我们将持久地存储数据,并同时提供Kinesis流程以对购物车放弃,产品推荐甚至信用卡欺诈检测之类的内容进行流分析。
We’ll do this by setting up a Stitch Trigger. When relevant data updates are made in MongoDB, the trigger will use a Stitch Function to call out to AWS Kinesis, as you can see in this architecture diagram:
我们将通过设置缝合触发器来做到这一点。 在MongoDB中进行相关数据更新后,触发器将使用Stitch Function调用AWS Kinesis,如在此架构图中所示:

您需要遵循的内容 (What you’ll need to follow along)
An Atlas instance
阿特拉斯实例
If you don’t already have an application running on Atlas, you can follow our
如果您还没有在Atlas上运行的应用程序,则可以按照我们的
getting started with Atlas guide here. In this example, we’ll be using a database called streamdata, with a collection called clickdata where we’re writing data from our web-based e-commerce application.
在这里开始使用Atlas指南 。 在此示例中,我们将使用一个名为streamdata的数据库,以及一个名为clickdata的集合,在该集合中,我们将从基于Web的电子商务应用程序中写入数据。
An AWS account and a Kinesis stream
一个AWS账户和一个Kinesis流
In this example, we’ll use a Kinesis stream to send data downstream to additional applications such as Kinesis Analytics. This is the stream we want to feed our updates into.
在此示例中,我们将使用Kinesis流将数据下游发送到其他应用程序,例如Kinesis Analytics。 这是我们要向其中提供更新的流。
A Stitch application
针迹应用
If you don’t already have a Stitch application,
如果您还没有Stitch应用程序,
log into Atlas, and click Stitch Apps from the navigation on the left, then click Create New Application.
登录Atlas ,然后从左侧导航栏中单击Stitch Apps ,然后单击创建新应用程序 。
创建收藏 (Create a Collection)
The first step is to create a database and collection from the Stitch application console. Click Rules from the left navigation menu and click the Add Collection button. Type streamdata for the database and clickdata for the collection name. Select the template labeled Users can only read and write their own data and provide a field name where we’ll specify the user id.
第一步是从Stitch应用程序控制台创建数据库和集合。 从左侧导航菜单中单击“规则” ,然后单击“ 添加集合”按钮。 为数据库键入streamdata ,并为集合名称单击clickdata 。 选择标有“用户只能读写自己的数据”的模板,并提供一个字段名称,我们将在其中指定用户ID。

配置Stitch与AWS对话 (Configuring Stitch to Talk to AWS)
Stitch lets you configure Services to interact with external services such as AWS Kinesis. Choose Services from the navigation on the left, and click the Add a Service button, select the AWS service and set AWS Access Key ID, and Secret Access Key.
Stitch允许您将服务配置为与AWS Kinesis等外部服务进行交互。 从左侧导航中选择服务 ,然后单击添加服务按钮,选择AWS服务并设置AWS Access Key ID和Secret Access Key 。

Services use Rules to specify what aspect of a service Stitch can use, and how. Add a rule which will enable that service to communicate with Kinesis by clicking the button labeled NEW RULE. Name the rule “kinesis” as we’ll be using this specific rule to enable communication with AWS Kinesis. In the section marked Action, select the API labeled Kinesis and select All Actions.
服务使用规则指定Stitch可以使用服务的哪个方面以及如何使用。 添加一个规则,使该服务能够通过单击标有“新规则”的按钮来与Kinesis通信。 将规则命名为“ kinesis”,因为我们将使用此特定规则来启用与AWS Kinesis的通信。 在标记为动作的部分中,选择标记为Kinesis的API,然后选择所有动作。

编写将文档流式传输到Kinesis的函数 (Write a Function that Streams Documents into Kinesis)
Now that we have a working AWS service, we can use it to put records into a Kinesis stream. The way we do that in Stitch is with Functions. Let’s set up a putKinesisRecord function.
现在我们有了一个可以正常工作的AWS服务,我们可以使用它来将记录放入Kinesis流中。 在Stitch中,我们的方法是使用功能。 让我们设置一个putKinesisRecord函数。
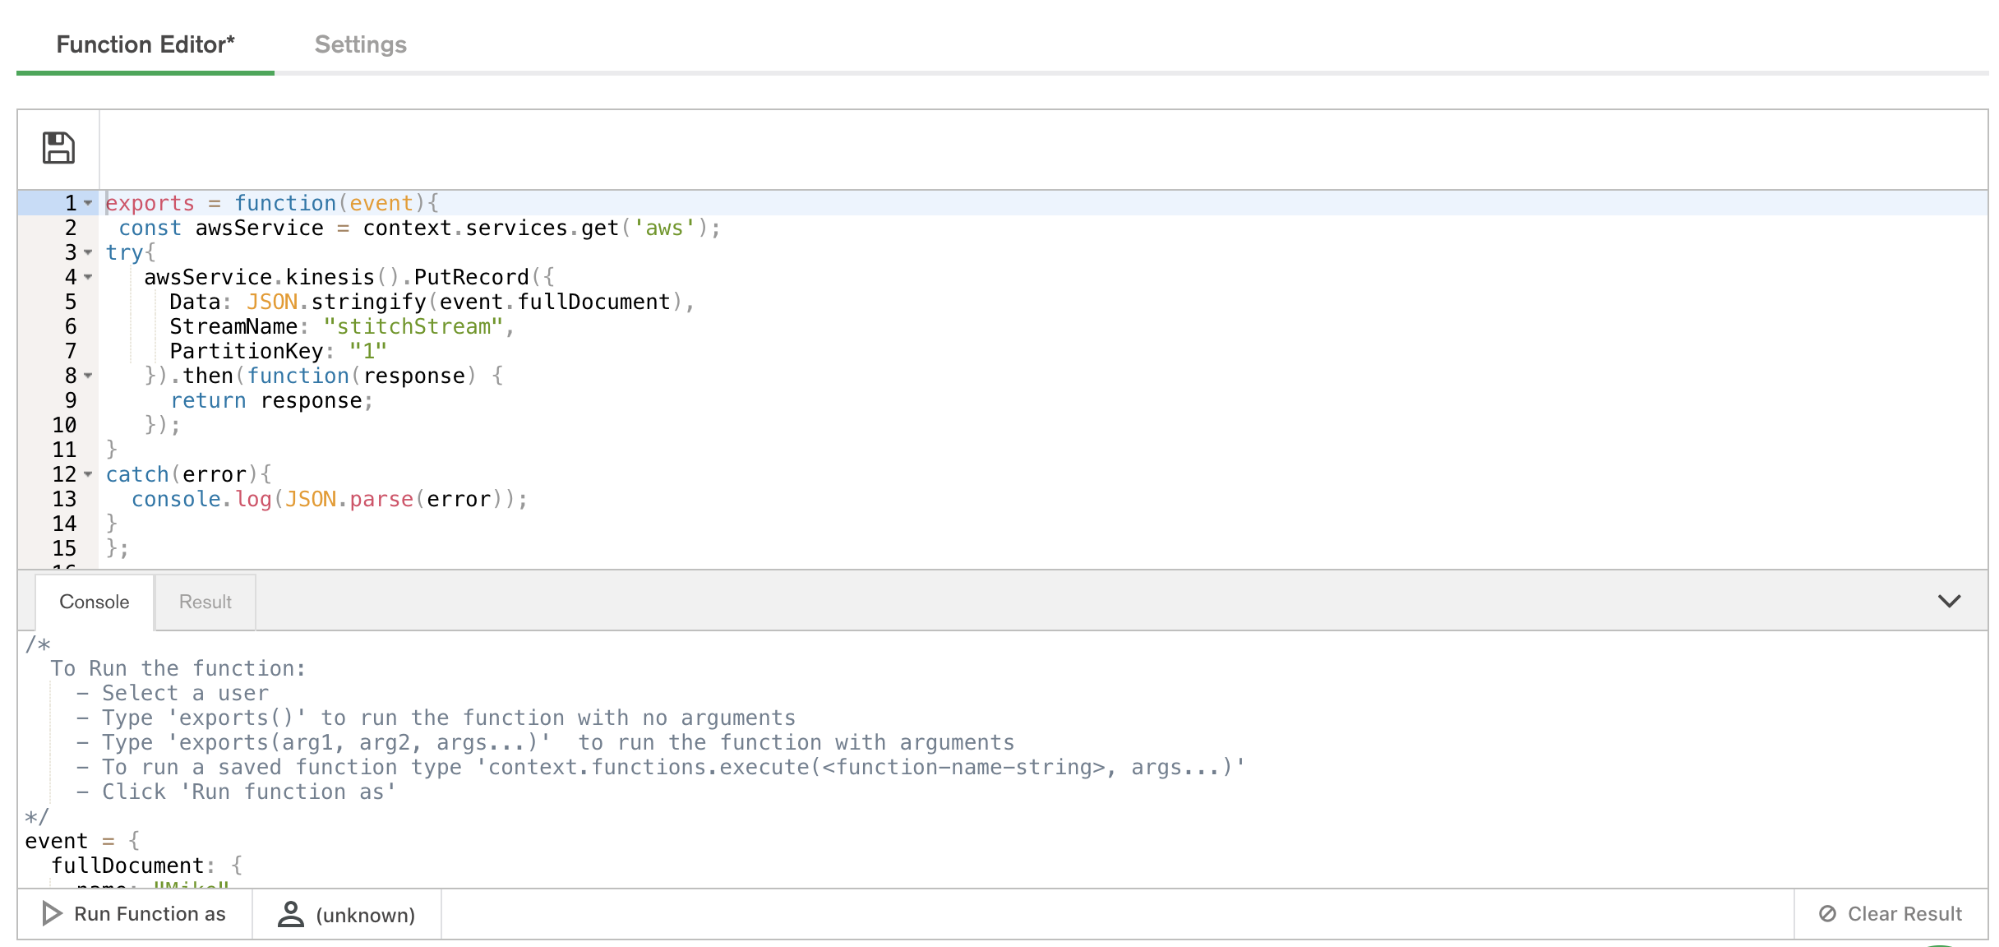
Select Functions from the left-hand menu, and click Create New Function. Provide a name for the function and paste the following in the body of the function.
从左侧菜单中选择“功能”,然后单击“创建新功能”。 提供函数名称,并将以下内容粘贴到函数主体中。

exports = function(event){
 const awsService = context.services.get('aws');
try{
   awsService.kinesis().PutRecord({
     Data: JSON.stringify(event.fullDocument),
     StreamName: "stitchStream",
     PartitionKey: "1"
      }).then(function(response) {
        return response;
      });
}
catch(error){
  console.log(JSON.parse(error));
}
};
测试功能 (Test Out the Function)
Let’s make sure everything is working by calling that function manually. From the Function Editor, Click Console to view the interactive javascript console for Stitch.
让我们通过手动调用该函数来确保一切正常。 在函数编辑器中 ,单击控制台以查看Stitch的交互式javascript控制台。
Functions called from Triggers require an event. To test execution of our function, we’ll need to pass a dummy event to the function. Creating variables from the console in Stitch is simple. Simply set the value of the variable to a JSON document. For our simple example, use the following:
从触发器调用的函数需要一个事件。 要测试函数的执行情况,我们需要将虚拟事件传递给函数。 在Stitch中从控制台创建变量很简单。 只需将变量的值设置为JSON文档即可。 对于我们的简单示例,使用以下命令:
event = {
   "operationType": "replace",
   "fullDocument": {
       "color": "black",
       "inventory": {
           "$numberInt": "1"
       },
       "overview": "test document",
       "price": {
           "$numberDecimal": "123"
       },
       "type": "backpack"
   },
   "ns": {
       "db": "streamdata",
       "coll": "clickdata"
   }
}
exports(event);
Paste the above into the console and click the button labeled Run Function As. Select a user and the function will execute.
将以上内容粘贴到控制台中,然后单击标记为Run Function As的按钮。 选择一个用户,该功能将执行。
Ta-da!
-
将其与缝合触发器组合在一起 (Putting It Together with Stitch Triggers)
We’ve got our MongoDB collection living in Atlas, receiving events from our web app. We’ve got our Kinesis stream ready for data. We’ve got a Stitch Function that can put data into a Kinesis stream.
我们已经将MongoDB集合保存在Atlas中,并从Web应用程序接收事件。 我们已经为数据准备好了Kinesis流。 我们有一个缝合功能,可以将数据放入Kinesis流中。
Configuring Stitch Triggers is so simple it’s almost anticlimactic. Click Triggers from the left navigation, name your trigger, provide the database and collection context, and select the database events Stitch will react to with execution of a function.
配置针脚触发器非常简单,几乎是滑稽的。 从左侧导航中单击“ 触发器 ”,命名触发器,提供数据库和集合上下文,然后选择Stitch将对函数执行做出React的数据库事件。
For the database and collection, use the names from step one. Now we’ll set the operations we want to watch with our trigger. (Some triggers might care about all of them – inserts, updates, deletes, and replacements – while others can be more efficient because they logically can only matter for some of those.) In our case, we’re going to watch for insert, update and replace operations.
对于数据库和集合,请使用第一步中的名称。 现在,我们将使用触发器设置要观看的操作。 (某些触发器可能会关心所有这些触发器-插入,更新,删除和替换-而其他触发器可能会更高效,因为从逻辑上讲,它们仅对某些触发器起作用。)在我们的情况下,我们将注意插入,更新和替换操作。
Now we specify our putKinesisRecord function as the linked function, and we’re done.
现在,我们将putKinesisRecordRecord函数指定为链接函数,然后完成。

As part of trigger execution, Stitch will forward details associated with the trigger event, including the full document involved in the event (i.e. the newly inserted, updated, or deleted document from the collection.) This is where we can evaluate some condition or attribute of the incoming document and decide whether or not to put the record onto a stream.
作为触发执行的一部分,Stitch将转发与触发事件相关的详细信息,包括事件中涉及的完整文档(即,集合中新插入,更新或删除的文档)。在这里,我们可以评估某些条件或属性传入文档的格式,并决定是否将记录放入流中。
测试扳机! (Test the Trigger!)
Amazon provides a dashboard which will enable you to view details associated with the data coming into your stream.
Amazon提供了一个仪表板,使您可以查看与流中数据关联的详细信息。
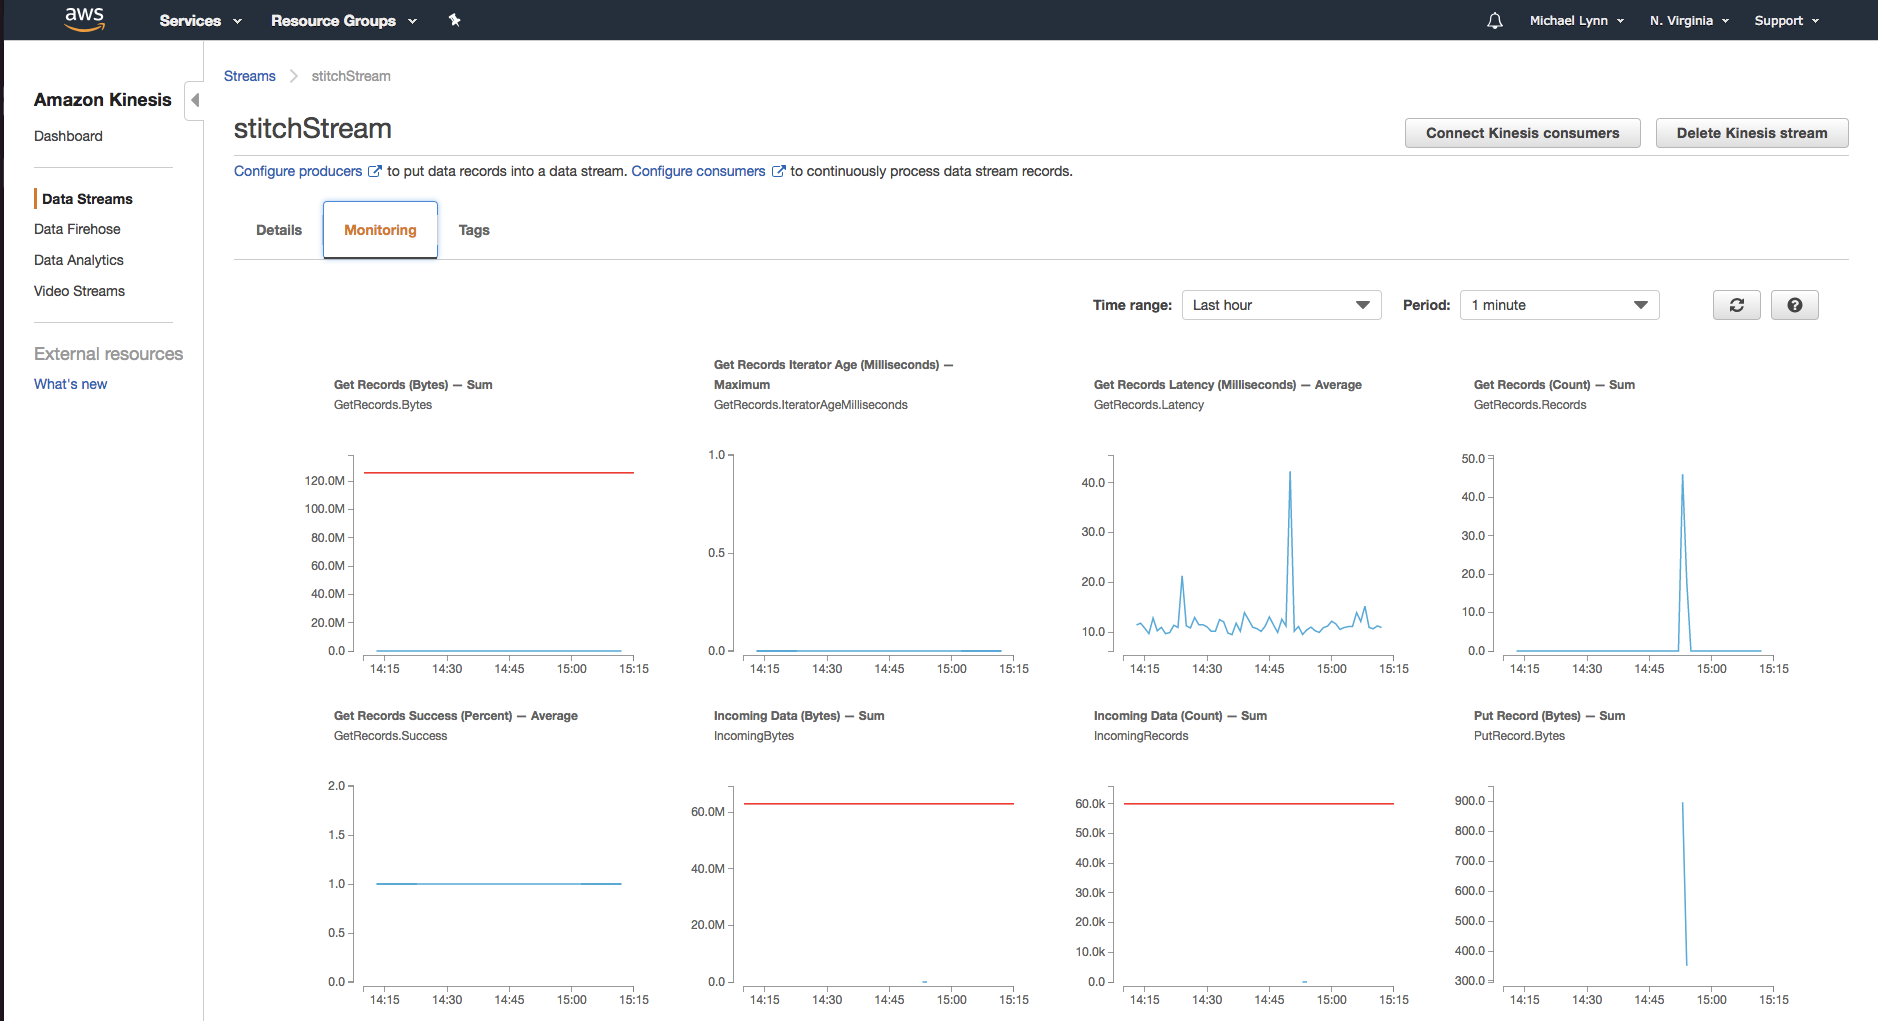
As you execute the function from within Stitch, you’ll begin to see the data entering the Kinesis stream.
从Stitch内部执行功能时,您将开始看到数据进入Kinesis流。
建立更多功能 (Building More Functionality)
So far our trigger is pretty basic – it watches a collection and when any updates or inserts happen, it feeds the entire document to our Kinesis stream. From here we can build out some more intelligent functionality. To wrap up this post, let’s look at what we can do with the data once it’s been durably stored in MongoDB and placed into a stream.
到目前为止,我们的触发器是非常基本的-它监视一个集合,并且在发生任何更新或插入时,它将整个文档馈送到我们的Kinesis流中。 从这里我们可以构建一些更智能的功能。 为了结束这篇文章,让我们看一下将数据持久存储在MongoDB中并放入流中后该如何处理。
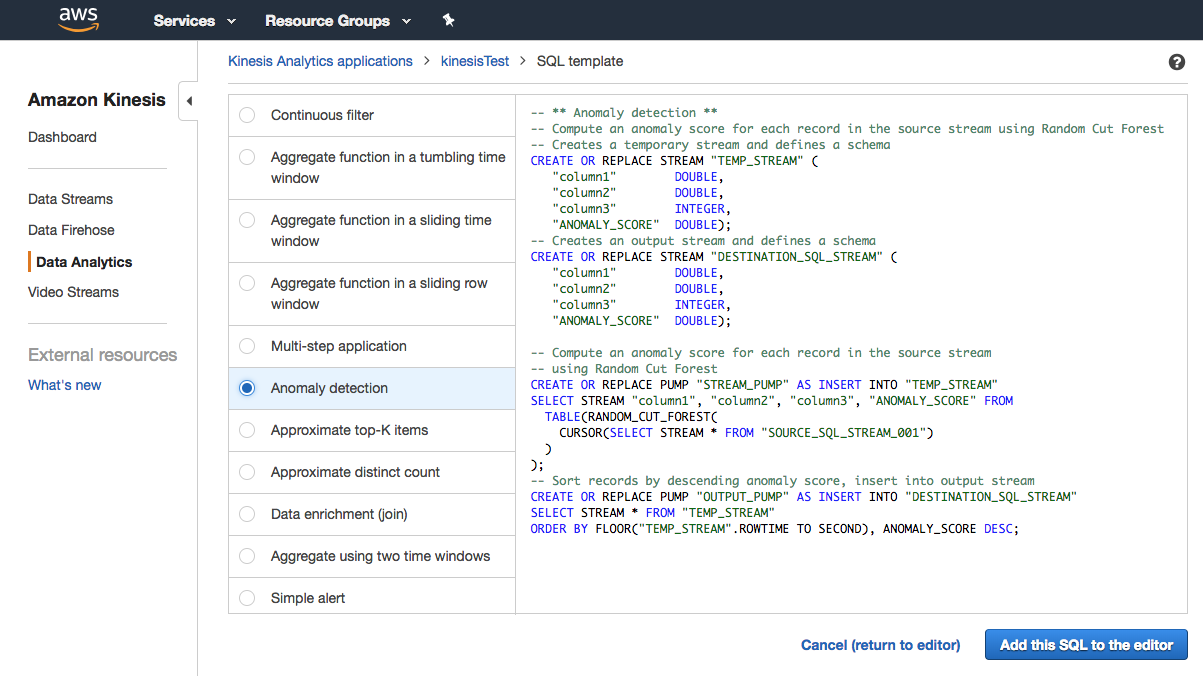
Once the record is in the Kinesis Stream you can configure additional services downstream to act on the data. A common use case incorporates Amazon Kinesis Data Analytics to perform analytics on the streaming data. Amazon Kinesis Data Analytics offers pre-configured templates to accomplish things like anomaly detection, simple alerts, aggregations, and more.
一旦记录在Kinesis Stream中,您就可以在下游配置其他服务以对数据进行操作。 一个常见的用例是结合使用Amazon Kinesis Data Analytics对流数据进行分析。 Amazon Kinesis Data Analytics提供了预配置的模板来完成诸如异常检测,简单警报,聚合等任务。
For example, our stream of data will contain orders resulting from purchases. These orders may originate from point-of-sale systems, as well as from our web-based e-commerce application. Kinesis Analytics can be leveraged to create applications that process the incoming stream of data. For our example, we could build a machine learning algorithm to detect anomalies in the data or create a product performance leaderboard from a sliding, or tumbling window of data from our stream.
例如,我们的数据流将包含购买产生的订单。 这些订单可能源自销售点系统以及基于我们的基于Web的电子商务应用程序。 可以利用Kinesis Analytics创建用于处理传入数据流的应用程序。 对于我们的示例,我们可以构建一种机器学习算法来检测数据中的异常情况,或者从流中数据的滑动窗口或翻滚窗口中创建产品性能排行榜。
结语 (Wrapping Up)
Now you can connect MongoDB to Kinesis. From here, you’re able to leverage any one of the many services offered from Amazon Web Services to build on your application. In our next article in the series, we’ll focus on getting the data back from Kinesis into MongoDB. In the meantime, let us know what you’re building with Atlas, Stitch, and Kinesis!
现在,您可以将MongoDB连接到Kinesis。 从这里开始,您就可以利用Amazon Web Services提供的众多服务中的任何一项来构建您的应用程序。 在本系列的下一篇文章中,我们将重点介绍如何将数据从Kinesis返回到MongoDB。 同时,让我们知道您正在使用Atlas,Stitch和Kinesis构建的内容!
资源资源 (Resources)
MongoDB Atlas
MongoDB地图集
Getting Started – Tutorial Playlist
入门 –教程播放列表
MongoDB Stitch
MongoDB针
Amazon Kinesis
亚马逊Kinesis
翻译自: https://www.sitepoint.com/integrating-mongodb-and-amazon-kinesis-for-intelligent-durable-streams/
mongodb 持久化


 1934
1934

 被折叠的 条评论
为什么被折叠?
被折叠的 条评论
为什么被折叠?
 到【灌水乐园】发言


