


zend studio使用
The continuous delivery approach aims at making the process of continuously deploying code to production error-free, or at least less error-prone, using automated tasks, tests, builds and deployments. Minimize risk and downtime, maximize quality and value. That’s the motto.
持续交付方法旨在使用自动化任务,测试,构建和部署,使将代码连续部署到生产中的过程无错误或至少不易出错。 最小化风险和停机时间,最大化质量和价值。 那是座右铭。

However, this process is not always straightforward, to say the least. Often enough, the continuous delivery tools chosen for implementing continuous integration and deployment are hard to figure out and use, and are usually time consuming and expensive. The bigger the application, the bigger the challenge.
但是,至少可以说,此过程并不总是那么简单。 通常很难选择和实施用于实现持续集成和部署的持续交付工具,并且这些工具通常既费时又昂贵。 应用程序越大,挑战就越大。
This article introduces an interesting new approach to dealing with this challenge by demonstrating a continuous delivery process using continuousphp and Zend Server.
本文通过演示使用continuousphp和Zend Server的持续交付过程,介绍了一种有趣的新方法来应对这一挑战。
continuousphp is a PaaS solution that allows you to easily design a continuous delivery pipeline in just a few minutes. continuousphp will sync with your existing repositories on GitHub (or Bitbucket and Stash), and handle all the various stages in the continuous delivery cycle: provisioning, packaging, testing and deployment. Every new commit made to your repository will push your code down the pipeline you created (read more about continuousphp).
Continuousphp是一种PaaS解决方案,可让您在短短几分钟内轻松设计出连续交付管道。 Continuousphp将与GitHub(或Bitbucket和Stash)上的现有存储库同步,并处理连续交付周期中的所有各个阶段:供应,打包,测试和部署。 对存储库的每次新提交都会将您的代码推入您创建的管道中(更多有关continuousphp的信息 )。
Zend Server is Zend’s professional PHP stack bundled with a set of advanced tools for developing, debugging, deploying and monitoring PHP web and mobile apps (read more about Zend Server).
Zend Server是Zend的专业PHP堆栈,捆绑了一组用于开发,调试,部署和监视PHP Web和移动应用程序的高级工具(了解有关Zend Server的更多信息)。
先决条件 (Prerequisites)
The procedure outlined in this tutorial uses a Zend Framework 2 skeleton application. If you want to follow the steps described below, go ahead and clone the repository.
本教程中概述的过程使用Zend Framework 2骨架应用程序。 如果要执行以下描述的步骤,请继续并克隆存储库 。
You’ll also need a running instance of Zend Server to complete the final step in the tutorial. An easy way for doing this is using one of the various cloud solutions – Zend Server is available on AWS, Azure, Google Cloud Platform, just take your pick. All offer free trials so it’s also a cheap way to get started.
您还需要一个正在运行的Zend Server实例来完成本教程的最后一步。 一种简单的方法是使用各种云解决方案之一 – Zend Server可在AWS,Azure,Google Cloud Platform上使用,任您选择。 所有这些都提供免费试用,因此这也是一种廉价的入门方法。
Let’s get started!
让我们开始吧!
步骤1:建立资料库 (Step 1: Setting up your repository)
Before you get your hands dirty, you’re going to need to set up your repository in continuousphp.
在变脏之前,您需要在Continuousphp中设置存储库。
To do this, go to https://continuousphp.com and click the Sign up for free button.
为此,请访问https://continuousphp.com ,然后单击免费注册按钮。
For public projects, you can use continuousphp as much as you want for free. For private projects, you get 30 free builds after which you can select any of the offered plans.
对于公共项目,您可以免费使用continuousphp。 对于私人项目,您可以获得30个免费版本,之后可以选择任何提供的计划 。
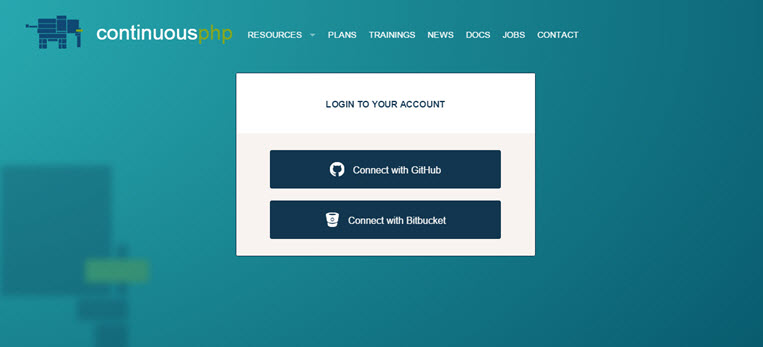
Then, you’re going to have to tell continuousphp which Git repository hosting service you want to integrate with. You can select to use GitHub or BitBucket (support for private providers like Atlassian Stash is available on demand).
然后,您将不得不告诉Continuousphp您想要与之集成的Git存储库托管服务。 您可以选择使用GitHub或BitBucket(可按需提供对Atlassian Stash等私有提供商的支持)。
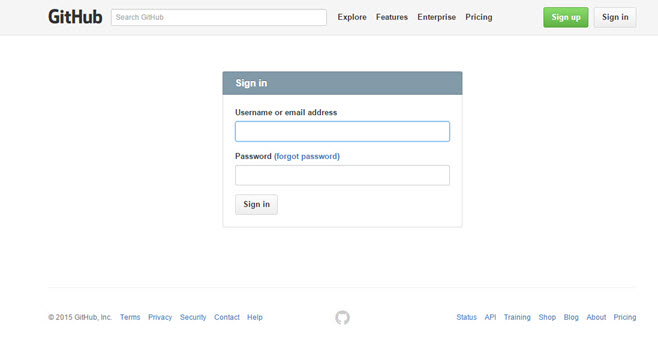
Once you’ve given your credentials, the integration is set up, and continuousphp retrieves and displays a list of all your hosted repositories.
授予凭据后,就可以进行集成设置,并且Continuousphp检索并显示所有托管存储库的列表。
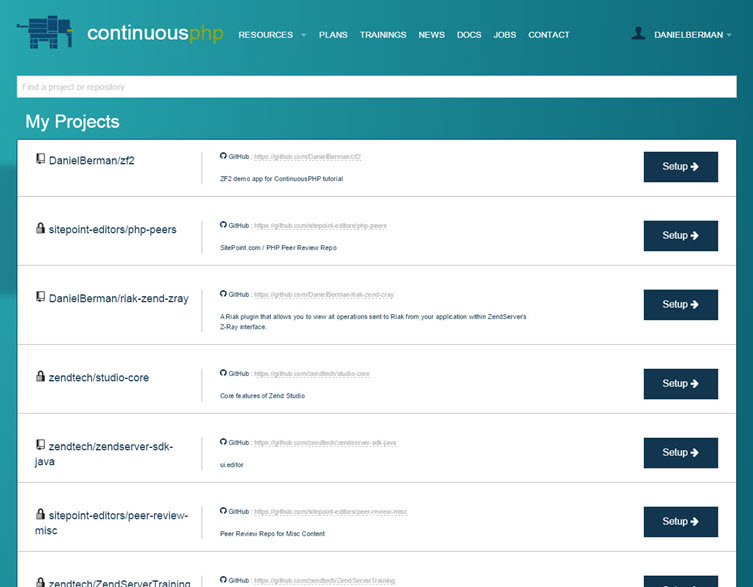
Click the Setup button on the right for the repository you want to set up a new continuous delivery pipeline for. In this case, we’re going to be using my Zend Framework 2 skeleton application repository. A new project page is displayed, which in the future will show the pipeline we define and any executed builds.
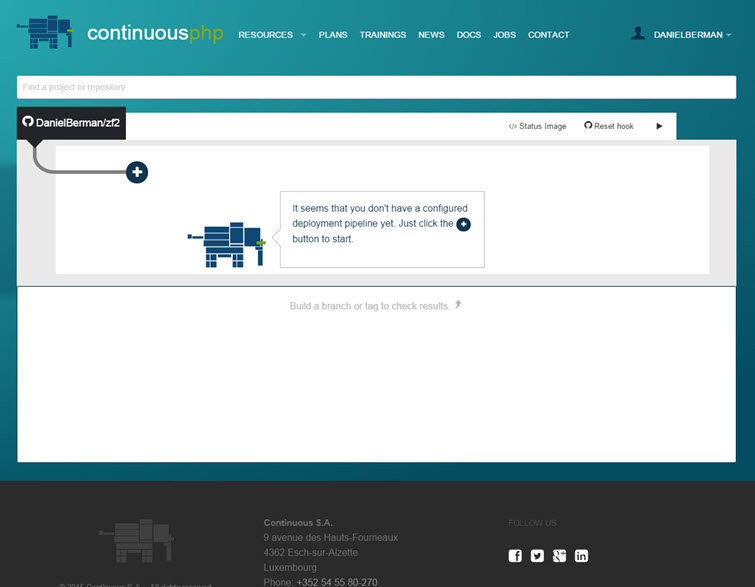
单击您要为其建立新的连续交付管道的存储库的右侧的“ 设置”按钮。 在这种情况下,我们将使用我的Zend Framework 2骨架应用程序存储库。 将显示一个新的项目页面,将来将显示我们定义的管道和任何已执行的构建。
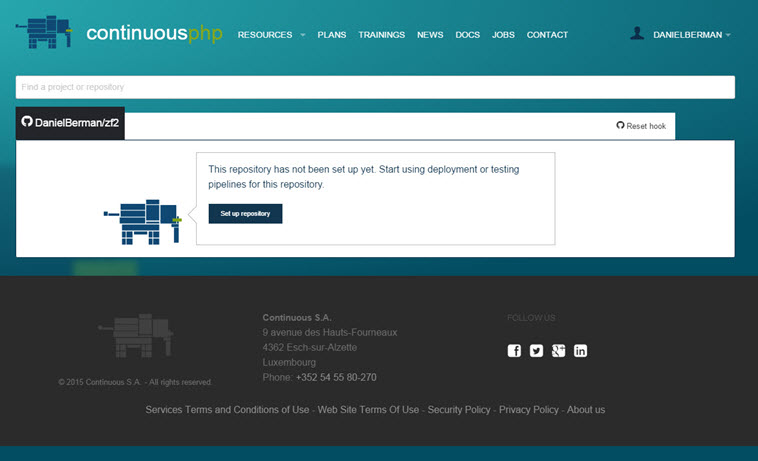
Click the Set up repository button, and behind the scenes continuousphp will add a new web hook to the repository for triggering new builds for each push and pull request, and create a new SSH key to allow continuousphp to clone the repository when builds are initialized. You should receive an email from GitHub notifying you of this new key.
单击“ 设置存储库”按钮,然后在幕后,continuousphp将向存储库添加一个新的Web挂钩,以针对每个推和拉请求触发新的构建,并创建一个新的SSH密钥,以便在初始化构建时允许Continuousphp克隆存储库。 您应该收到来自GitHub的电子邮件,通知您此新密钥。
步骤2:创建新的部署管道 (Step 2: Creating a new deployment pipeline)
Now that your repository is set up, it’s time to define a new continuous delivery deployment pipeline. A deployment pipeline in continuousphp breaks up the deployment process of your application into parallel processes. First, your repo is cloned. Then, continuousphp provisions the application and generates, in parallel, two separate application packages – one for testing and one for deployment.
现在,您的存储库已设置完毕,是时候定义一个新的连续交付部署管道了。 Continuousphp中的部署管道将应用程序的部署过程分解为并行过程。 首先,您的存储库已克隆。 然后,continuousphp设置应用程序并并行生成两个单独的应用程序包–一个用于测试,一个用于部署。
To create a new pipeline simply click the + icon as suggested by the continuousphp elephant.
要创建新的管道,只需单击continuousphp大象建议的+图标。

Then, select the starting point of your pipeline, either at a specific branch or for all branches/tags in case of a production pipeline.
然后,在生产分支的情况下,在特定分支或所有分支/标签中选择管道的起点。
In this case, the master branch will do just fine.
在这种情况下,master分支就可以了。

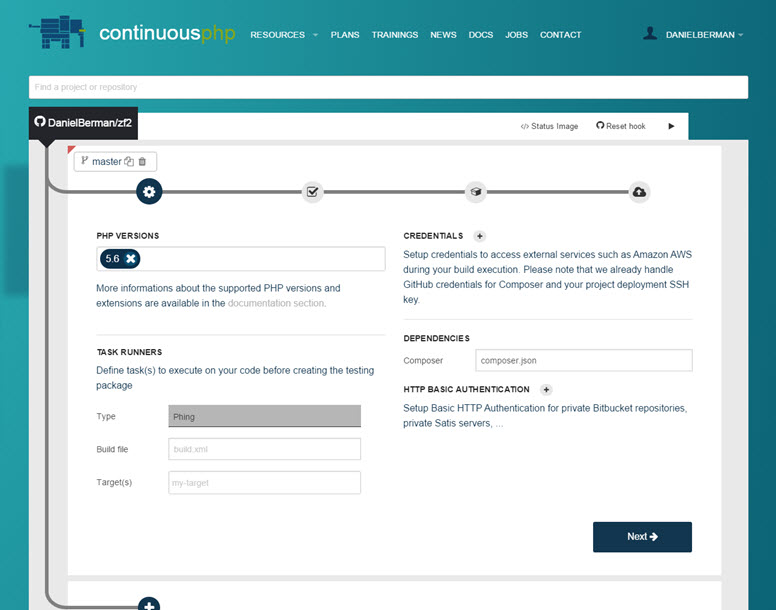
Next, we’re going to specify the PHP version we want continuousphp to use for provisioning our app and executing tests. The great thing here is that you can select as many PHP versions as you like, and for every version you select continuousphp runs tests in a separate container.
接下来,我们将指定我们希望continuousphp用于配置我们的应用程序和执行测试PHP版本。 这里最棒的是,您可以选择任意多个PHP版本,对于您选择的每个版本,continuousphp在单独的容器中运行测试。
步骤3:配置构建和测试设置 (Step 3: Configuring build and test settings)
Once you select your PHP versions, the deployment pipeline is saved, continuousphp automatically configures any tools that exist in the repository (e.g. Composer), and build configuration settings are displayed. Your next step is to review and fine-tune these settings, and the test settings on the next pipeline page, to suit your preferences and requirements.
选择PHP版本后,将保存部署管道,continuousphp自动配置存储库中存在的任何工具(例如Composer),并显示构建配置设置。 下一步是在下一个管道页面上检查并微调这些设置和测试设置,以适应您的首选项和要求。
构建配置 (Build configurations)
Build configurations allow you to define Amazon AWS credentials for integration during build execution, Phing tasks to run before creating the testing package, and Composer dependencies. You also have the option to add HTTP authentication for allowing Composer to access private repositories (e.g. on BitBucket) or get dependencies from a private Satis server.
通过构建配置,您可以定义要在构建执行期间进行集成的Amazon AWS凭证,在创建测试包之前要运行的Phing任务以及Composer依赖项。 您还可以选择添加HTTP身份验证,以允许Composer访问私有存储库(例如,在BitBucket上)或从私有Satis服务器获取依赖项。
Once you’ve reviewed the build settings, click the Next button at the bottom of the page.
查看构建设置后,单击页面底部的“ 下一步”按钮。
测试配置 (Test configurations)
Any existing testing configuration will be automatically identified and displayed on the Test settings page, but of course you can also add a new testing framework as well.
任何现有的测试配置都将自动识别并显示在“测试设置”页面上,但是您当然也可以添加新的测试框架。
To do this, simply click the + icon and select the testing framework you wish to add.
为此,只需单击+图标,然后选择要添加的测试框架。

I’m going to add PHPUnit to my pipeline. All I have to do is enter the path to the testing configuration, in this case defined at: /module/Application/tests/phpunit.xml.
我将把PHPUnit添加到我的管道中。 我要做的就是输入测试配置的路径,在这种情况下,定义为: /module/Application/tests/phpunit.xml 。

Note that my testing configuration has a red Blocking tag at the top. This tag means that the Blocking feature is enabled and that any failed tests will block the package from being deployed – very useful if you don’t want error-ridden code to be deployed. Removing the tag allows the build to be deployed in warning state.
请注意,我的测试配置的顶部有一个红色的阻止标签。 此标记意味着已启用“阻止”功能,并且任何失败的测试都将阻止该软件包的部署-如果您不希望部署受错误困扰的代码,则非常有用。 删除标签可以使构建以警告状态部署。
You can also define Phing targets for your testing frameworks. These are useful if you want to execute a task before testing, or for creating a database and inserting fixtures in the case of functional testing with frameworks like Behat.
您还可以为测试框架定义Phing目标。 如果您要在测试之前执行任务,或者在使用Behat等框架进行功能测试的情况下创建数据库并插入固定装置,这些功能将非常有用。
Once you’re done configuring the testing setting, click Next to advance to the next step.
完成测试设置的配置后,单击“ 下一步”前进到下一步。
步骤4:打包和部署您的应用 (Step 4: Packaging and deploying your app)
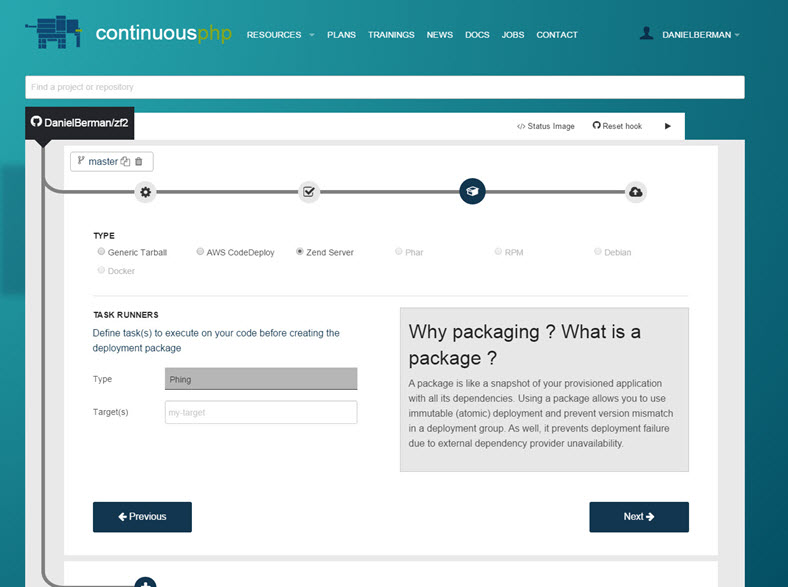
To complete the continuous delivery cycle, we’re now going to configure how we want the application packaged and deployed. There are various deployment options offered by continuousphp, including using AWS CodeDeploy, but in this case we’re going to select to deploy our application on Zend Server running on AWS.
为了完成连续交付周期,我们现在将配置如何打包和部署应用程序。 Continuousphp提供了多种部署选项,包括使用AWS CodeDeploy,但在这种情况下,我们将选择在AWS上运行的Zend Server上部署应用程序。
Zend Server gives PHP developers and DevOps access to Zend Server’s professional PHP stack and a set of advanced tools for developing, debugging and monitoring applications, including the new debugging toolbar – Z-Ray. The integration between continuousphp and Zend Server is based on the Zend Server SDK, a CLI application that communicates with the Zend Server web API.
Zend Server使PHP开发人员和DevOps可以访问Zend Server的专业PHP堆栈以及用于开发,调试和监视应用程序的一组高级工具,包括新的调试工具栏– Z-Ray。 Continuousphp和Zend Server之间的集成基于Zend Server SDK (与Zend Server Web API通信的CLI应用程序)。
The first thing we’re going to do is select the Zend Server packaging type from the available options. Applications deployed on Zend Server are packaged into a .zpk file (compressed file) and include all the application’s files, deployment scripts, and metadata.
我们要做的第一件事是从可用选项中选择Zend Server打包类型。 Zend Server上部署的应用程序打包到一个.zpk文件(压缩文件)中,并包括所有应用程序的文件,部署脚本和元数据。
At this stage of the game, and without having to configure anything else, any commit will begin a continuous integration process. Which means, code is cloned from the repo and provisioning of packages for testing and deployment are initialized. Leaving the pipeline as it is configured now leaves us with built packages that we could retrieve using the continuousphp API or SDK, but we’re going to take it one step further by defining a target for deployment.
在游戏的这个阶段,无需配置其他任何内容,任何提交都将开始持续的集成过程。 这意味着,将从存储库中克隆代码,并初始化用于测试和部署的程序包的供应。 现在将管道保留为已配置状态,这将为我们提供可以使用Continuousphp API或SDK检索的内置程序包,但我们将通过定义部署目标将其进一步向前。
Clicking Next, takes us to the Deployment Settings page.
单击下一步 ,将带我们进入“部署设置”页面。
新增目的地 (Adding a new destination)
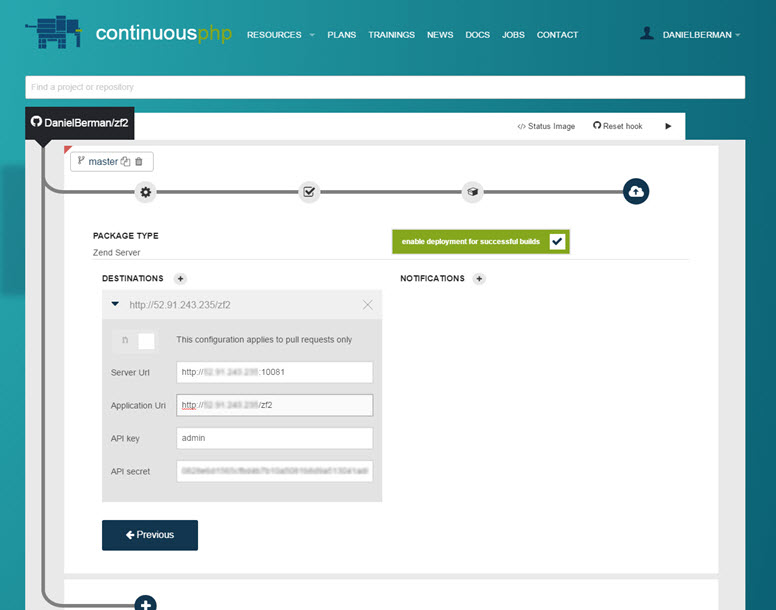
We now need to add and configure a new target destination for builds. In the Destinations section , click the + icon. Enter the URL of the Zend Server you are deploying to as well as the application’s URL (make sure the server URL includes the port number the Zend Server UI uses – 10081, or 10082 for HTTPS).
现在,我们需要添加和配置用于构建的新目标位置。 在“目标”部分中,单击+图标。 输入要部署到的Zend Server的URL以及应用程序的URL(确保服务器URL包括Zend Server UI使用的端口号– 10081,或HTTPS的10082)。
You will also need to add the name and hash of a Zend Server web API key required for authentication. This key can be created and retrieved using the Zend Server UI (Administration | Web API Keys).
您还需要添加身份验证所需的Zend Server Web API密钥的名称和哈希。 可以使用Zend Server UI( 管理| Web API密钥 )来创建和检索该密钥 。
Last but not least, select the ‘enable deployment for successful builds’ check-box to enable deployment.
最后但并非最不重要的一点是,选中“启用成功构建的部署”复选框以启用部署。
其他要求 (Additional requirements)
The final step for defining Zend Server as a deployment target is adding two files to the root directory of your repository. These two files instruct Zend Server how and what to deploy and without them, deployment fails.
将Zend Server定义为部署目标的最后一步是将两个文件添加到存储库的根目录中。 这两个文件指示Zend Server如何以及如何部署,如果没有它们,部署将失败。
deployment.xml (deployment.xml)
This descriptor file describes and defines all the necessary information needed to deploy your application using Zend Server’s deployment mechanism. It describes the application and specifies any prerequisites and parameters needed for the application to be deployed successfully. Here’s an example of what a simple ‘deployment.xml’ file can look like:
该描述符文件描述并定义了使用Zend Server的部署机制来部署应用程序所需的所有必要信息。 它描述了应用程序,并指定了成功部署应用程序所需的任何先决条件和参数。 这是一个简单的'deployment.xml'文件的外观示例:
<?xml version="1.0" encoding="utf-8"?>
  <package version="1.0" xmlns="http://www.zend.com/server/deployment-descriptor/1.0">
  <type>application</type>
  <name>My demo app</name>
  <summary>A ZF2 demo app</summary>
  <description>A ZF2 demo app for the ContinuousPHP article</description>
  <version>
    <release>1.0</release>
  </version>
  <appdir>data</appdir>
  <docroot>data</docroot>
  <dependencies>
    <required>
      <php>
        <min>5.5.26</min>
      </php>
      <extension>
        <name>pdo_mysql</name>
      </extension>
      <directive>
        <name>safe_mode</name>
        <equals>off</equals>
      </directive>
      <directive>
        <name>error_reporting</name>
        <equals><![CDATA[E_ALL & ~E_NOTICE]]></equals>
      </directive>
    </required>
  </dependencies>
</package>
Note that this example is informing Zend Server which PHP version the application requires, which extensions need to be loaded, and the value for php.ini directives.
请注意,此示例通知Zend Server应用程序需要哪个PHP版本,需要加载哪些扩展以及php.ini指令的值。
deployment.properties (deployment.properties)
This file tells continuousphp which files to include in the package and the location of the various deployment scripts. If you want to exclude big folders in the package this is the place to do it. Here’s an example of what a ‘deployment.properties file looks like:
该文件告诉Continuousphp包中包括哪些文件以及各种部署脚本的位置。 如果要在软件包中排除大文件夹,则可以使用它。 这是'deployment.properties文件的外观示例:
appdir.includes = config,\
  data,\
  module,\
  public,\
  vendor,\
  composer.json,\
  composer.lock,\
  continuousphp.package,\
  init_autoloader.php,\
  LICENSE.txt,\
  README.md
##Step 5: Pushing code down the pipeline That’s it! Your continuous delivery pipeline is complete. From this point onwards, any commit, including merged pull requests, will initiate a new build. Your code will go through all the various stages from being cloned from the repo, to being packaged, tested and eventually deployed on the target you selected and defined.
##第5步:将代码推入管道就是这样! 您的连续交付流程已完成。 从此以后,任何提交(包括合并的拉取请求)都将启动新的构建。 您的代码将经历从从存储库克隆到打包,测试并最终部署到您选择和定义的目标的所有各个阶段。
You can overview the various stages of the pipeline by selecting the build on your project page. You can then see snapshots of the various stages as they are being processed and executed.
您可以通过在项目页面上选择构建来概述管道的各个阶段。 然后,您可以查看正在处理和执行的各个阶段的快照。
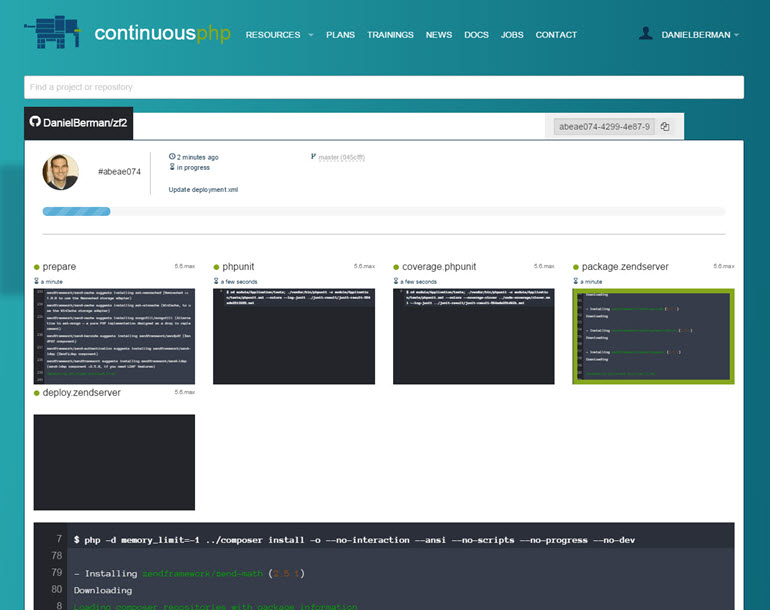
If at any stage the process fails, you’ll be able to see the precise error failing the build as well as being notified via email or the other notification channels you configured (e.g. Slack).
如果该过程在任何阶段失败,您将能够查看导致构建失败的确切错误,并通过电子邮件或您配置的其他通知渠道(例如Slack)得到通知。

If all goes well with the deployment process, you’ll be seeing green lights all along the way, and eventually your new code is deployed on Zend Server. Conveniently, you don’t have to create a virtual host on Zend Server – continuousphp takes care of this automatically.
如果部署过程一切顺利,您将一路看到绿灯,并最终将新代码部署在Zend Server上。 方便地,您不必在Zend Server上创建虚拟主机-Continuousphp会自动处理此问题。
Open the Zend Server UI using the same URL you used for defining the deployment destination, and visit the Manage Apps page (Applications | Manage Apps).
使用用于定义部署目标的相同URL打开Zend Server UI,然后访问“管理应用程序”页面(“ 应用程序” |“管理应用程序” )。
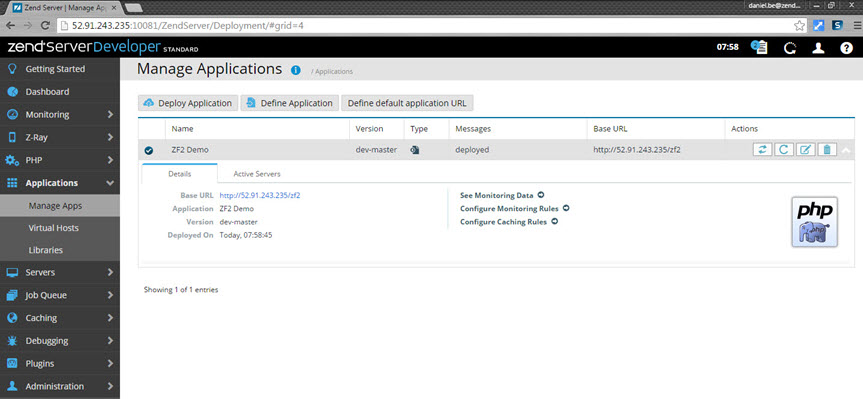
Of course, once deployed on Zend Server, you can begin to use all the various available features for developing, debugging and monitoring your application.
当然,一旦部署在Zend Server上,您就可以开始使用所有各种可用功能来开发,调试和监视应用程序。
摘要 (Summary)
The dual promise of speed and quality accompanying the Continuous Delivery approach is converting more and more development teams. But for developers, the task of fully understanding what Continuous Integration means, how it differs from a Continuous Deployment process, and how they both can fit into a Continuous Delivery cycle, can be daunting.
持续交付方法所带来的速度和质量双重承诺正在转化越来越多的开发团队。 但是对于开发人员来说,全面理解持续集成的含义,它与持续部署过程的区别以及它们如何适应持续交付周期的任务可能是艰巨的。
continuousphp could be a good way for PHP developers to get started. While there are many Continuous Delivery platforms out there, not many are focused entirely on PHP. The solution offered by continuousphp supports the methodologies and tools used by PHP developers and simplifies their integration into an easy-to-manage, fully transparent and reliable delivery pipeline.
Continuousphp可能是PHP开发人员入门的好方法。 尽管那里有许多Continuous Delivery平台,但没有很多完全专注于PHP。 Continuousphp提供的解决方案支持PHP开发人员使用的方法和工具,并简化了它们到易于管理,完全透明和可靠的交付管道中的集成。
更多东西 (More goodies)
Here are are some additional resources that can help you understand the solution offered by continuousphp and how to set up Zend Server:
以下是一些其他资源,可以帮助您了解Continuousphp提供的解决方案以及如何设置Zend Server:
Hope you enjoyed the read!
希望您喜欢阅读!
翻译自: https://www.sitepoint.com/easy-continuous-delivery-with-continuousphp-and-zend-server/
zend studio使用


 261
261

 被折叠的 条评论
为什么被折叠?
被折叠的 条评论
为什么被折叠?
 到【灌水乐园】发言


