


angular入门
This article was originally published on OKTA Developer Blog. Thank you for supporting the partners who make SitePoint possible.
本文最初发布在OKTA开发人员博客上 。 感谢您支持使SitePoint成为可能的合作伙伴。
AngularJS reigned as king of JavaScript MVC frameworks for several years. However, when the Angular team announced they would not provide backwards compatibility for their next version, there was a bit of a stir in its community, giving opportunities for frameworks like React and Vue.js to flourish. Fast forward a few years and both Angular 2 and Angular 4 have been released. Many developers are trying its TypeScript and finding the experience a pleasant one. According to JAXenter, it’s doing a pretty good job, and holding strong as the third most popular UI framework, behind React and HTML5.
几年来,AngularJS成为JavaScript MVC框架之王。 但是,当Angular团队宣布将不提供其下一版本的向后兼容性时,其社区引起了一些轰动,这为React和Vue.js之类的框架提供了发展机会。 快进几年了,Angular 2和Angular 4均已发布。 许多开发人员正在尝试使用TypeScript并发现一种令人愉悦的体验。 根据JAXenter的说法 ,它做得很好,并且作为第三大最受欢迎的UI框架保持了强大的地位 ,仅次于React和HTML5。
In this article, I’ll show you a quick way to get started with Angular, and add user authentication with Okta’s Sign-In Widget. If you’re just getting started with Angular, you might want to read my Angular tutorial. If you’d like to get the source code used in this article, you can find it on GitHub.
在本文中,我将向您展示一种快速入门Angular的方法,并使用Okta的Sign-In Widget添加用户身份验证。 如果您刚刚开始使用Angular,则可能需要阅读Angular教程 。 如果您想获取本文中使用的源代码,可以在GitHub上找到它 。
为什么使用Okta进行用户身份验证? (Why User Authentication with Okta?)
Okta provides an API service that allows developers to create, edit, and securely store user accounts and user account data, and connect them with one or multiple applications. We make user account management easier, more secure, and scalable so you can get to production sooner.
Okta提供了一种API服务,允许开发人员创建,编辑和安全地存储用户帐户和用户帐户数据,并将它们与一个或多个应用程序连接。 我们使用户帐户管理更容易,更安全和可扩展,因此您可以更快地投入生产。
The Okta Sign-in Widget provides an embeddable JavaScript sign-in implementation that can be easily customized. The Sign-in Widget carries the same feature set in the standard Okta sign-in page of every tenant – with the added flexibility to change the look-and-feel. Included in the widget is support for password reset, forgotten password and strong authentication – all of which are driven by policies configured in Okta. Developers don’t have to write a single line of code to trigger these functions from within the widget. For consumer facing sites, social providers are also supported in the widget.
Okta登录小部件提供了可轻松自定义的可嵌入JavaScript登录实现。 登录小部件具有每个租户的标准Okta登录页面中设置的相同功能,并具有更改外观的附加灵活性。 小部件中包括对密码重置,忘记密码和强身份验证的支持,所有这些均由Okta中配置的策略驱动。 开发人员不必编写任何代码即可从小部件内触发这些功能。 对于面向消费者的网站,小部件中还支持社交提供程序。
创建一个Angular应用程序 (Create an Angular Application)
Angular 4 was recently released, as well as Angular CLI 1.0. To see how you might use Okta’s Sign-In Widget in a simple Angular application, create a new application with Angular CLI. First, you’ll need to install Angular CLI.
最近发布了 Angular 4以及Angular CLI 1.0 。 要查看如何在简单的Angular应用程序中使用Okta的登录小部件,请使用Angular CLI创建一个新应用程序。 首先,您需要安装Angular CLI。
npm install -g @angular/cliAfter this command completes, you can create a new application.
该命令完成后,您可以创建一个新的应用程序。
[mraible:~] $ ng new angular-okta-example
create angular-okta-example/README.md (1034 bytes)
create angular-okta-example/.angular-cli.json (1255 bytes)
create angular-okta-example/.editorconfig (245 bytes)
create angular-okta-example/.gitignore (516 bytes)
create angular-okta-example/src/assets/.gitkeep (0 bytes)
create angular-okta-example/src/environments/environment.prod.ts (51 bytes)
create angular-okta-example/src/environments/environment.ts (387 bytes)
create angular-okta-example/src/favicon.ico (5430 bytes)
create angular-okta-example/src/index.html (305 bytes)
create angular-okta-example/src/main.ts (370 bytes)
create angular-okta-example/src/polyfills.ts (2498 bytes)
create angular-okta-example/src/styles.css (80 bytes)
create angular-okta-example/src/test.ts (1085 bytes)
create angular-okta-example/src/tsconfig.app.json (211 bytes)
create angular-okta-example/src/tsconfig.spec.json (304 bytes)
create angular-okta-example/src/typings.d.ts (104 bytes)
create angular-okta-example/e2e/app.e2e-spec.ts (302 bytes)
create angular-okta-example/e2e/app.po.ts (208 bytes)
create angular-okta-example/e2e/tsconfig.e2e.json (235 bytes)
create angular-okta-example/karma.conf.js (923 bytes)
create angular-okta-example/package.json (1325 bytes)
create angular-okta-example/protractor.conf.js (722 bytes)
create angular-okta-example/tsconfig.json (363 bytes)
create angular-okta-example/tslint.json (2968 bytes)
create angular-okta-example/src/app/app.module.ts (314 bytes)
create angular-okta-example/src/app/app.component.css (0 bytes)
create angular-okta-example/src/app/app.component.html (1120 bytes)
create angular-okta-example/src/app/app.component.spec.ts (986 bytes)
create angular-okta-example/src/app/app.component.ts (207 bytes)
You can `ng set --global packageManager=yarn`.
Installing packages for tooling via npm.
Installed packages for tooling via npm.
Successfully initialized git.
Project 'angular-okta-example' successfully created.
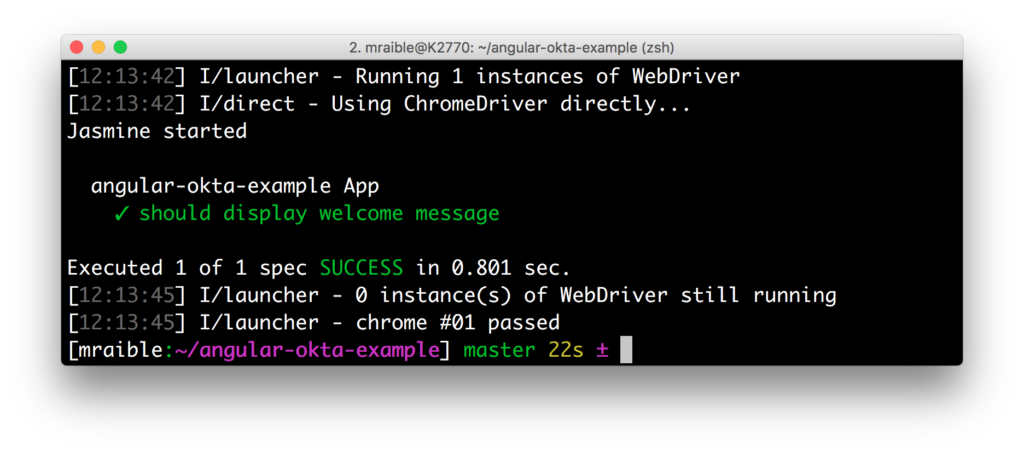
[mraible:~] 2m6s $This will create a new angular-okta-example directory and install all the necessary dependencies. To verify everything works, run ng e2e in a terminal window. All tests should pass and you should see results like the following.
这将创建一个新的angular-okta-example目录并安装所有必需的依赖项。 要验证一切正常,请在终端窗口中运行ng e2e 。 所有测试都应该通过,并且您应该看到如下结果。
将okta的登录小部件集成到Angular中 (Integrate Okta’s Sign-In Widget in Angular)
Now we’re going to leverage Okta’s Sign-In Widget for an easily customizable login view. To start, install the Okta Sign-In Widget using npm.
现在,我们将利用Okta的Sign-In Widget轻松自定义登录视图。 首先,使用npm安装Okta登录小部件 。
npm install --save @okta/okta-signin-widgetAdd the widget’s CSS to src/styles.css:
将小部件CSS添加到src/styles.css :
@import '~https://ok1static.oktacdn.com/assets/js/sdk/okta-signin-widget/2.1.0/css/okta-sign-in.min.css';
@import '~https://ok1static.oktacdn.com/assets/js/sdk/okta-signin-widget/2.1.0/css/okta-theme.css';
Create src/app/shared/okta/okta.service.ts and use it to wrap the widget’s configuration and make it an injectable service.
创建src/app/shared/okta/okta.service.ts并使用它包装小部件的配置并使其成为可注入服务。
import { Injectable } from '@angular/core';
import * as OktaSignIn from '@okta/okta-signin-widget/dist/js/okta-sign-in.min.js';

@Injectable()
export class Okta {
  widget;

  constructor() {
    this.widget = new OktaSignIn({
      baseUrl: 'https://{yourOktaDomain}.com',
      clientId: '{clientId}',
      redirectUri: 'http://localhost:4200'
    });
  }

  getWidget() {
    return this.widget;
  }
}
To make this service available to all components in the application, modify app.module.ts and list Okta as a provider.
要使此服务可用于应用程序中的所有组件,请修改app.module.ts并将Okta列为提供程序。
import { Okta } from './shared/okta/okta.service';

@NgModule({
  ...
  providers: [Okta],
  bootstrap: [AppComponent]
})
Before this will work, you’ll need to create an OpenID Connect (OIDC) application in Okta so you can replace the {yourOktaDomain} and {clientId} references when initializing the widget.
在此之前,您需要在Okta中创建一个OpenID Connect(OIDC)应用程序,以便在初始化小部件时替换{yourOktaDomain}和{clientId}引用。
在Okta中创建OpenID Connect应用程序 (Create an OpenID Connect App in Okta)
OpenID Connect is built on top of the OAuth 2.0 protocol. It allows clients to verify the identity of the user and, as well as to obtain their basic profile information. To learn more, see http://openid.net/connect.
OpenID Connect建立在OAuth 2.0协议之上。 它允许客户端验证用户的身份,以及获取其基本配置文件信息。 要了解更多信息,请参见http://openid.net/connect 。
Login to your Okta account, or create one if you don’t have one. Navigate to Applications and click on the Add Application button. Select SPA and click Next. On the next page, specify http://localhost:4200 as a Base URI, Login redirect URI, and Logout redirect URI. Click Done and you should see settings like the following.
登录到您的Okta帐户,如果没有,请创建一个。 导航到应用程序 ,然后单击添加应用程序按钮。 选择SPA并单击Next 。 在下一页上,将http://localhost:4200指定为基本URI,登录重定向URI和注销重定向URI。 单击完成 ,您将看到类似以下的设置。

显示登录小部件 (Show the Sign-In Widget)
After making these changes, copy the your Client ID and Platform ID into okta.service.ts. Then modify app.component.ts to use the Okta service and the widget to login/logout.
进行这些更改后,将您的客户端ID和平台ID复制到okta.service.ts 。 然后,修改app.component.ts以使用Okta服务,并使用小部件登录/注销。
import { Component, OnInit } from '@angular/core';
import { Okta } from './shared/okta/okta.service';

@Component({
  selector: 'app-root',
  templateUrl: './app.component.html',
  styleUrls: ['./app.component.css']
})
export class AppComponent implements OnInit {
  title = 'app works!';
  user;
  oktaSignIn;

  constructor(private okta: Okta) {
    this.oktaSignIn = okta.getWidget();
  }

  showLogin() {
    this.oktaSignIn.renderEl({el: '#okta-login-container'}, (response) => {
      if (response.status === 'SUCCESS') {
        this.user = response.claims.email;
      }
    });
  }

  ngOnInit() {
    this.oktaSignIn.session.get((response) => {
      if (response.status !== 'INACTIVE') {
        this.user = response.login
      } else {
        this.showLogin();
      }
    });
  }

  logout() {
    this.oktaSignIn.signOut(() => {
      this.showLogin();
      this.user = undefined;
    });
  }
}
And modify app.component.html to have a <div> with id="okta-login-container" and a place to show the logged in user’s email.
并将app.component.html修改为具有id="okta-login-container"的<div>以及显示登录用户电子邮件的位置。
<div *ngIf="!user" id="okta-login-container"></div>
<div *ngIf="user">
Hello {{user}}
<button (click)="logout()">Logout</button>
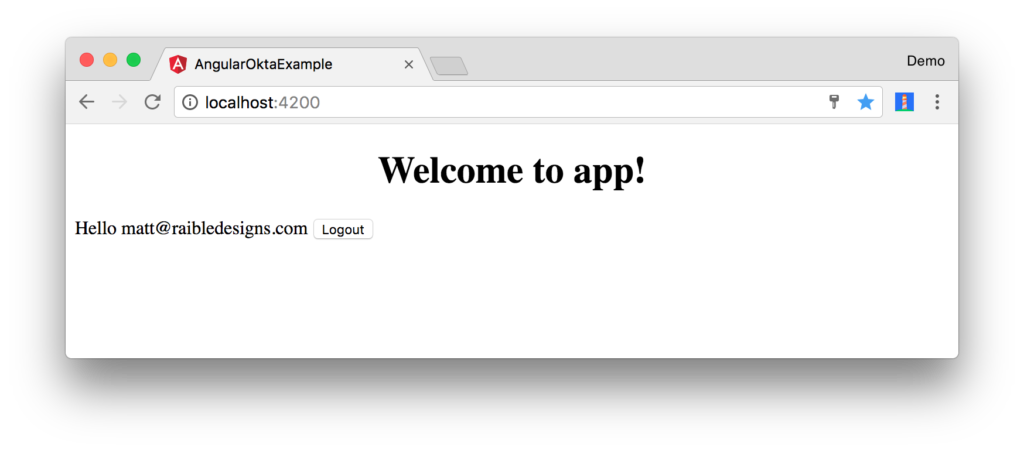
</div>Run ng serve, and open your browser to http://localhost:4200. You should see the sign-in widget. Enter one of your user’s credentials to login. You should see a “Hello {email}” message with a logout button.
运行ng serve ,然后打开浏览器到http:// localhost:4200 。 您应该看到登录小部件。 输入您的用户凭据之一进行登录。 您应该看到带有注销按钮的“ Hello {email}”消息。
NOTE: You may experience an issue where the sign-in process seems to hang. Clicking anywhere in the browser window seems to solve this problem. I’m not sure why this happens. You can track this issue here.
注意:您可能会遇到登录过程似乎挂起的问题。 单击浏览器窗口中的任意位置似乎可以解决此问题。 我不确定为什么会这样。 您可以在此处跟踪此问题。
If it works – congrats! If it doesn’t, please post a question to Stack Overflow with an okta tag, or hit me up on Twitter.
如果有效,那就恭喜! 如果不是,请使用okta标签向Stack Overflow发布问题,或在Twitter上打我。
自定义小部件CSS (Customize the Widget CSS)
If you’d like to customize the widget’s CSS, the easiest way is you write your own CSS. Remove the CSS @import statements you added to src/styles.css. Add an @import for Bootstrap 4 and a few style rules to position elements. Copy the following code into src/styles.css.
如果要自定义小部件CSS,最简单的方法是编写自己CSS。 删除添加到src/styles.cssCSS @import语句。 为Bootstrap 4添加一个@import以及一些样式规则来放置元素。 将以下代码复制到src/styles.css 。
@import url(https://maxcdn.bootstrapcdn.com/bootstrap/4.0.0-beta/css/bootstrap.min.css);
#okta-login-container {
margin: 0 auto;
max-width: 400px;
border: 1px solid silver;
padding: 20px;
box-shadow: 5px 5px 5px 0 silver;
}
#okta-login-container input {
margin-bottom: 5px;
width: 100%;
padding: 5px;
}
#okta-login-container input[type=checkbox] {
width: 25px;
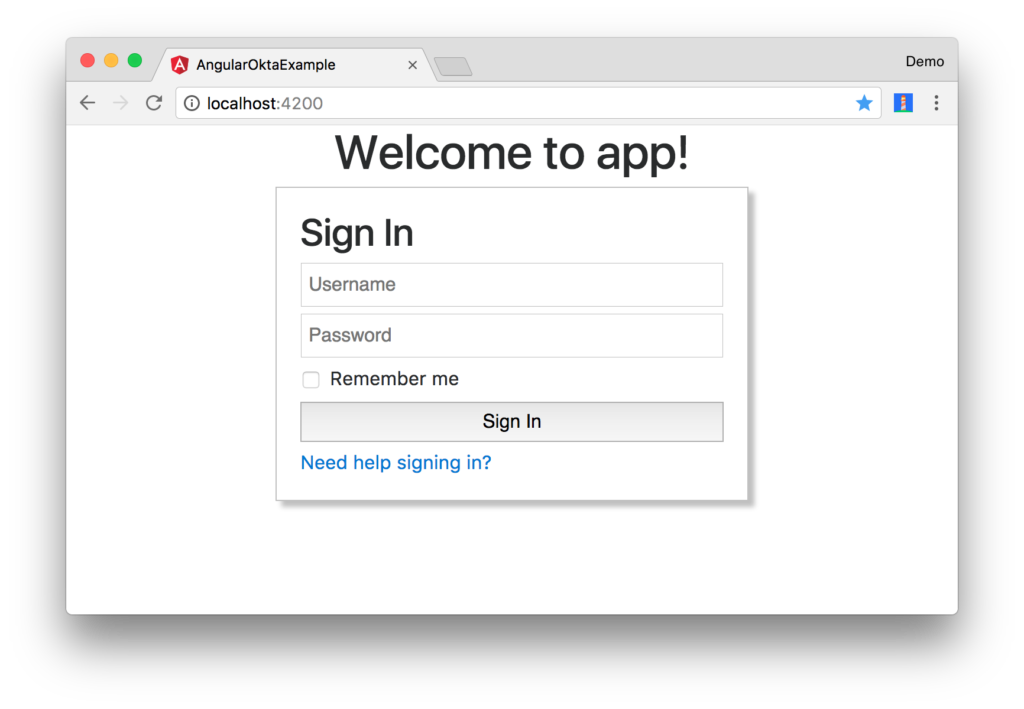
}After making these changes, the sign-in widget will look like the following screenshot.
进行这些更改之后,登录窗口小部件将如下图所示。
修正测试 (Fix Your Tests)
If you try to run npm test or ng test, tests will fail:
如果尝试运行npm test或ng test ,则测试将失败:
Chrome 61.0.3163 (Mac OS X 10.12.6): Executed 3 of 3 (3 FAILED) (0 secs / 0.157 secs)
Chrome 61.0.3163 (Mac OS X 10.12.6) AppComponent should render title in a h1 tag FAILED
    Failed: No provider for Okta!
To fix this, specify Okta as a provider in src/app/app.component.spec.ts.
要解决此问题,请在src/app/app.component.spec.ts Okta指定为提供src/app/app.component.spec.ts 。
import { Okta } from './shared/okta/okta.service';

describe('AppComponent', () => {
  beforeEach(async(() => {
    TestBed.configureTestingModule({
      declarations: [
        AppComponent
      ],
      providers: [Okta]
    }).compileComponents();
  }));
After making this changes, you should see the sweet smell of success.
进行此更改后,您应该会看到成功的甜美气味。
Chrome 61.0.3163 (Mac OS X 10.12.6): Executed 3 of 3 SUCCESS (0.77 secs / 0.759 secs)Protractor tests should still work as well. You can prove this by running ng e2e in a terminal window.
量角器测试也应同样有效。 您可以通过在终端窗口中运行ng e2e来证明这一点。
角+ Okta (Angular + Okta)
You can find a completed version of the application created in this blog post on GitHub. In a future post, I’ll show you how to create a more Angular-native experience, where you control the HTML for the login form.
您可以在GitHub上的此博客文章中找到该应用程序的完整版本。 在以后的文章中,我将向您展示如何创建更多的Angular原生体验,在其中您可以控制登录表单HTML。
Building authentication in an application is hard. It’s even less fun to build it over and over again in each application you build. Okta does the hard part for you and makes it a lot more fun to be a developer! Sign up for a forever-free developer account and try Okta today!.
在应用程序中建立身份验证很困难。 在您构建的每个应用程序中一遍又一遍地构建它的乐趣就更少了。 Okta为您完成了艰苦的工作,使成为一名开发人员变得更加有趣! 注册一个永久免费的开发者帐户,今天就尝试Okta! 。
I hope you’ve enjoyed this quick tour of our Angular support. If you have questions about Okta’s features, or what we’re building next, please hit me up on Twitter, post a question to Stack Overflow with an “okta” tag, or open a new issue on GitHub.
希望您喜欢我们的Angular支持快速浏览。 如果您对Okta的功能或下一步要解决的问题有疑问,请在Twitter 上与我联系,使用“ okta”标签在Stack Overflow 上 发布问题 ,或在GitHub上打开新期刊 。
angular入门


 3721
3721


 被折叠的 条评论
为什么被折叠?
被折叠的 条评论
为什么被折叠?
 到【灌水乐园】发言


