


As website code becomes more complicated and repetitive steps that just beg for optimization become ever more commonplace, there should be a better and more efficient development process out there.
随着网站代码变得越来越复杂,重复进行重复优化的步骤变得越来越普遍,应该有一个更好,更高效的开发流程。
In this tutorial, I’ll introduce Gulp, and how to integrate it with WordPress theming to automate and enhance the theme development process by putting together an automated workflow.
在本教程中,我将介绍Gulp以及如何将其与WordPress主题集成,以通过组合自动化的工作流程来自动化和增强主题开发过程。
为什么需要自动化开发流程 (Why You Need to Automate Your Development Workflow)
Workflow optimization can be incredibly beneficial and rewarding for your development process. Here are some of the reasons to give it a go:
工作流程优化可能对您的开发过程非常有益,并为您带来回报。 以下是一些原因:
- It removes all those repetitive and boring tasks, replacing them with custom tools. 它删除了所有那些重复性和无聊的任务,将其替换为自定义工具。
- It saves a lot of time for doing other important core development work. 这样可以节省大量时间进行其他重要的核心开发工作。
- It helps optimizes your website for performance by minifying and optimizing all assets. 它通过最小化和优化所有资产来帮助优化您的网站的性能。
您需要什么 (What You’ll Need)
- WordPress installed on your development machine. 在您的开发机器上安装了WordPress。
- Command line basic knowledge. 命令行基础知识。
Gulp简介 (Introduction to Gulp)
Gulp is a JavaScript task runner that will help automate time-consuming tasks like CSS compressing, Sass compiling, image optimization and browser reloading.
Gulp是一个JavaScript任务执行程序,它将帮助自动执行耗时的任务,例如CSS压缩,Sass编译,图像优化和浏览器重新加载。
Gulp gives you the tools to do various actions automatically after certain trigger events. For example, consider the following scenarios:
Gulp为您提供了在某些触发事件发生后自动执行各种操作的工具。 例如,请考虑以下情形:
- Every time you save a Sass file, Gulp will compile Sass and output a minified CSS file. 每次保存Sass文件时,Gulp都会编译Sass并输出一个缩小CSS文件。
- When you add a new image to a folder, Gulp will optimize this image and move it to a new dedicated folder. 当您将新图像添加到文件夹时,Gulp将优化该图像并将其移至新的专用文件夹。
- When you save a PHP or a Sass file, Gulp will automatically reload the browser. 保存PHP或Sass文件时,Gulp会自动重新加载浏览器。
Gulp设置 (Gulp Setup)
First, you need to install Gulp globally in your system. Later, I will show you how to install it as a package inside your theme.
首先,您需要在系统中全局安装Gulp 。 稍后,我将向您展示如何将其作为软件包安装在主题中。
Assuming Node.js is installed, open the command line tool, then install Gulp using npm via:
假设已安装Node.js,请打开命令行工具,然后使用npm通过以下命令安装Gulp:
npm install gulp -gNow, run gulp -v (Gulp’s version command) to test that Gulp is installed correctly. You should get output similar to:
现在,运行gulp -v (Gulp的version命令)以测试Gulp的安装正确。 您应该获得类似于以下内容的输出:
➜  ~ gulp -v
[09:33:59] CLI version 3.9.1
主题设定 (Theme Setup)
In this tutorial, I will use Underscores as the base theme. To download it, navigate to underscores.me, generate a new theme and give it a name like “gulp-wordpress”, download it to the WordPress themes directory, then activate it from the dashboard.
在本教程中,我将使用Underscores作为基本主题。 要下载它,请导航至underscores.me ,生成一个新主题,并为其命名,如“ gulp-wordpress”,然后将其下载到WordPress主题目录,然后从仪表板将其激活。
From the command line, navigate to the gulp-wordpress directory where you have added the theme, for example in my case:
在命令行中,导航到您在其中添加了主题的gulp-wordpress目录,例如,在我的情况下:
cd ~/www/wordpress/wp-content/themes/gulp-wordpressNext, run the npm init command and follow a few simple steps to create a package.json file which will include some information about the theme and the packages that will be installed later.
接下来,运行npm init命令,并按照几个简单步骤创建package.json文件,其中将包含有关主题和稍后将安装的软件包的一些信息。
After finishing up the steps, you will have a starting file that looks similar to this:
完成这些步骤后,您将拥有一个类似于以下内容的开始文件:
{
  "name": "gulp-wordpress",
  "version": "1.0.0",
  "description": "WordPress Theme Development Automation with Gulp",
  "author": "Name"
}
Next, install Gulp as a development dependency:
接下来,将Gulp安装为开发依赖项:
npm install gulp --save-devA node_modules directory is now created containing Gulp package source files, and your package.json file has been updated to include Gulp as a development dependency.
现在已创建一个包含Gulp软件包源文件的node_modules目录,并且您的package.json文件已更新为包括Gulp作为开发依赖项。
{
  "name": "gulp-wordpress",
  "version": "1.0.0",
  "description": "WordPress Theme Development Automation with Gulp",
  "author": "Author Name",
  "devDependencies": {
    "gulp": "^3.9.1"
  }
}
Some Gulp tasks like gulp-autoprefixer require ES6-style Promises support so that you can install the es6-promise polyfill, and then require it at the top of the gulpfile.js as we will do next.
一些Gulp任务(例如gulp-autoprefixer)需要ES6风格的Promises支持,以便您可以安装es6-promise polyfill ,然后在gulpfile.js的顶部将其gulpfile.js就像我们接下来要做的那样。
npm install es6-promise --save-devThe last step to configure Gulp is to create an empty gulpfile.js configuration file, which will be used to define Gulp tasks such as JavaScript and Sass.
配置Gulp的最后一步是创建一个空的gulpfile.js配置文件,该文件将用于定义Gulp任务,例如JavaScript和Sass。
The gulpfile.js starter file will look like this:
gulpfile.js起始文件将如下所示:
require('es6-promise').polyfill();

var gulp = require('gulp');

// default task
gulp.task('default');
What we have done above is:
我们上面所做的是:
Required the
es6-promisepolyfill on top of the file, then we have imported in gulp.在文件顶部要求使用
es6-promise,然后我们就用es6-promise导入了。Created a
defaulttask.创建一个
default任务。
To make sure that Gulp is running and everything is done perfectly, run gulp in the command line to execute the default task created in the gulpfile.js file. The output should be similar to:
为了确保咕嘟咕嘟运行,一切都完全可以做到的,运行gulp在命令行中执行default创建的任务gulpfile.js文件。 输出应类似于:
[09:48:23] Using gulpfile ~/www/wordpress/wp-content/themes/gulp-wordpress/gulpfile.js
[16:33:13] Starting 'default'...
[16:33:13] Finished 'default' after 58 μs
使用Gulp任务加速开发 (Speeding up Development with Gulp Tasks)
At this point, the theme is ready for new tasks, and it’s time to go through some common tasks that you can use to speed up your theme development.
至此,主题已准备就绪,可以执行新任务,是时候完成一些常见任务了,可以用来加快主题开发速度了。
使用CSS(Sass) (Working with CSS (Sass))
If you are using Sass to write CSS, two main things needed to be automated, the first one is to compile Sass to CSS, the second is to use autoprefixer to add vendor prefixes to your CSS. Also note that I’m using Sass as an example, if you prefer another option like Less for example, you can find a Gulp plugin for it too.
如果您使用Sass编写CSS,则需要自动化两个主要方面,第一个是将Sass编译为CSS,第二个是使用autoprefixer将供应商前缀添加到CSS。 还要注意,我以Sass为例,如果您喜欢其他选项(例如Less) ,也可以找到一个Gulp插件。
First, install gulp-sass and gulp-autoprefixer.
首先,安装gulp-autoprefixer gulp-sass和gulp-autoprefixer 。
npm install gulp-sass gulp-autoprefixer --save-devThe next step is to create a Sass directory with a basic structure.
下一步是创建具有基本结构的Sass目录。
├── sass
│   └── style.scss
The style.scss file is the main starting point, you are free to create your Sass architecture and import other components, modules, functions inside it based on your preference.
style.scss文件是主要的起点,您可以根据自己的喜好自由创建Sass体系结构并在其中导入其他组件,模块和功能。
The first few lines will be the stylesheet header required by WordPress.
前几行将是WordPress所需的样式表标题 。
/*
  Theme Name: Gulp WordPress
  Theme URI: http://example.com/
  Author: Author Name
  Author URI: http://example.com/
  Description: Description
  Version: 1.0.0
  License:
  License URI:
  Text Domain: gulp-wordpress
*/

body {
  color: #333;
  background-color: #fff;
}
The next step is to create a sass task that will do the following things:
下一步是创建一个sass任务,它将执行以下操作:
- Compile and autoprefix Sass. 编译并自动加前缀Sass。
Build a
style.cssfile, which is the final CSS file used by WordPress.构建一个
style.css文件,这是WordPress使用的最终CSS文件。
require('es6-promise').polyfill();
var gulp          = require('gulp');
var sass          = require('gulp-sass');
var autoprefixer  = require('gulp-autoprefixer');

gulp.task('sass', function() {
  return gulp.src('./sass/**/*.scss')
  .pipe(sass())
  .pipe(autoprefixer())
  .pipe(gulp.dest('./'))
});

gulp.task('default', ['sass']);
Now, run the gulp sass task directly from the command line, this will compile the style.scss file, and build a new style.css file in the theme root.
现在,直接从命令行运行gulp sass任务,这将编译style.scss文件,并在主题根目录中构建一个新的style.css文件。
Another way to run sass, is to pass the task name as a second parameter to the default task as I did above, so by running gulp, the sass task will be executed.
运行sass另一种方法是,像上面一样,将任务名称作为第二个参数传递给default任务,因此通过运行gulp ,将执行sass任务。
A good WordPress practice is to include the CSS table of contents in the final CSS file at the top just after the stylesheet header, and then add a CSS comment before any code or import related to the section.
WordPress的一种良好做法是在样式表标题之后的最后CSS文件中包含CSS目录,然后在与该节相关的任何代码或导入之前添加CSS注释。
Note that the comment is a standard CSS style comment like (/*----- 1.0 Normalize -----*/), and not a Sass comment like (//----- 1.0 Normalize -----). This is important because this comment needs to be to exist in the final CSS file, but with a Sass style comment it will be hidden by the Sass compiler. Also, note that this is used in the stylesheet header and the table of contents.
请注意,该注释是标准CSS样式注释,例如( /*----- 1.0 Normalize -----*/ ),而不是Sass注释,例如( //----- 1.0 Normalize ----- )。 这很重要,因为此注释必须存在于最终CSS文件中,但是具有Sass样式的注释将被Sass编译器隐藏。 另外,请注意,这在样式表标题和目录中使用。
The following is an example of the style.scss file containing the table of content, and some imports to external sass files.
以下是包含目录的style.scss文件的示例,以及一些导入到外部sass文件的示例。
/*
  Stylesheet Header ...
*/

/*--------------------
>>> TABLE OF CONTENTS:
----------------------
1.0 Normalize
2.0 Typography
3.0 Icons
4.0 Components
--------------------*/

/*----- 1.0 Normalize -----*/
@import 'normalize';

/*----- 2.0 Typography -----*/
@import 'typography';
To automate generating the rtl.css file automatically, the gulp-rtlcss plugin can be used to auto convert LTR (left to right) CSS to RTL (right to left), so you can write Sass in one file then Gulp will generate two CSS files, the first is style.css file, and the second is a rtl.css file.
为了自动自动生成rtl.css文件,可以使用gulp-rtlcss插件将LTR(从左到右)CSS自动转换为RTL(从右到左),因此您可以在一个文件中编写Sass,然后Gulp将生成两个CSS。文件,第一个是style.css文件,第二个是rtl.css文件。
The idea behind gulp-rtlcss is to convert all the CSS properties like floats, text-align, text direction, and other properties from left to right.
gulp-rtlcss背后的想法是gulp-rtlcss转换所有CSS属性,例如float,text-align,text direction和其他属性。
The second plugin is gulp-rename which will rename the file to rtl.css automatically.
第二个插件是gulp-rename ,它将自动将文件重命名为rtl.css 。
npm install gulp-rtlcss gulp-rename --save-devThe next step is to include the newly installed plugins at the top of gulpfile.js file, and modify the sass task to use rtlcss() after the style.css is generated to do the conversion.
下一步是将新安装的插件包括在gulpfile.js文件的顶部,并在生成style.css进行转换后,将sass任务修改为使用rtlcss() 。
In this step, the plugin will convert all the CSS properties like floats and text direction from left to right, then rename the file to rtl.css, and then output the file to the theme root:
在此步骤中,插件将从左到右转换所有CSS属性,例如float和文本方向,然后将文件重命名为rtl.css ,然后将文件输出到主题根目录:
var rtlcss       = require('gulp-rtlcss');
var rename       = require('gulp-rename');

gulp.task('sass', function() {
  return gulp.src('./sass/*.scss')
  .pipe(sass())
  .pipe(autoprefixer())
  .pipe(gulp.dest('./'))              // Output LTR stylesheets (style.css)

  .pipe(rtlcss())                     // Convert to RTL
  .pipe(rename({ basename: 'rtl' }))  // Rename to rtl.css
  .pipe(gulp.dest('./'));             // Output RTL stylesheets (rtl.css)
});
Run gulp sass, and you will have style.css and rtl.css files generated.
运行gulp sass ,您将生成style.css和rtl.css文件。
To read more about Sass structure, and how to use it with Gulp, have a read of the following:
要了解有关Sass结构以及如何在Gulp中使用它的更多信息,请阅读以下内容:
观看文件 (Watching Files)
Instead of running gulp sass whenever you change a Sass file, a new task is required to do this automatically for you.
无需在更改Sass文件时运行gulp sass而是需要执行新任务来自动为您执行此操作。
The watch task will be used to view any changes made to a file, so once that file has changed, it will run another action. For example, when you save a Sass file, then the sass task should run automatically.
watch任务将用于查看对文件所做的任何更改,因此,一旦该文件发生更改,它将运行另一个操作。 例如,当您保存Sass文件时, sass任务应自动运行。
Inside our gulpfile.js file, add a new watch task to watch for any changes in the /sass directory, then run the sass task. The next step is to update the default task with the watch task.
在我们的gulpfile.js文件中,添加一个新的watch任务以监视/sass目录中的任何更改,然后运行sass任务。 下一步是使用监视任务更新default任务。
gulp.task('watch', function() {
  gulp.watch('./sass/**/*.scss', ['sass']);
});

gulp.task('default', ['sass', 'watch']);
Now you can run gulp in the command line to execute sass task first then the watch task will continue working after that.
现在,您可以在命令行中运行gulp以先执行sass任务,然后再执行watch任务。
错误处理 (Error Handling)
Sometimes while you are writing code, you might write an undefined Sass variable while in the middle of work. While you are watching files, Gulp will break because the particular task can’t compile that variable, this is annoying because you have to start Gulp again to continue working.
有时在编写代码时,您可能会在工作中编写未定义的Sass变量。 当您查看文件时,Gulp会中断,因为特定的任务无法编译该变量,这很烦人,因为您必须再次启动Gulp才能继续工作。
You can fix this by using gulp-plumber plugin, which will prevent Gulp breaking caused by errors.
您可以使用gulp-plumber插件解决此问题,这将防止由于错误而导致Gulp损坏。
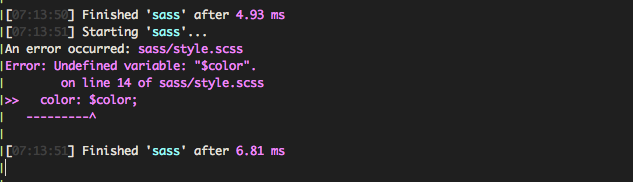
To improve error handling, install the gulp-util utility functions package to customize the error message, add beep sound once the error occurred, plus adding colors to the error message which is useful identifying the error.
为了改善错误处理能力,请安装gulp-util实用程序功能包以自定义错误消息,在错误发生时添加提示音,并在错误消息中添加颜色,这对于识别错误非常有用。
npm install gulp-plumber gulp-util --save-devvar plumber = require('gulp-plumber');
var gutil = require('gulp-util');
var onError = function (err) {
console.log('An error occurred:', gutil.colors.magenta(err.message));
gutil.beep();
this.emit('end');
};
gulp.task('sass', function() {
return gulp.src('./sass/*.scss')
.pipe(plumber({ errorHandler: onError }))
//
//
});What has been done above:
上面做了什么:
Added an
onErrorfunction to log the error message, and create a beep sound.添加了
onError函数以记录错误消息并创建蜂鸣声。Updated the
sasstask to use theplumberfunction, then passed theonErrorfunction to theerrorHandlerobject property.更新了
sass任务以使用plumber函数,然后将onError函数传递给errorHandler对象属性。
By doing this you can know exactly what’s happening with errors and in which file. Most importantly, it will also prevent Gulp from stopping!
通过执行此操作,您可以准确了解发生了什么错误以及在哪个文件中发生了什么。 最重要的是,它也可以防止Gulp停止!
An example of an undefined Sass variable $color.
未定义的Sass变量$color的示例。
JavaScript (JavaScript)
For working with JavaScript, there are different tools that can speed up and improve your accompanying JavaScript development workflow, for example:
为了使用JavaScript,可以使用多种工具来加快和改善随附JavaScript开发工作流程,例如:
- Concatenating many JavaScript files into a single file. 将许多JavaScript文件串联为一个文件。
- Checking code errors with JSHint. 使用JSHint检查代码错误。
- Minifying code to get a much smaller file size. 压缩代码以减小文件大小。
You can install these plugins as following:
您可以按以下方式安装这些插件:
To concatenate files:
串联文件:
npm install gulp-concat --save-devTo validate JavaScript:
要验证JavaScript:
npm install gulp-jshint --save-devTo minify code:
最小化代码:
npm install gulp-uglify --save-devNext, inside the gulpfile.js file, we require the newly installed plugins and add a new js task.
接下来,在gulpfile.js文件中,我们需要新安装的插件并添加一个新的js任务。
var concat = require('gulp-concat');
var jshint = require('gulp-jshint');
var uglify = require('gulp-uglify');

gulp.task('js', function() {
  return gulp.src(['./js/*.js'])
    .pipe(jshint())
    .pipe(jshint.reporter('default'))
    .pipe(concat('app.js'))
    .pipe(rename({suffix: '.min'}))
    .pipe(uglify())
    .pipe(gulp.dest('./js'))
});
This task takes any file that ends with .js inside the ./js directory, checks for code errors with jshint, then concatenates them into app.js, and as we need a minified output, it is time to rename the file to app.min.js. We then minify the code, and in the last step, output the file to the ./js directory.
此任务将在./js目录中获取任何以.js结尾的文件,使用./js检查代码错误,然后将其连接到app.js ,并且由于我们需要缩小的输出,现在该将该文件重命名为app.min.js 然后,我们将代码压缩为最小,并在最后一步中,将文件输出到./js目录。
At this point, you’ll want to create a .jshintrc configuration file in the theme root, which is a simple JSON file that specifies which JSHint options to turn on or off, for example:
此时,您将需要在主题根目录中创建一个.jshintrc配置文件,该文件是一个简单的JSON文件,用于指定要打开或关闭哪些JSHint选项,例如:
{
  "undef": true,
  "unused": true,
  "browser": true
}undef: Warns when you use a variable that was not declared.undef:当您使用未声明的变量时发出警告。unused: Warns when defining a variable and never using it.unused:定义变量且从不使用时发出警告。browser: Defines globals exposed by modern browsers, likenavigatoranddocument.browser:定义现代浏览器(如navigator和document公开的全局变量。
JSHint comes with a whole series of options that you can use based on your preference.
JSHint附带了一系列选项 ,您可以根据自己的喜好使用它们。
Now, run gulp js from the command line (or terminal). A new app.min.js file will be generated which will be used later in the theme.
现在,从命令行(或终端)运行gulp js 。 将生成一个新的app.min.js文件,该文件稍后将在主题中使用。
By default, the _underscore theme includes customizer.js, navigation.js, and skip-link-focus-fix.js files under the /js directory.
默认情况下, _underscore主题在/js目录下包含customizer.js , navigation.js和skip-link-focus-fix.js文件。
If you only need to include specific files, you can add them inside the gulp.src array as:
如果只需要包含特定文件,则可以将它们添加到gulp.src数组中,如下所示:
gulp.task('js', function() {
  return gulp.src([
    './js/navigation.js',
    './js/skip-link-focus-fix.js'
  ])
});
The code above will do all the operations on those two files. If you need to add another new file you can append it to the array.
上面的代码将对这两个文件执行所有操作。 如果您需要添加另一个新文件,则可以将其附加到数组中。
You can also update the watch task to watch changes to any JavaScipt file, and also update the default task to run the js actions automatically when running gulp, just as we did with Sass.
您还可以更新watch任务以监视对任何JavaScipt文件的更改,还可以更新default任务以在运行gulp时自动运行js操作,就像我们对Sass所做的那样。
gulp.task('watch', function() {
  gulp.watch('./sass/**/*.scss', ['sass']);
  gulp.watch('./js/*.js', ['js']);
});

gulp.task('default', ['sass', 'js', 'watch']);
Inside the functions.php theme file, enqueue the generated app.min.js file as:
在functions.php主题文件中,将生成的app.min.js文件排队为:
wp_enqueue_script( 'gulp-wordpress-javascript', get_template_directory_uri() . '/js/app.min.js', array(), '20151215', true );You can remove other enqueued JavaScript files as they already concatenated and minified into a single file. In the current state of HTTP, including one file rather than many will speed up and improve website performance.
您可以删除其他已排队JavaScript文件,因为它们已经串联并缩小为一个文件。 在HTTP的当前状态下,仅包含一个文件而不是多个文件将加快并提高网站性能。
The enqueue scripts function inside functions.php file will end up to looking similar to:
入队里面的脚本功能functions.php文件最终会以寻找类似:
/**
 * Enqueue scripts and styles.
 */
function gulp_wordpress_scripts() {
  wp_enqueue_style( 'gulp-wordpress-style', get_stylesheet_uri() );

  wp_enqueue_script( 'gulp-wordpress-javascript', get_template_directory_uri() . '/js/app.min.js', array(), '20151215', true );
}
add_action( 'wp_enqueue_scripts', 'gulp_wordpress_scripts' );
图片 (Images)
Let’s now try to optimize images with Gulp, by doing this we will ensure that all the used pictures in the theme are automatically optimized for speed. To make this automation easier, you can set up a Gulp task to watch the images directory, and once you drag an image there, gulp will optimize it and move it to another folder for optimized and ready to use images.
现在,让我们尝试使用Gulp优化图像,这样做将确保自动优化主题中所有使用的图像。 为了使这种自动化更加容易,您可以设置一个Gulp任务来查看图像目录,一旦将图像拖到那里,gulp就会对其进行优化并将其移动到另一个文件夹中以进行优化并准备使用图像。
Create two folders:
创建两个文件夹:
/images/src: Source folder contains the original images./images/src:源文件夹包含原始图像。/images/dest: Destination folder contains the optimized images./images/dest:目标文件夹包含优化的图像。
Install gulp-imagemin to minify PNG, JPEG, GIF, and SVG images.
安装gulp-imagemin以缩小PNG,JPEG,GIF和SVG图像。
npm install gulp-imagemin --save-devCreate a new task (images), that will watch images located in the source folder (/images/src), optimize them, and move them to the optimized folder (/images/dest).
创建一个新任务( images ),它将监视位于源文件夹( /images/src )中的/images/src ,对其进行优化,然后将其移动到优化的文件夹( /images/dest )中。
var imagemin = require('gulp-imagemin');

gulp.task('images', function() {
  return gulp.src('./images/src/*')
    .pipe(plumber({errorHandler: onError}))
    .pipe(imagemin({optimizationLevel: 7, progressive: true}))
    .pipe(gulp.dest('./images/dist'));
});
You can also watch the /images/src folder, so that every time you drag a new image there, the images task will run. Also, update the default task to run the images action.
您还可以观看/images/src文件夹,以便每次在其中拖动新图像时, images任务都会运行。 另外,更新default任务以运行images操作。
gulp.task('watch', function() {
  //
  gulp.watch('images/src/*', ['images']);
});

gulp.task('default', ['sass', 'js', 'images', 'watch']);
使用BrowserSync刷新浏览器 (Browser Refresh with BrowserSync)
What if you want to refresh the browser after any code changes whether the code is PHP, Sass, or JavaScript? What if you are testing with more than one browser or mobile device? You will have to hit the refresh button on every single screen. BrowserSync will help in doing this effectively and automatically!
如果无论代码是PHP,Sass还是JavaScript,在更改任何代码后想要刷新浏览器怎么办? 如果要使用多个浏览器或移动设备进行测试怎么办? 您将必须在每个屏幕上都单击刷新按钮。 BrowserSync将帮助您有效而自动地做到这一点!
First, you’ll need to install BrowserSync as a development dependency.
首先,您需要将BrowserSync安装为开发依赖项。
npm install browser-sync --save-devNext, require BrowserSync inside your gulpfile.js file, and update the watch task to include BrowserSync:
接下来,在您的gulpfile.js文件中需要BrowserSync,并更新watch任务以包括BrowserSync:
var browserSync = require('browser-sync').create();
var reload = browserSync.reload;

gulp.task('watch', function() {
  browserSync.init({
    files: ['./**/*.php'],
    proxy: 'http://localhost:8888/wordpress/',
  });
  gulp.watch('./sass/**/*.scss', ['sass', reload]);
  gulp.watch('./js/*.js', ['js', reload]);
  gulp.watch('images/src/*', ['images', reload]);
});
Notice that you will need to update the proxy option to the local development URL. For example, if your local URL is localhost:8888/wordpress, update the proxy value above with that.
请注意,您将需要将proxy选项更新为本地开发URL。 例如,如果您的本地URL是localhost:8888/wordpress ,则使用它更新上面的代理值。
As BrowserSync can watch your files as you work, for example, I configured the task to watch any changes to PHP files.
例如,由于BrowserSync可以在工作时监视您的文件,因此,我将任务配置为监视对PHP文件的任何更改。
I also updated the sass, js, and images watch tasks to reload the page if any changes happened to the files, or the content of the images folder has changed.
如果文件发生任何更改,或者images文件夹的内容已更改,我还更新了sass , js和images监视任务以重新加载页面。
Now, you can run gulp, a new tab will be opened automatically in the browser to the localhost URL, and your console will look something like this:
现在,您可以运行gulp ,将在浏览器中自动打开一个新标签页,指向localhost URL,您的控制台将如下所示:
[BS] Access URLs:
 --------------------------------------------
       Local: http://localhost:3000/wordpress/
    External: http://192.168.1.2:3000/wordpress/
 --------------------------------------------
          UI: http://localhost:3001
 UI External: http://192.168.1.2:3001
 --------------------------------------------
You can use the External URL in any device connected to the same network, so in every change browserSync will reload all the browsers.
您可以在连接到同一网络的任何设备中使用外部 URL,因此在每次更改中,browserSync都会重新加载所有浏览器。
The UI External URL is used for the Browsersync control panel, which allows you to change sync options, manage devices.
UI外部 URL用于Browsersync控制面板,它使您可以更改同步选项,管理设备。
结论 (Conclusion)
As you’ve seen, working with automation tools is incredibly valuable and can improve the speed of the development process. There are lots of Gulp plugins out there you can try and use based on your requirements, so there is anything that could be automated to save time, do so!
如您所见,使用自动化工具非常有价值,并且可以提高开发过程的速度。 您可以根据自己的需求尝试使用许多Gulp插件 ,因此可以自动节省时间!
I’ve created a GitHub repo for this article’s WordPress theme and you can check out the code here. Let me know if you use any Gulp plugins in your development process that makes your life easier.
我已经为本文的WordPress主题创建了GitHub存储库, 您可以在此处查看代码 。 让我知道您是否在开发过程中使用了任何Gulp插件,从而使您的生活更轻松。
翻译自: https://www.sitepoint.com/wordpress-theme-automation-with-gulp/


 221
221

 被折叠的 条评论
为什么被折叠?
被折叠的 条评论
为什么被折叠?
 到【灌水乐园】发言


