


wordpress插件开发
In the first part of my series, an introduction to the WordPress Plugin Boilerplate, we looked at how the code is organised within the Boilerplate. To continue with this series, we’ll apply what we’ve learnt previously to build a real working plugin. We are going to take a look at how quickly we can get our plugin up and running using the Boilerplate code, with as little work as possible.
在本系列的第一部分中,对WordPress插件Boilerplate进行了介绍 ,我们研究了Boilerplate中代码的组织方式。 为了继续进行本系列文章,我们将运用我们先前学到的知识来构建一个真正有效的插件。 我们将研究如何使用Boilerplate代码以最快的速度启动并运行插件,而只需花费最少的工作。
This article will focus on creating and activating the plugin, as well as developing the admin facing functionality of the plugin. In order to follow this tutorial, you’ll need a basic understanding of PHP and WordPress, as well as having a working knowledge of the WordPress Plugin API.
本文将重点介绍如何创建和激活插件,以及开发面向管理员的功能。 为了遵循本教程,您需要对PHP和WordPress有基本的了解,并且对WordPress Plugin API有一定的了解。
关于插件 (About the Plugin)
We’re going to develop a simple plugin that will display the number of days since a specific post was last updated. We’re also going to offer a couple of simple customizations to the plugin, allowing the user to choose a specific number of days after which a post will be considered outdated, as well as the position of the notice in the post content.
我们将开发一个简单的插件,以显示自上次更新特定帖子以来的天数。 我们还将为插件提供一些简单的自定义功能,允许用户选择特定的天数(在此天之后,帖子将被视为过时)以及通知在帖子内容中的位置。
准备样板 (Preparing the Boilerplate)
As mentioned in the first article, we can either download a fresh copy of the Boilerplate and do the search and replace ourselves, or we can use the unofficial WordPress Plugin Boilerplate Generator to speed up the process. Let’s use the generator for our plugin.
如第一篇文章中所述,我们可以下载Boilerplate的新副本并进行搜索并自行替换,也可以使用非官方的WordPress插件Boilerplate Generator来加快此过程。 让我们为插件使用生成器。
Head over to the WordPress Plugin Boilerplate Generator website and fill in the form with the appropriate values. Let’s just call our plugin “Outdated Notice”. Here’s a sample form with the fields filled in.
前往WordPress插件样板生成器网站,并在表格中填写适当的值。 让我们将我们的插件称为“过期通知”。 这是一个示例表格,其中填写了字段。
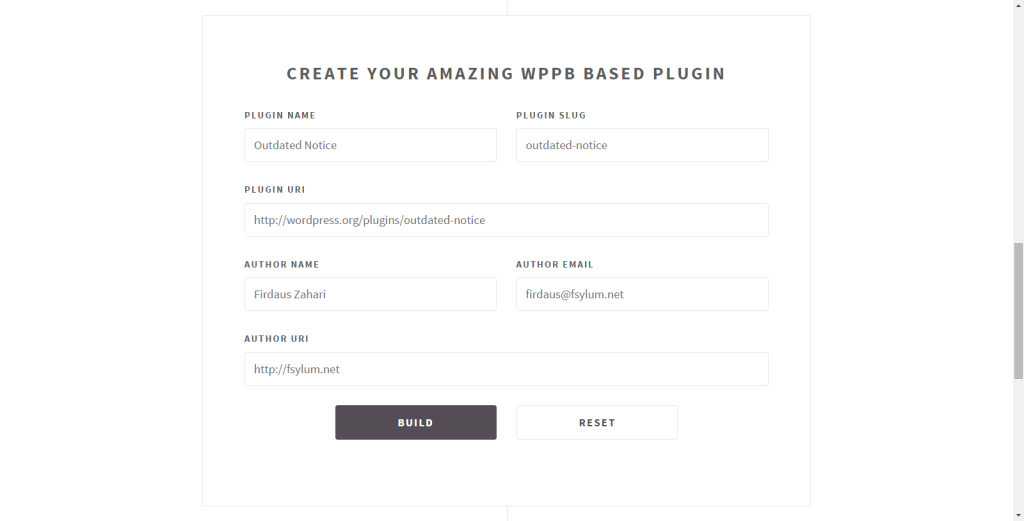
I’m using an imaginary URL for the plugin URL that links to an official repository. Don’t worry too much about this stuff as we can always modify it later on in the plugin header.
我使用虚构的URL作为链接到官方存储库的插件URL。 不用太担心这些东西,因为我们以后总是可以在插件头中对其进行修改。
Click the “Build” button and you should get a nice, customized copy of the WordPress Plugin Boilerplate.
单击“生成”按钮,您将获得一个漂亮的自定义WordPress插件样板。
安装和激活插件 (Installing and Activating the Plugin)
The generated zip archive will contain the two expected directories, assets and trunk. We are not going to use the symlink route in installing our plugin, so extract the trunk folder in the archive and copy it into the wp-content/plugins directory.
生成的zip归档文件将包含两个预期目录, assets和trunk 。 在安装插件时,我们不会使用symlink路由,因此请在归档文件中解压缩trunk文件夹并将其复制到wp-content/plugins目录中。
We still need to rename it appropriately to avoid a naming conflict with other plugins, so we will rename the trunk directory to outdated-notice.
我们仍然需要适当地重命名它,以避免与其他插件的命名冲突,因此我们将trunk目录重命名为outdated-notice 。
If you now go to the “Installed Plugins” section in wp-admin, sure enough, you’ll see your plugin is on the list of plugins installed but not yet activated. The Plugin Boilerplate generator does not change anything with regards to plugin description so if we want to change it, we can simply edit the description in the main plugin file, in our case, outdated-notice.php.
如果现在确定进入wp-admin的“已安装插件”部分,那么您肯定会看到您的插件在已安装但尚未激活的插件列表中。 Plugin Boilerplate生成器不会更改插件描述,因此,如果要更改它,我们可以在主插件文件中简单地编辑描述,在本例中为outdated-notice.php 。
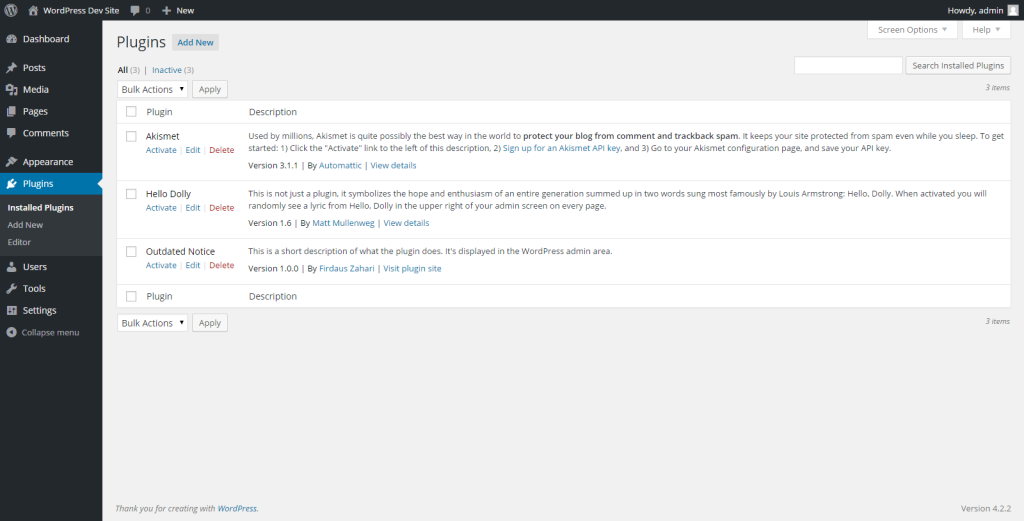
Click on “Activate” to activate your shiny new plugin. Nothing will change on your WordPress site, so don’t worry that there’s nothing to see yet after activating the plugin.
单击“激活”以激活您的闪亮新插件。 您的WordPress网站上什么都不会改变,所以不用担心在激活插件后什么也看不到。
添加选项页 (Adding an Options Page)
Plugin developers usually provide a means for the user to customize the settings of the plugin. This can be achieved by utilizing the Settings API provided by WordPress. Let’s see how can we integrate our own settings into the plugin.
插件开发人员通常为用户提供一种自定义插件设置的方法。 这可以通过利用WordPress提供的Settings API来实现。 让我们看看如何将自己的设置集成到插件中。
In short, we are going to allow the user to choose where the notice will appear, either before the post content or after the post content. As far as the number of days threshold goes, the user can set the number of days before a post is to be considered outdated. Using that piece of information, we are going to d
 最低0.47元/天 解锁文章


 1239
1239


 被折叠的 条评论
为什么被折叠?
被折叠的 条评论
为什么被折叠?
 到【灌水乐园】发言


