


gulp定义函数
If you are developing a web project using Bootstrap, you may have the need to add a set of custom icons in the place of the default Glyphicons that come with the framework.
如果使用Bootstrap开发Web项目,则可能需要在框架随附的默认Glyphicons位置添加一组自定义图标。
I’ve already covered the topic of building an icon using Illustrator and Icomoon, but what is the better way to integrate icons in a Bootstrap project?
我已经介绍了使用Illustrator和Icomoon构建图标的主题,但是在Bootstrap项目中集成图标的更好方法是什么?
Icomoon CSS与Glyphicons CSS (Icomoon CSS vs Glyphicons CSS)
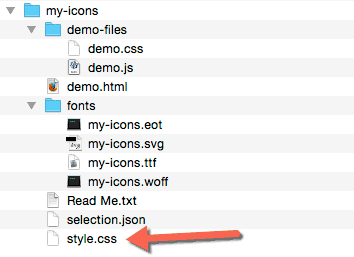
When we download a set of icons from Icomoon (for this demo I’ve created a project called my-icons), we get the font files, some demo files (that provide a useful reference to our glyphs), and a style.css file. This one contains all the CSS rules you need to use the font in your project.
当我们从Icomoon下载一组图标时(对于这个演示,我创建了一个名为my-icons的项目),我们会得到字体文件,一些演示文件(为字形提供有用的参考)以及style.css文件。 此代码包含在项目中使用字体所需的所有CSS规则。
Lets take a look at the CSS file. It contains a @font-face declaration, a rule to catch all icon classes (based on the first part of their names) and a list of all icon classes:
让我们看一下CSS文件。 它包含一个@font-face声明,一个捕获所有图标类的规则(基于其名称的第一部分)以及所有图标类的列表:
@font-face {
  font-family: 'my-icons';
  src:url('fonts/my-icons.eot?-dp1fqh');
  /* other properties */
}

[class^="myicon-"], [class*=" myicon-"] {
  /* some properties */
}

.myicon-alert:before {
  content: "\e600";
}

.myicon-arrow-down:before {
  content: "\61";
}

/* ... more icons */
Now, let’s see the glyphicons.less file from Bootstrap:
现在,让我们看一下Bootstrap中的glyphicons.less文件:
// Import the fonts
@font-face {
  font-family: 'Glyphicons Halflings';
  src: url('@{icon-font-path}@{icon-font-name}.eot');
  /* other properties */
}

// Catchall baseclass
.glyphicon {
  /* some properties */
}

// Individual icons
.glyphicon-asterisk {
  &:before {
    content: "\2a";
  }
}

.glyphicon-plus {
  &:before {
    content: "\2b";
  }
}

/* ... more icons */
They are very similar, but with some fundamental differences:
它们非常相似,但有一些根本区别:
First, Glyphicons is a Less file (there is a Sass file too) and the icon font path and name are assigned to two variables (
@{icon-font-path}and@{icon-font-name}).首先,Glyphicons是一个Less文件(也有一个Sass文件),并且图标字体路径和名称分配给了两个变量(
@{icon-font-path}和@{icon-font-name})。Glyphicons uses a class as a “catchall” selector (
.glyphicon), while Icomoon uses an attribute selector.Glyphicons使用类作为“
.glyphicon”选择器(.glyphicon),而Icomoon使用属性选择器。Glyphicons uses the parent selector (&) for individual classes.
Glyphicons将父选择器 (&)用于各个类。
The last point can be really useful in some situations, because it can simplify the way you build your CSS files.
最后一点在某些情况下可能非常有用,因为它可以简化构建CSS文件的方式。
The ampersand refers to the parent of each rule, and when glyphicons.less is compiled, it produces exactly the same result as the Icomoon CSS:
“&”号引用每个规则的父级,并且在编译glyphicons.less时,其产生的结果与Icomoon CSS完全相同:
.glyphicon-asterisk:before {
  content: "\2a";
}
So, what’s the difference?
那么,有什么区别呢?
Simply put, you can use each icon class as a mixin, therefore you can embed them in other rules without worrying about any changes to the original class.
简而言之,您可以将每个图标类用作mixin ,因此您可以将它们嵌入其他规则中,而不必担心对原始类的任何更改。
Lets see a sample.
让我们看一个示例。
使用字体混合 (Using font mixins)
In the screenshot below, you can see an alert block that uses an icon from the my-icons font created with Icomoon.
在下面的屏幕截图中,您可以看到一个警报块,该警报块使用Icomoon创建的my-icons字体中的图标 。

The icon is applied using a span element; this is the “classic” way to use an icon font, and it is the same way suggested for Bootstrap Glyphicons.
使用span元素应用图标; 这是使用图标字体的“经典”方式,与Bootstrap Glyphicons建议的方式相同。
Therefore, to build our example we need to add a span.myicon-alert element inside a container (in this case a div):
因此,要构建我们的示例,我们需要在容器(在本例中为div )内添加span.myicon-alert元素:
<div class="alert">
  <span class="myicon-alert"></span>
  .alert
</div>
You can’t apply the myicon-alert directly to the div, because it would inherit the icon font. This is the reason we need the additional span element. But using mixins there’s another way to solve our problem.
您不能将myicon-alert直接应用于div ,因为它将继承图标字体。 这就是我们需要附加span元素的原因。 但是使用mixins可以解决我们的问题。
First, let’s rearrange our icon font in the same way as Glyphicons and build the alert rules using mixins:
首先,让我们以与Glyphicons相同的方式重新排列图标字体,并使用mixins构建alert规则:
/* this replaces the [class^="myicon-"], [class*=" myicon-"] selectors */
.myicon {
  /* catchall properties */
}

.myicon-alert {
  &:before {
    content: "\e600";
  }
}

.alert {
  /* some properties */
  .myicon-alert();
  &:before {
    .myicon();
  }
}
.myicon-alert and .myicon (parentheses can be omitted) refer to the respective classes, and import all their properties inside the .alert rule.
.myicon-alert和.myicon (可以省略括号)引用相应的类,并将它们的所有属性导入.alert规则内。
This is the generated CSS:
这是生成CSS:
.myicon {
  /* catchall properties */
}

.myicon-alert:before {
  content: "\e600";
}

.alert {
  /* some properties */
}

.alert:before {
  content: "\e600";
}

.alert:before {
  /* myicon catchall properties */
}
Now we can minimize the markup and obtain the same result as the previous sample without a span element:
现在,我们可以最小化标记,并获得与之前没有span元素的样本相同的结果:
<div class="alert">
  .alert
</div>
But the generated CSS is redundant: the catchall properties are repeated twice, there are two .alert:before rules, and so on.
但是生成CSS是多余的:catchall属性重复两次,规则中有两个.alert:before ,依此类推。
We can do it more efficiently using the :extend pseudo-class:
我们可以使用:extend伪类更有效地做到这一点:
.alert {
  /* some properties */

  &:before {
    &:extend(.myicon);
    &:extend(.myicon-alert:before);
  }
}
Which produces:
产生:
.myicon,
.alert:before {
   /* myicon catchall properties */
}

.myicon-alert:before,
.alert3:before {
  content: "\e600";
}

.alert {
  /* some properties */
}
Not bad, right?
还不错吧?
走向引导 (Towards Bootstrap)
The above example is just one of many benefits you can get by using Less (or Sass) for icon fonts. So let’s recap the tasks we have to do to rearrange our Icomoon CSS file in the Bootstrap way:
上面的示例只是使用图标字体的Less(或Sass)可获得的许多好处之一。 因此,让我们回顾一下以Bootstrap方式重新排列Icomoon CSS文件所要做的任务:
Change the font path using the
@{icon-font-path}variable (that must be set in our Bootstrap projectvariables.lessfile). I don’t care about the@{icon-font-name}variable (there is also another one:@{icon-font-svg-id}), but you can handle that too if you need.使用
@{icon-font-path}变量(必须在我们的Bootstrap项目variables.less文件中设置)来更改字体路径。 我不在乎@{icon-font-name}变量(还有另一个变量:@{icon-font-svg-id}),但是您也可以根据需要进行处理。Change the catchall selectors (
[class^="myicon-"], [class*=" myicon-"]) in.myicon.改变全部接收选择器(
[class^="myicon-"], [class*=" myicon-"])在.myicon。Change all individual icon classes using the
&selector.使用
&选择器更改所有单个图标类。Rename the file in
my-icons.less重命名
my-icons.less的文件
You can do most of these changes manually, and the individual icon classes can be easily rearranged using a regular expression. Many tools can help you to perform this task, but I usually prefer Bare Bones BBEdit:
您可以手动进行大多数更改,并且可以使用正则表达式轻松重新排列各个图标类。 许多工具可以帮助您执行此任务,但我通常更喜欢Bare Bones BBEdit :
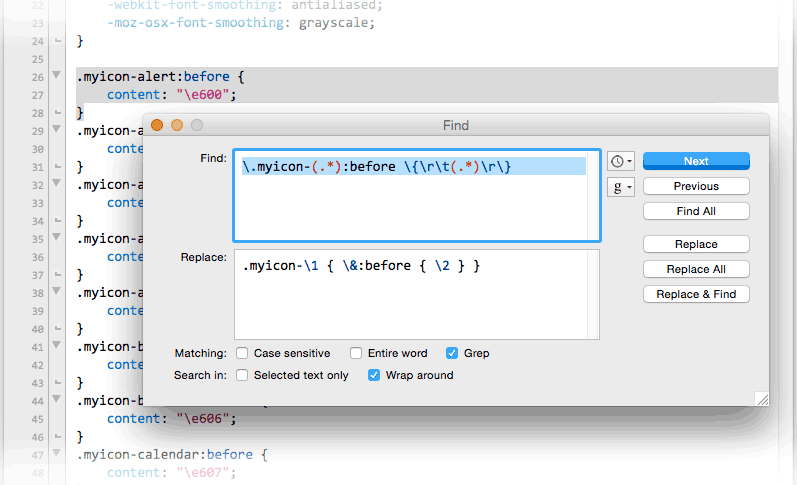
Its handy Search & Replace window, and the well documented support of Grep Patterns make BBEdit a very useful tool for this kind of work. BBEdit is a commercial code editor, but you can use its free “little brother” Text Wrangler to get the same results.
BBEdit方便的“搜索和替换”窗口,以及详细记录的Grep模式支持,使BBEdit成为进行此类工作的非常有用的工具。 BBEdit是商业代码编辑器,但是您可以使用其免费的“小兄弟” Text Wrangler获得相同的结果。
All changes take a few minutes, but you’ll probably need to repeat these tasks many times (especially when a project starts), and it would be useful if the tasks could be automated. Here is when a task runner like Gulp or Grunt, enters the game.
所有更改都需要几分钟,但是您可能需要多次重复执行这些任务(尤其是在项目启动时),如果可以将任务自动化,这将很有用。 这是当任务运行者(例如Gulp或Grunt )进入游戏时。
什么是Gulp? (What is Gulp?)
Gulp and Grunt are JavaScript task runners, in other words, a simple way to automate repetitive tasks. They use JavaScript and are perfect for a front-end developer since they don’t need to learn another language. Both of them only need Node.js to be installed on your computer, and this makes Grunt/Gulp scripts easy to share.
Gulp和Grunt是JavaScript任务执行者,换句话说,是一种自动执行重复任务的简单方法。 他们使用JavaScript,非常适合前端开发人员,因为他们不需要学习其他语言。 他们两个都只需要在计算机上安装Node.js ,这使得Grunt / Gulp脚本易于共享。
I’ve spent a bit of time to help me decide which one of them would be more suitable for this work. The difference is minimal, but I found Gulp to be a little easier, so I prefer it (maybe I’ll change my mind in the future).
我花了一些时间来帮助我确定其中哪一个更适合此工作。 差别很小,但是我发现Gulp稍微容易一些,所以我更喜欢它(也许将来会改变主意)。
Take a look at Craig’s article An Introduction to Gulp.js from last year, if you want an overview.
如果需要概述,请查看Craig去年的文章Gulp.js简介。
安装Gulp (Installing Gulp)
According to the official Gulp getting started guide, to install Gulp you have to perform a few simple steps.
根据Gulp官方入门指南 ,要安装Gulp,您需要执行一些简单的步骤。
Note: If you are already familiar with Gulp and have it installed, you can skip down to the next section.
注意:如果您已经熟悉Gulp并已安装,则可以跳到下一部分。
First of all, you need to install the Node Package Manager for JavaScript (npm). npm comes with the Node.js installer, so you only need to download and run it.
首先,您需要安装Node Package Manager for JavaScript(npm)。 npm带有Node.js安装程序 ,因此您只需下载并运行它。
Once npm is on your computer:
一旦npm在您的计算机上:
- Open the Terminal app (or the Command Prompt on Windows) 打开终端应用程序(或Windows上的命令提示符)
Type
npm install --global gulp键入
npm install --global gulp
On a Mac, you will probably get a lot of errors, since you need to be authenticated as administrator to run this kind of command:
在Mac上,您可能会遇到很多错误,因为您需要通过管理员身份验证才能运行以下命令:
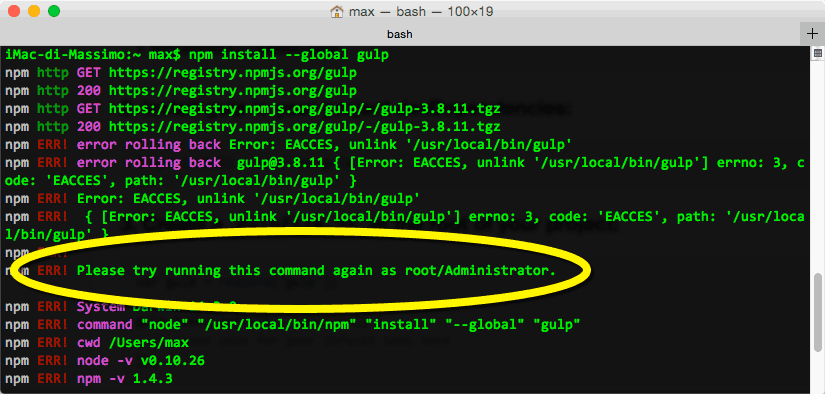
This can be easily solved using the sudo (= super user do) command that allows you to run commands as a top level administrator:
使用sudo (=超级用户do)命令可以轻松解决此问题,该命令允许您以顶级管理员身份运行命令:
sudo npm install --global gulpYou will be asked for your administrator password, and then the installation will start.
系统将要求您输入管理员密码,然后开始安装。
At this point, Gulp will be installed globally on your computer, but you need to install it in your project folder too (on StackOverflow you can find a brief and clear explanation on this).
此时,Gulp将被全局安装在您的计算机上,但您也需要将其安装在项目文件夹中( 在StackOverflow上,您可以找到对此的简要说明)。
To install Gulp locally you have to locate your project folder in the Terminal using the cd (= change directory) command. You can perform this task by simply dragging your project folder into the Terminal / Command Prompt window (after you have typed cd followed by a space):
要在本地安装Gulp,您必须使用cd (=更改目录)命令在终端中找到您的项目文件夹。 您可以通过简单地将项目文件夹拖到“终端/命令提示符”窗口中(在键入cd后键入空格)将其执行:
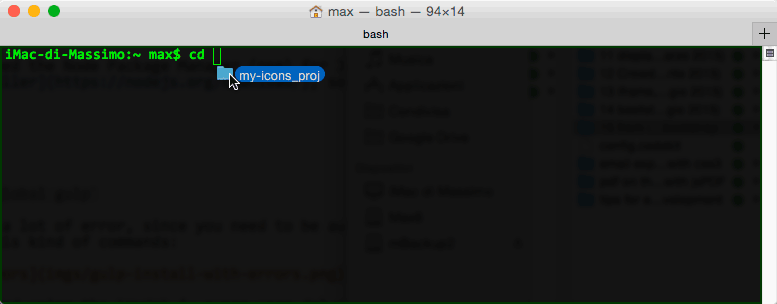
The full path of the folder will be automatically added to the terminal and you will only need to press the return key.
文件夹的完整路径将自动添加到终端,您只需按return键。
Once inside your project folder, type:
进入项目文件夹后,输入:
npm install --save-dev gulpYour Gulp installation is now completed and you will find a node_modules folder inside your project that contains the local Gulp files. Note that if you will need Gulp for other projects, you will have to repeat the local installation for each of them.
Gulp安装现已完成,您将在项目内部找到一个包含本地Gulp文件的node_modules文件夹。 请注意,如果其他项目需要Gulp,则必须为每个项目重复本地安装。
提示:使用Coda终端 (Tip: Using Coda Terminal)
Although the Terminal app is perfect for our purposes, I find that Panic Coda, the application I normally use for development, is particularly suitable for this kind of work.
尽管Terminal应用程序非常适合我们的目的,但我发现我通常用于开发的Panic Coda应用程序特别适合此类工作。
Coda has a built-in Terminal app that can open a local shell inside your project window. The Terminal opens directly in your project folder and you can switch to it without leaving Coda.
Coda具有内置的Terminal应用程序,可以在项目窗口中打开本地外壳。 终端直接在项目文件夹中打开,您无需离开Coda即可切换到该终端。
安装Gulp模块 (Install Gulp Modules)
Besides installing Gulp, we need two modules (Gulp extensions) to perform our task.
除了安装Gulp,我们还需要两个模块 (Gulp扩展)来执行我们的任务。
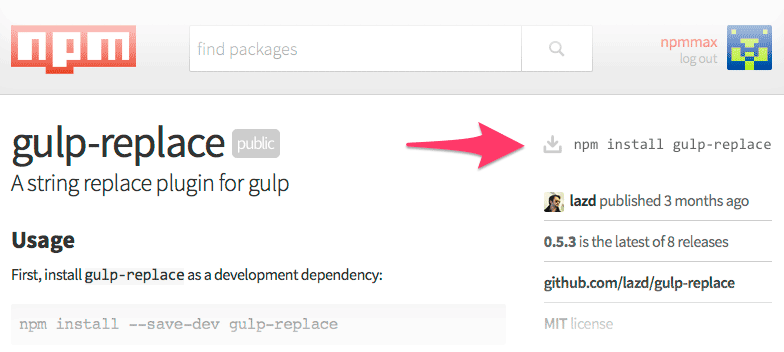
They can be found at the npmjs online repository, and are Gulp Replace and Gulp Rename.
可以在npmjs联机存储库中找到它们,分别是Gulp Replace和Gulp重命名 。
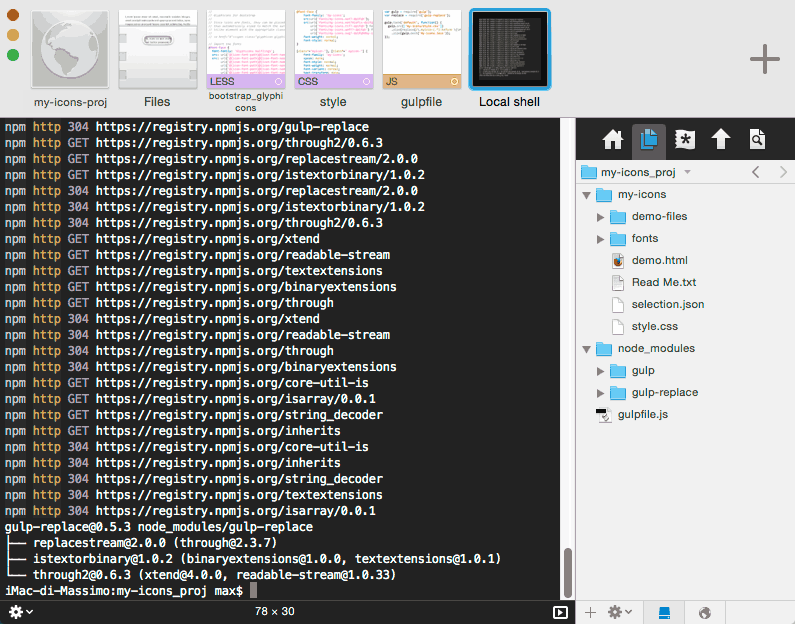
You have to install them locally in the same way you did for Gulp:
您必须以与Gulp相同的方式在本地安装它们:
npm install --save-dev gulp-replace
npm install --save-dev gulp-rename
Note that the install command for each module can be found on its npmjs page:
请注意,每个模块的安装命令都可以在其npmjs页面上找到:
构建gulpfile.js (Building the gulpfile.js)
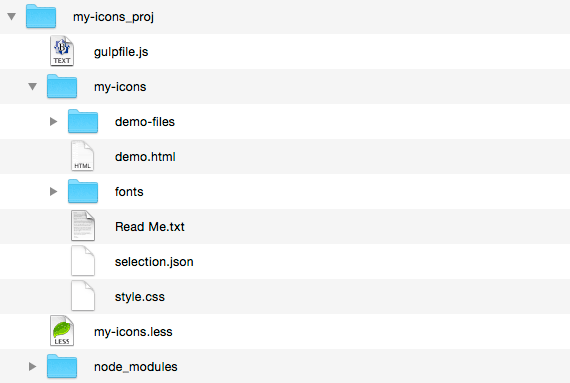
Now we can write our script. When Gulp is launched, it searches for a file named gulpfile.js, so you have to create it at the root of your project.
现在我们可以编写脚本了。 启动Gulp时,它将搜索名为gulpfile.js的文件,因此您必须在项目的根目录下创建它。
This is the content of it:
这是它的内容:
var gulp = require('gulp');
var replace = require('gulp-replace');
var rename = require("gulp-rename");

gulp.task('default', function() {
  gulp.src(['my-icons/style.css'])
    .pipe(replace(/\.myicon-(.*):before \{\n\t(.*)\n\}/g, '.myicon-$1 { \&:before { $2 } }'))
    .pipe(replace(/\[class\^="myicon-"\], \[class\*=" myicon-"\]/, '.myicon'))
    .pipe(replace(/url\('fonts\//g, "url('@{icon-font-path}/"))
    .pipe(rename("my-icons.less"))
    .pipe(gulp.dest('./'));
});
The first three lines load everything we need: Gulp and the two modules we have downloaded, then a task is instantiated: it first loads our source file (my-icons/style.css) and three replaces are performed. Note that we are using the vanilla JavaScript replace syntax and that the RegExp string is the same we’ve previously tested with BBEdit (or the tool you are using).
前三行加载我们需要的一切:Gulp和我们下载的两个模块,然后实例化一个任务:它首先加载我们的源文件( my-icons/style.css )并执行三个替换。 请注意,我们使用的是原始JavaScript替换语法,并且RegExp字符串与我们之前使用BBEdit(或您使用的工具)测试过的字符串相同。
By default, Gulp generates a file with the same name of the source, therefore we need the Gulp Rename module to change it in my-icons.less. The last command tells Gulp the position of the generated file (in this case ./ indicates the same folder as gulpfile.js).
默认情况下,Gulp会生成一个与源名称相同的文件,因此我们需要Gulp重命名模块才能在my-icons.less进行更改。 最后一条命令告诉Gulp生成文件的位置(在这种情况下,. ./表示与gulpfile.js相同的文件夹)。
To perform all of the tasks, simply open the Terminal (or the Command Prompt) at your project root and type gulp.
要执行所有任务,只需在项目根目录下打开终端(或命令提示符),然后输入gulp 。

This will create a my-icons.less file in your project folder root. The original file my-icons/style.css is left untouched, so that the my-icons/demo.html file (in your Icomoon folder) is still available to provide a useful reference to your font glyphs.
这将在项目文件夹根目录中创建一个my-icons.less文件。 原始文件my-icons/style.css保持不变,因此my-icons/demo.html文件(在Icomoon文件夹中)仍然可用,可以为字体字形提供有用的参考。
If you need to update your font, you only have to download the files from Icomoon and run your Gulp task again.
如果您需要更新字体,则只需从Icomoon下载文件并再次运行Gulp任务。
结论 (Conclusion)
Although not mandatory, I found that rearranging the CSS icon file can really improve and speed up the development of a web project (not only if you are using Bootstrap). Gulp can help you in many ways, we have seen here a basic usage, but you can add more actions and speed up your work further.
尽管不是强制性的,但我发现重新排列CSS图标文件确实可以改善和加快Web项目的开发(不仅是在使用Bootstrap的情况下)。 Gulp可以在许多方面为您提供帮助,我们在这里看到了基本用法,但是您可以添加更多操作并进一步加快工作速度。
翻译自: https://www.sitepoint.com/customizing-bootstrap-icons-using-gulp/
gulp定义函数


 422
422

 被折叠的 条评论
为什么被折叠?
被折叠的 条评论
为什么被折叠?
 到【灌水乐园】发言


