


Elixir is a modern, dynamic, functional programming language used to build highly distributed and fault-tolerant applications. Ecto is its main library for working with databases, providing us with tools to interact with databases under a common API, version the database alongside our application, and handle data processing within our application.
Elixir是一种现代,动态,功能性的编程语言,用于构建高度分布式且容错的应用程序。 Ecto是其用于处理数据库的主要库,为我们提供了使用通用API与数据库进行交互,与应用程序一起对数据库进行版本管理以及在应用程序内处理数据的工具。
This article takes a quick look at the major aspects of the Ecto library. Whilst it is written for Ecto 1.x, the examples in this article are forwards compatible with Ecto 2, and where discrepancies lie, they are mentioned. Basic knowledge of Elixir and Mix are assumed.
本文简要介绍了Ecto库的主要方面。 虽然它是为Ecto 1.x编写的,但本文中的示例与Ecto 2正向兼容,并且其中存在差异。 假设有Elixir和Mix的基本知识。
应用程序 (The Application)
We’ll be building a very simple application from scratch that will store and retrieve notes for us. By doing this, we’ll look through each of Ecto’s four main components: repos, schemas, changesets, and queries.
我们将从头开始构建一个非常简单的应用程序,它将为我们存储和检索笔记。 通过这样做,我们将遍历Ecto的四个主要组件:存储库,模式,变更集和查询。
创建一个新的应用程序 (Creating a new application)
Let’s start by generating a new Mix application:
让我们从生成一个新的Mix应用程序开始:
mix new notex --supThe --sup flag generates some additional boilerplate code that’s required for an OTP application. This application needs to have a supervision tree, because Ecto needs it (more on this in a minute).
--sup标志生成OTP应用程序所需的一些其他样板代码。 该应用程序需要有一个监督树,因为Ecto需要它(一分钟内会介绍更多内容)。
设置依赖 (Setting up the dependencies)
Now, let’s update our mix.exs file with some application dependencies. For this, we’re going to want to specify Ecto and one of its adapters. I’ve chosen to use MySQL for this, so we’ll need to specify the Mariaex library (Ecto supports a number of databases).
现在,让我们使用一些应用程序依赖项来更新mix.exs文件。 为此,我们将要指定Ecto及其适配器之一。 我选择为此使用MySQL,因此我们需要指定Mariaex库 (Ecto支持许多数据库 )。
Update the application/0 function in the mix.exs file with the following:
使用以下命令更新mix.exs文件中的application/0函数:
def application do
  [applications: [:logger, :ecto, :mariaex],
   mod: {Notex, []}]
end
And update deps/0 with the following:
并使用以下命令更新deps/0 :
defp deps do
  [{:ecto, "~> 1.1.5"}, # or "~> 2.0" for Ecto 2
   {:mariaex, "~> 0.6.0"}] # or "~> 0.7.0" for Ecto 2
end
Now fetch the dependencies with mix deps.get.
现在,使用mix deps.get获取依赖mix deps.get 。
Next, we need to integrate these dependencies into our application. This will involve creating a new wrapper module for an Ecto repository, updating our application’s supervision tree to start and supervise that new module, and configuring the adapter’s connection information.
接下来,我们需要将这些依赖项集成到我们的应用程序中。 这将涉及为Ecto存储库创建一个新的包装器模块,更新我们的应用程序的监视树以启动和监视该新模块,以及配置适配器的连接信息。
Let’s firstly start by defining a Notex.Repo module at lib/notex/repo.ex with the following code:
首先,我们使用以下代码在lib/notex/repo.ex上定义一个Notex.Repo模块:
defmodule Notex.Repo do
  use Ecto.Repo, otp_app: :notex
end
The location of this module (lib/app_name/repo.ex) is conventional. Any time we use a mix ecto command, it will default to looking for the defined repository at AppName.Repo. We can place it elsewhere, but it will be at the inconvenience of having to specify its location using the -r (or --repo) flag.
该模块的位置( lib/app_name/repo.ex )是常规的。 每当我们使用mix ecto命令时,它将默认在AppName.Repo上查找已定义的存储库。 我们可以将其放置在其他位置,但是使用-r (或--repo )标志指定其位置会带来不便。
The above Notex.Repo module enables us to work with databases using Ecto. It does this by firstly injecting functions from Ecto’s Repo module (that provide the database querying API) and by secondly naming our OTP application as :notex.
上面的Notex.Repo模块使我们能够使用Ecto处理数据库。 它首先通过从Ecto的Repo模块(提供数据库查询API)中注入函数,然后将我们的OTP应用程序命名为:notex 。
An Ecto repository provides us with a common interface to interact with an underlying database (which is decided upon by the adapter being used). As such, whilst Ecto uses the terminology repo, it does not follow the repository design pattern, since it’s a wrapper around a database, not a table.
Ecto存储库为我们提供了一个与底层数据库进行交互的公共接口(由所使用的适配器决定)。 因此,虽然Ecto使用术语库,但它不遵循存储库设计模式,因为它是数据库而不是表的包装。
Now that we have defined the Notex.Repo module, we must now add this to our supervision tree in the Notex module (at lib/notex.ex). Update the start/2 function with the following:
现在我们已经定义了Notex.Repo模块,我们现在必须将其添加到Notex模块中的监督树中(位于lib/notex.ex )。 使用以下命令更新start/2函数:
def start(_type, _args) do
  import Supervisor.Spec, warn: false

  children = [
    supervisor(Notex.Repo, []),
  ]

  opts = [strategy: :one_for_one, name: Notex.Supervisor]
  Supervisor.start_link(children, opts)
end
We’ve added the Notex.Repo module as a child supervisor (since it is itself a supervising OTP app). This means that it will be supervised by our OTP application, and our application will be responsible for starting it upon application startup.
我们已将Notex.Repo模块添加为子监管程序(因为它本身是监管OTP应用程序)。 这意味着它将由我们的OTP应用程序进行监督,并且我们的应用程序将在应用程序启动时负责启动它。
Each connection created with Ecto uses a separate process (where the process is pulled from a process pool using a library called Poolboy). This is done so that our queries can execute concurrently, as well as being resilient from failures (e.g. timeouts). Our application therefore requires OTP, because Ecto has its own processes that need supervising (including a supervision tree supervising a pool of database connections). This can be seen using Erlang’s Observer library, which enables us to visualize the processes in an application.
用Ecto创建的每个连接都使用一个单独的进程(使用称为Poolboy的库从进程池中拉出该进程)。 这样做是为了使我们的查询可以同时执行,并且可以抵抗故障(例如超时)。 因此,我们的应用程序需要OTP,因为Ecto拥有自己的需要监督的进程(包括监督数据库连接池的监督树)。 使用Erlang的Observer库可以看到这一点,该库使我们能够可视化应用程序中的进程。
After having added the repo to our worker processes to be supervised, we need to lastly configure the adapter so that it can communicate with our database. Place the following code at the end of the `config/config.exs` file (updating the details as necessary):
在将仓库添加到要受监视的工作进程之后,我们需要最后配置适配器,以便它可以与我们的数据库通信。 将以下代码放在config / config.exs文件的末尾(根据需要更新详细信息):
config :notex, Notex.Repo,
  adapter: Ecto.Adapters.MySQL,
  database: "notex",
  username: "root",
  password: "root",
  hostname: "localhost"

# uncomment the following line if Ecto 2 is being used
# config :notex, ecto_repos: [Notex.Repo]
Here, we specify the name of our OTP application (:notex) and the name of our freshly defined module (Notex.Repo) for enabling communication with the database. The other configure options should be pretty self-explanatory. Ecto 2 requires us to additionally specify a list of the Ecto repos we are using in our application.
在这里,我们指定OTP应用程序的名称( :notex )和我们新定义的模块( Notex.Repo )的名称,以实现与数据库的通信。 其他配置选项应该很容易解释。 Ecto 2要求我们另外指定我们在应用程序中使用的Ecto存储库的列表。
Ecto actually provides us with a shortcut for setting up the above Repo module as a mix task: mix ecto.gen.repo. This generates the repository module for us and updates the config.exs file with some basic configuration (the Repo module still needs to be manually added to the supervision tree though). I avoided using it here predominantly for didactic reasons of showing how to set up Ecto manually (that, and the fact that the repo generator assumes you’re using Postgres, so we would have had to update the adapter in the config anyway).
Ecto实际上为我们提供了将上述Repo模块设置为混合任务的快捷方式: mix ecto.gen.repo 。 这将为我们生成存储库模块,并使用一些基本配置更新config.exs文件(尽管Repo模块仍需要手动添加到监管树中)。 我之所以避免在这里使用它,主要是出于教学上的原因,说明了如何手动设置Ecto(并且,回购生成器假定您正在使用Postgres,因此无论如何我们都必须更新配置中的适配器)。
Before moving on, let’s take a very quick look at the process hierarchy. (Note that if you’re running Ecto 2, you will firstly need to create the database with mix ecto.create before attempting to compile the project.) Start up our application in Elixir’s interactive shell and then start the observer:
在继续之前,让我们快速看一下流程层次结构。 (请注意,如果您正在运行Ecto 2,则在尝试编译项目之前,首先需要使用mix ecto.create创建数据库。)在Elixir的交互式Shell中启动我们的应用程序,然后启动观察器:
iex -S mix

iex(1)> :observer.start
:ok
Navigating to the Application tab, we can see the application’s processes, including which ones are the supervisors:
导航到“ 应用程序”选项卡,我们可以看到应用程序的流程,包括哪些是主管:
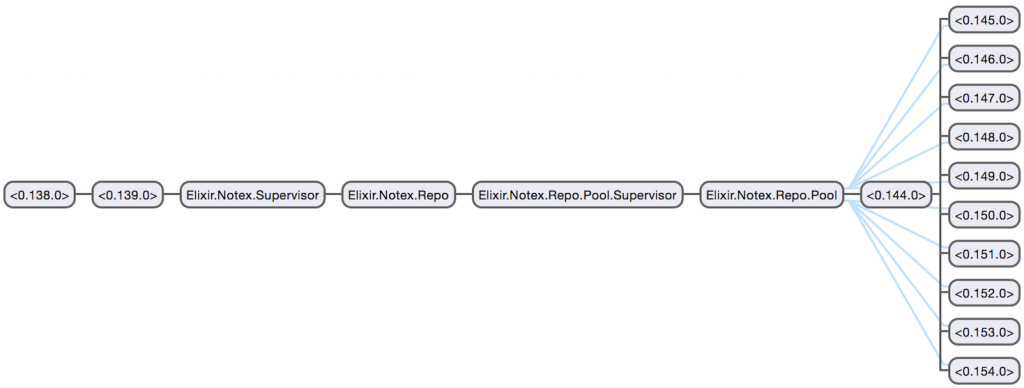
So that’s why this application needs to be an OTP app. But that’s as far down the rabbit hole we’ll be going with respect to processes and OTP in this article. They will be covered in greater detail in later articles to come.
这就是为什么此应用程序需要是OTP应用程序的原因。 但这距离我们在本文中将要讨论的流程和OTP的障碍还很遥远。 它们将在以后的文章中更详细地介绍。
创建数据库和表 (Creating the database and tables)
Now with that setup, we can create our database and tables. To create the database, run the following command:
现在有了该设置,我们可以创建数据库和表。 要创建数据库,请运行以下命令:
mix ecto.createTo create the tables, we’ll use Ecto’s migrations feature. Migrations enable us to version the database alongside the source code, enabling changes to be tracked and different states to be applied. We therefore create new migrations whenever we’d like to change the structure of the database.
要创建表,我们将使用Ecto的迁移功能。 迁移使我们能够与源代码一起对数据库进行版本控制,从而可以跟踪更改并应用不同的状态。 因此,每当我们想要更改数据库的结构时,我们都会创建新的迁移。
A new migration can be created with the mix ecto.gen.migration command as follows:
可以使用mix ecto.gen.migration命令创建新的迁移,如下所示:
mix ecto.gen.migration create_notes_tableThe above should create a new migrations folder at priv/repo/migrations, as well as a new migration file. This file is prefixed with the date and time created (for easy directory ordering), along with our migration name. Open up that file and modify it to the following:
上面的代码应该在priv/repo/migrations处创建一个新的迁移文件夹,以及一个新的迁移文件。 该文件的前缀是创建的日期和时间(以方便目录排序),以及我们的迁移名称。 打开该文件并将其修改为以下内容:
defmodule Notex.Repo.Migrations.CreateNotesTable do
  use Ecto.Migration

  def change do
    create table(:notes) do
      add :note_name, :string
      add :note_content, :string
    end
  end
end
Keeping things simple, we used the create macro to define a new table (called notes) with two fields: note_name and note_content. The primary key is automatically created for us (named id). Whilst both of our fields were defined as simple strings, Ecto supports many types — which you can check out in its documentation.
为简单note_name ,我们使用create宏定义了一个具有两个字段的新表(称为notes ): note_name和note_content 。 将自动为我们创建主键(名为id )。 虽然我们两个字段都定义为简单字符串,但是Ecto支持许多类型-您可以在其文档中查看。
With our migration complete, we can now run the migration with the following command:
迁移完成后,我们现在可以使用以下命令运行迁移:
mix ecto.migrateThis will create our notes table with 3 fields (the third field being id, the primary key).
这将创建包含3个字段的notes表(第三个字段为id ,为主键)。
With the table created, it’s now time to create a model for the table. The model is used to define the fields of the table and their respective types. These will be used by the application and Ecto’s querying DSL when casting and validating the data. Model definitions may also contain virtual fields (unlike migration definitions), which are used to hold typically ephemeral data that we don’t want to persist (such as unhashed passwords).
创建表后,现在该为该表创建模型了。 该模型用于定义表的字段及其各自的类型。 这些将由应用程序和Ecto的查询DSL在投射和验证数据时使用。 模型定义可能还包含虚拟字段(与迁移定义不同),这些虚拟字段通常用于保存我们不想保留的临时数据(例如未加密的密码)。
In its most basic form, our Notex.Note model (located at lib/notex/note.ex) will look like the following:
以其最基本的形式,我们的Notex.Note模型(位于lib/notex/note.ex )将如下所示:
defmodule Notex.Note do
  use Ecto.Schema

  schema "notes" do
    field :note_name, :string
    field :note_content, :string
  end
end
We inject the Ecto.Schema module so that we can use the schema macro to define the fields and their types. These definitions will become important later on when we used Ecto’s changesets. Something else the schema macro does for us is define a struct of the type as the current module (in this case, it’s %Notex.Note{}). This struct will enable us to create new changesets (more on this soon) and insert data into the table.
我们注入Ecto.Schema模块,以便可以使用schema宏定义字段及其类型。 当我们使用Ecto的变更集时,这些定义将变得很重要。 schema宏为我们做的其他事情是将类型的结构定义为当前模块(在本例中为%Notex.Note{} )。 这个结构将使我们能够创建新的变更集(稍后将进行详细介绍)并将数据插入表中。
With just the above, we can fire up IEx and begin querying our database:
通过以上操作,我们可以启动IEx并开始查询数据库:
iex(1)> import Ecto.Query
nil

iex(2)> Notex.Repo.all(from n in Notex.Note, select: n.note_name)
[]
(Console debugging information redacted.)
(控制台调试信息已删除。)
Ecto’s Query module is imported to make all of the querying DSL macros (such as from) available to us in the shell. We then create a simple query to return all records (using all/1), selecting only the note_name field. This returns back an empty list, since we currently have no records in the database. Let’s create a new changeset and insert it into the table:
导入了Ecto的Query模块,以使我们可以在外壳中使用所有查询DSL宏(例如from )。 然后,我们创建一个简单的查询以返回所有记录(使用all/1 ),仅选择note_name字段。 这将返回一个空列表,因为我们当前在数据库中没有记录。 让我们创建一个新的变更集并将其插入表中:
iex(1)> import Ecto.Query
nil

iex(2)> changeset = Ecto.Changeset.change(%Notex.Note{note_name: "To Do List", note_content: "Finish this article"})
%Ecto.Changeset{action: nil, changes: %{}, constraints: [], errors: [],
 filters: %{},
 model: %Notex.Note{__meta__: #Ecto.Schema.Metadata<:built>, id: nil,
  note_content: "Finish this article", note_name: "To Do List"}, optional: [], opts: [],
 params: nil, prepare: [], repo: nil, required: [],
 types: %{id: :id, note_content: :string, note_name: :string}, valid?: true,
 validations: []}

iex(3)> Notex.Repo.insert(changeset)
{:ok,
 %Notex.Note{__meta__: #Ecto.Schema.Metadata<:loaded>, id: 2,
  note_content: "Finish this article", note_name: "To Do List"}}

iex(4)> Notex.Repo.all(from n in Notex.Note, select: n.note_name)
["To Do List"]
(Console debugging information redacted.)
(控制台调试信息已删除。)
We start by importing Ecto.Query again, which is needed for the last fetch operation (specifically for the from macro). We then use the change/1 function from Ecto.Changeset to create a new changeset using a %Notex.Note{} struct. This changeset is then inserted, and then retrieved.
我们从再次导入Ecto.Query开始,这是最后一次获取操作所需的(特别是from宏)。 然后,我们使用Ecto.Changeset的change/1函数使用%Notex.Note{}结构创建一个新的变更集。 然后插入此变更集,然后进行检索。
Changesets are what we use when working with records. They enable us to track changes to the data prior to insertion, as well as validating those changes and casting their values to the correct data types (according to our schema definition). As we can see from the above, the %Ecto.Changeset{} struct contains a number of members that will be useful for seeing if the changes are valid (changeset.valid?), what the errors are if they weren’t (changeset.errors), and so on.
变更集是我们在处理记录时使用的。 它们使我们能够在插入之前跟踪对数据的更改,以及验证这些更改并将其值转换为正确的数据类型(根据我们的架构定义)。 我们可以从上面看到, %Ecto.Changeset{}结构包含多个成员的更改是否会是有效的(这将是有益的看到changeset.valid?有什么错误,如果他们不是( changeset.errors ),等等。
Let’s update the Notex.Note model to demonstrate some changesets and query operations, since performing these in IEx is getting a little messy:
让我们更新Notex.Note模型以演示一些变更集和查询操作,因为在IEx中执行这些操作会有些混乱:
defmodule Notex.Note do
  use Ecto.Schema

  import Ecto.Changeset, only: [cast: 4]
  import Ecto.Query, only: [from: 2]

  alias Notex.Note
  alias Notex.Repo

  schema "notes" do
    field :note_name, :string
    field :note_content, :string
  end

  @required_fields ~w(note_name)
  @optional_fields ~w(note_content)

  def insert_note(%{} = note) do
    %Note{}
    |> cast(note, @required_fields, @optional_fields)
    |> Repo.insert!
  end

  def get_notes do
    query = from n in Note,
      select: {n.id, n.note_name}

    query
    |> Repo.all
  end

  def get_note(note_id) do
    Repo.get!(Note, note_id)
  end

  def update_note(%{"id" => note_id} = note_changes) do
    Repo.get!(Note, note_id)
    |> cast(note_changes, @required_fields, @optional_fields)
    |> Repo.update!
  end

  def delete_note(note_id) do
    Repo.get!(Note, note_id)
    |> Repo.delete!
  end
end
Let’s go through each of the five new functions. The insert_note/1 function creates a new note for us. The cast/4 function handles the casting of data from the input fields to their respective field types (according to our schema definition), as well as ensuring that all required fields have values. The changeset returned from cast/4 is then inserted into the database. Note that in Ecto 2, the cast/3 and validate_required/3 functions should be used instead of cast/4.
让我们逐一介绍这五个新功能。 insert_note/1函数为我们创建一个新注释。 cast/4函数处理将数据从输入字段转换为各自的字段类型(根据我们的架构定义),并确保所有必填字段都具有值。 然后将从cast / 4返回的变更集插入数据库中。 请注意,在Ecto 2中,应使用cast/3和validate_required/3函数而不是cast/4 。
The get_notes/0 function returns a list of tuples of all notes in the table. This is done through pattern matching in the select statement. (We could quite easily have returned a list of maps instead with select: %{id: n.id, note_name: n.note_name}, for example.)
get_notes/0函数返回表中所有注释的元组列表。 这是通过select语句中的模式匹配完成的。 (例如,我们可以很容易地返回地图列表,而不是select: %{id: n.id, note_name: n.note_name} 。)
The get_note/1 function retrieves a single note from the table according to the note ID. This is done via the get! function, which either returns the note upon success or throws upon failure.
get_note/1函数根据注释ID从表中检索单个注释。 这是通过get!完成的get! 函数,该函数将在成功时返回注释或在失败时引发。
The update_note/1 function updates a note according to the supplied note ID. Notice the string key in the map of the function signature (the id key). This is a convention I’ve taken from the Phoenix framework, where unsanitized data (typically user-supplied) is represented in maps with string keys, and sanitized data is represented in maps with atom keys. To perform the update, we first retrieve the note according to its ID from the database, then use the cast/4 function to apply the changes to the record before finally inserting the updated changeset back into the database.
update_note/1函数根据提供的注释ID更新注释。 注意函数签名的映射中的字符串键( id键)。 这是我从Phoenix框架中获得的约定,其中未净化的数据(通常由用户提供)在带有字符串键的映射中表示,而已净化的数据在带有原子键的映射中表示。 要执行更新,我们首先根据其ID从数据库中获取注释,然后使用cast/4函数将更改应用于记录,最后将更新的更改集重新插入数据库。
The delete_note/1 function removes a note from the database. We firstly fetch the note from the database via its ID (similar to the update_note/1 function), and then delete it using the returned Note struct.
delete_note/1函数从数据库中删除注释。 我们首先通过数据库的ID(类似于update_note/1函数)从数据库中获取该注释,然后使用返回的Note结构将其删除。
With the above CRUD operations in place, let’s jump back into IEx and try it out:
完成上述CRUD操作后,让我们跳回到IEx并尝试一下:
iex(1)> alias Notex.Note
nil

iex(2)> Note.insert_note(%{"note_name" => "To Do's", "note_content" => "Finish this article..."})
{:ok,
 %Notex.Note{__meta__: #Ecto.Schema.Metadata<:loaded>, id: 6,
  note_content: "Finish this article...", note_name: "To Do's"}}

iex(3)> Note.get_notes
[{6, "To Do's"}]

iex(4)> Note.get_note(6)
%Notex.Note{__meta__: #Ecto.Schema.Metadata<:loaded>, id: 6,
 note_content: "Finish this article...", note_name: "To Do's"}

iex(5)> Note.update_note(%{"id" => 6, "note_name" => "My To Do List"})
{:ok,
 %Notex.Note{__meta__: #Ecto.Schema.Metadata<:loaded>, id: 6,
  note_content: "Finish this article...", note_name: "My To Do List"}}

iex(6)> Note.get_note(6)
%Notex.Note{__meta__: #Ecto.Schema.Metadata<:loaded>, id: 6,
 note_content: "Finish this article...", note_name: "My To Do List"}

iex(7)> Note.delete_note(6)
{:ok,
 %Notex.Note{__meta__: #Ecto.Schema.Metadata<:deleted>, id: 6,
  note_content: nil, note_name: nil}}

iex(8)> Note.get_notes
[]
(Console debugging information redacted.)
(控制台调试信息已删除。)
And there we have it, a basic CRUD application using Ecto! We could render the output and make the API nicer to query against, but I’ll leave that as an extension, since those are tangential to what we are covering (and this article is long enough, I think).
有了我们,它是使用Ecto的基本CRUD应用程序! 我们可以渲染输出并使API更易于查询,但是我将其保留为扩展,因为这些内容与我们要介绍的内容相切(我认为这篇文章足够长)。
结论 (Conclusion)
This article has looked at the fundamentals of Ecto by creating a simple CRUD application from scratch. We’ve seen the many abilities Ecto packs to manage records and database changes, including migrations, schemas, and its querying DSL, along with touching upon tangential topics such as OTP. I hope this has served as a good primer for those looking to get up to speed in working with databases in Elixir!
本文通过从头开始创建一个简单的CRUD应用程序研究了Ecto的基础知识。 我们已经看到了Ecto包具有许多管理记录和数据库更改的功能,包括迁移,模式及其查询DSL,以及涉及切线主题(如OTP)。 我希望这对于希望快速使用Elixir的数据库的人来说是一个很好的入门!
In my next article, I look at the basics of Elixir’s Ecto Querying DSL.
在下一篇文章中,我将介绍Elixir的Ecto Querying DSL的基础知识。
翻译自: https://www.sitepoint.com/introduction-to-elixirs-ecto-library/


 575
575

 被折叠的 条评论
为什么被折叠?
被折叠的 条评论
为什么被折叠?
 到【灌水乐园】发言


