


Apache Maven is a build automation tool with the purpose of building, reporting, and creating documentation of projects. It builds projects using a Project Object Model (POM) and a set of plugins shared by all projects using Maven, thus providing a uniform build system. Once you familiarize yourself with how one Maven project builds, you automatically know how all Maven projects build. This saves you an immense amount of time from trying to navigate the build process of many different projects.
Apache Maven是一个构建自动化工具,旨在构建,报告和创建项目文档。 它使用项目对象模型(POM)和所有Maven所有项目共享的插件集来构建项目,从而提供统一的构建系统。 一旦熟悉了一个Maven项目的构建方式,您就会自动知道所有Maven项目的构建方式。 这为您节省了尝试浏览许多不同项目的生成过程的大量时间。
Through this article you will gain familiarity with Maven for PHP, and how to install and use the PHP-Maven plugin from the command line and in Eclipse.
通过本文,您将熟悉Maven for PHP,以及如何从命令行和Eclipse中安装和使用PHP-Maven插件。
安装Maven (Install Maven)
PHP-Maven uses the power of Maven for building, reporting, and creating documentation of your PHP projects. It adapts the Maven build life cycle to the PHP world while fully supporting PHP 5. PHP-Maven uses PHPUnit for unit testing and phpDocumentor for creating the project documentation.
PHP-Maven使用Maven的功能来构建,报告和创建PHP项目的文档。 它在完全支持PHP 5的同时使Maven构建生命周期适应PHP世界。PHP-Maven使用PHPUnit进行单元测试,并使用phpDocumentor创建项目文档。
To install Maven:
要安装Maven:
Download Maven from http://maven.apache.org/download.cgi. For this article, the version is 3.0.4.
从http://maven.apache.org/download.cgi下载Maven。 对于本文,版本为3.0.4。
Unpack the archive wherever you would like to store the binaries, and a folder named
apache-maven-<version>will be created.将存档解压缩到您想要存储二进制文件的任何位置,然后将创建一个名为
apache-maven-<version>的文件夹。Add its
binfolder to yourPATH.将其
bin文件夹添加到PATH。Make sure
JAVA_HOMEis set to the location of your JDK.确保将
JAVA_HOME设置为JDK的位置。
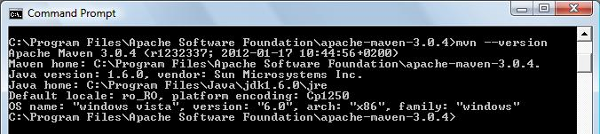
After you’ve completed the above steps, to test whether Maven is installed correctly or not you should run mvn --version at a command prompt.
完成上述步骤后,要测试Maven是否正确安装,应在命令提示符下运行mvn --version 。
Once Maven is successfully installed, go to the settings.xml file (found in ~/.m2 on Unix/Mac OS X and in C:Documents and Settingsusername.m2 on Windows) and add the PHP for Maven repository. If there is no settings.xml file, you must create it.
成功安装Maven后,转到settings.xml文件(在Unix / Mac OS X上的~/.m2 C:Documents and Settingsusername.m2 Windows的C:Documents and Settingsusername.m2中找到),然后添加PHP for Maven存储库。 如果没有settings.xml文件,则必须创建它。
Below is a sample settings.xml file:
以下是一个示例settings.xml文件:
<settings>
 <profiles>
  <profile>
   <id>profile-php-maven</id>
   <pluginRepositories>
    <pluginRepository>
     <id>release-repo1.php-maven.org</id>
     <name>PHP-Maven 2 Release Repository</name>
     <url>http://repos.php-maven.org/releases</url>
     <releases>
      <enabled>true</enabled>
     </releases>
    </pluginRepository>

    <pluginRepository>
     <id>snapshot-repo1.php-maven.org</id>
     <name>PHP-Maven 2 Snapshot Repository</name>
     <url>http://repos.php-maven.org/snapshots</url>
     <releases>
      <enabled>false</enabled>
     </releases>
     <snapshots>
      <enabled>true</enabled>
     </snapshots>
    </pluginRepository>
   </pluginRepositories>

   <repositories>
    <repository>
     <id>release-repo1.php-maven.org</id>
     <name>PHP-Maven 2 Release Repository</name>
     <url>http://repos.php-maven.org/releases</url>
     <releases>
      <enabled>true</enabled>
     </releases>
    </repository>

    <repository>
     <id>snapshot-repo1.php-maven.org</id>
     <name>PHP-Maven 2 Snapshot Repository</name>
     <url>http://repos.php-maven.org/snapshots</url>
     <releases>
      <enabled>false</enabled>
     </releases>
     <snapshots>
      <enabled>true</enabled>
     </snapshots>
    </repository>
   </repositories>
  </profile>
 </profiles>

 <activeProfiles>
  <activeProfile>profile-php-maven</activeProfile>
 </activeProfiles>
</settings>
创建您的第一个项目 (Create Your First Project)
To create a simple project from the command line I’ll use the Maven Archetype Plugin. The Archetype Plugin allows a user to create a Maven project from an existing template called an archetype. You can run the Maven Archetype plugin with the mvn archetype:generate command to generate a new project from an archetype, in a folder corresponding to its artifact ID.
要从命令行创建一个简单的项目,我将使用Maven Archetype插件 。 原型插件允许用户从称为原型的现有模板创建Maven项目。 您可以使用mvn archetype:generate命令运行Maven Archetype插件,以根据原型在其工件ID对应的文件夹中从原型生成新项目。

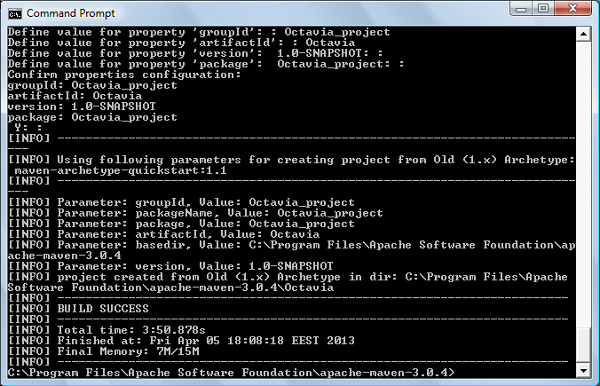
Maven will start downloading all the dependencies needed to your computer. At some point, Maven will ask you to define a value for groupId, artifactId, version and package, as you see here:
Maven将开始将所有需要的依赖项下载到您的计算机。 有时,Maven会要求您为groupId , artifactId , version和package定义一个值,如下所示:
Notice that at the official Maven Archetype Plugin page you will find all the available parameters along with their description.
请注意,在Maven原型插件的官方页面上,您会找到所有可用的参数及其说明。
After successfully creating your first project, you should find the following in the corresponding folder, in my case Octavia_project:
成功创建第一个项目后,您应该在相应的文件夹中找到以下内容,在我的情况下为Octavia_project :
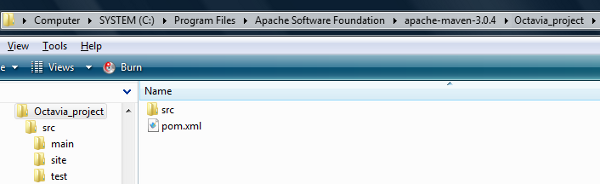
src/main/php– contains the project’s source code.src/main/php–包含项目的源代码。src/test/php– contains the project’s test code.src/test/php–包含项目的测试代码。src/site– contains the project’s site descriptor.src/site–包含项目的站点描述符。pom.xml– contains the project’s POM description.pom.xml–包含项目的POM描述。
The contents of pom.xml looks like this:
pom.xml的内容如下所示:
<?xml version="1.0" encoding="UTF-8"?>
<project xmlns="http://maven.apache.org/POM/4.0.0"
 xmlns:xsi="https://www.w3.org/2001/XMLSchema-instance"
 xsi:schemaLocation="http://maven.apache.org/POM/4.0.0 http://maven.apache.org/xsd/maven-4.0.0.xsd">

 <parent>
  <groupId>org.phpmaven</groupId>
  <artifactId>php-parent-pom</artifactId>
  <version>2.0.2</version>
 </parent>

 <modelVersion>4.0.0</modelVersion>
 <groupId>org.phpsample</groupId>
 <artifactId>Octavia_project</artifactId>
 <packaging>php</packaging>
 <version>1.0-SNAPSHOT</version>
 <build>
  <plugins>
   <plugin>
    <groupId>org.phpmaven</groupId>
    <artifactId>maven-php-plugin</artifactId>
    <extensions>true</extensions>
   </plugin>

   <plugin>
    <groupId>org.apache.maven.plugins</groupId>
    <artifactId>maven-site-plugin</artifactId>
    <version>3.0</version>
    <configuration>
     <reportPlugins>
      <plugin>
       <groupId>org.phpmaven</groupId>
       <artifactId>maven-php-plugin</artifactId>
       <reportSets>
        <reportSet>
         <reports>
          <report>phpdocumentor</report>
          <report>phpunit-coverage</report>
          <report>phpunit</report>
         </reports>
        </reportSet>
       </reportSets>
      </plugin>
     </reportPlugins>
    </configuration>
   </plugin>
  </plugins>
 </build>

 <dependencies>
  <!--  phpUnit for PHP 5 -->
  <dependency>
   <groupId>de.phpunit</groupId>
   <artifactId>PHPUnit</artifactId>
   <version>3.6.10</version>
   <type>phar</type>
  </dependency>
 </dependencies>
</project>
The test phase comes after creating your application, and for that you need the PHPUnit dependency. If it’s missing, be sure to add it to your pom.xml as shown above.
测试阶段是在创建应用程序之后进行的,为此,您需要PHPUnit依赖项。 如果丢失,请确保如上所示将其添加到pom.xml中。
The PHPUnit tests should be place into the src/test/php folder and a test should be named SomthingTest.php, that is, the suffix “Test.php” is a must. My test, MyTest.php, is listed below:
必须将PHPUnit测试放置在src/test/php文件夹中,并将测试命名为Somthing Test.php ,即,后缀“ Test.php”是必须的。 我的测试MyTest.php列出如下:
<?php
class MyTest extends PHPUnit_Framework_TestCase
{
public function testBar() {
include "org/sample/app.php";
$this->fail("we will fail");
}
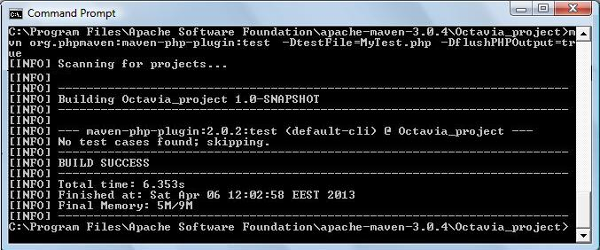
}To execute a test you use the command mvn test. In the official documentation has a section How to Ignore Failing Tests, and you can find there some commands that may help you run your test. (The only command that actually worked for me was the one that executed a single test.)
要执行测试,请使用命令mvn test 。 在官方文档中有一节如何忽略失败的测试 ,您可以在其中找到一些可以帮助您运行测试的命令。 (唯一对我有用的命令是执行单个测试的命令。)
To build your newly created Maven project, you run the command mvn:package. You will notice again that Maven automatically starts downloading any dependencies needed for your project.
要构建新创建的Maven项目,请运行命令mvn:package 。 您会再次注意到,Maven自动开始下载项目所需的所有依赖项。
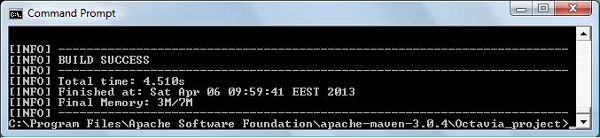
After downloading all needed dependencies and performing the build actions, you should get the following success message:
下载所有必需的依赖项并执行构建操作后,您应该获得以下成功消息:
To create documentation from the project, you’ll need the phpDocumentor 2 PEAR package. In the src/site folder, create the site.xml file with the following contents:
要从项目创建文档,您需要phpDocumentor 2 PEAR包 。 在src/site文件夹中,创建具有以下内容的site.xml文件:
<?xml version="1.0" encoding="ISO-8859-1"?>
<project name="Maven">
 <version position="left" />

 <skin>
  <groupId>org.apache.maven.skins</groupId>
  <artifactId>maven-stylus-skin</artifactId>
  <version>1.0</version>
 </skin>
 <body>
  <links>
   <item name="PHP-Maven" href="http://www.php-maven.org/" />
  </links>

  <menu name="Main">
   <item name="Welcome" href="index.html" />
  </menu>

  <menu ref="reports" />
 </body>
</project>
Next run the mvn site command and you’ll find the results in the target/site folder.
接下来运行mvn site命令,您将在target/site文件夹中找到结果。
Eclipse整合 (Eclipse Integration)
The php-maven plugin supports integration with the Eclipse IDE, but it doesn’t contain the php-maven plugin by default. You need to integrate it manually. To do that, follow these steps:
php-maven插件支持与Eclipse IDE集成,但是默认情况下它不包含php-maven插件。 您需要手动集成它。 为此,请按照下列步骤操作:
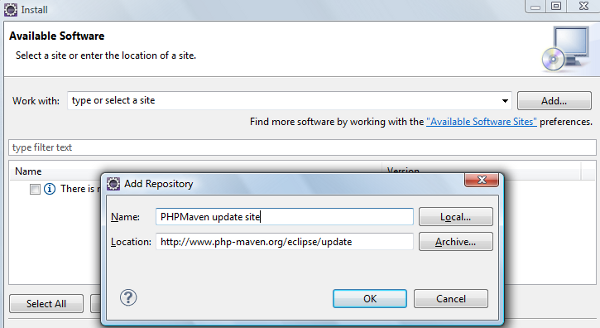
- From the Help menu, choose Install New Software option and then press the “Add…” button. 从“帮助”菜单中,选择“安装新软件”选项,然后按“添加...”按钮。
In the Add Repository window enter the name: “PHPMaven update site” and URL http://www.php-maven.org/eclipse/update.
在“添加存储库”窗口中,输入名称:“ PHPMaven更新站点”和URL http://www.php-maven.org/eclipse/update 。
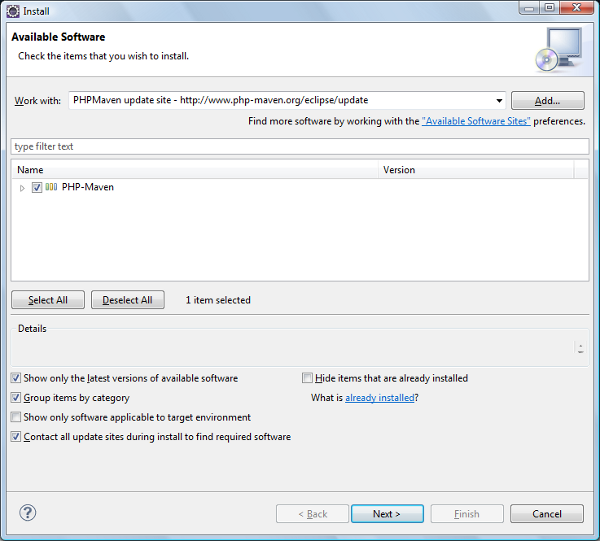
- The PHPMaven update site is listed and you can choose the PHP-Maven option. 列出了PHPMaven更新站点,您可以选择PHP-Maven选项。
- Hit Next/Finish to install the plugins. 点击下一步/完成以安装插件。
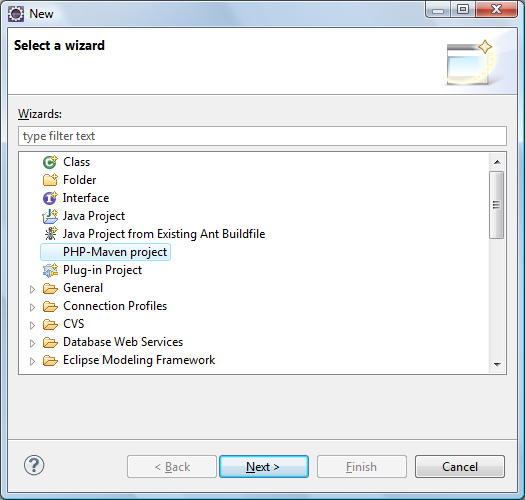
After the installation you will find the PHP-Maven project option when you go to create a new project. Select it, and press Next in order to install the plugin.
安装完成后,您将在创建新项目时找到PHP-Maven项目选项。 选择它,然后按Next(下一步)以安装插件。
To create a new project within Eclipse, select File > New > Other (or press the CTRL + N combination) and you should see something like in the image below:
要在Eclipse中创建一个新项目,请选择File> New> Other(或按CTRL + N组合键),您将在下图中看到类似的内容:
After pressing the Next button you will receive a list of different archetypes.
按下“下一步”按钮后,您将收到不同原型的列表。
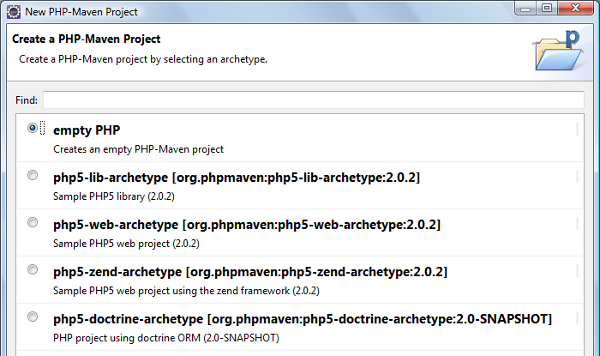
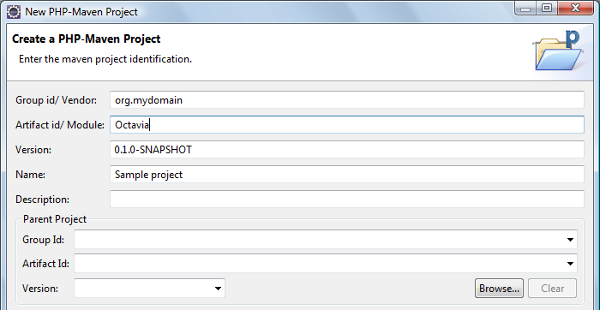
Choose your artifact and you will be prompted for the project information, just like earlier on the command prompt.
选择您的工件,就像前面在命令提示符下一样,系统将提示您输入项目信息。
The new project will be added to the Project Explorer tab. The folder structure is mostly similar to the one for the project created from command line.
新项目将添加到“项目资源管理器”选项卡。 文件夹结构与从命令行创建的项目的文件夹结构最相似。
After you create the project, right click on it and you’ll see the PHP-Maven option at the bottom of the menu, and its children list the most important phases of a PHP-Maven project.
创建项目后,右键单击它,您将在菜单底部看到PHP-Maven选项,其子项列出了PHP-Maven项目的最重要阶段。

摘要 (Summary)
In this article you’ve learned how to install and use the PHP-Maven plugin from the command line and in Eclipse. Maven for PHP is a capable build automation tool for the PHP platform. Using Maven, the user only needs to provide the configuration for the project, while the configurable plugins do the work of compiling the project, running unit tests, generating API documentation and so on. Maven for PHP will quickly become a necessary tool in the PHP developer’s toolbox.
在本文中,您学习了如何从命令行和Eclipse中安装和使用PHP-Maven插件。 Maven for PHP是适用于PHP平台的功能强大的构建自动化工具。 使用Maven,用户只需要提供项目的配置,而可配置的插件就可以完成项目的编译,运行单元测试,生成API文档等工作。 Maven for PHP将Swift成为PHP开发人员工具箱中的必要工具。
Image via Fotolia
图片来自Fotolia


 627
627

 被折叠的 条评论
为什么被折叠?
被折叠的 条评论
为什么被折叠?
 到【灌水乐园】发言


