


openbiz
In the first part of this series we talked about the development challenges we face and how Openbiz Cubi can help by providing a solid, ready-to-use web application framework. In this part we’ll see how to build our own module and dive a bit deeper into the core architecture of the framework.
在本系列的第一部分中,我们讨论了我们面临的开发挑战以及Openbiz Cubi如何通过提供一个可靠的,随时可用的Web应用程序框架来提供帮助。 在这一部分中,我们将看到如何构建自己的模块,并更深入地研究框架的核心体系结构。
构建第一个模块 (Build the First Module)
Let’s get to the exciting part – creating a module; we’ll start with a simple customer editing page. On this page users can create, update, and delete customers.
让我们进入令人兴奋的部分–创建模块; 我们将从一个简单的客户编辑页面开始。 用户可以在此页面上创建,更新和删除客户。
First let’s make a database table customer. The SQL to create the table is:
首先,让我们成为数据库表customer 。 创建表SQL是:
CREATE TABLE customer (
  id INTEGER NOT NULL AUTO_INCREMENT,
  name VARCHAR(64) NOT NULL,
  description VARCHAR(255) DEFAULT NULL,
  address VARCHAR(255) DEFAULT NULL,
  phone VARCHAR(20) DEFAULT NULL,
  fax VARCHAR(20) DEFAULT NULL,
  status INTEGER DEFAULT NULL,
  create_by INTEGER DEFAULT '1',
  create_time DATETIME DEFAULT NULL,
  update_by INTEGER DEFAULT '1',
  update_time DATETIME DEFAULT NULL,
  PRIMARY KEY (id)
)
ENGINE=InnoDB
The next step to creating a module is to create the XML metadata files for the customer editing page. Here we use gen_meta, the metadata generation command under the cubi/bin/tools directory.
创建模块的下一步是为客户编辑页面创建XML元数据文件。 在这里,我们使用gen_meta ,即cubi/bin/tools目录下的元数据生成命令。
/dev/cubi/bin/tools$ php gen_meta.php Default customer
You can simply press the Enter key to complete the wizard. After the command executes, the following files are generated:
您只需按Enter键即可完成向导。 命令执行后,将生成以下文件:
Module configuration file
模块配置文件
modules/customer/mod.xmlmodules/customer/mod.xml
Module DO file
模块DO文件
modules/customer/do/CustomerDO.xmlmodules/customer/do/CustomerDO.xml
Module Form file
模块表格文件
modules/customer/form/CustomerListForm.xmlmodules/customer/form/CustomerListForm.xmlmodules/customer/form/CustomerDetailForm.xmlmodules/customer/form/CustomerDetailForm.xmlmodules/customer/form/CustomerEditForm.xmlmodules/customer/form/CustomerEditForm.xmlmodules/customer/form/CustomerNewForm.xmlmodules/customer/form/CustomerNewForm.xmlmodules/customer/form/CustomerCopyForm.xmlmodules/customer/form/CustomerCopyForm.xml
Module View file
模块查看文件
modules/customer/view/CustomerListView.xmlmodules/customer/view/CustomerListView.xml
Module Widget files
模块小部件文件
modules/customer/widget/DashboardForm.xmlmodules/customer/widget/DashboardForm.xmlmodules/customer/widget/LeftMenu.xmlmodules/customer/widget/LeftMenu.xml
Module Template files
模块模板文件
modules/customer/template/detail.tplmodules/customer/template/detail.tplmodules/customer/template/detail_elementset.tplmodules/customer/template/detail_elementset.tplmodules/customer/template/grid.tplmodules/customer/template/grid.tplmodules/customer/template/view.tplmodules/customer/template/view.tpl
Next we load the newly created module with the load_module command.
接下来,我们使用load_module命令加载新创建的模块。
/dev/cubi/bin/tools/php$ load_module.php customer
Start loading customer module ...
--------------------------------------------------------
[2013-01-26T17:57:16+08:00] Loading module customer
[2013-01-26T17:57:16+08:00] Install Module customer
[2013-01-26T17:57:16+08:00] Install Module ACL.
[2013-01-26T17:57:16+08:00] Install Module Menu.
[2013-01-26T17:57:16+08:00] Install Module Widget.
[2013-01-26T17:57:16+08:00] Install Module Resource.
[2013-01-26T17:57:16+08:00] Install Module Change Logs.
[2013-01-26T17:57:16+08:00] Copy resource files to /cubi/resources folder.
[2013-01-26T17:57:16+08:00] customer is loaded.

Give admin to access all actions of module 'customer'
--------------------------------------------------------
End loading customer module
Let’s test the module. If you are already logged in to Cubi, log out and log back in again. You should see a new tab named “Customer” appearing in the header section. Click the tab to enter the Customer Dashboard page, then click the Customer Manage link to enter the customer management page. Now we’re able to create, update, search, and delete customers.
让我们测试一下模块。 如果您已经登录到Cubi,请注销并再次登录。 您应该在标题部分看到一个名为“客户”的新标签。 单击选项卡进入“客户仪表板”页面,然后单击“客户管理”链接进入客户管理页面。 现在,我们可以创建,更新,搜索和删除客户。
引擎盖下 (Under the Hood)
You may wonder without any programming, how does Openbiz Cubi make everything work? In the previous steps, gen_meta created XML files under the customer module folder. Cubi then knows how to interpret these files. Let’s visit the module description file mod.xml first.
您可能想知道,没有任何编程,Openbiz Cubi如何使一切正常工作? 在前面的步骤中, gen_meta在客户模块文件夹下创建了XML文件。 然后Cubi知道如何解释这些文件。 让我们首先访问模块描述文件mod.xml 。
模块描述文件 (Module Description File)
We created the customer module with mod.xml under the modules/customer directory.
我们在modules/customer目录下使用mod.xml创建了客户模块。
<?xml version="1.0" standalone="no"?>
<Module Name="customer" Description="customer module" Version="0.1.0" OpenbizVersion="3.0">
 <ACL>
  <Resource Name="customer">
   <Action Name="Access" Description="Access Customer Module Dashboard"/>
  </Resource>
  <Resource Name="customer">
   <Action Name="Access" Description="Access Customer"/>
   <Action Name="Manage" Description="Manage Customer"/>
  </Resource>
 </ACL>
 <Menu>
  <MenuItem Name="CustomerTop" Title="Customer" Description="Customer Description" URL="/customer/dashboard" Parent="" Order="10">
   <MenuItem Name="Customer" Title="Customer" Description="Customer description" URL="" Order="10">
    <MenuItem Name="Customer.List" Title="Customer Manage" Description=""  URL="/customer/customer_list" Order="10"/>
   </MenuItem>
  </MenuItem>
 </Menu>
 <Dependency>
  <Module Name="system"/>
 </Dependency>
</Module>
mod.xml contains 3 sections:
mod.xml包含3个部分:
Access control – the
ACLsection defines the resources and their actions. These definitions are used to control permissions for given roles.访问控制–
ACL部分定义了资源及其动作。 这些定义用于控制给定角色的权限。Menu – the
Menusection defines the page links in the navigation system (application tabs, breadcrumb, and menus).菜单–“
Menu部分定义了导航系统中的页面链接(应用程序选项卡,面包屑和菜单)。Dependencies – the
Dependencysection defines modules that the current module depends on. The depended modules should be installed first.依赖关系–“
Dependency部分定义了当前模块所依赖的模块。 依赖的模块应首先安装。
Usually each module includes its own data models and presentation XML files. The framework has a metadata engine that can then understand the XML and load the data and UI objects on the fly. The framework mainly work with two types of metadata objects:
通常,每个模块都包含自己的数据模型和表示XML文件。 该框架具有一个元数据引擎,该引擎可以随后理解XML并动态加载数据和UI对象。 该框架主要处理两种类型的元数据对象:
- Data objects – Cubi maps physical data stores (such as a database table) to logic objects. 数据对象– Cubi将物理数据存储区(例如数据库表)映射到逻辑对象。
- Form and view objects – Form objects describe how to present data objects’ data on a block in a page, while view objects define a container of Form objects. In a browser, a view is the same as a web page. 表单和视图对象–表单对象描述了如何在页面的块上显示数据对象的数据,而视图对象定义了表单对象的容器。 在浏览器中,视图与网页相同。
数据对象 (Data Object)
Now let’s take a look at the data object XML in modules/customer/do/CustomerDO.xml:
现在,让我们看一下modules/customer/do/CustomerDO.xml中的数据对象XML:
<?xml version="1.0" standalone="no"?>
<BizDataObj Name="CustomerDO" Description="" Class="BizDataObj" DBName="Default" Table="customer" SearchRule="" SortRule="" OtherSQLRule="" Uniqueness="" Stateless="N" IdGeneration="Identity" CacheLifeTime="0" CreateCondition="customer.Manage" UpdateCondition="customer.Manage" DeleteCondition="customer.Manage">
 <BizFieldList>
  <BizField Name="Id" Column="id" Type="Number"/>
  <BizField Name="name" Column="name" Length="64" Required="Y" Type="Text"/>
  <BizField Name="description" Column="description" Length="255" Required="N" Type="Text"/>
  <BizField Name="address" Column="address" Length="255" Required="N" Type="Text"/>
  <BizField Name="phone" Column="phone" Length="20" Required="N" Type="Text"/>
  <BizField Name="fax" Column="fax" Length="20"   Required="N" Type="Text"/>
  <BizField Name="status" Column="status"    Required="N" Type="Number"/>
  <BizField Name="create_by" Column="create_by" Type="Number" ValueOnCreate="{@profile:Id}"/>
  <BizField Name="create_time" Column="create_time"  Type="Datetime" ValueOnCreate="{date('Y-m-d H:i:s')}"/>
  <BizField Name="update_by" Column="update_by" Type="Number" ValueOnCreate="{@profile:Id}" ValueOnUpdate="{@profile:Id}"/>
  <BizField Name="update_time" Column="update_time" Type="Datetime" ValueOnCreate="{date('Y-m-d H:i:s')}" ValueOnUpdate="{date('Y-m-d H:i:s')}"/>
 </BizFieldList>
 <TableJoins>
 </TableJoins>
 <ObjReferences>
 </ObjReferences>
</BizDataObj>
The XML defines a mapping between the customer table to the CustomerDO object. It also defines certain rules on the objects as well as validation, type, and value of each field.
XML定义了customer表到CustomerDO对象之间的映射。 它还定义了有关对象的某些规则,以及每个字段的验证,类型和值。
表单对象 (Form Object)
Let’s also take a look at the form object XML in modules/customer/form/CustomerListForm.xml.
我们还来看看modules/customer/form/CustomerListForm.xml中的表单对象XML。
<?xml version="1.0" encoding="UTF-8"?>
<EasyForm Name="CustomerListForm" Class="EasyForm" FormType="List" jsClass="jbForm" Title="Customer Management" Description="" BizDataObj="customer.do.CustomerDO" PageSize="10" DefaultForm="Y" TemplateEngine="Smarty" TemplateFile="grid.tpl" Access="customer.Access">
 <DataPanel>
  <Element Name="row_selections" Class="RowCheckbox" Label="" FieldName="Id"/>
  <Element Name="fld_Id" Class="ColumnText" FieldName="Id" Label="Id" Sortable="Y"/>
  <Element Name="fld_name" Class="ColumnText" FieldName="name" Label="Name" DefaultValue="New Customer" Sortable="Y" Link="javascript:">
  <EventHandler Name="fld_name_onclick" Event="onclick" Function="SwitchForm(customer.form.CustomerDetailForm,{@:Elem[fld_Id].Value})"   />
 </Element>
 <Element Name="fld_description" Class="ColumnText" FieldName="description" Label="Description"  Sortable="Y"/>
  <Element Name="fld_address" Class="ColumnText" FieldName="address" Label="Address"  Sortable="Y"/>
  <Element Name="fld_phone" Class="ColumnText" FieldName="phone" Label="Phone" Sortable="Y"/>
  <Element Name="fld_fax" Class="ColumnText" FieldName="fax" Label="Fax" Sortable="Y"/>
  <Element Name="fld_status" Class="ColumnText" FieldName="status" Label="Status" Sortable="Y"/>
 </DataPanel>
 <ActionPanel>
...
  <Element Name="btn_delete" Class="Button" Text="Delete" CssClass="button_gray_m" Access="customer.Manage">
   <EventHandler Name="del_onclick" Event="onclick" EventLogMsg="" Function="DeleteRecord()" ShortcutKey="Ctrl+Delete" ContextMenu="Delete"/>
  </Element>
...
 </ActionPanel>
 <NavPane>
...
 </NavPanel>
 <SearchPane>
...
 </SearchPanel>
</EasyForm>
The XML maps fields from data objects to UI elements. It also defines panels for the logical layout of elements. For each UI element, interaction behavior can be described within its EventHandler section.
XML将字段从数据对象映射到UI元素。 它还定义了元素逻辑布局的面板。 对于每个UI元素,可以在其EventHandler部分中描述交互行为。
自定义对象 (Customize Objects)
Each Metadata element comes with a Class attribute. In the metadata generated by gen_meta, the attribute is set to a core framework class (BizDataObj for data objects, EasyForm for form objects). Developers can simply replace this to implement special business logic. For example, to add special logic for deleting a customer record, you can create the file /modules/customer/form/CustomerForm.php, and set the Metadata element’s Class attribute to it. The PHP class might look like:
每个Metadata元素都带有Class属性。 在所产生的元数据gen_meta ,该属性被设置为核心框架类( BizDataObj为数据对象, EasyForm为形式的对象)。 开发人员可以简单地替换它以实现特殊的业务逻辑。 例如,要添加用于删除客户记录的特殊逻辑,可以创建文件/modules/customer/form/CustomerForm.php ,并将Metadata元素的Class属性设置为其。 PHP类可能类似于:
<?php
class CustomerForm extends EasyForm
{
    public function deleteRecord($id = null) {
        // add your logic here
        Parent::deleteRecord($id); // call parent deleteRecord method
    }
}
Cubi执行流程 (The Cubi Execution Flow)
So what happens when the http://host/cubi/index.php/customer/customer_list is called in the browser?
那么,在浏览器中调用http://host/cubi/index.php/customer/customer_list时会发生什么?
index.phpcalls_forward.phpto parse the URL. It understands that /customer/customer_list points tocubi/modules/customer/view/CustomerListView.xmlbased on Cubi’s URL naming convention.index.php调用_forward.php来解析URL。 它了解到/ customer / customer_list基于Cubi的URL命名约定指向cubi/modules/customer/view/CustomerListView.xml。- The render method of the view is invoked. 视图的render方法被调用。
The render method calls the render method of its included form (
cubi/modules/customer/form/CustomerListForm.xml).render方法调用其包含的表单(
cubi/modules/customer/form/CustomerListForm.xml)的render方法。- The render method of the form calls its data object’s data query methods. 表单的render方法调用其数据对象的数据查询方法。
- The query methods prepare the SQL and executes it against the database. 查询方法准备SQL并针对数据库执行它。
- The form uses the returned dataset from the DO to generate HTML with its template. 该表单使用从DO返回的数据集来生成HTML及其模板。
- The view uses the output of the forms to generate HTML with its template. 该视图使用表单的输出来生成带有模板HTML。
- The server sends the HTML output to browser. 服务器将HTML输出发送到浏览器。
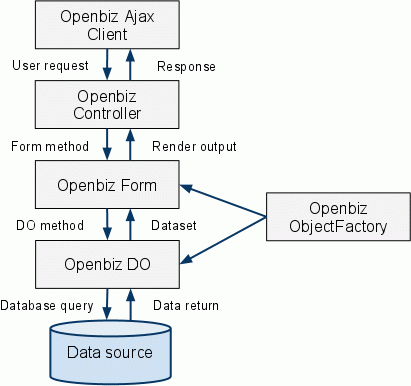
Once a view is loaded in the browser, most user interactions happen on forms through Ajax (no page reload). The diagram below shows how the Ajax call works:
在浏览器中加载视图后,大多数用户交互都会通过Ajax在表单上发生(无需重新加载页面)。 下图显示了Ajax调用的工作方式:
结论 (Conclusion)
In the series we’ve learned how to install Cubi, set up the system, and create a module. You may also find that the XML metadata file can be easier to learn and maintain than programming code. I hope you’ve enjoyed the series and wish you luck with your very own Openbiz Cubi powered business applications.
在本系列中,我们学习了如何安装Cubi,设置系统和创建模块。 您可能还会发现XML元数据文件比编程代码更容易学习和维护。 我希望您喜欢这个系列,并祝您在拥有自己的Openbiz Cubi技术的商业应用程序中好运。
Image via Fotolia
图片来自Fotolia
翻译自: https://www.sitepoint.com/openbiz-cubi-a-robust-php-application-framework-2/
openbiz


 231
231


 被折叠的 条评论
为什么被折叠?
被折叠的 条评论
为什么被折叠?
 到【灌水乐园】发言


