


社保照片修饰软件
Hot spots are shiny areas on a subject’s face which are caused by a flash reflecting off a shiny surface or by uneven lighting. It tends to make the subject look as if they are sweating, which is not a good look. There are nearly always more that one way to fix problems like this in Photoshop but here I’ll show you how to do it using the clone tool and some blending modes.
热点是被摄对象脸上的发亮区域,是由于闪光灯从发亮的表面反射或光线不均匀而引起的。 它倾向于使被摄对象看起来好像在流汗,这不是一个好的外观。 在Photoshop中,解决这种问题的方法几乎总是一种,但在这里,我将向您展示如何使用克隆工具和某些混合模式来解决问题。
1. Open up the photograph with the shiny hot spots that you want to fix. I’m using a picture of Stella McCartney that looks like it was taken in a red carpet situation and she’s looking a little shiny on the forehead and nose.
1.用您要修复的亮点打开照片。 我正在使用Stella McCartney的照片,看起来像是在红地毯上拍摄的,她的额头和鼻子看起来有些发亮。
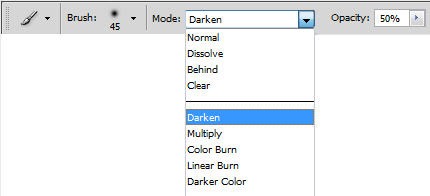
2. Select the Clone Stamp Tool (S) from the toolbox. In the Options Bar at the top of the screen, choose a large, soft-edged brush and set the Mode to Darken and lower the Opacity to about 50%.
2.从工具箱中选择“克隆图章工具(S)”。 在屏幕顶部的选项栏中,选择一个大的软边画笔,并将“模式”设置为“变暗”,并将“不透明度”降低到大约50%。
The idea behind setting the mode to Darken is that the only pixels that will change are the ones that are lighter than our sample area. The hot spots are essentially light colored pixels.
将模式设置为“变暗”的想法是,唯一会改变的像素就是比我们的采样区域更亮的像素。 热点本质上是浅色像素。
3. On your subject’s face, choose an area of “clean” or non-hot spot skin. This will be the reference point and Photoshop will now only change pixels that are lighter than this. Hold down the Alt (Windows) or Option (Mac) key and click to set the reference point. The cursor will change to an eye-dropper.
3.在对象的脸上,选择一个“干净”或非热点皮肤区域。 这将作为参考点,Photoshop现在将仅更改比此更亮的像素。 按住Alt键(Windows)或Option键(Mac),然后单击以设置参考点。 光标将变为滴管。
4. Start to paint over the hot spots with the Clone Stamp tool. The hot spots will fade but it will still look like natural skin. You’ll find that you need to resample several times in order to correctly match the skin tones. Just Alt/Option click every time you want to resample and start to paint again.
4.使用“克隆图章”工具开始在热点上绘制。 热点将消失,但仍然看起来像天然皮肤。 您会发现您需要重新采样几次才能正确匹配肤色。 每次要重新采样并再次开始绘制时,只需按住Alt / Option单击。
If the effect is too much, you can also reduce down the Opacity of the Clone Stamp Tool a little further to about 45 – 40%. Be especially careful on the skin under the eyes. You don’t want to replace hot spots with dark bags! Work around your image until you’ve removed all of the hot spots. Below you can see Before, on the left, and After.
如果效果太大,还可以将“克隆图章工具”的不透明度进一步降低到大约45 – 40%。 尤其要注意眼睛下方的皮肤。 您不想用黑袋代替热点! 解决您的图像,直到您删除了所有热点为止。 在下面,您可以看到“之前”,左侧和“之后”。
So with a couple of seconds of retouching with the Clone Stamp Tool and the right blending mode you can quickly and easily do a makeover and remove the sweaty, shiny look.
因此,使用“克隆图章工具”(Clone Stamp Tool)和正确的混合模式进行几秒钟的修饰后,您可以快速轻松地进行改头换面,并去除汗湿,发亮的外观。
翻译自: https://www.sitepoint.com/photo-retouching-removing-hot-spots-in-photoshop/
社保照片修饰软件


 被折叠的 条评论
为什么被折叠?
被折叠的 条评论
为什么被折叠?
 到【灌水乐园】发言


