


coldfusion
Tired of the same old URL shorteners like TinyURL, tr.im or bit.ly? Ever wished you could run your very own URL shortener? In ColdFusion, it’s probably easier than you think. To demonstrate just how powerful and easy to use ColdFusion is, we’re going to build our own simple URL shortener from scratch. In this article, we’ll start out with a basic set of functions – creating shortened links, and expanding them. Don’t forget to try the quiz when you’ve finished reading!
厌倦了像TinyURL,tr.im或bit.ly这样的旧URL缩短器? 曾经希望您可以运行自己的URL缩短程序吗? 在ColdFusion中,它可能比您想象的要容易。 为了演示ColdFusion的功能强大和易于使用,我们将从头开始构建自己的简单URL缩短器。 在本文中,我们将从一组基本功能开始-创建缩短的链接并扩展它们。 阅读完毕后,别忘了尝试测验 !
To follow along, you’ll need to download and install the ColdFusion 9 and ColdFusion Builder betas and install them on your development machine. ColdFusion 9 is also available for Linux, and it is possible (with some tweaking) to install ColdFusion Builder – see this tutorial at Compound Theory for details. You’ll also need to grab the code archive for this tutorial.
要继续学习,您需要下载并安装ColdFusion 9和ColdFusion Builder Beta ,并将它们安装在开发计算机上。 ColdFusion 9也可用于Linux,并且可以(稍作调整)安装ColdFusion Builder – 有关详细信息,请参见Compound Theory上的本教程。 您还需要获取本教程的代码档案 。
开始之前 (Before we start)
This tutorial assumes that you have ColdFusion 9 beta running on localhost, on port 8500, using the stand-alone, built-in development server. If you’ve installed ColdFusion on a machine other than localhost, or are using IIS or Apache instead of the stand-alone development server, or are using a J2EE server configuration, you’re going to need to change the server paths mentioned in the code listings.
本教程假定您使用独立的内置开发服务器在端口8500的本地主机上运行ColdFusion 9 beta。 如果您在本地主机以外的计算机上安装了ColdFusion,或者使用IIS或Apache代替了独立开发服务器,或者使用了J2EE服务器配置,则需要更改代码清单。
We’re also going to assume that you have ColdFusion Builder installed on the same localhost machine. If you already have the Eclipse IDE on your machine (including Flash Builder or Flex Builder) and have installed ColdFusion Builder as a plugin, you’ll need to make sure you’re in the ColdFusion perspective: from the Window menu, select Open Perspective > Other > ColdFusion.
我们还将假设您在同一台localhost计算机上安装了ColdFusion Builder。 如果您的计算机(包括Flash Builder或Flex Builder)已经具有Eclipse IDE,并且已将ColdFusion Builder作为插件安装,则需要确保您处于ColdFusion透视图:从“窗口”菜单中,选择“ 打开透视图”。 >其他> ColdFusion 。
Before we start coding, we’re going to tell ColdFusion Builder which ColdFusion server we will be working with. We’ll configure this using the Servers tab at the bottom of the ColdFusion Builder window. There are quite a few steps to follow here, which I’ve broken down for you below:
在开始编码之前,我们将告诉ColdFusion Builder我们将使用哪台ColdFusion服务器。 我们将使用ColdFusion Builder窗口底部的“ 服务器”选项卡进行配置。 这里有很多步骤要遵循,下面为您介绍了以下步骤:
Click on the Add Server icon – there’s a little yellow plus sign on it.
单击添加服务器图标–上面有一个黄色的加号。
Select ColdFusion as the server type, and click Next.
选择ColdFusion作为服务器类型,然后单击Next 。
- Enter a name for the server – this is so it’s recognizable to you. I’ve entered localhost. 输入服务器的名称-这样您就可以识别它。 我进入了本地主机。
- Enter the hostname – if you’re running the default setup, it’s localhost too. 输入主机名-如果您正在运行默认设置,那么它也是localhost。
- Enter the port – the default for the built in development setup is port 8500. 输入端口-内置开发设置的默认端口为8500。
- Enter the RDS User Name, which is always admin, unless you specified a different username when you installed the server (this is usually only the case if you’re running on a J2EE server configuration). 输入RDS用户名,该名称始终为admin,除非在安装服务器时指定了其他用户名(通常只有在J2EE服务器配置上运行时才如此)。
Enter the RDS password you specified when installing ColdFusion. Click Next.
输入在安装ColdFusion时指定的RDS密码。 单击下一步 。
- Browse for your Server Home. This is the directory where ColdFusion was installed – on Windows, it will probably be C:ColdFusion9; on the Mac, /Applications/ColdFusion 9. 浏览您的服务器主页。 这是ColdFusion的安装目录–在Windows上,可能为C:ColdFusion9; 在Mac上,是/ Applications / ColdFusion 9。
- You might also need to browse for your Document Root. This is your web root – on a default Windows installation, it will probably be C:ColdFusion9wwwroot; on the Mac, it’s at /Applications/ColdFusion9/wwwroot. 您可能还需要浏览您的文档根目录。 这是您的Web根目录–在默认的Windows安装中,它可能是C:ColdFusion9wwwroot;。 在Mac上,该文件位于/ Applications / ColdFusion9 / wwwroot。
- Select the version of ColdFusion installed from the drop down box – 9.0.x. 从下拉框中选择安装的ColdFusion版本–9.0.x。
Click Finish.
点击完成 。
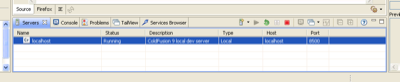
ColdFusion Builder will verify these details and connect to the server. If all went well, you should see the server in the Servers tab. You can start and stop the server and access its ColdFusion Administrator panel from this tab.
ColdFusion Builder将验证这些详细信息并连接到服务器。 如果一切顺利,您应该在“ 服务器”选项卡中看到服务器。 您可以启动和停止服务器,并从此选项卡访问其ColdFusion Administrator面板。
ColdFusion Builder works with projects. We could create a new project now, and associate it with our development server, but to make things easier for you we’ve included all the code in a downloadable project which we’re now going to import.
ColdFusion Builder可以处理项目。 我们现在可以创建一个新项目,并将其与我们的开发服务器关联,但是为了使您更轻松,我们将所有代码包含在一个可下载的项目中,现在将要导入该项目。
- Download the sample zip file and extract the folder into your ColdFusion web root. Change the name of the folder to URLS now, if needed. 下载示例zip文件,然后将文件夹解压缩到ColdFusion网站根目录中。 如果需要,现在将文件夹名称更改为URLS。
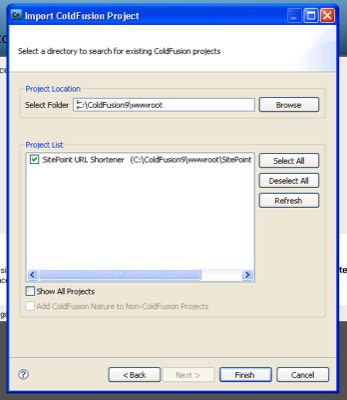
The navigator panel on the left hand side of the screen shows the files in your current project. Right-click in the Navigator and select Import.
屏幕左侧的导航器面板显示当前项目中的文件。 右键单击导航器,然后选择导入 。
From the Import wizard, drill down to ColdFusion -> Import Existing Projects, and click Next.
在“导入”向导中,深入到ColdFusion->导入现有项目 ,然后单击下一步 。
- Browse for the folder you just extracted. 浏览您刚刚提取的文件夹。
ColdFusion Builder will scan the folder and look for any project files, which will then be listed in the Project List below. Check the box next to our URLs project, and then click Finish.
ColdFusion Builder将扫描文件夹并查找任何项目文件,这些文件将在下面的“ 项目列表”中列出。 选中我们的URL项目旁边的框,然后点击完成 。
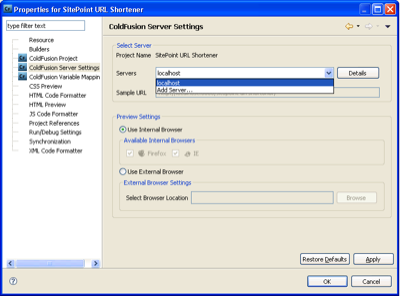
The project will now be listed in your Navigator panel. The last step is to associate the project with our server.
现在,该项目将列在“ 导航器”面板中。 最后一步是将项目与我们的服务器关联。
Right click on the project name and select Properties.
右键单击项目名称,然后选择“ 属性” 。
Select ColdFusion Server Settings from the left hand side of the dialog.
从对话框的左侧选择“ ColdFusion服务器设置” 。
Select your local development server from the drop-down box of servers, and click OK.
从服务器下拉框中选择本地开发服务器,然后单击确定 。
设置数据库 (Setting up the database)
Our URL shortener application will need a database. Apache Derby is an open source database with some fairly heavy-duty features, and it’s built right in to ColdFusion 8 and later. For our purposes, it’s perfect, because although Derby has no client and no user interface, setting up databases is very simple and there’s no need to install MSSQL, MySQL, or other database server.
我们的URL缩短程序应用程序将需要一个数据库。 Apache Derby是一个开源数据库,具有一些相当强大的功能,并且内置在ColdFusion 8及更高版本中。 就我们的目的而言,它是完美的,因为尽管Derby没有客户端,也没有用户界面,但是设置数据库非常简单,并且不需要安装MSSQL,MySQL或其他数据库服务器。
ColdFusion uses data source names to store database connections. Data source names are set up in the ColdFusion Administrator, which is the command central for your ColdFusion Server. To access the ColdFusion Administrator for your local development server, right-click on the server name in the Servers tab (remember, it’s down the bottom of the screen) and select Launch Admin Page.
ColdFusion使用数据源名称来存储数据库连接。 数据源名称在ColdFusion管理器中设置,这是ColdFusion服务器的命令中心。 要访问本地开发服务器的ColdFusion管理员,请右键单击“ 服务器”选项卡中的服务器名称(请记住,它位于屏幕底部),然后选择“ 启动管理页面”。
The ColdFusion Administrator launches in a new Eclipse tab and prompts you for your administrator password (which is the one you chose during installation).
ColdFusion管理员会在新的Eclipse选项卡中启动,并提示您输入管理员密码(这是在安装过程中选择的密码)。
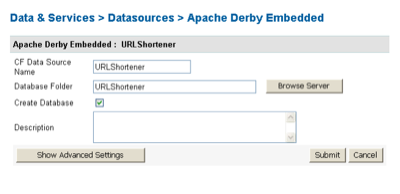
Once you’ve logged in, select Data Sources from the left hand menu. At the top of the screen there’s a form for creating a new data source. Enter “URLShortener” as the data source name, select Apache Derby Embedded from the driver dropdown and click Add.
登录后,从左侧菜单中选择“数据源”。 在屏幕顶部,有一个用于创建新数据源的表单。 输入“ URLShortener”作为数据源名称,从驱动程序下拉列表中选择“ Apache Derby Embedded”,然后单击“ 添加” 。
You’re nearly there! In the form that you are now shown, type “URLShortener” in the Database Folder (same as the data source name), and tick the Create Database checkbox. Hit Submit, and your Derby embedded database is created at the same time as your ColdFusion data source name.
你快到了! 在现在显示的表单中,在“数据库文件夹”中键入“ URLShortener”(与数据源名称相同),然后选中“ 创建数据库”复选框。 点击Submit ,您的Derby嵌入式数据库将与您的ColdFusion数据源名称同时创建。
问题概述 (Overview of the problem)
Are you still with me? Now that we have a development environment and a database, we’re ready to think about how we’ll develop our URL shortener.
你还在吗? 现在我们有了开发环境和数据库,我们准备考虑如何开发URL缩短器。
URL shortening applications are all over the Internet these days. URL shorteners aim to solve the problem encountered when trying to use long URLs in an instant message, a Twitter message, or any other form of communication with limited characters. The basic premise of a URL shortener is to give you a unique short URL to their site, which, when clicked will redirect the user to the longer URL.
如今,URL缩短应用程序遍布Internet。 URL缩短器旨在解决尝试在即时消息,Twitter消息或任何其他字符有限的通信形式中使用长URL时遇到的问题。 URL缩短器的基本前提是为您的站点提供唯一的短URL,单击该URL会将用户重定向到较长的URL。
For example, to link to this SitePoint article “What’s New in ColdFusion 9”, with the following URL:
例如,使用以下URL链接到此SitePoint文章“ ColdFusion 9的新增功能”:
https://www.sitepoint.com/article/whats-new-coldfusion-9/4/
https://www.sitepoint.com/article/whats-new-coldfusion-9/4/
The service TweetBurner will give you this shorter URL:
TweetBurner服务将为您提供以下较短的URL:
At just 22 characters, the shortened URL is less than half the length of the original 58 character link. And with longer URLs, the benefits are even more obvious.
缩短的URL只有22个字符,不到原始58个字符链接的一半。 网址越长,好处就越明显。
将表添加到数据库 (Adding tables to the database)
To create our URL shortening application, we’re going to need to create a table in our Derby database. We’ll call our table content and give it the following columns:
要创建我们的URL缩短应用程序,我们需要在Derby数据库中创建一个表。 我们将调用表content并为其提供以下列:
| Column | Data type | Description |
|---|---|---|
| id | integer | Data |
| label | character(100) | – |
| text | text | – |
| link | text | The URL we are linking to |
| shortlink | character(20) | The short code that will identify our URL |
| 柱 | 数据类型 | 描述 |
|---|---|---|
| ID | 整数 | 数据 |
| 标签 | 角色(100) | – |
| 文本 | 文本 | – |
| 链接 | 文本 | 我们链接到的URL |
| 短链接 | 角色(20) | 可以识别我们网址的简短代码 |
There are some fields in this database that are not strictly necessary for a simple URL shortener, but we’re going to use them in a follow-up article to this tutorial, so we might as well add them now.
数据库中的某些字段对于简单的URL缩短程序不是严格必需的,但是我们将在本教程的后续文章中使用它们,因此我们不妨现在添加它们。
As we mentioned before, there’s no client or user interface for the embedded version of the Apache Derby database, so to create our tables we’re going to run a SQL script in ColdFusion. Open the file db.cfm in the web root of our ColdFusion Builder Project. It contains the following code:
如前所述,Apache Derby数据库的嵌入式版本没有客户端或用户界面,因此要创建表,我们将在ColdFusion中运行SQL脚本。 在ColdFusion Builder项目的Web根目录中打开文件db.cfm。 它包含以下代码:
Creating database... <cfquery datasource="URLShortener" result="return"> CREATE TABLE content ( id INTEGER NOT NULL GENERATED ALWAYS AS IDENTITY (START WITH 1, INCREMENT BY 1), label VARCHAR(100), text VARCHAR(500), link VARCHAR(500) NOT NULL, shortlink VARCHAR(20) NOT NULL, CONSTRAINT shortlink_uc UNIQUE(shortlink) ) </cfquery> <cfdump var="#return#">
Creating database... <cfquery datasource="URLShortener" result="return"> CREATE TABLE content ( id INTEGER NOT NULL GENERATED ALWAYS AS IDENTITY (START WITH 1, INCREMENT BY 1), label VARCHAR(100), text VARCHAR(500), link VARCHAR(500) NOT NULL, shortlink VARCHAR(20) NOT NULL, CONSTRAINT shortlink_uc UNIQUE(shortlink) ) </cfquery> <cfdump var="#return#">
You can execute this code by clicking the Run icon in the toolbar – it’s a white arrow in a green circle. This will launch the script in your default browser. It is also possible to launch the browser inside of ColdFusion Builder by switching to a tab at the bottom of the editing window. There will be a tab for every browser that has been detected on your computer.
您可以通过单击工具栏中的“运行”图标来执行此代码-这是一个绿色圆圈中的白色箭头。 这将在默认浏览器中启动脚本。 通过切换到编辑窗口底部的选项卡,也可以在ColdFusion Builder中启动浏览器。 对于您的计算机上检测到的每个浏览器,都有一个选项卡。
After executing, you’ll see the result of the query operation that we ran:
执行之后,您将看到我们运行的查询操作的结果:
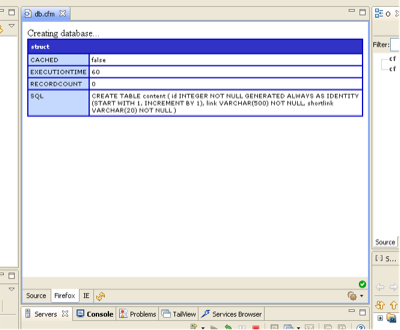
While there’s nothing to specifically state that the operation was successful, it indicates that there were no errors, and shows the execution time and generated SQL code that was run, so we can safely assume that all is okay.
虽然没有什么可以具体说明该操作已成功完成,但它表示没有错误,并显示了执行时间和已运行的生成SQL代码,因此我们可以放心地认为一切正常。
应用程式码 (The application code)
Take a look inside the ColdFusion Builder project and you’ll see a couple of other .cfm files, and several .cfc files – one on the root directory, and one inside the /com subdirectory. Files ending in .cfm are regular ColdFusion template files. The .cfm extension tells the web server to pass them through the ColdFusion application server before serving them to the end user’s browser. A file with the .cfc extension is a ColdFusion component. This is ColdFusion’s equivalent to what is often called a class in other languages.
看一下ColdFusion Builder项目内部,您将看到其他两个.cfm文件和几个.cfc文件-一个在根目录下,一个在/ com子目录内。 以.cfm结尾的文件是常规ColdFusion模板文件。 .cfm扩展名告诉Web服务器在将它们提供给最终用户的浏览器之前,先将它们通过ColdFusion应用程序服务器传递。 扩展名为.cfc的文件是ColdFusion组件。 这与ColdFusion等效,在其他语言中通常称为类。
Application.cfc (Application.cfc)
The Application.cfc file in the root directory is a special kind of component which is run before each page request. It holds application-wide settings and has a set of special functions that are run when the application first fires up, before and after each request, when a user session is started or ended, and when an error occurs.
根目录中的Application.cfc文件是一种特殊的组件,它在每个页面请求之前运行。 它具有应用程序范围的设置,并具有一组特殊功能,这些功能在应用程序首次启动时,每个请求之前和之后,启动或结束用户会话以及发生错误时运行。
There is an Application.cfc file in the root folder of our ColdFusion Builder project. Open it up and you’ll see it sets a couple of variables – the application name, and a timeout value – and has one function, onApplicationStart:
ColdFusion Builder项目的根文件夹中有一个Application.cfc文件。 打开它,您会看到它设置了几个变量–应用程序名称和超时值–并具有一个功能onApplicationStart :
<cfcomponent output="false">
  <cfset this.Name="URLShortener">
  <cfset this.ApplicationTimeout=CreateTimeSpan(0,0,5,0)>
  <cffunction name="OnApplicationStart" access="public"
      returntype="boolean" output="false"
      hint="Fires when the application is first created">
    <!--- delete and recreate the content cfc
          stored in the application scope --->
    <cfset StructDelete(application,"oContent")>
    <cfset application.oContent=CreateObject("component","com.content")>
     <cfreturn true>
  </cffunction>
</cfcomponent>
As we will have multiple files in our URL Shortener application, and they are all going to need to use functions in content.cfc, we’re going to load that component into the application scope when the application starts. This means that on any page request, we’ll be able to reference any of the functions inside content.cfc by prefixing them with application.oContent.
由于我们的URL Shortener应用程序中将有多个文件,并且它们都将需要使用content.cfc中的函数,因此我们将在应用程序启动时将该组件加载到应用程序范围中。 这意味着在任何页面请求上,我们都可以在content.cfc中引用任何功能,方法是在它们前面加上application.oContent 。
一,形式 (First, the form)
Enough housekeeping – let’s jump into some code. To allow our users to enter their URLs to shorten, we’ll need a form. Open up add.cfm in the ColdFusion Builder project root, and you’ll see a basic form.
足够的内务处理–让我们跳入一些代码。 为了允许我们的用户输入缩短的URL,我们需要一个表格。 在ColdFusion Builder项目根目录中打开add.cfm,您将看到一个基本表单。
At the top of the form is some code that is run when a variable called form.action is defined. Essentially, a function from our content CFC is run inside a loop until the loop’s exit condition – the shortlink variable is not zero length – happens. We’ll examine what’s actually going on here in a moment. Skip down in the file and you’ll see a standard HTML template with a little bit of ColdFusion conditional display code – checking for a variable’s existence and if it is found, displaying it – and a HTML form to enter our URL to shorten. Fairly simple stuff.
表单的顶部是定义了名为form.action的变量时运行的一些代码。 本质上,来自内容CFC的函数在循环内运行,直到发生循环的退出条件( shortlink变量的长度不为零)为止。 我们将在稍后检查这里实际发生的情况。 跳到文件中,您将看到带有一点ColdFusion条件显示代码的标准HTML模板-检查变量是否存在以及是否找到该变量,将其显示-以及一个HTML表单以输入要缩短的URL。 很简单的东西。
<!--- display the add form --->
<form action="add.cfm" method="post">
  <label for="link">URL to shorten</label>
  <input type="text" name="link" id="link" size="100"><br>
  <input type="submit" name="action" value="Submit">
</form>
繁重的工作:生成短链接代码 (The heavy lifting: generating the short link code)
To generate our short URL, we’re going to create a function which returns a random string of a predefined length from a pool of acceptable characters. I’ve added 63 possible characters – uppercase characters A-Z, lowercase characters a-z, digits 0-9 and the dash character (-). A six-character string made up of these characters yields 636 possible combinations: that’s 62,523,502,209 URLs, which should be enough to keep us going for quite a while!
为了生成短URL,我们将创建一个函数,该函数从可接受的字符池中返回预定义长度的随机字符串。 我添加了63个可能的字符-大写字母AZ,小写字母az,数字0-9和破折号(-)。 由这些字符组成的六个字符的字符串会产生636种可能的组合:即62,523,502,209个URL,这足以让我们继续运行很长时间!
Open up Content.cfc in the /com directory under our project root to see this function (it’s the very first one listed). You’ll see that the function generateShowLink takes one argument, length, which is required but has a default value of 6, should it not be supplied:
在项目根目录下的/ com目录中打开Content.cfc,以查看此功能(这是列出的第一个功能)。 您会看到函数generateShowLink接受一个参数length ,这是必需的,但如果不提供,则默认值为6:
<cffunction name="generateShortLink" returntype="string">
<cfargument name="length" type="Numeric" required="true" default="6">
  <cfset var local=StructNew()>
This is the number of characters that will be generated for the shortcode. Should you wish to use more or fewer characters, you could simply pass a value for length into the function when it’s called. In this code snippet we’re also setting up a variable structure called local to store local variables.
这是将为简码生成的字符数。 如果您希望使用更多或更少的字符,则只需在调用函数时将length的值传递给该函数即可。 在此代码段中,我们还将设置一个名为local的变量结构来存储局部变量。
First we set up a list of all allowable characters, then define our radix – that is, the total number of possible characters:
首先,我们列出所有允许使用的字符,然后定义我们的基数 ,即可能的字符总数:
<!--- create a list of all allowable characters for our short URL link --->
<cfset local.chars="A,B,C,D,E,F,G,H,I,J,K,L,M,N,O,P,Q,R,S,
T,U,V,W,X,Y,Z,a,b,c,d,e,f,g,h,i,j,k,l,m,n,
o,p,q,r,s,t,u,v,w,x,y,z,0,1,2,3,4,5,6,7,8,9,-">
<!--- our radix is the total number of possible characters --->
<cfset local.radix=listlen(local.chars)>
Then, after setting our return variable to an empty string, we're going to add random characters from that list in a loop:Finally, return the newly generated short link to the calling code:
<!--- return the generated random short link --->
<cfreturn local.shortlink>
</cffunction>When we insert our link and short URL code into the database, we need to make sure that the short link value is unique in the database. To help with this, we made the
shortlinkcolumn in the database unique, so if we attempted to insert a duplicate value, the database would throw an error. We're going to use this to our advantage.The function in content.cfc that actually handles the insertion of data into the database is called
insertContent. It takes one argument,link- the URL that we wish to shorten - defined at the top, and then initialises a local structure that will hold variables that we need to use locally in this function:Next, inside an error-catching
cftryblock, we're going to attempt to insert the link and a short link code generated by ourgenerateShortlinkfunction. If theshortlinkvalue is unique, the insert will be successful, and ourinsertContentfunction will return the new value to display to the end user.<!--- begin our error-catching block --->
<cftry>
<!--- try to insert the new link into the database --->
<cfquery datasource="#variables.dsn#" name="result.qry" result="result.stats">
INSERT INTO
content(
link,
shortlink
)
VALUES(
<cfqueryparam cfsqltype="cf_sql_varchar" value="#arguments.link#">,
<cfqueryparam cfsqltype="cf_sql_varchar" value="#generateShortLink()#">
)
</cfquery>
<!--- try to return the new shortlink value,
referencing the last returned identifier --->
<cfquery datasource="#variables.dsn#" name="result.inserted">
SELECT
shortlink
FROM
content
WHERE
id = <cfqueryparam cfsqltype="cf_sql_integer" value="#result.stats.IDENTITYCOL#">
</cfquery>What if the generated shortcode just happens to be one that's already been used? The function will hit the error-catching cfcatch block, where the result is instead set to an empty string:
coldfusion


 被折叠的 条评论
为什么被折叠?
被折叠的 条评论
为什么被折叠?
 到【灌水乐园】发言


