


flash图片批量创建元件
In this article I will explain how Flash Panels fit into the grand scheme of extending Flash MX 2004. We’ll also discuss some of the benefits and pitfalls you may encounter when using Flash Panels in your day to day work.
在本文中,我将说明Flash Panel如何适应扩展Flash MX 2004的宏伟计划。我们还将讨论在日常工作中使用Flash Panel时可能遇到的一些好处和陷阱。
Through this tutorial, you’ll create your very own Flash Panel to control the rotation of Movie Clips on the stage using standard Flash MX 2004 components, a hefty sprinkling of ActionScript and some tips and tricks along the way. I hope you’ll come away from this tutorial feeling empowered to create your own Flash Panels, and to explore the capabilities and possibilities of Flash MX 2004 — and your own mind!
通过本教程,您将创建自己的Flash Panel,以使用标准Flash MX 2004组件,大量的ActionScript和一些技巧来控制舞台上影片剪辑的旋转。 希望您能摆脱本教程的束缚,拥有创建自己的Flash面板,探索Flash MX 2004的功能和可能性的能力,以及自己的想法!
Before we set out on this extensibility trip, let me point out a couple of resources that will be invaluable in your pursuit of Flash Panel excellence:
在我们开始这一可扩展性之旅之前,让我指出一些资源,这些资源对于您追求Flash Panel的卓越性将是无价的:
Flash MX 2004 JavaScript Dictionary: An invaluable bible that contains nearly all the Flash API information that you’ll ever need.
Flash MX 2004 JavaScript词典 :一部宝贵的圣经,其中包含几乎所有您需要的Flash API信息。
JSFL File API (Not included in the Flash MX 2004 JavaScript Dictionary; functionality added in Flash MX 2004 7.2 udpater).
JSFL File API (不包括在Flash MX 2004 JavaScript字典中;在Flash MX 2004 7.2 udpater中添加的功能)。
The creation of Flash Panels for use in Flash MX 2004 basically hinges around the understanding and use of the JSAPI (JavaScript API). It’s based on a Document Object Model (DOM), which allows both Flash Documents and the internal functions of Flash MX 2004 to be accessed via simple JavaScript-based commands.
用于Flash MX 2004的Flash Panel的创建基本上取决于对JSAPI(JavaScript API)的理解和使用。 它基于文档对象模型(DOM),该文档对象模型允许通过基于JavaScript的简单命令访问Flash文档和Flash MX 2004的内部功能。
Since the release of Flash MX 2004, many JSFL (Flash JavaScript) commands, Flash Panels and custom tools have been created to help automate tasks and add custom interfaces to complex controls that directly influence feedback in the Flash authoring environment. Some of these can be found in SitePoint’s Flash Blog; others are easily found via search (use ‘JSFL commands’ or ‘Flash Panels’ as your keywords).
自从Flash MX 2004发布以来,已经创建了许多JSFL(Flash JavaScript)命令,Flash面板和自定义工具,以帮助自动执行任务并将自定义界面添加到直接影响Flash创作环境中反馈的复杂控件。 其中一些可以在SitePoint的Flash博客中找到 ; 通过搜索可以轻松找到其他关键字(使用“ JSFL命令”或“ Flash面板”作为关键字)。
If you’re comfortable with ActionScript, pushing the boundaries to develop your own custom commands and panels is hardly a leap of faith — it’s a small step forward. As the JSAPI is based around the Netscape JavaScript API and Flash’s Document Object Model, developing and writing Flash JavaScript should be a natural progression.
如果您对ActionScript感到满意,那么突破界限来开发自己的自定义命令和面板几乎不会让人信服-向前迈出了很小的一步。 由于JSAPI基于Netscape JavaScript API和Flash的文档对象模型,因此开发和编写Flash JavaScript应该是一个自然的过程。
By their very nature, Flash Panels are exported SWF files. However, they’re subtly different from the standard JSFL files that are used to create commands, as they utilise a wrapper function called MMExecute(). This allows interaction between the compiled SWF and the Flash MX 2004 API.
就其本质而言,Flash Panel是导出的SWF文件。 但是,它们与用于创建命令的标准JSFL文件有细微的区别,因为它们利用了称为MMExecute()的包装函数。 这允许已编译的SWF与Flash MX 2004 API之间的交互。
Consider the following line of JSFL, which returns the current width of the first selected item on the stage:
考虑下面的JSFL行,该行返回舞台上第一个选定项目的当前宽度:
var objectWidth= fl.getDocumentDOM().selection[0].width;In order to gain the same functionality within your SWF Panel, this code needs to be changed as follows:
为了在SWF面板中获得相同的功能,需要按以下方式更改此代码:
var objectWidth=MMExecute("fl.getDocumentDOM().selection[0].width");If we examine the code contained within the MMExecute("JavaScript String"), we’ll note that it’s exactly the same piece of Flash JavaScript we saw above. The only difference is that it’s now encapsulated within the wrapper. The MMExecute() function takes the Flash JavaScript string as a single argument and passes it to the Flash API. It’s then processed and a return value is optionally given. This value can then be assigned to a variable.
如果我们检查MMExecute("JavaScript String")包含的代码,我们会注意到它与上面看到的Flash JavaScript完全相同。 唯一的区别是它现在被封装在包装器中。 MMExecute()函数将Flash JavaScript字符串作为单个参数,并将其传递给Flash API。 然后进行处理,并有选择地给出返回值。 然后可以将此值分配给变量。
Flash面板位置 (Flash Panel Location)
All the major Flash Panels can be found in one simple location within the authoring environment. Simply select ‘Window > Other Panels >’ to access it in Flash MX 2004.
所有主要的Flash面板都可以在创作环境中的一个简单位置找到。 只需选择“窗口>其他面板>”即可在Flash MX 2004中访问它。
When you’re creating Flash Panels and testing in the live environment, keep the following locations in mind. These are the folders in which Flash MX 2004 locates the custom panels:
在现场环境中创建Flash Panel和进行测试时,请记住以下位置。 这些是Flash MX 2004在其中定位自定义面板的文件夹:
Windows 2000 or Windows XP
Windows 2000或Windows XP
Drive:Documents and SettingsuserLocal SettingsApplication DataMacromediaFlash MX 2004languageConfigurationWindowSWF
驱动器:文档和设置用户本地设置应用程序数据MacromediaFlash MX 2004语言配置窗口SWF
Windows 98
Windows 98
Drive:WindowsApplication DataMacromediaFlash MX 2004languageConfigurationWindowSWF
驱动器:WindowsApplication DataMacromediaFlash MX 2004语言配置WindowSWF
Mac OS X
Mac OS X
Drive:/Users/userName/Library/Application Support/Macromedia/Flash MX 2004/language/Configuration/WindowSWF
驱动器:/用户/用户名/库/应用程序支持/ Macromedia / Flash MX 2004 /语言/配置/ WindowSWF
We will make use of these directory locations later, when we test and deploy the extension.
我们稍后将在测试和部署扩展时使用这些目录位置。
灵感 (Inspiration)
Sometimes when you’re working, you suddenly think ‘Gee, wouldn’t it be quicker if I could automate [Insert Task Here]?’ More often than not, the answer is usually, ‘Yep, it’d be great to automate that task …but how on earth do I do it?’
有时,当您在工作时,您突然想到:“天哪,如果我可以自动化[在这里插入任务]会更快吗?” 通常,答案通常是:“是的,自动化该任务会很棒……但是,我到底该怎么做呢?”
Enter: Flash Panels… Actually, it’s not just the automation of tasks that warrants the creation of Flash Panels; the need for can stem from any of the following (and some other) requirements:
输入:Flash面板…实际上,保证创建Flash面板的不仅仅是任务的自动化;还包括 需求可能来自以下(以及其他一些)要求:
Automation: Automate often laborious and time consuming tasks within Flash MX 2004 (Code Addition, Timeline Effects)
自动化:在Flash MX 2004中自动执行繁琐且耗时的任务(代码添加,时间轴效果)
Speedier Access: Quicker access to menu hidden commands
快速访问:更快地访问菜单隐藏命令
GUI Control: Add a GUI to control real-time effects (rotation, scaling, position etc)
GUI控件:添加GUI以控制实时效果(旋转,缩放,位置等)
The creation of a Flash Panel can be a daunting task, which is why you need a clear goal for the panel before you begin. Once you decide specifically what you want the panel to do, you’re already most of the way to creating the panel (apart from the obvious coding and hooking into the interface).
创建Flash Panel可能是一项艰巨的任务,这就是为什么在开始之前需要为Panel明确目标的原因。 一旦明确决定了面板的功能,就已经是创建面板的大部分方法(除了显而易见的编码和连接界面之外)。
The next step is to sketch the process flow of the command (how it all works) either on paper, or in a text editor of your choice.
下一步是在纸上或在您选择的文本编辑器中草绘命令的处理流程(如何工作)。
Note: when I’m working in Flash, I always keep next to me a notebook that’s dedicated to ideas/workarounds. Sometimes, as you’re working away, a need or idea will spring into your mind that you can automate, speed up, or add an interface to, in order to make your life — and those of your colleagues — easier. Keep a list of these ideas so that those fleeting thoughts are never lost and everyone may benefit from the creation of your time-saving panel!
注意:在Flash中工作时,我总是在旁边放着一个笔记本,专用于想法/解决方法。 有时,当您在工作时,就会想到一个需求或想法,您可以自动化,加快速度或向其中添加界面,以使您(以及同事)的生活更轻松。 保留这些想法的清单,以使那些短暂的想法永远不会丢失,每个人都可以从创建您的省时面板中受益!
In the example that we’re about to create, we will use a single instance of the NumericStepper component to control the rotation of Movie Clips. Consider the following diagram, which shows the command process flow of the command we’re about to create in Flash MX 2004:
在我们将要创建的示例中,我们将使用NumericStepper组件的单个实例来控制影片剪辑的旋转。 考虑下图,该图显示了我们将在Flash MX 2004中创建的命令的命令处理流程:

To this, we’ll add a change event handler to catch when the value of the NumericStepper component increases or decreases. When the value changes, the event handler will trigger a function called rotateMe(), which contains all the Flash JavaScript encapsulated in the MMExecute() wrapper function, which is necessary for the function to carry out its given task.
为此,我们将添加一个change事件处理程序,以在NumericStepper组件的值增加或减少时进行捕获。 当值更改时,事件处理程序将触发一个名为rotateMe()的函数,该函数包含封装在MMExecute()包装函数中的所有Flash JavaScript,这对于该函数执行其给定任务是必需的。
有人上历史课吗? (Anyone for a History Lesson?)
The History Panel (Window > Other Panels > History), can be a useful insight into the inner workings of Flash MX 2004. When you’re looking to recreate an effect via scripted methods, the History Panel can be a good place to start.
“历史记录”面板(“窗口”>“其他面板”>“历史记录”)可以帮助您深入了解Flash MX 2004的内部工作原理。当您希望通过脚本方法重新创建效果时,“历史记录面板”可能是一个不错的起点。
During the majority of your user interaction with the application on the stage, if you have the History Panel open, you’ll notice events appearing within it. This is a visual representation of the communication history between you the user and the application in JSFL.
在舞台上与应用程序进行的大多数用户交互过程中,如果您打开了“历史记录面板”,则会注意到其中出现了事件。 这是用户与JSFL中的应用程序之间的通信历史的直观表示。
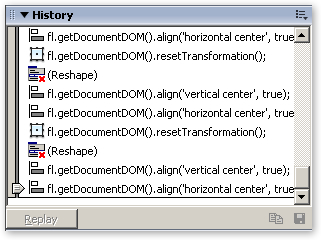
The majority of elements within the history can be copied to the clipboard and pasted into your favourite text editor for investigation, except those beside which a red cross appears. If you’re trying to identify the relevant API reference to carry out a given stage-based task that you’re trying to automate, and you can’t find it within the Flash MX 2004 JavaScript Dictionary, execute the task on the stage, and simply copy and paste from the History Panel. It makes an excellent starting point for your own custom commands!
历史记录中的大多数元素都可以复制到剪贴板,然后粘贴到您喜欢的文本编辑器中进行调查,除了那些旁边会出现红叉的元素。 如果您要确定相关的API参考以执行要使其自动化的给定基于阶段的任务,而又无法在Flash MX 2004 JavaScript词典中找到它,请在该阶段执行该任务,只需从“历史记录”面板中复制和粘贴即可。 它是您自己的自定义命令的绝佳起点!
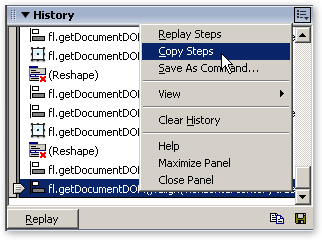
You may also save selected steps (but not those denoted with a red ‘x’) as a command, which will be made available from the ‘Commands’ menu provided it doesn’t require any user interaction. The process of creating one-time commands complete with interfaces is another topic — we’ll come back to it in another article.
您也可以将选定的步骤(但不是用红色“ x”表示的步骤)保存为命令,只要不需要用户交互即可从“命令”菜单中使用这些步骤。 创建具有接口的一次性命令的过程是另一个主题-我们将在另一篇文章中再次讨论。
创建 (Creation )
Enough with the introduction! Let’s dive into creating a command that rotates the Movie Clips. Create the Rotator Flash Panel
足够介绍了! 让我们开始研究创建一个旋转影片剪辑的命令。 创建Rotator Flash Panel
I’ve provided the code for the panel in this article’s downloadable code archive. The RotatorStart.fla contains the timeline layer structure and the background image for the panel. The finished FLA for this example is called RotatorFinal.fla.
我已经在本文的可下载代码档案中提供了该面板的代码 。 RotatorStart.fla包含时间线图层结构和面板的背景图像。 在此示例中,完成的FLA称为RotatorFinal.fla。
If at any time you need to look up the process flow for the function, refer to the diagram shown above.
如果您需要随时查找该功能的处理流程,请参考上图。
设置场景 (Setting the Scene)
Our first course of action is to add the component that will control the effect; as the background and layers have already been set up, we need only to add a single component to the stage before we insert the controlling ActionScript.
我们的第一个步骤是添加将控制效果的组件。 由于已经设置了背景和图层,因此我们只需要在舞台上添加一个组件,然后再插入控制ActionScript。
Of course, it goes without saying that the more complex the panel, the more controls you may have on screen at any one time. I’ll leave it to you to experiment with your own creations after you’ve created this simple but effective example.
当然,不用说面板越复杂,您一次可以在屏幕上显示的控件越多。 在创建了这个简单但有效的示例之后,我将留给您尝试自己的创作。
- Open the starting point FLA (RotatorStart.fla from the code archive) and drag an instance of the NumericStepper Component from the ‘UI Components’ section of the Components Panel onto the first frame of the ‘Interface’ layer. Name the instance stepSizer. 打开起点FLA(代码档案中的RotatorStart.fla),然后将“ NumericStepper组件”的一个实例从“组件面板”的“ UI组件”部分拖动到“接口”层的第一帧上。 将实例命名为stepSizer。
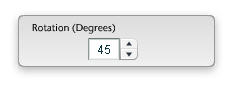
Position the NumericStepper component instance centrally over the rounded rectangle background, and change the default parameter values to the following:
将NumericStepper组件实例放置在圆角矩形背景的中央,并将默认参数值更改为以下内容:
- Maximum: 360 最大值:360
- Minimum: 0 最小:0
- stepSize: 5 步长:5
- Value: 45 价值:45
- Save your Flash Document to a location of your choice. 将Flash文档保存到您选择的位置。
- Copy the JXLFLAPI.as file from the code archive to the location of your saved FLA. (this is a JSFL Wrapper that’s used to simplify some tasks). 将JXLFLAPI.as文件从代码档案库复制到保存的FLA的位置。 (这是一个JSFL包装器,用于简化某些任务)。
Now that we’ve created the interface, we need to add the controlling ActionScript to bring the effect to life.
现在,我们已经创建了接口,我们需要添加控制ActionScript才能使效果栩栩如生。
添加动作脚本 (Add the ActionScript)
It’s pretty obvious, but the more things that your panel tries to accomplish, the more complex both the ActionScript and the encapsulated JSFL becomes.
这很明显,但是您的小组尝试完成的事情越多,ActionScript和封装的JSFL都变得越复杂。
In this example, the code is pretty simple and linear, but as you create your own Flash Panels and begin to extend Flash MX 2004, things can get a little more complex. For this reason, it’s often extremely helpful to sketch out the data flow of your command, as I mentioned earlier. You won’t regret it!
在此示例中,代码非常简单且线性,但是当您创建自己的Flash Panel并开始扩展Flash MX 2004时,事情可能会变得有些复杂。 因此,如我前面所述,勾画命令的数据流通常非常有帮助。 你不会后悔的!
Select the first frame of the Actions layer and add the following code within the Actions Panel:
选择“动作”层的第一帧,然后在“动作面板”中添加以下代码:
//Stage Controls
Stage.align = "TC";
Stage.scaleMode = "noScale";
Stage.showMenu = false;
//Flash API Wrapper (Courtesy Jesse Warden)
#include "JXLFLAPI.as"
//Main Rotation Function
function rotateMe()
{
  var selectionChecker = MMExecute("fl.getDocumentDOM().selection.length");
  if (selectionChecker == 1)
  {
    //Reset Transformation Points to allow easy rotation
    MMExecute("fl.getDocumentDOM().resetTransformation()");
    //Get Selection Width and Height
    var objectWidth =  MMExecute("fl.getDocumentDOM().selection[0].width");
    var objectHeight = MMExecute("fl.getDocumentDOM().selection[0].height");
    //Calculate Center Points
    var objCenterHorz = int(objectWidth / 2);
    var objCenterVert = int(objectHeight / 2);
    //Move Transformation Point to Dead Center (Helps when rotating)
    MMExecute("fl.getDocumentDOM().setTransformationPoint({x:" + Math.floor(objCenterHorz) + ", y:" + Math.floor(objCenterVert) + "})");
    //Get Rotation Value
    var incrementer = stepSizer.value;
    //Rotate Selection
    MMExecute("fl.getDocumentDOM().rotateSelection(" + incrementer + ")");
    //Align H/V to Center of Stage
    MMExecute("fl.getDocumentDOM().align('vertical center', true)");
    MMExecute("fl.getDocumentDOM().align('horizontal center', true)");
    //Update Preview Information
  } else
  {
    break;
  }
}
//==========================
//Miscellaneous Functions
//==========================
//Middle Mouse Wheel Support
//==========================
var mouseListener:Object = new Object();
mouseListener.onMouseWheel = function(delta)
{
  stepSizer.value += delta;
};
Mouse.addListener(mouseListener);
//==========================
//Create Event Handler / Dispatcher for Numeric Stepper
//==========================
stepsListener = new Object();
stepsListener.change = function()
{
  rotateMe();
};
stepSizer.addEventListener("change", stepsListener);
//Numeric Stepper Event Handler Ends
Let’s step through the code and see how it fits together. First, we set the main stage settings, aligning the contents of the stage to TC (Top Centre). We switch off the ability to zoom in, and stop the right click menu from appearing.
让我们逐步看一下代码,看看它如何组合在一起。 首先,我们设置主舞台设置,使舞台的内容与TC(顶部中心)对齐。 我们关闭了放大功能,并停止了右键菜单的出现。
//Stage Controls
Stage.align = "TC";
Stage.scaleMode = "noScale";
Stage.showMenu = false;
We then include a nifty JSFL wrapper from Jesse Warden , which allows us to encapsulate some flavours of JSFL without needing to worry about sometimes complex single and double escape strings in the
MMExecute()function.然后,我们包括来自Jesse Warden的漂亮JSFL包装器,该包装器使我们可以封装JSFL的某些样式,而不必担心
MMExecute()函数中有时会出现复杂的单,双转义字符串。#include "JXLFLAPI.as"Note: Using the JSFL wrapper, we can simplify the following trace statement:
注意:使用JSFL包装器,我们可以简化以下trace语句:
MMExecute("fl.trace("Tracing to the Output Panel")");
The JSFL wrapper simplifies the code as follows:
flapi.trace("Tracing to the Output Panel")
Moving on through the process flow of the panel, we must consider the listener object for the NumericStepper component instance that we have on the stage. We use the change event so that, when the user clicks the up or down controllers of the NumericStepper, the
rotateMe()function is called:继续讨论面板的流程,我们必须考虑舞台上具有的NumericStepper组件实例的侦听器对象。 我们使用change事件,以便当用户单击NumericStepper的向上或向下控制器时,将
rotateMe()函数:stepsListener = new Object(); stepsListener.change = function() { rotateMe(); }; stepSizer.addEventListener("change", stepsListener);The
rotateMe()function is called every time the listener object detects that the selected value of the NumericStepper component has changed. If we refer to the previous process flow diagram, we can see clearly the chain of events that occurs.每当侦听器对象检测到NumericStepper组件的选定值已更改时,都会调用
rotateMe()函数。 如果参考前面的流程图,我们可以清楚地看到发生的事件链。First of all, we check that the user has selected only a single item from the stage:
首先,我们检查用户是否从舞台中仅选择了一个项目:
var selectionChecker =       MMExecute("fl.getDocumentDOM().selection.length");
if (selectionChecker == 1) {
We then reset the transformation point of the object to a central location. The reason for this is simple: when we rotate the object, it rotates around this transformation point. If the transformation point is off-centre, it can be difficult to gauge what’s going on. Resetting the transformation point to the centre point of the object using the object’s width and height makes the rotation easier to observe and keeps things tidy.
然后,我们将对象的变换点重置到中心位置。 这样做的原因很简单:当我们旋转对象时,它绕此变换点旋转。 如果转换点不在中心,则可能很难确定发生了什么。 使用对象的宽度和高度将变换点重置为对象的中心点,使旋转更容易观察,并使事物保持整洁。
//Reset Transformation Points to allow easy rotation
MMExecute("fl.getDocumentDOM().resetTransformation()");
//Get Selection Width and Height
var objectWidth =
    MMExecute("fl.getDocumentDOM().selection[0].width");
var objectHeight =     MMExecute("fl.getDocumentDOM().selection[0].height");
//Calculate Center Points
var objCenterHorz = int(objectWidth/2);
var objCenterVert = int(objectHeight/2);
//Move Transformation Point to Dead Center (Helps when rotating)
MMExecute("fl.getDocumentDOM().setTransformationPoint({x:"+Math.floor(objCenterHorz)+", y:"+Math.floor(objCenterVert)+"})");
We then get the current value of the NumericStepper Component, store it in the incrementer variable, and rotate the selection accordingly using
rotateSelection(value). As the NumericStepper component facilitates the use of continuous feedback by holding down the direction buttons, this can lead to a pleasing and functional effect.然后,我们获取NumericStepper组件的当前值,将其存储在增量变量中,并使用
rotateSelection(value)相应地旋转选择。 由于NumericStepper组件可以通过按住方向按钮来促进连续反馈的使用,因此可以带来令人愉悦的功能效果。//Get Rotation Value var incrementer = stepSizer.value; //Rotate Selection MMExecute("fl.getDocumentDOM().rotateSelection("+incrementer+")");Finally, we align the object centrally to the stage while rotating it. It’s a personal choice of mine to add this code. If it’s omitted, the object can drift as a result of the way Flash MX 2004 applies the centralised transformation point (see the earlier discussion).
最后,我们在旋转对象时将对象与舞台中央对齐。 添加此代码是我个人的选择。 如果省略它,则对象可能会由于Flash MX 2004应用集中式转换点的方式而漂移(请参阅前面的讨论)。
//Align H/V to Center of Stage
MMExecute("fl.getDocumentDOM().align('vertical center', true)");
MMExecute("fl.getDocumentDOM().align('horizontal center', true)");
That’s all we need to do in order to rotate the selected object; however, there’s an additional snippet of ActionScript that will give the Flash Panel middle mouse wheel support. This allows us to increase or decrease the value of the rotation either by clicking on the up and down arrows, or by scrolling the mouse wheel up or down. This utilises the same methodology as the event handler for the NumericStepper component, but uses the
onMouseWheelevent handler to increase or decrease the component’s value.这就是我们要旋转所选对象所要做的一切; 但是,还有一个ActionScript的附加片段,该片段将为Flash Panel的鼠标中键提供支持。 这使我们可以通过单击向上和向下箭头,或者通过向上或向下滚动鼠标滚轮来增加或减小旋转值。 这使用与NumericStepper组件的事件处理程序相同的方法,但是使用
onMouseWheel事件处理程序增加或减少组件的值。var mouseListener:Object = new Object(); mouseListener.onMouseWheel = function(delta) { stepSizer.value += delta; }; Mouse.addListener(mouseListener);Save your Flash document, and export the SWF with a suitable name to your Flash MX 2004 'WindowSWF' directory as follows.
保存您的Flash文档,并将具有合适名称的SWF导出到Flash MX 2004'WindowSWF'目录,如下所示。
Windows 2000 or Windows XP
Windows 2000或Windows XP
Drive:Documents and SettingsuserLocal SettingsApplication DataMacromediaFlash MX 2004languageConfigurationWindowSWF
驱动器:文档和设置用户本地设置应用程序数据MacromediaFlash MX 2004语言配置窗口SWF
Windows 98
Windows 98
Drive:WindowsApplication DataMacromediaFlash MX 2004languageConfigurationWindowSWF
驱动器:WindowsApplication DataMacromediaFlash MX 2004语言配置WindowSWF
Mac OS X
Mac OS X
Drive:/Users/userName/Library/Application Support/Macromedia/Flash MX 2004/language/Configuration/WindowSWF
驱动器:/用户/用户名/库/应用程序支持/ Macromedia / Flash MX 2004 /语言/配置/ WindowSWF
Restart Flash and access the panel from Window > Other Panels > [Name of Exported SWF]
重新启动Flash并从“窗口”>“其他面板”>“ [导出的SWF名称]”访问该面板
To use the command, simply select a single object from the stage, then use the controls within the Flash panel to control rotation of the object. Now you have a fully functional Flash Panel that controls the rotation of your object in a quick, defined and timely manner!
要使用该命令,只需从舞台中选择一个对象,然后使用Flash面板中的控件来控制对象的旋转。 现在,您有了功能齐全的Flash Panel,可以快速,定义且及时地控制对象的旋转!
Note: I usually use the Flash JSFL Wrapper to trace out information to the Output Panel during the development phase. For example, if in this case, I wanted to trace out the current value of the NumericStepper component when middle mouse wheel was scrolled, I would add to our code the lines denoted in bold.
注意:在开发阶段,我通常使用Flash JSFL包装器将信息跟踪到“输出面板”。 例如,如果在这种情况下,我想在滚动鼠标中键时找出NumericStepper组件的当前值,则可以在代码中添加以粗体表示的行。
var mouseListener:Object = new Object();
mouseListener.onMouseWheel = function(delta) {
  flapi.trace("Object rotation is now "+stepSizer.value+ " degrees");
  stepSizer.value += delta;
};
Note also that there are a couple of extra functions I've included at the end of this article to help you on your way!
还请注意,本文结尾处提供了一些额外的功能,以帮助您前进!
Now all that remains is to package the SWF into a manageable MXP file that can be installed onto your machine, or computers of your colleagues or anyone that you wish!
现在剩下的就是将SWF打包到一个可管理的MXP文件中,该文件可以安装到您的计算机,同事的计算机或您希望的任何人的计算机上!
实作 (Implementation)
Before we package the Flash Panel into a distributable format, there are a couple of 'gotchas' that we need to examine!
在将Flash Panel打包为可分发格式之前,需要检查一些“陷阱”!
Updating the Panel while still in Flash MX 2004
仍在Flash MX 2004中更新面板
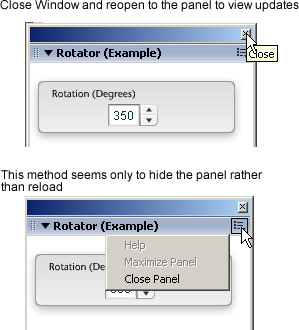
When you make changes to the interface of, or add code to, your Flash Panel projects, you will obviously need to export your updated SWF to the 'WindowSWF' folder. However, in order to see the updates, you'll need to close the panel by clicking the window 'x' button when the panel is undocked and reopen it from the 'Window > Other Panels >' menu, rather than selecting 'Close Panel' from the Options flyout. The reasoning behind this is that clicking the 'Close Panel' option seems merely to hide the panel from view, rather than properly closing it and releasing it from memory.
当您更改Flash Panel项目的界面或向其中添加代码时,显然需要将更新的SWF导出到“ WindowSWF”文件夹。 但是,为了查看更新,您需要通过在取消固定面板时单击窗口“ x”按钮来关闭面板,然后从“窗口”>“其他面板”>“菜单”中重新打开它,而不是选择“关闭面板”从“选项”弹出菜单中选择。 其背后的原因是,单击“关闭面板”选项似乎只是在隐藏面板,而不是正确关闭面板并将其从内存中释放。
Name the Exported SWF
命名导出的SWF
I've experienced several 'Name Clash' issues when developing extensions for Flash MX 2004, and they can be slightly irritating -- to say the least! Sometimes, when you export a SWF to the 'WindowSWF' directory and attempt to open the panel within Flash MX 2004, a different panel opens!
在开发Flash MX 2004扩展时,我遇到了几个“名称冲突”问题,它们可能会有点令人讨厌-至少可以说是! 有时,当您将SWF导出到“ WindowSWF”目录并尝试在Flash MX 2004中打开面板时,会打开另一个面板!
There is apparently no workaround for this -- you simply have to change the name of the SWF until it opens the correct panel when you select the panel from Window > Other Panels > [Your Panel]. To me, it looks like Flash MX 2004's built-in directory parsing uses a simple regular expression to iterate through the directory, and it can easily get confused! Hopefully, this will be rectified in the next minor (or major) release of Flash MX 2004.
显然,这没有解决方法-当您从“窗口”>“其他面板”>“ [您的面板]”中选择面板时,只需更改SWF的名称,直到它打开正确的面板即可。 在我看来,Flash MX 2004的内置目录解析使用了一个简单的正则表达式来遍历目录,因此很容易混淆! 希望这一点将在Flash MX 2004的下一个次要(或主要)版本中得到纠正。
Package your Panel
打包面板
In order to make your shiny new panel easily shareable, you need to create an MXP file that can be installed with the Macromedia Extension Manager. The first step is to create an MXI file that the Extension Manager can use to compile the MXP file. The MXI is essentially an XML file that contains simple information about the extension: version information, extension name and description, as well as the files to compile.
为了使您的闪亮新面板易于共享,您需要创建一个可以与Macromedia Extension Manager一起安装的MXP文件。 第一步是创建一个MXI文件,扩展管理器可以使用该文件来编译MXP文件。 MXI本质上是一个XML文件,其中包含有关扩展的简单信息:版本信息,扩展名和描述以及要编译的文件。
Note that an example .mxi file is included within the article source code, so you can alter it for your needs.
请注意,文章源代码中包含示例.mxi文件,因此您可以根据需要进行更改。
Although it's outside the scope of this article to describe all the options available to those creating distributable MXPs, I'll cover some of the basics here to get you started.
尽管描述创建可分发MXP的人员可用的所有选项不在本文讨论范围之内,但我将在此处介绍一些基础知识以帮助您入门。
In order to create an MXI file for the Flash Panel we've just created, open your favourite text editor and add the following:
为了为我们刚刚创建的Flash Panel创建一个MXI文件,打开您喜欢的文本编辑器并添加以下内容:
<?xml version="1.0" encoding="UTF-8"?>

<macromedia-extension

   name="Rotator Panel for Flash MX 2004"

   version="1.0.1"

   type="Command"

   requires-restart="true">

  <author name="Phireworx" />

  <products>

    <product name="Flash" version="7" primary="true" />

  </products>

  <description>

  <![CDATA[

  Happily rotate your objects in Flash MX 2004 using this Simple     Panel

  ]]>

  </description>

  <ui-access>

  <![CDATA[

  Access to the command panel is by selecting 'Window > Other Panels     > Rotator Panel' in Flash MX 2004.

  ]]>

  </ui-access>

  <license-agreement>

  <![CDATA[

  ]]>

  </license-agreement>

  <files>

  <file source="Rotator Panel.swf" destination="$flash/WindowSWF" />

  </files>

</macromedia-extension>
The MXI file contains different information, all of which can be easily understood and edited to suit your own needs. Here's a quick overview of where the information is located:
MXI文件包含不同的信息,所有这些信息都可以轻松理解和编辑以适合您自己的需求。 以下是有关信息所在位置的快速概述:
Author Name: within the
<author>tag name attribute作者名:在
<author>标记名属性中Description: within the
<description>tag说明:在
<description>标记内Access and Usage Instructions: within the
<UI-access>tag访问和使用说明:在
<UI-access>标记内Source File: within the
<file>tag source attribute源文件:在
<file>标记源属性中File Destination: the location at which you should install the file is within the
<file>tag destination attribute文件目标:应在
<file>标记目标属性中安装文件的位置
The most important section is the name of the SWF file that we are going to add:
最重要的部分是我们要添加的SWF文件的名称:
<file source="Rotator Panel.swf" destination="$flash/WindowSWF" />We simply place the name of the exported SWF into the 'file source' section, and add the 'WindowSWF' directory as the destination ($flash/WindowSWF).
我们只需将导出的SWF的名称放入“文件源”部分,然后将“ WindowSWF”目录添加为目标目录( $flash/WindowSWF )。
Note that the name of the exported SWF file that you include within the extension will appear as it does in the Flash MX 2004 menu system under 'Other Panels'.
请注意,扩展名中包含的已导出SWF文件的名称将与在“其他面板”下的Flash MX 2004菜单系统中一样显示。
Once you've edited the options to your needs, save the file with the extension .mxi (e.g. Rotator Panel;.mxi).
根据需要编辑完选项后,请保存扩展名为.mxi的文件(例如Rotator Panel; .mxi)。
Now, you can double-click the MXI file, and (if Macromedia Extension Manager is installed), you'll be prompted for an extension (MXI) to package. You'll also be asked for a name by which the extension package (MXP) can be saved. The Macromedia Extension Manager automatically creates the MXP file, which can then be distributed as you see fit!
现在,您可以双击MXI文件,并且(如果已安装Macromedia Extension Manager)将提示您输入要打包的扩展(MXI)。 您还将被要求提供一个名称,可以用来保存扩展包(MXP)。 Macromedia Extension Manager自动创建MXP文件,然后您可以根据需要分发该文件!
I've only skimmed the surface of creating your own custom Flash Panels in this article, but I certainly hope that this information has given you the incentive to create your own Flash Panels! If you do create any exciting Flash Panels, you can always share them with the SitePoint community by posting in the Flash forums.
我只是在本文中略过了创建自己的自定义Flash Panel的内容,但是我当然希望这些信息能激励您创建自己的Flash Panel! 如果您确实创建了任何激动人心的Flash面板,则始终可以通过在Flash论坛中发布与SitePoint社区共享它们。
Don't be afraid to experiment with your own cool effects and ideas for panels and commands. I'll see you in the forums!
不要害怕尝试自己的面板和命令效果和创意。 我会在论坛上见!
额外功能 (Extra Functions)
Here are a few of extra functions to help you on your way with the development of Flash Panels.
这里有一些额外的功能,可以帮助您逐步开发Flash Panel。
Show an Alert
显示警报
When called from a compiled SWF, this simple piece of code will produce an alert within Flash MX 2004.
从编译的SWF调用时,此简单代码段将在Flash MX 2004中产生警报。
errMsg = "alert('Please Save Your FLA before Applying the Effect');";

MMExecute(errMsg);
Check the File is Saved
检查文件已保存
This next section of code will check to see whether the current document has been saved or not, and carries out a conditional function:
代码的下一部分将检查当前文档是否已保存,并执行条件函数:
function checkDocumentIsSaved() {

  var fileDestinationTemp = MMExecute("fl.getDocumentDOM().path");

  if (fileDestinationTemp != "undefined") {

    //Document is Saved, do something

  } else {

    //Document is NOT Saved, do something

  }

}
Iterate Through Selected Stage Objects
遍历选定的舞台对象
This simple code will iterate through an array of currently selected objects on the stage. This can be extremely useful to change en masse properties of groups of selected objects:
这个简单的代码将遍历舞台上当前选定对象的数组。 这对于更改选定对象组的整体属性非常有用:
var objLength = MMExecute("fl.getDocumentDOM().selection.length");

  for (var i = 0; i<objLength; i++)

      {

      //Do Something to the selected object here

      flapi.trace(i);

}flash图片批量创建元件


 5万+
5万+

 被折叠的 条评论
为什么被折叠?
被折叠的 条评论
为什么被折叠?
 到【灌水乐园】发言


