


 本文是关于构建示例应用程序进行性能优化系列的一部分,重点是使用Nginx进行服务器端优化。通过调整PHP-FPM进程管理器设置、Nginx和fastcgi缓存,将28秒的缩略图生成时间降低到0.7秒。测试显示,经过优化,服务器每秒可以处理超过100个请求,失败率显著降低,页面加载时间大幅缩短。
服务器端配置nginx
This article is part of a series on building a sample application — a multi-image gallery blog — for performance benchmarking and optimizations. (View the repo here.)
本文是构建用于性能基准测试和优化的示例应用程序(一个多图像画廊博客)系列文章的一部分。 (在此处查看回购 。)
Let’s continue optimizing our app. We’re starting with on-the-fly thumbnail generation that takes 28 seconds per request, depending on the platform running your demo app (in my case it was a slow filesystem integration between host OS and Vagrant), and bring it down to a pretty acceptable 0.7 seconds.
让我们继续优化我们的应用程序 。 我们从即时生成缩略图开始,每个缩略图需要28秒,具体取决于运行演示应用程序的平台(在我的情况下,这是主机OS和Vagrant之间的缓慢文件系统集成),并将其简化为可接受的0.7秒。

Admittedly, this 28 seconds should only happen on initial load. After the tuning, we were able to achieve production-ready times:
诚然,这28秒仅应在初始加载时发生。 调整之后,我们能够实现生产就绪时间:

故障排除 (Troubleshooting)
It is assumed that you’ve gone through the bootstrapping process and have the app running on your machine — either virtual or real.
假设您已经完成了引导过程 ,并在虚拟机或真实机上运行了该应用程序。
Note: if you’re hosting the Homestead Improved box on a Windows machine, there might be an issue with shared folders. This can be solved by adding type: "nfs" setting to the folder in Homestead.yaml:
注意:如果您在Windows计算机上托管“ 改进的Homestead”框,则共享文件夹可能存在问题。 这可以通过在Homestead.yaml的folder中添加type: "nfs"设置来解决:
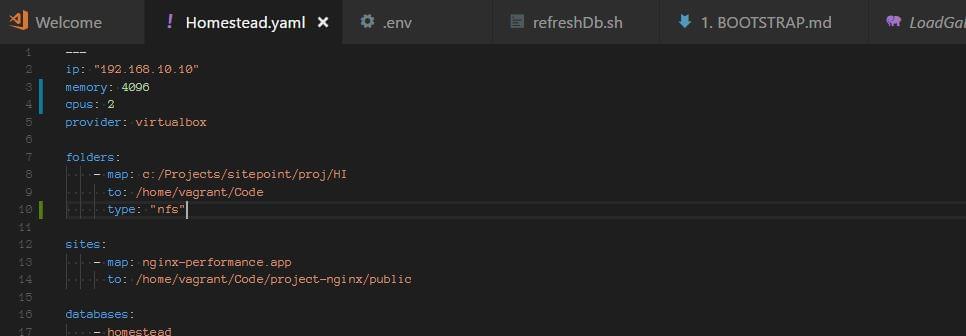
You should also run vagrant up from a shell/powershell interface that has administrative privileges if problems persist (right-click, run as administrator).
如果问题仍然存在(右键单击,以管理员身份运行),您还应该从具有管理特权的Shell / PowerShell界面运行vagrant up 。
In one example before doing this, we got 20 to 30 second load times on every request, and couldn’t get a rate faster than one request per second (it was closer to 0.5 per second):
在执行此操作之前的一个示例中,每个请求的加载时间为20到30秒,并且无法获得比每秒一个请求更快的速率(每秒接近0.5):

流程 (The Process)
Let’s go through the testing process. We installed Locust on our host, and created a very simple locustfile.py:
让我们来看一下测试过程。 我们在主机上安装了Locust ,并创建了一个非常简单的locustfile.py :
from locust import HttpLocust, TaskSet, task

class UserBehavior(TaskSet):
    @task(1)
    def index(self):
        self.client.get("/")

class WebsiteUser(HttpLocust):
    task_set = UserBehavior
    min_wait = 300
    max_wait = 1000
Then we downloaded ngrok to our guest machine and tunneled all HTTP connections through it, so that we can test our application over a static URL.
然后,我们将ngrok下载到客户机中,并通过该客户机建立了所有HTTP连接的隧道,以便我们可以通过静态URL测试应用程序。
Then we started Locust and swarmed our app with 100 parallel users:
然后,我们启动了Locust,并与100个并行用户组成了我们的应用程序:

Our server stack consisted of PHP 7.1.10, Nginx 1.13.3 and MySQL 5.7.19, on Ubuntu 16.04.
我们的服务器堆栈由Ubuntu 16.04上PHP 7.1.10,Nginx 1.13.3和MySQL 5.7.19组成。
PHP-FPM及其过程管理器设置 (PHP-FPM and its Process Manager Setting)
php-fpm spawns its own processes, independent of the web-server process. Management of the number of these processes is configured in /etc/php/7.1/fpm/pool.d/www.conf (7.1 here can be exchanged for the actual PHP version number currently in use).
php-fpm生成其自己的进程,而与Web服务器进程无关。 这些进程数的管理在/etc/php/7.1/fpm/pool.d/www.conf配置(此处的7.1可交换为当前使用的实际PHP版本号)。
In this file, we find the pm setting. This setting can be set to dynamic, ondemand and static. Dynamic is maybe the most common wisdom; it allows the server to juggle the number of spawned PHP processes between several settings:
在此文件中,我们找到pm设置。 此设置可以设置为dynamic , ondemand和static 。 动态也许是最常见的智慧。 它允许服务器在几种设置之间调整生成PHP进程的数量:
pm = dynamic
; The number of child processes to be created when pm is set to 'static' and the
; maximum number of child processes when pm is set to 'dynamic' or 'ondemand'.
; This value sets the limit on the number of simultaneous requests that will be
; served.
pm.max_children = 6
; The number of child processes created on startup.
; Note: Used only when pm is set to 'dynamic'
; Default Value: min_spare_servers + (max_spare_servers - min_spare_servers) / 2
pm.start_servers = 3
; The desired minimum number of idle server processes
; Note: Used only when pm is set to 'dynamic'
; Note: Mandatory when pm is set to 'dynamic'
pm.min_spare_servers = 2
; The desired maximum number of idle server proceses
; Note: Used only when pm is set to 'dynamic'
; Note: Mandatory when pm is set to 'dynamic'
pm.max_spare_servers = 4
The meanings of these values are self-explanatory, and the spawning of processes is being done on demand, but constrained by these minimum and maximum values.
这些值的含义是不言自明的,并且进程的生成是按需进行的,但是受到这些最小值和最大值的限制。
After fixing the Windows shared-folders issue with nfs, and testing with Locust, we were able to get approximately five requests per second, with around 17–19% failures, with 100 concurrent users. Once it was swarmed with requests, the server slowed down and each request took over ten seconds to finish.
用nfs修复Windows共享文件夹问题,并使用Locust进行测试后,我们每秒能够收到大约5个请求,大约17–19%的失败,并发用户100个。 一旦被请求淹没,服务器就会变慢,每个请求都花了十秒钟完成。
Then we changed the pm setting to ondemand.
然后,我们将pm设置更改为ondemand 。
Ondemand means that there are no minimum processes: once the requests stop, all the processes will stop. Some advocate this setting, because it means the server won’t be spending any resources in its idle state, but for the dedicated (non-shared) server instances this isn’t necessarily the best. Spawning a process includes an overhead, and what is gained in memory is being lost in time needed to spawn processes on-demand. The settings that are relevant here are:
按需表示没有最小进程:一旦请求停止,所有进程将停止。 有人主张使用此设置,因为这意味着服务器不会在空闲状态下花费任何资源,但是对于专用(非共享)服务器实例,这不一定是最好的。 产生一个进程会产生额外的开销,并且在内存中获得的内容会浪费在按需生成进程所需的时间上。 此处相关的设置是:
pm.max_children = 6
; and
pm.process_idle_timeout = 20s;
; The number of seconds after which an idle process will be killed.
; Note: Used only when pm is set to 'ondemand'
; Default Value: 10s
When testing, we increased these settings a bit, having to worry about resources less.
在测试时,我们稍微增加了这些设置,而不必担心资源。
There’s also pm.max_requests, which can be changed, and which designates the number of requests each child process should execute before respawning.
还有pm.max_requests ,可以更改,并指定每个子进程在重生之前应执行的请求数。
This setting is a tradeoff between speed and stability, where 0 means unlimited.
此设置是速度和稳定性之间的权衡,其中0表示无限制。
ondemand didn’t bring much change, except that we noticed more initial waiting time when we started swarming our application with requests, and more initial failures. In other words, there were no big changes: the application was able to serve around four to maximum six requests per second. Waiting time and rate of failures were similar to the dynamic setup.
ondemand并没有带来太大变化,只是我们注意到在开始使用请求来充实我们的应用程序时出现了更多的初始等待时间,并且出现了更多的初始失败。 换句话说,没有什么大的变化:该应用程序每秒能够处理大约4到最多6个请求。 等待时间和失败率与dynamic设置相似。
Then we tried the pm = static setting, allowing our PHP processes to take over the maximum of the server’s resources, short of swapping, or driving the CPU to a halt. This setting means we’re forcing the maximum out of our system at all times. It also means that — within our server’s constraints — there won’t be any spawning overhead time cost.
然后,我们尝试了pm = static设置,使我们PHP进程可以接管服务器的最大资源,而无需进行交换或使CPU停止运行。 此设置意味着我们一直在强制将最大数量限制出我们的系统。 这也意味着-在我们服务器的限制范围内-不会产生任何开销。
What we saw was an improvement of 20%. The rate of failed requests was still significant, though, and the response time was still not very good. The system was far from being ready for production.
我们看到的是改善了20%。 但是,失败请求的比率仍然很高,并且响应时间仍然不是很好。 该系统远未准备好投入生产。

However, on Pingdom Tools, we got a bearable 3.48 seconds when the system was not under pressure:
但是,在Pingdom Tools上,当系统没有压力时,我们可以忍受3.48秒:
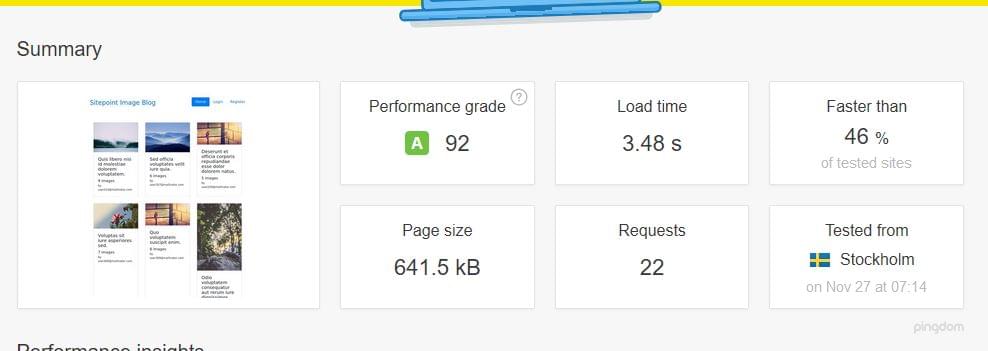
This meant that pm static was an improvement, but in the case of a bigger load, it would still go down.
这意味着pm static是一个改进,但是在更大的负载的情况下,它仍然会下降。
In one of the previous articles, we explained how Nginx can itself serve as a caching system, both for static and dynamic content. So we reached for the Nginx wizardry, and tried to bring our application to a whole new level of performance.
在之前的一篇文章中,我们解释了Nginx如何本身可以用作静态和动态内容的缓存系统。 因此,我们接触了Nginx向导,并试图将我们的应用程序提升到全新的性能水平。
And we succeeded. Let’s see how.
我们成功了。 让我们看看如何。
Nginx和fastcgi缓存 (Nginx and fastcgi Caching)
proxy_cache_path /home/vagrant/Code/ng-cache levels=1:2 keys_zone=ng_cache:10m max_size=10g inactive=60m;
proxy_cache_use_stale error timeout http_500 http_502 http_503 http_504;
fastcgi_cache_path /home/vagrant/Code/ngd-cache levels=1:2 keys_zone=ngd_cache:10m inactive=60m;
fastcgi_cache_key "$scheme$request_method$host$request_uri";
fastcgi_cache_use_stale error timeout invalid_header http_500;
fastcgi_ignore_headers Cache-Control Expires Set-Cookie;
add_header NGINX_FASTCGI_CACHE $upstream_cache_status;

server {
    listen 80;
    listen 443 ssl http2;
    server_name nginx-performance.app;
    root "/home/vagrant/Code/project-nginx/public";

    index index.html index.htm index.php;

    charset utf-8;

    proxy_cache ng_cache;

    location / {
        try_files $uri $uri/ /index.php?$query_string;
    }

    location = /favicon.ico { access_log off; log_not_found off; }
    location = /robots.txt  { access_log off; log_not_found off; }

    access_log off;
    error_log  /var/log/nginx/nginx-performance.app-error.log error;

    sendfile off;

    client_max_body_size 100m;

    location ~ \.php$ {
        fastcgi_split_path_info ^(.+\.php)(/.+)$;
        fastcgi_pass unix:/var/run/php/php7.1-fpm.sock;
        fastcgi_index index.php;
        include fastcgi_params;
        fastcgi_param SCRIPT_FILENAME $document_root$fastcgi_script_name;

        fastcgi_intercept_errors off;
        fastcgi_buffer_size 16k;
        fastcgi_buffers 4 16k;
        fastcgi_connect_timeout 300;
        fastcgi_send_timeout 300;
        fastcgi_read_timeout 300;


      fastcgi_cache ngd_cache;
      fastcgi_cache_valid  60m;
    }

    location ~ /\.ht {
        deny all;
    }

    ssl_certificate     /etc/nginx/ssl/nginx-performance.app.crt;
    ssl_certificate_key /etc/nginx/ssl/nginx-performance.app.key;
}
We opened our Nginx virtual host file and added the above settings. Let’s explain them.
我们打开了Nginx虚拟主机文件,并添加了以上设置。 让我们解释一下。
proxy_cache_path /home/vagrant/Code/ng-cache levels=1:2 keys_zone=ng_cache:10m max_size=10g inactive=60m;As explained in Apache vs Nginx Performance: Optimization Techniques, proxy_cache_path is used for caching of static assets — like images, style sheets, JavaScript files. The path itself needs to exist; we need to create those directories. levels designates depth of the directories inside that path/folder. Traversing can be costly for the request time, so it’s good to keep it small. Keys zone is a name; every virtual host can (and should) use a separate one. Max size means maximum size of the cache, and inactive means the time items will be kept in cache even if they aren’t requested.
如Apache vs Nginx性能:优化技术中所述 , proxy_cache_path用于缓存静态资产 ,例如图像,样式表,JavaScript文件。 路径本身必须存在; 我们需要创建这些目录。 levels指定该路径/文件夹内目录的深度。 在请求时间中遍历可能会很昂贵,因此最好将其保持为较小。 键区是一个名称; 每个虚拟主机都可以(并且应该)使用单独的虚拟主机。 “最大大小”是指高速缓存的最大大小,而“不活动”是指即使没有请求,时间项也将保留在高速缓存中。
After that time of inactivity, the cache for a resource will be repopulated.
在这段时间不活动之后,将重新填充资源的缓存。
proxy_cache_use_stale and fastcgi_cache_use_stale are interesting, as they can provide the “always online” feature we can see with CDN providers like Cloudflare: if the back end goes offline, Nginx will serve these resources from cache. This failure-proofs our website to a degree.
proxy_cache_use_stale和fastcgi_cache_use_stale很有趣,因为它们可以提供我们像Cloudflare这样的CDN提供程序可以看到的“始终在线”功能:如果后端脱机,Nginx将从缓存中提供这些资源。 这一定程度上证明了我们的网站。
All the fastcgi_cache_* settings are for the PHP-generated (dynamic) content, and proxy_cache_* settings are for the static files.
所有fastcgi_cache_*设置均用于PHP生成的(动态)内容,而proxy_cache_*设置均用于静态文件。
fastcgi_cache_key defines a key for caching.
fastcgi_cache_key定义用于缓存的密钥。
fastcgi_ignore_headers disables processing some response header fields from the FastCGI backend.
fastcgi_ignore_headers 禁止处理来自FastCGI后端的某些响应头字段 。
There’s another interesting setting we could have used:
我们可以使用另一个有趣的设置:
fastcgi_cache_purgeThis defines requests which will be able to purge the cache. Nginx (its ngx_http_fastcgi_module) gives us quite the comprehensive toolset for caching. One example of using the above directive would be:
这定义了将能够清除缓存的请求。 Nginx(其ngx_http_fastcgi_module )为我们提供了非常全面的缓存工具集。 使用上述指令的一个示例是:
fastcgi_cache_path /data/nginx/cache keys_zone=cache_zone:10m;

map $request_method $purge_method {
    PURGE   1;
    default 0;
}

server {
    ...
    location / {
        fastcgi_pass        backend;
        fastcgi_cache       cache_zone;
        fastcgi_cache_key   $uri;
        fastcgi_cache_purge $purge_method;
    }
}
Here, PURGE REST request would be able to delete things from cache.
在这里,PURGE REST请求将能够从缓存中删除内容。
It’s also possible to revalidate the cache under some conditions.
在某些情况下,还可以重新验证缓存。
In our configuration, we didn’t use all the intricacies and capabilities of Nginx, but it’s good to know they’re there if we need them.
在我们的配置中,我们没有使用Nginx的所有复杂性和功能,但是很高兴知道它们是否在需要的地方。
We added Nginx headers to our responses, to be able to tell whether the resource was served from cache or not:
我们在响应中添加了Nginx标头,以便能够判断该资源是否由缓存提供:
add_header NGINX_FASTCGI_CACHE $upstream_cache_status;Then, we can inspect and dissect our page load time to see what works and what doesn’t:
然后,我们可以检查和剖析页面加载时间,以了解哪些有效,哪些无效:

To warm up the cache, we’ll need to go through the requests for each of the resources.
要预热缓存,我们需要遍历每个资源的请求。
fastcgi_cache_methods can be useful for caching specific request methods, like POST. GET and HEAD are cached by default.
fastcgi_cache_methods对于缓存特定的请求方法(例如POST)很有用。 GET和HEAD默认情况下被缓存。
There’s also byte-range caching, which can be used for video-streaming optimization, as outlined here.
还有字节范围的缓存,可用于视频流优化,概述这里 。
One could easily design a whole private CDN network with all the configurability that Nginx offers.
可以轻松设计一个具有Nginx提供的所有可配置性的整个专用CDN网络。
Having enabled the above configuration — both for the static and the dynamic content of our website — we started Locust, and swarmed our system with 100 parallel users. The difference in results was nothing short of amazing. The strain the server was under previously could not be felt now.
启用以上配置(包括网站的静态内容和动态内容)后,我们启动了Locust,并用100个并行用户组成了我们的系统。 结果的差异令人惊讶。 现在无法感觉到服务器以前所承受的压力。

We can see that the median time per request was 170 milliseconds. That is around a hundredfold improvement. Requests per second were above 100.
我们可以看到每个请求的平均时间为170毫秒。 这大约是一百倍的改进。 每秒的请求数超过100。
We can also see, in the Average Response Time chart, that the initial requests saw spikes in response times, and after that, the response time declined more and more, to around 130ms.
在“平均响应时间”图表中,我们还可以看到,初始请求的响应时间达到峰值,然后,响应时间越来越短,下降到130毫秒左右。
Nginx caching brought us some great improvements. The main bottleneck with this application will not be hardware resources, even if they’re modest.
Nginx缓存为我们带来了一些很大的改进。 此应用程序的主要瓶颈将不是硬件资源,即使它们很小。

We can also see that the percentage of failed requests went from 17% to 0.53%.
我们还可以看到,失败请求的百分比从17%上升到0.53%。
We then went to Pingdom’s page test and tested our website:
然后,我们去了Pingdom的页面测试并测试了我们的网站:

We can see that we managed to bring page load time well below one second!
我们可以看到,我们成功地将页面加载时间缩短到了不到一秒!
We also tested the single gallery page, which has additional “baggage” of related, and newest galleries:
我们还测试了单个画廊页面,该页面具有与相关画廊和最新画廊有关的其他“行李”:

We are attaching a HAR file report of this test for analysis.
结论 (Conclusion)
In this article, some of the points covered in my earlier discussion on Nginx performance were tested, and other settings like process management, and the measure of its impact on page load time were discussed and analyzed.
在本文中,测试了我先前有关Nginx性能的讨论中涵盖的一些要点,并讨论和分析了诸如进程管理之类的其他设置以及其对页面加载时间的影响的度量。
Did we miss anything worth mentioning? Can you think of other Nginx settings we could apply to this app to improve the performance?
我们错过了任何值得一提的东西吗? 您能想到我们可以应用于此应用程序以提高性能的其他Nginx设置吗?
翻译自: https://www.sitepoint.com/server-side-optimization-with-nginx-and-pm-static/
服务器端配置nginx


 732
732

 被折叠的 条评论
为什么被折叠?
被折叠的 条评论
为什么被折叠?
 到【灌水乐园】发言


