


phpunit入门
There are a lot of PHPUnit posts on our site already (just check the tag), but it’s been a while since we’ve actually introduced people to it, and the tool has evolved significantly since then.
我们的网站上已经有很多PHPUnit帖子(只需检查tag ),但是距离我们实际上向人们介绍过已经有一段时间了,自那时以来该工具已经有了很大的发展。
This article aims to re-introduce the tool in a modern way, to a modern audience, in a modern PHP environment – if you’re unfamiliar with PHPUnit or testing, this post is for you.
本文旨在在现代PHP环境中以现代的方式向现代用户介绍该工具-如果您不熟悉PHPUnit或测试,那么本篇文章适合您。

Here we assume you’re familiar with object oriented PHP and are using PHP version 7 and above. To get an environment up and running which has PHP 7 pre-installed, and to be able to follow instructions in this post to the letter without getting tripped up, we suggest you use Homestead Improved. Note also that some command line usage will be expected, but you will be guided through it all. Don’t be afraid of it – it’s a tool more powerful than you can imagine.
在这里,我们假设您熟悉面向对象PHP,并且正在使用PHP 7及更高版本。 要启动并运行已预安装PHP 7的环境,并能够按照本帖子中的说明进行操作而不被绊倒,建议您使用Homestead Improvement 。 还要注意,某些命令行用法是可以预期的,但是将指导您完成全部操作。 不用担心-它是您无法想象的强大工具。
If you’re wondering why we’re recommending everyone use a Vagrant box, I go in depth about this in Jump Start PHP Environment, but this introduction of Vagrant will explain things adequately as well.
如果您想知道为什么我们建议每个人都使用Vagrant框,我将在Jump Start PHP Environment中对此进行深入探讨,但是对Vagrant的介绍也将对这些内容进行充分的解释。
测试驱动开发到底是什么? (What exactly is Test Driven Development?)
Test Driven Development is the idea that you write code in such a way that you first write another bit of code the sole purpose of which is making sure that the originally intended code works, even if it’s not written yet.
测试驱动开发的想法是,您以这样的方式编写代码:首先编写另一段代码,其唯一目的是确保最初打算的代码可以工作,即使尚未编写。
Checking if something is indeed what we expect it to be is called asserting in TDD-land. Remember this term.
在TDD领域中,检查某事物是否确实是我们期望的东西称为断言 。 记住这个词。
For example, an assertion that 2+2=4 is correct. But if we assert that 2+3=4, the testing framework (like PHPUnit) will mark this assertion as false. This is called a “failed test”. We tested is 2+3 is 4, and failed. Obviously, in your application you won’t be testing for sums of scalar values – instead, there’ll be variables which the language will replace with real values at run-time and assert that, but you get the idea.
例如,断言2 + 2 = 4是正确的。 但是,如果我们断言2 + 3 = 4,那么测试框架(如PHPUnit)会将此断言标记为false。 这称为“失败测试”。 我们测试的是2 + 3是4,失败了。 显然,在您的应用程序中,您不会测试标量值的总和-而是会有一些变量,语言会在运行时将其替换为真实值并断言,但是您明白了。
什么是PHPUnit? (What is PHPUnit?)
PHPUnit is a collection of utilities (PHP classes and executable files) which makes not only writing tests easy (writing tests often entails writing more code than the application actually has – but it’s worth it), but also allows you to see the output of the testing process in a nice graph which lets you know about code quality (e.g. maybe there’s too many IFs in a class – that’s marked as bad quality because changing one condition often requires rewriting as many tests as there are IFs), code coverage (how much of a given class or function has been covered by tests, and how much remains untested), and more.
PHPUnit是实用程序(PHP类和可执行文件)的集合,不仅使编写测试变得容易(编写测试通常需要编写比应用程序实际多的代码,但这是值得的),而且还可以使您查看程序的输出。一个漂亮的图形中的测试过程,可以让您了解代码质量(例如,类中可能有过多的IF –被标记为不良质量,因为更改一个条件通常需要重写与IF一样多的测试),代码覆盖率(多少)给定的类或函数已被测试覆盖,还有多少未测试),等等。
In order not to bore you with too much text (too late?), let’s actually put it to use and learn from examples.
为了不给您带来太多文字(太晚了?),让我们实际使用它并从示例中学习。
The code we end up with at the end of this tutorial can be downloaded from Github.
可以从Github下载本教程末尾使用的代码。
引导示例应用程序 (Bootstrapping an Example Application)
To drive the examples home, we’ll build a simple command line package which lets users turn a JSON file into a PHP file. That PHP file will contain the JSON data as an associative PHP array. This is just a personal use case of mine – I use Diffbot a lot and the output there can be enormous – too large to manually inspect, so easier processing with PHP can come in very handy.
为了使示例更容易理解,我们将构建一个简单的命令行程序包,该程序包使用户可以将JSON文件转换为PHP文件。 该PHP文件将包含JSON数据作为关联PHP数组。 这只是我的一个个人用例–我经常使用Diffbot ,并且输出可能非常庞大–太大而无法手动检查,因此使用PHP进行更轻松的处理非常方便。
Henceforth, it is assumed that you are running a fully PHP 7 capable environment with Composer installed, and can follow along. If you’ve booted up Homestead Improved, please SSH into it now with vagrant ssh, and let’s begin.
从今以后,假定您正在运行一个完全支持PHP 7的环境,并安装了Composer ,并且可以继续进行。 如果您已经启动Homestead Improvement ,请立即使用vagrant ssh SSH进入它,让我们开始。
First, we’ll go into the folder where our projects live. In the case of Homestead Improved, that’s Code.
首先,我们将进入项目所在的文件夹。 在改进Homestead的情况下, 则为 Code 。
cd CodeThen, we’ll create a new project based on PDS-Skeleton and install PHPUnit inside it with Composer.
然后,我们将基于PDS-Skeleton创建一个新项目,并使用Composer在其中安装PHPUnit。
git clone https://github.com/php-pds/skeleton converter
cd converter
composer require phpunit/phpunit --dev
Notice that we used the --dev flag to only install PHPUnit as a dev dependency – meaning it’s not needed in production, keeping our deployed project lightweight. Notice also that the fact that we started with PDS-Skeleton means our tests folder is already created for us, with two demo files which we’ll be deleting.
请注意,我们使用--dev标志仅将PHPUnit作为dev依赖项安装-意味着在生产中不需要它,从而使我们部署的项目保持轻量级。 还请注意,我们从PDS-Skeleton开始的事实意味着我们已经为我们创建了tests文件夹,其中有两个演示文件将被删除。
Next, we need a front controller for our app – the file all requests are routed through. In converter/public, create index.php with the following contents:
接下来,我们需要为我们的应用程序提供一个前端控制器–所有请求都将通过该文件进行路由。 在converter/public ,使用以下内容创建index.php :
<?php
echo "Hello world";
You should be familiar with all the above contents. With our “Hello World” contents in place, let’s make sure we can access this from the browser.
您应该熟悉上述所有内容。 放置好“ Hello World”内容后,确保可以从浏览器访问此内容。
If you’re using Homestead Improved, I hope you followed instructions and set up a virtual host or are accessing the app via the virtual machine’s IP.
如果您使用的是Homestead Improvement ,希望您按照说明进行操作并设置虚拟主机,或者希望通过虚拟机的IP访问该应用程序。
Let’s delete the extra files now. Either do it manually, or run the following:
让我们现在删除多余的文件。 手动执行,或运行以下命令:
rm bin/* src/* docs/* tests/*You may be wondering why we need the front controller with Hello World. We won’t be using it in this tutorial, but later on as we test our app as humans, it’ll come in handy. Regardless, it won’t be part of the final package we deploy.
您可能想知道为什么我们需要Hello World的前端控制器。 我们不会在本教程中使用它,但是稍后,当我们以人类的身份测试我们的应用程序时,它将派上用场。 无论如何,它不会成为我们部署的最终软件包的一部分。
套件和配置 (Suites and Configurations)
We need a PHPUnit configuration file which tells PHPUnit where to find the tests, which preparation steps to take before testing, and how to test. In the root of the project, create the file phpunit.xml with the following content:
我们需要一个PHPUnit配置文件,该文件告诉PHPUnit在哪里可以找到测试,在测试之前需要执行哪些准备步骤以及如何进行测试。 在项目的根目录中,创建具有以下内容的文件phpunit.xml :
<phpunit bootstrap="tests/autoload.php">
  <testsuites>
    <testsuite name="converter">
      <directory suffix="Test.php">tests</directory>
    </testsuite>
  </testsuites>
</phpunit>
phpunit.xml
phpunit.xml
A project can have several test suites, depending on context. For example, everything user-account-related could be grouped into a suite called “users”, and this could have its own rules or a different folder for testing that functionality. In our case, the project is very small so a single suite is more than enough, targeting the tests directory. We defined the suffix argument – this means PHPUnit will only run those files that end with Test.php. Useful when we want some other files among tests as well, but don’t want them to be run except when we call them from within actual Test files.
一个项目可以有多个测试套件,具体取决于上下文。 例如,所有与用户帐户相关的内容都可以归为一个名为“用户”的套件,并且可以具有自己的规则或用于测试该功能的其他文件夹。 在我们的案例中,该项目非常小,因此,针对tests目录的单个套件已绰绰有余。 我们定义了suffix参数–这意味着PHPUnit将只运行那些以Test.php结尾的文件。 当我们也希望在tests其他文件,但又不想运行它们时,除非我们从实际的Test文件中调用它们,否则它很有用。
You can read about other such arguments here.
您可以在此处了解其他类似的论点。
The bootstrap value tells PHPUnit which PHP file to load before testing. This is useful when configuring autoloading or project-wide testing variables, even a testing database, etc – all things that you don’t want or need when in production mode. Let’s create tests/autoload.php:
bootstrap值告诉PHPUnit在测试之前要加载哪个PHP文件。 在配置自动加载或项目范围内的测试变量,甚至是测试数据库等时,这非常有用–在生产模式下,您不需要或不需要的所有东西。 让我们创建tests/autoload.php :
<?php

require_once __DIR__.'/../vendor/autoload.php';
tests/autoload.php
tests/autoload.php
In this case, we’re just loading Composer’s default autoloader because PDS-Skeleton already has the Tests namespace configured for us in composer.json. If we replace template values in that file with our own, we end up with a composer.json that looks like this:
在这种情况下,我们只是加载Composer的默认自动加载器,因为PDS-Skeleton已经在composer.json为我们配置了Tests命名空间。 如果我们用自己的文件替换该文件中的模板值,则最终得到一个composer.json ,如下所示:
{
    "name": "sitepoint/jsonconverter",
    "type": "standard",
    "description": "A converter from JSON files to PHP array files.",
    "homepage": "https://github.com/php-pds/skeleton",
    "license": "MIT",
    "autoload": {
        "psr-4": {
            "SitePoint\\": "src/SitePoint"
        }
    },
    "autoload-dev": {
        "psr-4": {
            "SitePoint\\": "tests/SitePoint"
        }
    },
    "bin": ["bin/converter"],
    "require-dev": {
        "phpunit/phpunit": "^6.2"
    }
}
After this, we run composer du (short for dump-autoload) to refresh the autoloading scripts.
此后,我们运行composer du ( dump-autoload缩写)刷新自动加载脚本。
composer du第一次测试 (The First Test)
Remember, TDD is the art of making errors first, and then making changes to the code that gets them to stop being errors, not the other way around. With that in mind, let’s create our first test.
请记住,TDD是先犯错误,然后对代码进行更改以使它们停止成为错误的技术,而不是相反。 考虑到这一点,让我们创建第一个测试。
<?php

namespace SitePoint\Converter;

use PHPUnit\Framework\TestCase;

class ConverterTest extends TestCase {

    public function testHello() {
        $this->assertEquals('Hello', 'Hell' . 'o');
    }

}
tests/SitePoint/Converter/ConverterTest.php
tests/SitePoint/Converter/ConverterTest.php
It’s best if the tests follow the same structure we expect our project to have. With that in mind, we give them the same namespaces and same directory tree layouts. Thus, our ConverterTest.php file is in tests, subfolder SitePoint, subfolder Converter.
最好的测试是遵循我们期望项目具有的相同结构。 考虑到这一点,我们为它们提供了相同的名称空间和相同的目录树布局。 因此,我们的ConverterTest.php文件处于tests ,子文件夹SitePoint ,子文件夹Converter 。
The file we’re extending is the most basic version of the Test class that PHPUnit offers. In most cases, it’ll be enough. When not, it’s perfectly fine to extend it further and then build on that. Remember – tests don’t have to follow the rules of good software design, so deep inheritance and code repetition are fine – as long as they test what needs to be tested!
我们正在扩展的文件是PHPUnit提供的Test类的最基本版本。 在大多数情况下,这就足够了。 如果没有,最好进一步扩展它,然后在此基础上构建。 请记住,测试不必遵循良好的软件设计规则,因此深度继承和代码重复就可以了,只要它们可以测试需要测试的内容即可!
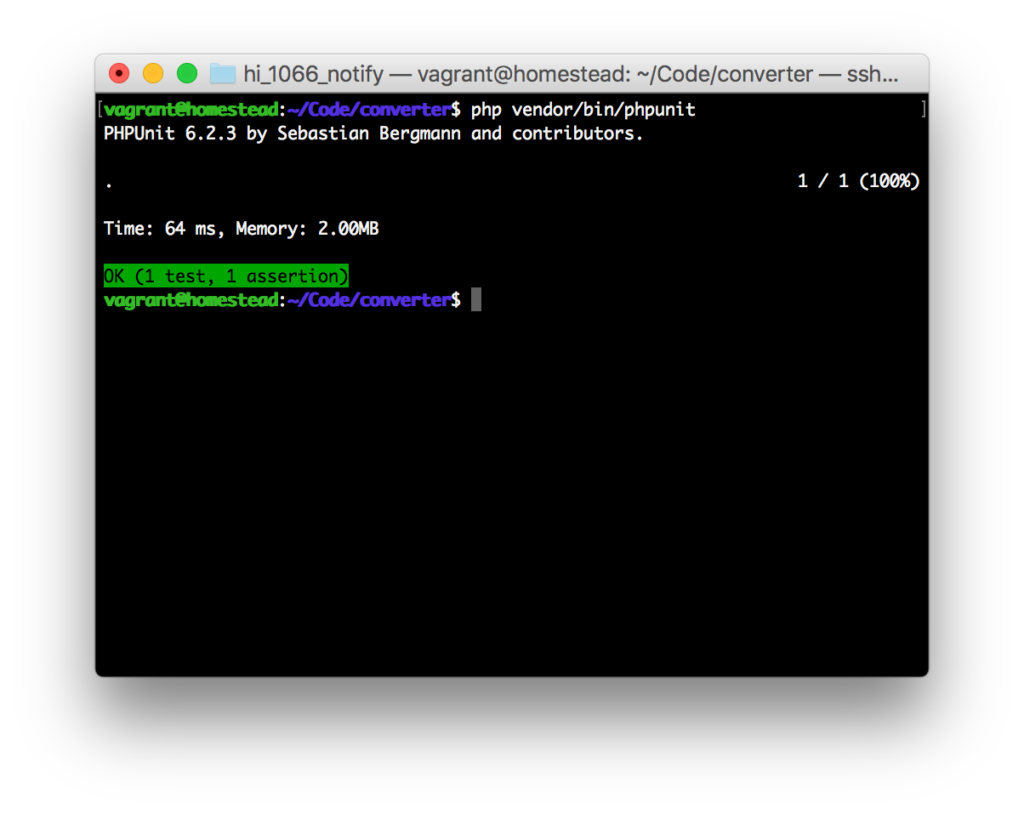
This example “test case” asserts that the string Hello is equal to the concatenation of Hell and o. If we run this suite with php vendor/bin/phpunit now, we’ll get a positive result.
此示例“测试用例”断言字符串 Hello等于Hell和o的串联。 如果现在使用php vendor/bin/phpunit运行此套件,我们将获得积极的结果。
PHPUnit runs every method starting with
testin aTestfile unless told otherwise. This is why we didn’t have to be explicit when running the test suite – it’s all automatic.除非另有说明,否则PHPUnit会在
Test文件中运行所有以test开头的方法。 这就是为什么我们在运行测试套件时不必明确说明的原因-它都是自动的。
Our current test is neither useful nor realistic, though. We used it merely to check if our setup works. Let’s write a proper one now. Rewrite the ConverterTest.php file like so:
但是,我们当前的测试既无用,也不现实。 我们仅使用它来检查我们的设置是否有效。 让我们现在写一个合适的。 像这样重写ConverterTest.php文件:
<?php

namespace SitePoint\Converter;
use PHPUnit\Framework\TestCase;

class ConverterTest extends TestCase
{

    public function testSimpleConversion()
    {
        $input = '{"key":"value","key2":"value2"}';
        $output = [
            'key' => 'value',
            'key2' => 'value2'
        ];
        $converter = new \SitePoint\Converter\Converter();
        $this->assertEquals($output, $converter->convertString($input));
    }
}
tests/SitePoint/Converter/ConverterTest.php
tests/SitePoint/Converter/ConverterTest.php
Okay, so what’s going on here?
好的,这是怎么回事?
We’re testing a “simple” conversion. The input is a JSON string, an object stringified, and the expected output is its PHP array version. Our test asserts that our Converter class, when processing the $input using the convertString method, produces the desired $output, just as defined.
我们正在测试“简单”转换。 输入是JSON字符串,已字符串化的对象,预期输出是其PHP数组版本。 我们的测试断言,我们的Converter类在使用convertString方法处理$input ,会产生所需的$output ,正如定义的那样。
Re-run the suite.
重新运行套件。
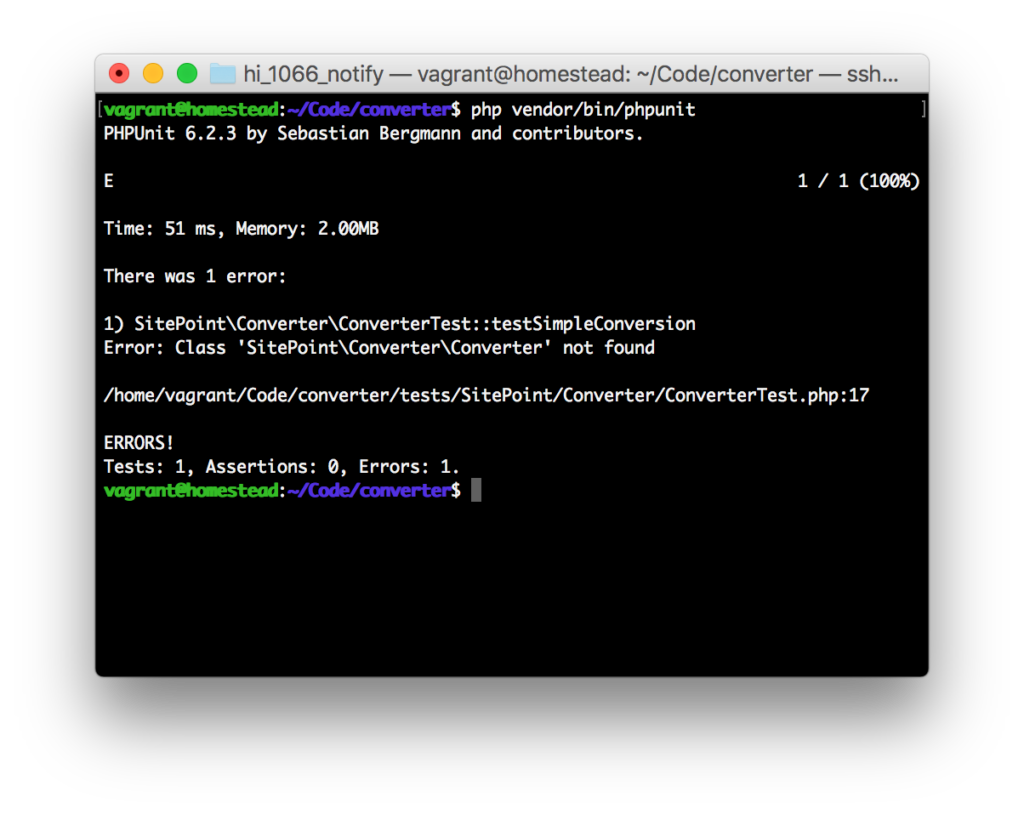
A failing test! Expected, since the class doesn’t even exist yet.
测试失败! 可以预期,因为该类甚至还不存在。
Let’s make things a little bit more dramatic – with color! Edit the phpunit.xml file so that the <phpunit tag contains colors="true", like so:
让我们用色彩使事情更具戏剧性! 编辑phpunit.xml文件,使<phpunit标记包含colors="true" ,如下所示:
<phpunit colors="true" bootstrap="tests/autoload.php">Now if we run php vendor/bin/phpunit, we get a more dramatic output:
现在,如果我们运行php vendor/bin/phpunit ,我们将得到更加生动的输出:

通过测试 (Making the Test Pass)
Now, we begin the process of making this test pass.
现在,我们开始进行此测试通过的过程。
Our first error is: “Class ‘SitePoint\Converter\Converter’ not found”. Let’s fix that.
我们的第一个错误是:“找不到类'SitePoint \ Converter \ Converter'”。 让我们修复它。
<?php

namespace SitePoint\Converter;

class Converter
{

}
src/SitePoint/Converter/Converter.php;
src/SitePoint/Converter/Converter.php;
Now if we re-run the suite…
现在,如果我们重新运行套件...
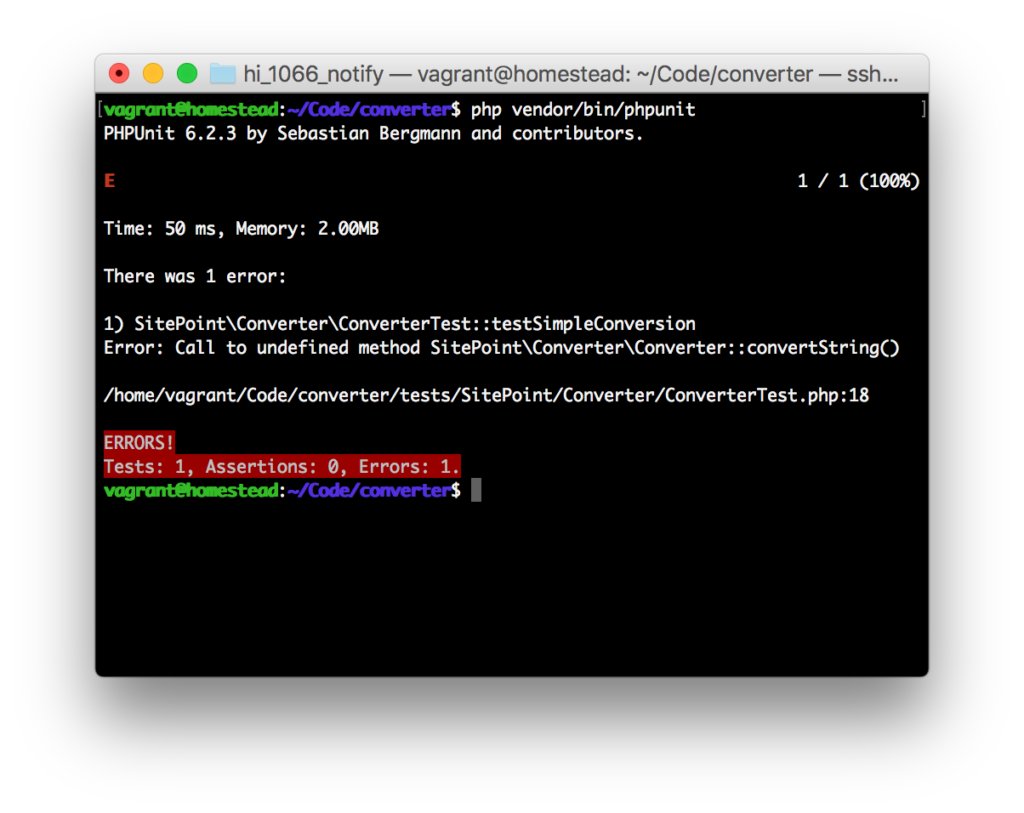
Progress! We’re missing the method we invoked now. Let’s add it to our class.
进展! 我们缺少了现在调用的方法。 让我们将其添加到我们的课程中。
<?php

namespace SitePoint\Converter;

class Converter
{
    public function convertString(string $input): ?array
    {

    }
}
src/SitePoint/Converter/Converter.php;
src/SitePoint/Converter/Converter.php;
We defined a method which accepts an input of type string, and returns either an array or null if unsuccessful. If you’re not familiar with scalar types (string $input), learn more here, and for nullable return types (?array), see here.
我们定义了一个方法,该方法接受字符串类型的输入,如果不成功,则返回一个数组或null。 如果您不熟悉标量类型( string $input ),请在此处了解更多信息 ;有关可为空的返回类型( ?array ),请参见此处 。
Re-run the tests.
重新运行测试。

This is a return type error – the function returns nothing (void) – because it’s empty – and it’s expected to return either null or an array. Let’s complete the method. We’ll use PHP’s built-in json_decode function to decode a JSON string.
这是一个返回类型错误–函数不返回任何值(无效)–因为它为空–预期返回null或数组。 让我们完成该方法。 我们将使用PHP的内置json_decode函数来解码JSON字符串。
public function convertString(string $input): ?array
    {
        $output = json_decode($input);
        return $output;
    }
src/SitePoint/Converter/Converter.php;
src/SitePoint/Converter/Converter.php;
Let’s see what happens if we re-run the suite.
让我们看看如果我们重新运行套件会发生什么。

Uh oh. The function returns an object, not an array. Ah ha! That’s because we didn’t activate “associative array” mode on the json_decode function. The function turns JSON arrays into stdClass instances by default, unless told otherwise. Change it like so:
哦哦 该函数返回一个对象,而不是数组。 啊哈! 那是因为我们没有在json_decode函数上激活“关联数组”模式。 除非另有说明,否则该函数默认将JSON数组转换为stdClass实例。 像这样更改它:
public function convertString(string $input): ?array
    {
        $output = json_decode($input, true);
        return $output;
    }
src/SitePoint/Converter/Converter.php;
src/SitePoint/Converter/Converter.php;
Re-run the suite.
重新运行套件。
Huzzah! Our test now passes! It gets the exact same output we expect from it in the test!
晕! 我们的测试现在通过了! 它获得与测试中期望的输出完全相同的输出!
Let’s add a few more test cases now, to make sure our method really performs as intended. Let’s make those a little more complicated than the simple example we started with. Add the following methods to ConverterTest.php:
现在让我们添加更多测试用例,以确保我们的方法确实按预期执行。 让我们比起手的简单示例复杂一些。 将以下方法添加到ConverterTest.php :
{
        $input     = '{"key":"value","key2":"value2","some-array":[1,2,3,4,5]}';
        $output    = [
            'key'        => 'value',
            'key2'       => 'value2',
            'some-array' => [1, 2, 3, 4, 5],
        ];
        $converter = new \SitePoint\Converter\Converter();
        $this->assertEquals($output, $converter->convertString($input));
    }

    public function testMoreComplexConversion()
    {
        $input     = '{"key":"value","key2":"value2","some-array":[1,2,3,4,5],"new-object":{"key":"value","key2":"value2"}}';
        $output    = [
            'key'        => 'value',
            'key2'       => 'value2',
            'some-array' => [1, 2, 3, 4, 5],
            'new-object' => [
                'key'  => 'value',
                'key2' => 'value2',
            ],
        ];
        $converter = new \SitePoint\Converter\Converter();
        $this->assertEquals($output, $converter->convertString($input));
    }

    public function testMostComplexConversion()
    {
        $input     = '[{"key":"value","key2":"value2","some-array":[1,2,3,4,5],"new-object":{"key":"value","key2":"value2"}},{"key":"value","key2":"value2","some-array":[1,2,3,4,5],"new-object":{"key":"value","key2":"value2"}},{"key":"value","key2":"value2","some-array":[1,2,3,4,5],"new-object":{"key":"value","key2":"value2"}}]';
        $output    = [
            [
                'key'        => 'value',
                'key2'       => 'value2',
                'some-array' => [1, 2, 3, 4, 5],
                'new-object' => [
                    'key'  => 'value',
                    'key2' => 'value2',
                ],
            ],
            [
                'key'        => 'value',
                'key2'       => 'value2',
                'some-array' => [1, 2, 3, 4, 5],
                'new-object' => [
                    'key'  => 'value',
                    'key2' => 'value2',
                ],
            ],
            [
                'key'        => 'value',
                'key2'       => 'value2',
                'some-array' => [1, 2, 3, 4, 5],
                'new-object' => [
                    'key'  => 'value',
                    'key2' => 'value2',
                ],
            ],
        ];
        $converter = new \SitePoint\Converter\Converter();
        $this->assertEquals($output, $converter->convertString($input));
    }
tests/SitePoint/Converter/ConverterTest.php
tests/SitePoint/Converter/ConverterTest.php
We made each test case a bit more complex than the previous one, with the last one containing multiple objects in an array. Re-running the test suite shows us that everything is fine…
我们使每个测试用例都比前一个复杂一些,最后一个在数组中包含多个对象。 重新运行测试套件向我们显示一切都很好…

… but something feels wrong, doesn’t it? There’s an awful lot of repetition here, and if we ever change the class’ API, we’d have to make the change in 4 locations (for now). The advantages of DRY are starting to show even in tests. Well, there’s a feature to help with that.
……但是有些不对劲,不是吗? 这里有很多重复,并且如果我们更改了类的API,则必须在4个位置进行更改(目前)。 即使在测试中,DRY的优势也开始显现出来。 好吧,有一个功能可以帮助您。
资料提供者 (Data Providers)
Data providers are special functions in Test classes which have one specific purpose: to provide a set of data to a test function, so that you don’t need to repeat its logic across several test functions like we did. It’s best explained on an example. Let’s refactor our ConverterTest class to this:
数据提供程序是Test类中的特殊功能,具有一个特定的目的:向测试功能提供一组数据,这样您就无需像我们一样在多个测试功能中重复其逻辑。 最好在一个示例中进行解释。 让我们将ConverterTest类重构为:
<?php

namespace SitePoint\Converter;

use PHPUnit\Framework\TestCase;

class ConverterTest extends TestCase
{

    public function conversionSuccessfulProvider()
    {
        return [
            [
                '{"key":"value","key2":"value2"}',
                [
                    'key'  => 'value',
                    'key2' => 'value2',
                ],
            ],

            [
                '{"key":"value","key2":"value2","some-array":[1,2,3,4,5]}',
                [
                    'key'        => 'value',
                    'key2'       => 'value2',
                    'some-array' => [1, 2, 3, 4, 5],
                ],
            ],

            [
                '{"key":"value","key2":"value2","some-array":[1,2,3,4,5],"new-object":{"key":"value","key2":"value2"}}',
                [
                    'key'        => 'value',
                    'key2'       => 'value2',
                    'some-array' => [1, 2, 3, 4, 5],
                    'new-object' => [
                        'key'  => 'value',
                        'key2' => 'value2',
                    ],
                ],
            ],

            [
                '[{"key":"value","key2":"value2","some-array":[1,2,3,4,5],"new-object":{"key":"value","key2":"value2"}},{"key":"value","key2":"value2","some-array":[1,2,3,4,5],"new-object":{"key":"value","key2":"value2"}},{"key":"value","key2":"value2","some-array":[1,2,3,4,5],"new-object":{"key":"value","key2":"value2"}}]',
                [
                    [
                        'key'        => 'value',
                        'key2'       => 'value2',
                        'some-array' => [1, 2, 3, 4, 5],
                        'new-object' => [
                            'key'  => 'value',
                            'key2' => 'value2',
                        ],
                    ],
                ],
            ],

        ];
    }

    /**
     * @param $input
     * @param $output
     * @dataProvider conversionSuccessfulProvider
     */
    public function testStringConversionSuccess($input, $output)
    {
        $converter = new \SitePoint\Converter\Converter();
        $this->assertEquals($output, $converter->convertString($input));
    }

}
tests/SitePoint/Converter/ConverterTest.php
tests/SitePoint/Converter/ConverterTest.php
We first wrote a new method called conversionSuccessfulProvider. This hints at the expectation that all the provided cases should return a positive result, because the output and input match. Data providers return arrays (so that the test function can auto-iterate through elements). Each element of this array is a single test case – in our case, each element is an array with two elements: the former is input, the latter is output, just like before.
我们首先编写了一个名为conversionSuccessfulProvider的新方法。 这暗示了期望所有提供的案例应返回肯定结果,因为输出和输入匹配。 数据提供者返回数组(以便测试功能可以通过元素自动迭代)。 该数组的每个元素都是一个测试用例–在我们的例子中,每个元素都是一个包含两个元素的数组:前者是输入,后者是输出,就像之前一样。
We then consolidated the test functions into a single one with a more generic name, indicative of what’s expected: testStringConversionSuccess. This test method accepts two arguments: input and output. The rest of the logic is identical to what it was before. Additionally, in order to make sure the method uses the dataprovider, we declare the provider in the docblock of the method with @dataProvider conversionSuccessfulProvider.
然后,我们将测试功能合并为一个具有更通用名称的测试功能,以表明预期的结果: testStringConversionSuccess 。 此测试方法接受两个参数:输入和输出。 其余逻辑与之前相同。 另外,为了确保该方法使用dataprovider,我们使用@dataProvider conversionSuccessfulProvider在方法的@dataProvider conversionSuccessfulProvider声明提供程序。
That’s all there is to it – we now get the exact same result.
这就是全部–我们现在得到的结果完全相同。

If we now wish to add more test cases, we only need to add more input-output pairs into the provider. No need to invent new method names or repeat logic. Convenient, right?
如果现在我们希望添加更多的测试用例,则只需要将更多的输入输出对添加到提供程序中。 无需发明新的方法名称或重复逻辑。 方便吧?
代码覆盖率简介 (An Introduction into Code Coverage)
Before we sign off on this part and let you absorb everything we’ve covered so far, let’s briefly discuss code coverage.
在我们对此部分进行签名并让您吸收到目前为止所介绍的所有内容之前,让我们简要讨论一下代码覆盖率。
Code coverage is a metric telling us how much of our code is covered by tests. If our class has two methods, but only one is ever being tested in the tests, then our code coverage is at most 50% – depending on how many logical forks (IFs, switches, loops, etc.) the methods have (every fork should be covered by a separate test). PHPUnit has the ability to generate code coverage reports automatically after running a given test suite.
代码覆盖率是一个指标,它告诉我们测试覆盖了多少代码。 如果我们的类有两个方法,但是测试中只有一个方法正在测试,那么我们的代码覆盖率最多为50%-取决于这些方法有多少逻辑分支(IF,开关,循环等)(每个分支)应该进行单独的测试)。 在运行给定的测试套件之后,PHPUnit能够自动生成代码覆盖率报告。
Let’s quickly get that set up. We’ll expand phpunit.xml by adding <logging> and <filter> sections as elements immediately inside <phpunit>, so as level 1 elements (if <phpunit> is level 0 or root):
让我们快速进行设置。 我们将通过添加<logging>和<filter>部分作为元素直接添加到<phpunit> ,从而扩展phpunit.xml ,从而添加1级元素(如果<phpunit>是0级或根):
<phpunit ...>
    <filter>
        <whitelist>
            <directory suffix=".php">src/</directory>
        </whitelist>
    </filter>
    <logging>
        <log type="tap" target="tests/build/report.tap"/>
        <log type="junit" target="tests/build/report.junit.xml"/>
        <log type="coverage-html" target="tests/build/coverage" charset="UTF-8" yui="true" highlight="true"/>
        <log type="coverage-text" target="tests/build/coverage.txt"/>
        <log type="coverage-clover" target="tests/build/logs/clover.xml"/>
    </logging>
Filter sets up a whitelist telling PHPUnit which files to pay attention to while testing. This one translates to all .php files inside /src, at any level. Logging tells PHPUnit which reports to generate – various tools can read various reports, so it doesn’t hurt to generate more formats than one might need. In our case, we’re really just interested in the HTML one.
过滤器会建立一个白名单,告诉PHPUnit测试时要注意哪些文件。 此文件可转换为/ src内部任何级别的所有.php文件 。 日志记录告诉PHPUnit生成哪些报告–各种工具都可以读取各种报告,因此生成超出一种可能所需格式的文件也没有什么坏处。 就我们而言,我们实际上只是对HTML感兴趣。
Before this can work, we need to activate XDebug, as that’s the PHP extension PHPUnit uses to inspect the classes it’s walking through. Homestead Improved comes with the phpenmod tool for activating and deactivating PHP extensions on the fly:
在此之前,我们需要激活XDebug,因为这是PHPUnit用来检查其遍历的类PHP扩展。 改进的Homestead附带了phpenmod工具,用于phpenmod激活和停用PHP扩展:
sudo phpenmod xdebugIf you’re not using HI, follow XDebug installation instructions relevant to your OS distribution. This article should help.
如果您不使用HI,请按照与OS发行版相关的XDebug安装说明进行操作。 本文应该有所帮助。
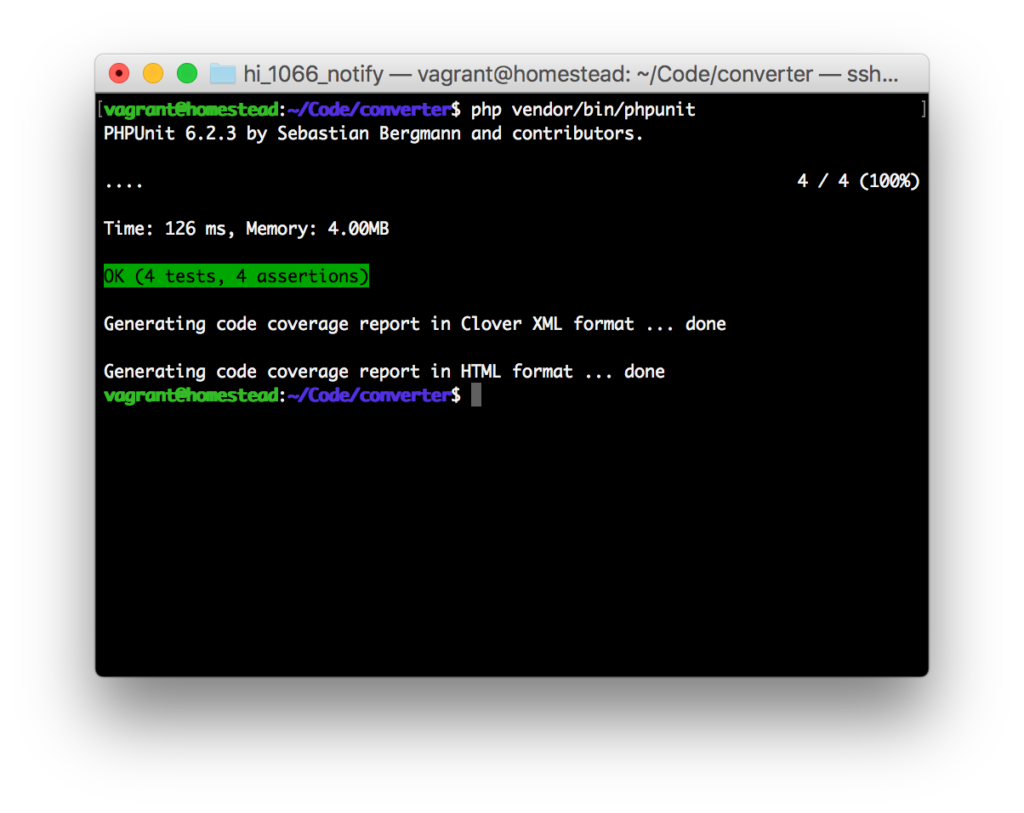
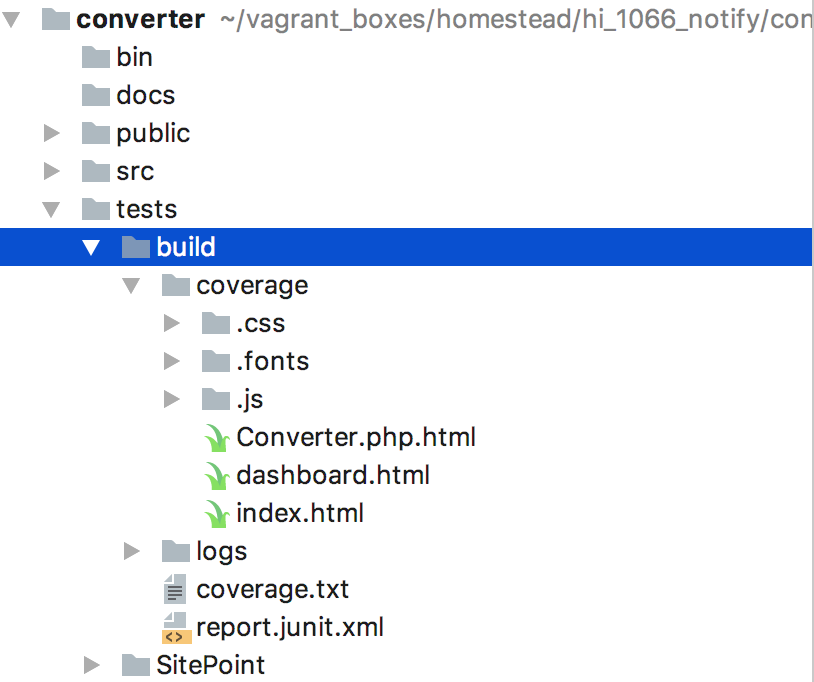
Re-running the suite will now inform us of generated coverage reports. Additionally, they’ll appear in the directory tree at the specified location.
现在,重新运行套件将通知我们生成的覆盖率报告。 此外,它们将显示在目录树中的指定位置。
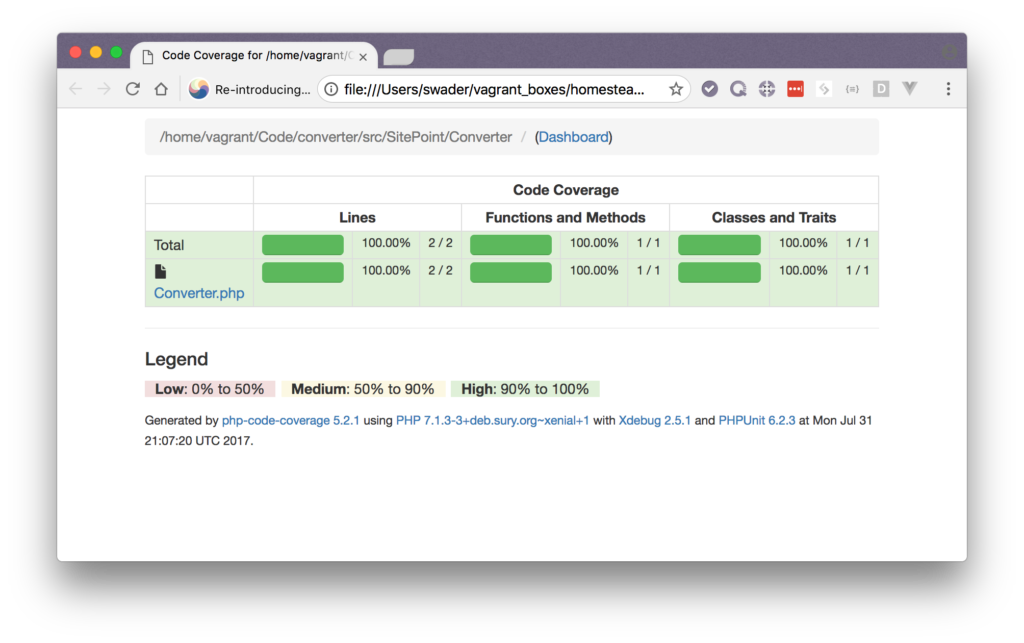
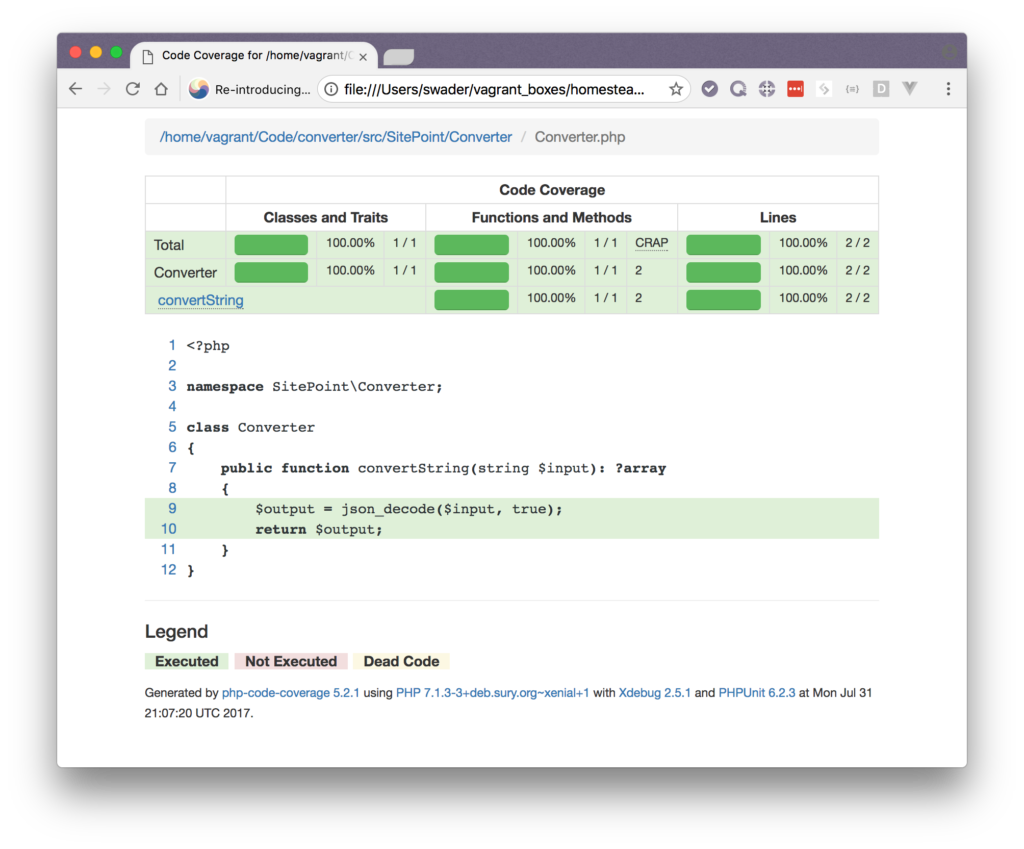
Let’s open the index.html file in the browser. Straight drag and drop into any modern browser should work just fine – no need for virtual hosts or running servers – it’s just a static file.
让我们在浏览器中打开index.html文件。 直接拖放到任何现代浏览器中都可以正常工作–不需要虚拟主机或运行服务器–只是静态文件。
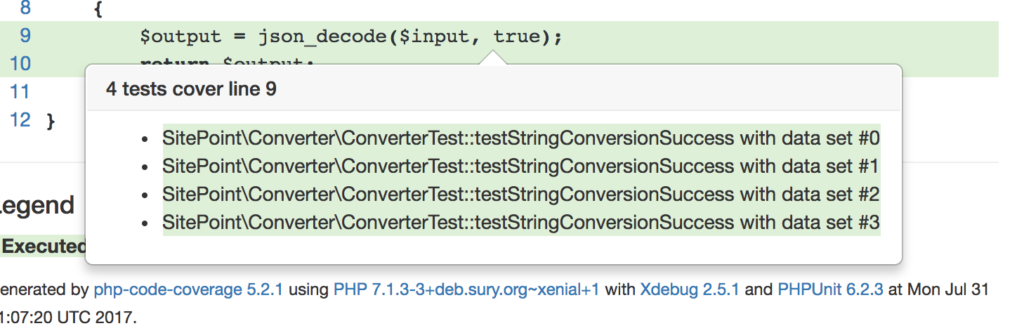
The index file will list a summary of all tests. You can click into individual classes to see their detailed coverage reports, and hovering over method bodies will summon tooltips that explain how much a given method is tested.
索引文件将列出所有测试的摘要。 您可以单击各个类以查看其详细的覆盖率报告,然后将鼠标悬停在方法主体上将召唤工具提示,这些提示解释了对给定方法进行了多少测试。
We’ll go into much more depth about code coverage in a follow-up post as we further develop our tool.
随着我们进一步开发工具,我们将在后续文章中深入探讨代码覆盖率。
结论 (Conclusion)
In this introduction of PHPUnit, we looked at test driven development (TDD) in general, and applied its concepts to the starting stage of a new PHP tool. All the code we’ve written can be downloaded from Github.
在PHPUnit的简介中,我们从总体上研究了测试驱动开发(TDD),并将其概念应用于新PHP工具的开始阶段。 我们编写的所有代码都可以从Github下载。
We went through PHPUnit basics, explained data providers, and showed code coverage. This post only touched on some of the basic concepts and features of PHPUnit, and we encourage you to explore further on your own, or to request clarification on concepts that you deem confusing – we’d love to be able to clear more things up for you.
我们研究了PHPUnit的基础知识,解释了数据提供程序,并展示了代码覆盖率。 这篇文章只涉及了PHPUnit的一些基本概念和功能,我们鼓励您自己进一步探索,或者要求澄清您认为令人困惑的概念-我们很乐意为您解决更多问题您。
In a followup post, we’ll cover some intermediate techniques and further develop our application.
在后续文章中,我们将介绍一些中间技术,并进一步开发我们的应用程序。
Please leave your comments and questions below!
请在下面留下您的评论和问题!
翻译自: https://www.sitepoint.com/re-introducing-phpunit-getting-started-tdd-php/
phpunit入门


 216
216


 被折叠的 条评论
为什么被折叠?
被折叠的 条评论
为什么被折叠?
 到【灌水乐园】发言


