


polymer ajax
Web components are a set of standards for creating custom, reusable HTML elements. Polymer is an open-source JavaScript library for building web applications using web components. Created by those clever folks at Google, it provides a number of additional features over vanilla web components and when used with a polyfill, supports the latest version of all major browsers.
Web组件是用于创建自定义可重用HTML元素的一组标准。 Polymer是一个开放源代码JavaScript库,用于使用Web组件构建Web应用程序。 由Google的那些聪明人创建,它提供了比普通Web组件更多的其他功能,并且与polyfill一起使用时,它支持所有主要浏览器的最新版本 。
In this tutorial I’m going to show you how easy it is to make use of web components and Polymer in WordPress. I’m going to start by showing you how to integrate Polymer into your WordPress install, then I’m going to demonstrate how to add a working Google Maps component to your site’s side bar. This might be useful for any site (e.g. that of a restaurant) which needs to provide visitors with directions to their premises.
在本教程中,我将向您展示在WordPress中使用Web组件和Polymer多么容易。 我将首先向您展示如何将Polymer集成到您的WordPress安装中,然后将演示如何向网站的侧边栏添加有效的Google Maps组件 。 这对于需要向访客提供前往其场所的路线的任何站点(例如,餐馆的站点)可能都是有用的。
After reading, you’ll be able to employ this technique on a site of your own. And you’ll not be limited to a Google Map widget, you’ll be able to choose from the wide range of pre-made components, or even write your own.
阅读后,您将可以在自己的网站上使用此技术。 而且,您不仅限于Google Map小部件,还可以从各种预制组件中进行选择 ,甚至可以编写自己的组件 。
As ever, all of the code for this tutorial is available in a GitHub repository.
与以往一样,该教程的所有代码都可以在GitHub存储库中找到 。
为什么选择聚合物? (Why Polymer?)
As native support for web components is growing ever better, you might be forgiven for asking if Polymer is still relevant. The short answer to that question is Yes!
随着对Web组件的本地支持越来越好,您可能会问,Polymer是否仍然有用。 这个问题的简短答案是肯定的!
Polymer does make use of a variety of web component polyfills—which will hopefully one day full by the wayside—but it is a lot more than that. Polymer is a wrapper around the web components API that allows us to develop and implement new components at a much greater speed than we would otherwise be able. It offers various additional features over vanilla web components, such as one-way and two-way data binding, computed properties and gesture events. It comes with a very polished CLI which can be used for such tasks as scaffolding out a project, running tests, or running a local server, and it can make use of a wide range of pre-built elements, such as the much loved material design elements library.
Polymer确实使用了多种Web组件填充材料(希望可以在一天之内将其填满),但远远不止这些。 Polymer是Web组件API的包装,它使我们能够以比原本更快的速度开发和实施新组件。 它提供了超越原始Web组件的各种附加功能,例如单向和双向数据绑定,计算的属性和手势事件。 它带有非常优美的CLI ,可用于诸如搭建项目,运行测试或运行本地服务器之类的任务,并且可以利用各种预先构建的元素,例如备受喜爱的材料。设计元素库 。
In short, Polymer is still very relevant. It is a powerful framework, which is used in production by large companies such as USA Today, Coca Cola and Electronic Arts.
简而言之,Polymer仍然非常重要。 它是一个强大的框架,已被《今日美国》,《可口可乐》和《电子艺术》等大型公司用于制作。
设置WordPress (Setting Up WordPress)
Before we start, we need to setup our environment that is going to be running WordPress. For this tutorial, I’ll be using the ScotchBox Vagrant VM, equipped with some pre-installed tools to kickstart your WordPress installation.
在开始之前,我们需要设置将要运行WordPress的环境。 在本教程中,我将使用ScotchBox Vagrant VM ,该VM配备了一些预安装的工具来启动WordPress安装。
If you have WordPress installed already, or would prefer to use a different method, you can skip this bit. If you need a bit of help with the setup, but don’t want to go the vagrant route described below, try Googling “install WordPress locally” and looking for an up-to-date tutorial.
如果您已经安装了WordPress,或者希望使用其他方法,则可以跳过此位。 如果您需要设置方面的帮助,但又不想走下面描述的游荡路线,请尝试使用Google搜索“ 本地安装WordPress ”并寻找最新的教程。
We start of by making sure that Git, Vagrant and Virtual Box are installed on our system. We can then clone the GitHub repo with ScotchBox’s pre-populated Vagrantfile.
我们首先要确保在我们的系统上安装了Git , Vagrant和Virtual Box 。 然后,我们可以使用ScotchBox的预填充的Vagrantfile克隆GitHub存储库。
git clone https://github.com/scotch-io/scotch-box sitepoint-wp-polymerNow we are ready to run vagrant up. After our machine has booted, we have to remove the default /public/index.php static file and install WordPress.
现在我们准备好了vagrant up 。 机器启动后,我们必须删除默认的/public/index.php静态文件并安装WordPress。
cd sitepoint-wp-polymer/public
rm index.php
git clone https://github.com/WordPress/WordPress.git .
Now we have to make a duplicate of the wp-config-sample.php file. Name it wp-config.php.
现在,我们必须复制wp-config-sample.php文件。 将其命名为wp-config.php 。
cp wp-config-sample.php wp-config.phpand edit the following values:
并编辑以下值:
// wp-config.php
// ...
define('DB_NAME', 'scotchbox');
define('DB_USER', 'root');
define('DB_PASSWORD', 'root');
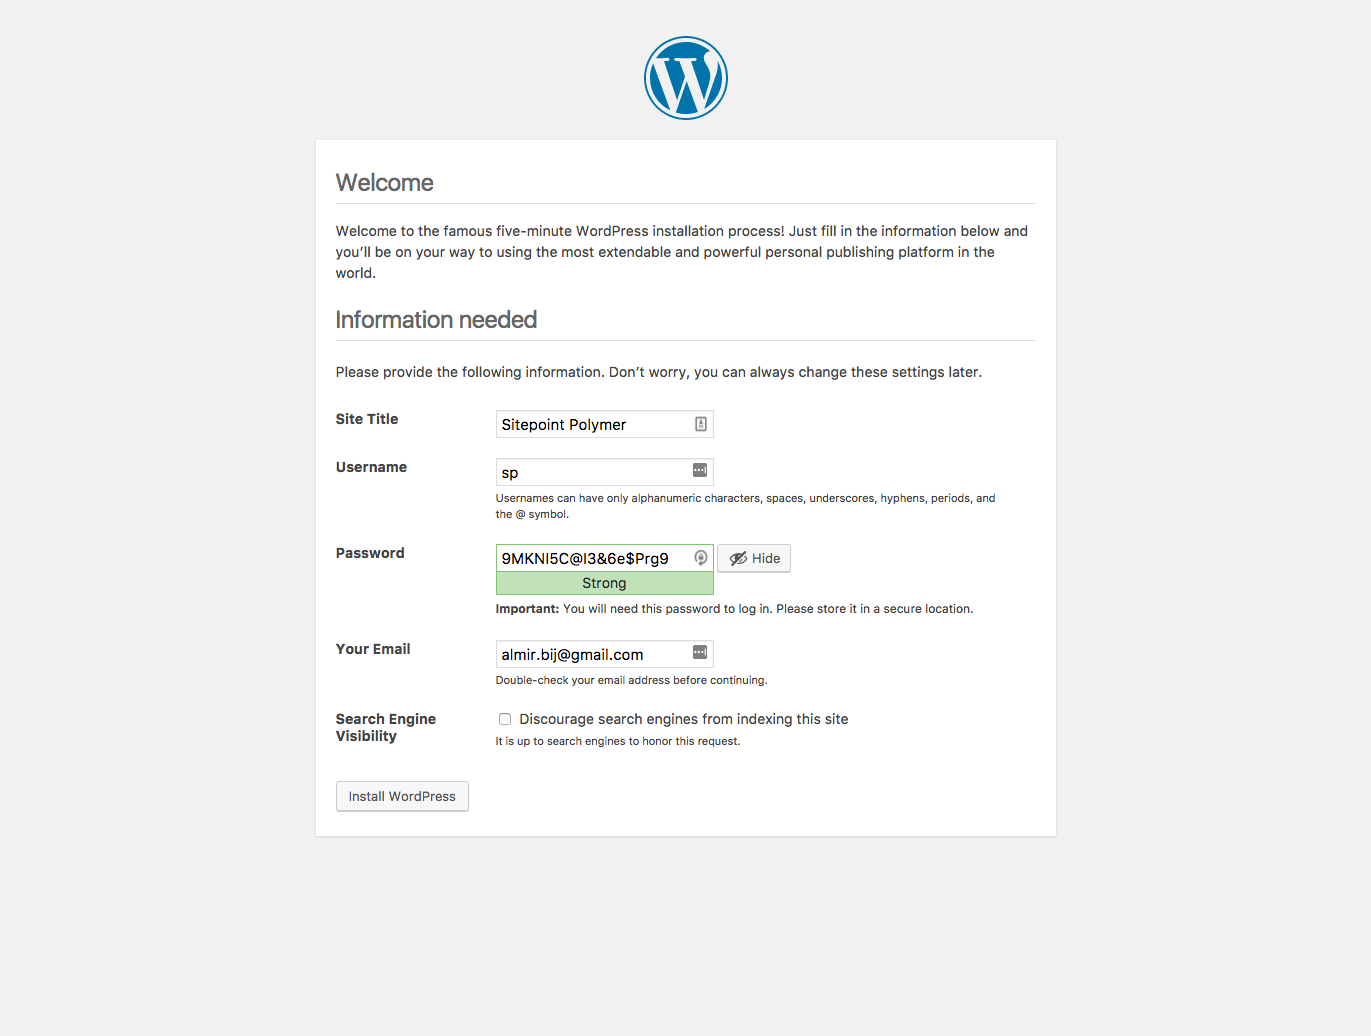
// ...Now you are ready to fire up your browser and visit http://192.168.33.10. You will be prompted to enter the admin account credentials and site title. Feel free to fill these out as you see fit.
现在,您可以启动浏览器并访问http://192.168.33.10。 系统将提示您输入管理员帐户凭据和网站标题。 随意填写这些表格。
添加SitePoint基本主题 (Adding the SitePoint Base Theme)
So we’ve got WordPress set up, now we need a theme. Out of the box, this will be the Twenty Seventeen theme, but this is pretty generic and includes much more than you normally need. A good alternative here, is to use the SitePoint WordPress base theme.
因此,我们已经设置了WordPress,现在我们需要一个主题。 开箱即用,这将是第二十七个主题 ,但这是非常通用的,包含的内容远远超出了您通常需要的内容。 一个很好的替代方法是使用SitePoint WordPress基本主题 。
This theme was created in response to the question “What would the perfect WordPress base theme look like?”. Its features include:
创建该主题是为了回答以下问题:“完美的WordPress基本主题是什么样?”。 其功能包括:
- No fat. No cruft. Speedy. 没有脂肪 没有cru夫。 Swift。
- Minimal design. It’s your job to make it pretty. 最小的设计。 使它漂亮是您的工作。
- No ‘cute’ features you never actually use. 没有您从未真正使用过的“可爱”功能。
- SEO friendly to its core. SEO对其核心友好。
- Super Mobile-friendly. 超级移动友好。
- 100% Open Source and free to use. 100%开放源代码,免费使用。
The SitePoint WordPress base theme is a great starting point for new projects. It’s mobile friendly, easy to use and 100% free. To follow along with the rest of this tutorial, head over to the theme’s homepage and download it now.
SitePoint WordPress基本主题是新项目的理想起点。 它移动友好,易于使用且100%免费。 要继续学习本教程的其余部分,请转到主题的主页并立即下载 。
And while you’re there, you might like to check out the suite of paid themes SitePoint offers, too. These are all built on top of the base theme and include an ecommerce theme, restaurant theme, portfolio theme, business theme and construction theme.
并且,当您在那里时,您可能也想看看SitePoint提供的一组付费主题 。 这些都是基于基本主题构建的,包括电子商务主题,餐厅主题,投资组合主题,业务主题和建筑主题。
After downloading SitePoint WordPress base theme, unzip it and copy/paste to thewp-content/themes folder. Then create a new folder called sitepoint-base-child, in wp-content/themes. In that directory create a style.css file and a functions.php file.
下载SitePoint WordPress基本主题后,将其解压缩并复制/粘贴到wp-content/themes文件夹中。 然后在wp-content/themes创建一个名为sitepoint-base-child的新文件夹。 在该目录中,创建一个style.css文件和一个functions.php文件。
cd wp-content/themes/
mkdir sitepoint-base-child
cd sitepoint-base-child
touch functions.php style.css
Open up style.css and copy this into it:
打开style.css并将其复制到其中:
/*
 Theme Name:   SitePoint Base Child
 Author:       Almir B.
 Author URI:   http://almirbijedic.rocks
 Template:     sitepoint-base
 Version:      1.0.0
 Text Domain:  ab-sitepoint-base
*/
And into functions.php:
并进入functions.php :
<?php
//functions.php

add_action( 'wp_enqueue_scripts', 'sp_theme_enqueue_styles' );
function sp_theme_enqueue_styles() {
  wp_enqueue_style( 'parent-style', get_template_directory_uri() . '/style.css' );
}
This will enqueue the base CSS from the parent theme.
这将从父主题中加入基本CSS。
We just created a child theme, whose role is to implement functionalities on top of the base theme without having to modify the base files. All of the customisations go into this child theme.
我们刚刚创建了一个子主题,该子主题的作用是在基本主题之上实现功能,而无需修改基本文件。 所有自定义项都属于该子主题。
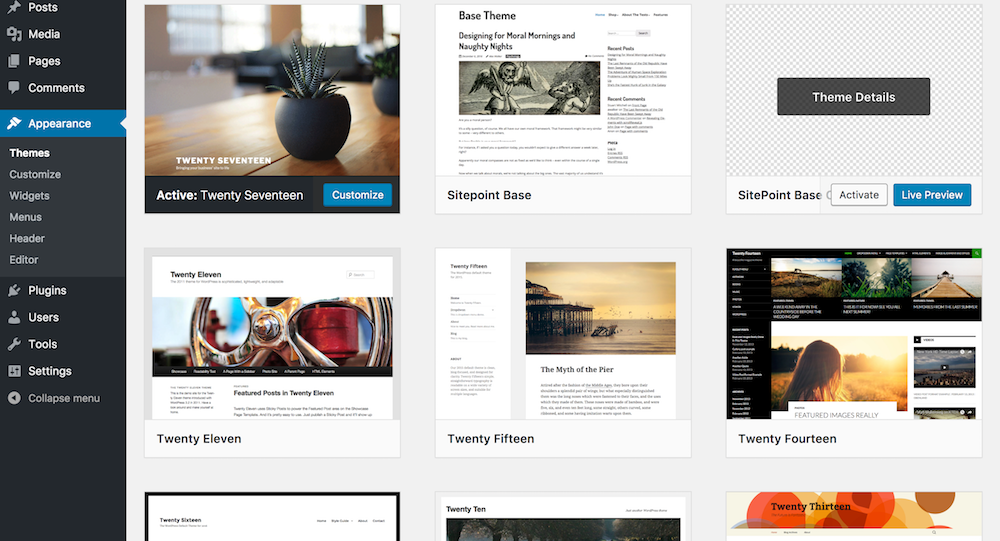
One last step is to go to the admin dashboard, then to Appearance > Themes from the main side menu, and click Activate under, Sitepoint Base Child theme.
最后一步是转到管理控制台 ,然后从主侧面菜单转到“ 外观”>“主题 ”,然后在“ Sitepoint Base Child”主题下单击“ 激活 ”。
在WordPress中包含Polymer (Including Polymer in WordPress)
Now that’s done, we have to install Polymer with bower. Make sure you are in the public/wp-content/themes/sitepoint-base-child folder, and then run:
现在完成了,我们必须安装带有bower的 Polymer。 确保您位于public/wp-content/themes/sitepoint-base-child文件夹中,然后运行:
bower initYou can answer with default answer to every question. Next we need to install the dependencies:
您可以使用默认答案回答每个问题。 接下来,我们需要安装依赖项:
bower install --save Polymer/polymer#^2.0.0 PolymerElements/paper-input#2.0-previewThis will install Polymer and the paper-input component, so that we can have a fancy material designed input component out of the box. It is important to use the #2.0-preview tag for the paper input and also for the Google Map element later, as it will not work with the latest version of Polymer (version 2.0) otherwise.
这将安装Polymer和纸张输入组件 ,以便我们可以开箱即用精美的材料设计输入组件。 请务必在纸张输入和以后的Google Map元素中使用#2.0-preview标记,因为否则它将不适用于最新版本的Polymer(2.0版)。
In order to user Polymer, we have to include it using an HTML import, and we will also include the polyfill for web components, so as to support older browsers.
为了使用Polymer,我们必须使用HTML导入将其包括在内,并且还将包括用于Web组件的polyfill,以支持较旧的浏览器。
Head to the functions.php file in the child theme, and add an enqueue to the existing enqueue function.
转到子主题中的functions.php文件,然后向现有的enqueue函数添加一个enqueue 。
<?php
//functions.php

add_action( 'wp_enqueue_scripts', 'sp_theme_enqueue_styles' );
function sp_theme_enqueue_styles() {
  wp_enqueue_style( 'parent-style', get_template_directory_uri() . '/style.css' );
  wp_enqueue_script( 'polymer', get_stylesheet_directory_uri() . '/bower_components/webcomponentsjs/webcomponents-lite.js' );
}
WordPress does not have an enqueue function for enqueueing HTML imports, but we can hook into the wp_head hook which outputs into the <head> element of the page.
WordPress没有用于使HTML导入入队的入队功能,但是我们可以将其钩到wp_head钩子中,该钩子将输出到页面的<head>元素中。
<?php
//functions.php

add_action( 'wp_enqueue_scripts', 'sp_theme_enqueue_styles' );
function sp_theme_enqueue_styles() {
  wp_enqueue_style( 'parent-style', get_template_directory_uri() . '/style.css' );
  wp_enqueue_style( 'polymer', get_stylesheet_directory_uri() . '/bower_components/webcomponentsjs/webcomponents-lite.min.js' );
}

add_action( 'wp_head', 'include_polymer_elements' );
function include_polymer_elements() {
  ?>

  <link rel="import"
        href="<?php echo get_stylesheet_directory_uri() ?>/bower_components/polymer/polymer.html">
  <link rel="import"
        href="<?php echo get_stylesheet_directory_uri() ?>/bower_components/paper-input/paper-input.html">
  <?php
}
That’s all we needed to start using Polymer elements in WordPress. Now let’s create a WordPress widget so we can take this out for a test ride.
这就是我们开始在WordPress中使用Polymer元素所需要的。 现在让我们创建一个WordPress小部件,以便我们进行测试。
注册小部件 (Registering a Widget)
In order to create a new widget, we will create a new child class from the WP_Widget class and then register it with the widgets_init hook.
为了创建一个新的小部件,我们将根据WP_Widget类创建一个新的子类,然后使用widgets_init钩子对其进行注册。
Create a new folder in your child theme, name it lib, and add it a file named sitepoint-map-widget.php.
在您的子主题中创建一个新文件夹,将其命名为lib ,并添加一个名为sitepoint-map-widget.php的文件。
mkdir lib
cd lib
touch sitepoint-map-widget.php
Copy the following into that file:
将以下内容复制到该文件中:
<?php
// lib/sitepoint-map-widget.php

class SitepointMapWidget extends WP_Widget {

  function __construct() {
    // Instantiate the parent object
    parent::__construct( false, 'Google Paper Input' );
  }

  function widget( $args, $instance ) {
    echo '<paper-input raised always-float-label label="Floating label"></paper-input>';
  }
}
All we did here is create a new child class of WP_Widet and called the parent constructor in order to give the widget a custom name. Additionally, the widget function is the one that does the actual output. For now, we will simply output a <paper-input> element, which is an element from the paper-input-elements collection.
我们在这里所做的只是创建一个新的WP_Widet子类并调用父构造函数,以便为小部件指定自定义名称。 另外, widget函数是执行实际输出的函数。 现在,我们将只输出一个<paper-input>元素,它是paper-input-elements集合中的一个元素。
Last but not least, we need to include this new PHP file at the top of our functions.php file:
最后但并非最不重要的一点是,我们需要在functions.php文件顶部包括以下新PHP文件:
<?php
// functions.php
require_once( 'lib/sitepoint-map-widget.php' );

// ...
and then register a widget at the end of the file:
然后在文件末尾注册一个小部件:
<?php
// functions.php

// ...

add_action( 'widgets_init', 'sp_register_widgets' );
function sp_register_widgets() {
  register_widget( 'SitepointMapWidget' );
}
Now we can go into the admin dashboard of WordPress. From the main menu, go into Appearance > Widgets, and there you should see a widget named Google Paper Input on the left.
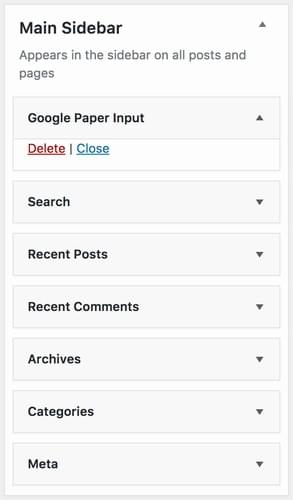
现在,我们可以进入WordPress的管理控制台 。 从主菜单进入外观>窗口小部件 ,然后您应该在左侧看到一个名为Google Paper Input的窗口小部件。
Drag and drop it into the Main Sidebar section to the right, above the rest of the default widgets from the SitePoint Base theme.
将其拖放到右侧的Main Sidebar部分中,位于SitePoint Base主题的其余默认小部件上方。
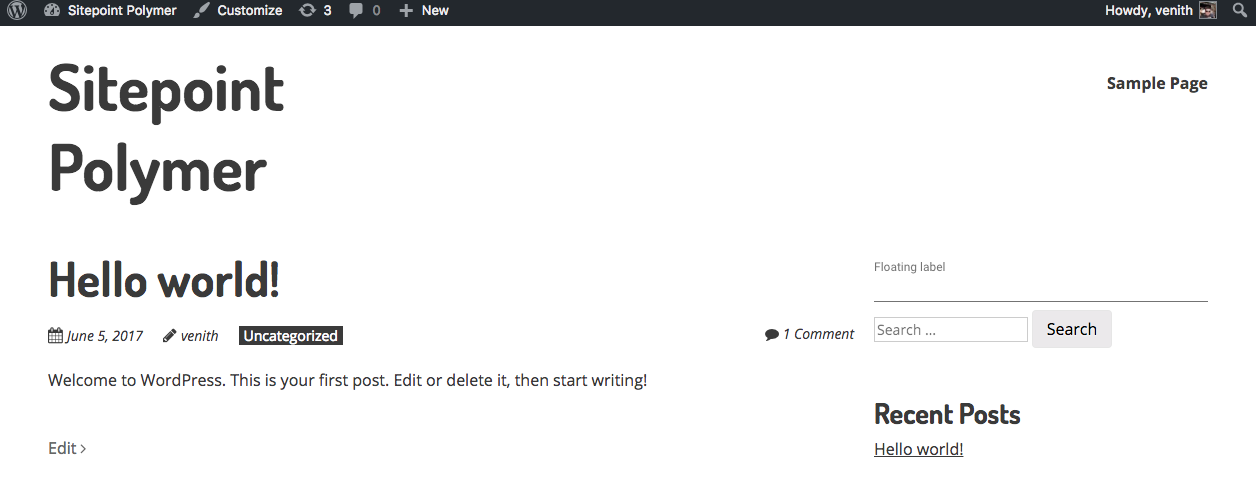
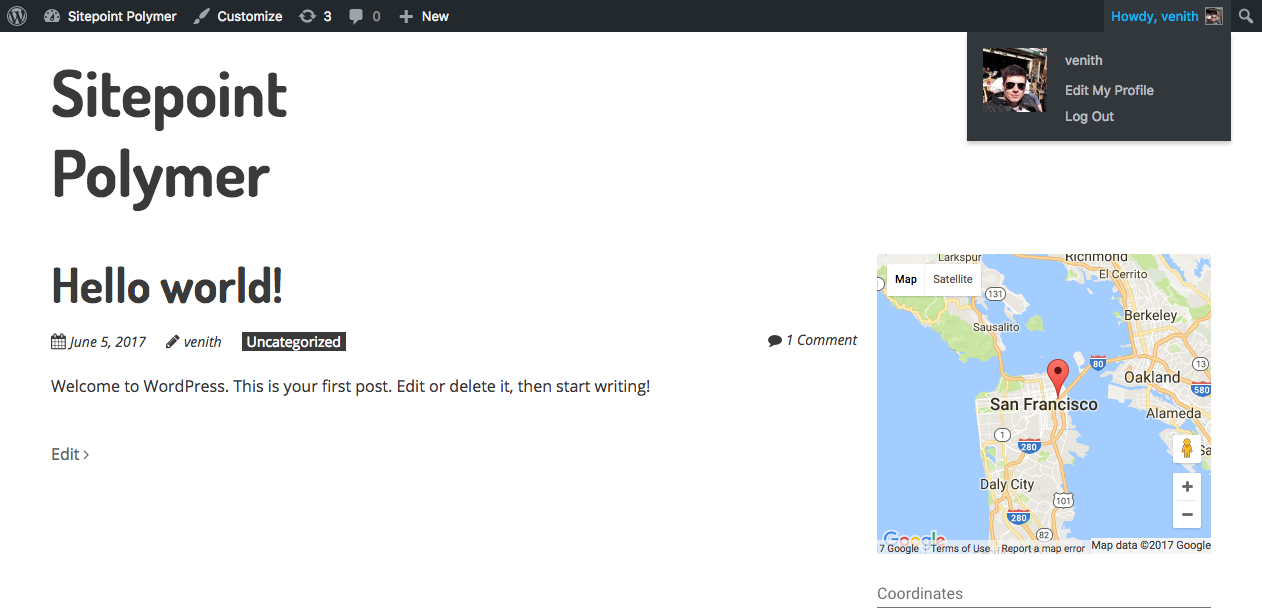
Now you can visit the homepage, and on the right side right above the search box, you will see a material design input with a label.
现在,您可以访问主页,在搜索框上方的右侧,您将看到带有标签的材料设计输入。
And thus we have concluded Polymer’s Hello, World! example. We’ve covered a lot of ground already—installing Polymer, integrating it with WordPress and including a sample widget, all in just a few lines of code—but in the next section we will take this further and implement our Google Map component.
因此,我们得出了Polymer的Hello,World! 例。 我们已经介绍了很多内容-安装Polymer,将其与WordPress集成,并包括示例小部件,所有这些仅用几行代码即可完成,但是在下一节中,我们将进一步介绍并实现我们的Google Map组件。
Web组件库简介 (Introducing the Web Components Library)
Now we will make use of the collection of out-of-the-box web components, available on WebComponents.org. Searching for “Google Map” will lead us to the element we need. By looking at the final part of that page’s URL, we can find out the name of the package in bower.
现在,我们将利用WebComponents.org上可用的现成Web组件集合 。 搜索“ Google Map”将使我们找到所需的元素 。 通过查看该页面URL的最后部分,我们可以在bower中找到包的名称。
Make sure you are in the sitepoint-base-child directory and run the following command:
确保您位于sitepoint-base-child目录中,并运行以下命令:
bower install --save GoogleWebComponents/google-map#2.0-previewNow create a new folder in your sitepoint-base-child directory and name it webcomponents. This is where we will be keeping all of our Polymer related stuff.
现在,在sitepoint-base-child目录中创建一个新文件夹,并将其命名为webcomponents 。 这是我们将保留所有与聚合物相关的材料的地方。
mkdir webcomponents创建一个新的聚合物组件 (Creating a New Polymer Component)
Create a new file in the webcomponents folder and name it sitepoint-map.html.
在webcomponents文件夹中创建一个新文件,并将其命名为sitepoint-map.html 。
cd webcomponents
touch sitepoint-map.html
Each Polymer component is organised into separate HTML files, representing a new custom HTML tag. This HTML file is composed of three notable sections:
每个Polymer组件都组织成单独HTML文件,代表一个新的自定义HTML标签。 该HTML文件由三个值得注意的部分组成:
1.依赖项的导入 (1. The Import of Dependencies)
// sitepoint-map.html

<link rel="import" href="../bower_components/google-map/google-map.html">
<link rel="import" href="../bower_components/paper-input/paper-input.html">
Here we have the Google Maps element we installed moments ago, as well as the paper-input element from our Hello, World! example.
这里有我们刚才安装的Google Maps元素,以及Hello,World!中的paper-input元素。 例。
2.模板 (2. The Template)
// sitepoint-map.html

<link rel="import" href="../bower_components/google-map/google-map.html">
<link rel="import" href="../bower_components/paper-input/paper-input.html">

<dom-module id="sitepoint-map">
  <template>
    <style>
      google-map {
        height: 300px;
      }
    </style>
    <google-map id="spMap"
                fit-to-marker
                mouse-events="true"
                on-google-map-mousemove="trackCoords"
                on-google-map-mouseout="resetCoords"
                api-key="[[clientId]]">
      <google-map-marker latitude="37.78"
                         longitude="-122.4"
                         draggable="true"></google-map-marker>
    </google-map>
    <paper-input raised id="coords" label="Coordinates"></paper-input>
  </template>
</dom-module>
The ID of the <dom-module> element is the actual name of the element—i.e. its tag name. The best practice is to give it the same name as the name of the file. Inside of that we have a <template> tag, which represents what the new custom element will consist of. This can always be broken down to basic HTML elements. The <google-map> tag is nothing other than a collection of scripts, standard HTML elements and other custom HTML elements which can be broken down again the same way.
<dom-module>元素的ID是该元素的实际名称,即其标签名称。 最佳做法是为它提供与文件名相同的名称。 在其中,我们有一个<template>标记,它表示新的自定义元素将由什么组成。 始终可以将其分解为基本HTML元素。 <google-map>标记就是脚本,标准HTML元素和其他自定义HTML元素的集合,它们可以用相同的方式再次分解。
The ID of the element allows us to easily access it from the script (see next section) using a this.$.id syntax. In our case we will use this.$.coords to reference to the input element.
元素的ID允许我们使用this.$.id语法从脚本(请参阅下一节)轻松访问它。 在我们的例子中,我们将使用this.$.coords来引用输入元素。
Then the next attributes on the <google-map> tag are two events, google-map-mouseover which is triggered when a user mouses over our widget, and google-map-mouseout which is triggered when the mouse leaves the map. This doesn’t serve much practical purpose here, rather demonstrates how we bind to events fired from the component. All we have to do is add the on-event-name keyword, and pass in the name of the function from our component which we wish to be triggered. This is a recommended best practice, as we remove the need to add an ID to the element solely for the purpose of targeting it to add an event listener. You can see a full list of available methods, events and properties here.
然后,<google-map>标记上的下一个属性是两个事件:当用户将鼠标悬停在我们的小部件上时触发的google-map-mouseover和当鼠标离开地图时触发的google-map-mouseout 。 这在这里并没有太大的实际用途,而是演示了我们如何绑定到从组件触发的事件。 我们要做的就是添加on-event-name关键字,并从我们希望触发的组件中传入函数的名称。 这是推荐的最佳实践,因为我们不再需要将ID添加到元素,仅是为了将其定位为添加事件侦听器。 您可以在此处查看可用方法,事件和属性的完整列表 。
We also pass in the fit-to-marker attribute, which tells the map to resize and re-centre so as to show all markers inside the map.
我们还传递了fit-to-marker属性,该属性告诉地图调整大小和重新居中,以显示地图内的所有标记。
You’ll also notice that we’re specifying a client-id attribute. You’ll have to fill this out with a client ID of your own. In order to obtain one of these, please follow the official Google instructions. When you visit that link, start by clicking the GET A KEY button.
您还会注意到,我们正在指定一个client-id属性。 您必须使用自己的客户ID填写。 为了获得其中之一,请按照Google的官方说明进行操作 。 当您访问该链接时,请先单击“ 获取密钥”按钮。
- The script 剧本
// sitepoint-map.html

<link rel="import" href="../bower_components/google-map/google-map.html">
<link rel="import" href="../bower_components/paper-input/paper-input.html">

<dom-module id="sitepoint-map">
  <template>
    ...
  </template>

  <script>
    class SitepointMap extends Polymer.Element {
      static get is() { return 'sitepoint-map'; }
      static get properties() {
        return {
          clientId: String
        }
      }
      trackCoords(e) {
        this.$.coords.value = e.detail.latLng.lat() + ", " + e.detail.latLng.lng();
      }
      resetCoords() { this.$.coords.value = "" }
    }

    window.customElements.define(SitepointMap.is, SitepointMap);
  </script>
</dom-module>
The bare minimum to create an element is just this part:
创建元素的最低要求就是这一部分:
class SitepointMap extends Polymer.Element {
  static get is() { return 'sitepoint-map'; }
}
window.customElements.define(SitepointMap.is, SitepointMap);
Where the name of the class should be the same as the ID of the <dom-template> element. It’s a best practice to camel case this name, and return the ID of the <dom-template> element from the static is function.
类的名称应与<dom-template>元素的ID相同。 最好使用驼峰式命名此名称,然后从静态is函数返回<dom-template>元素的ID。
Next there is the properties object, which is a reserved function name for registering any attributes on the element. The important thing to note here is that any attributes consisting of more than one word that are dashed, like this:
接下来是属性对象,它是保留的函数名称,用于在元素上注册任何属性。 这里要注意的重要一点是,任何包含多个破折号的单词的属性,如下所示:
<sitepoint-map client-id="..."></sitepoint-map>Will be referenced as clientId, i.e. camel cased inside of the component.
将被引用为clientId ,即骆驼装在组件内部。
Had we used camel case, like this:
我们是否使用过骆驼套,像这样:
<sitepoint-map clientId="..."></sitepoint-map>Then inside of the component, the attribute gets flattened to all lowercase, so the reference would be clientid instead.
然后,在组件内部,该属性将变为所有小写形式,因此引用将改为clientid 。
After the properties, we have two custom methods, which are used as callbacks for the mousemove and mouseout events, respectively. The trackCoords method simply takes the longitude and the latitude position of the mouse on the map and displays it in the input.
在属性之后,我们有两个自定义方法,分别用作mousemove和mouseout事件的回调。 trackCoords方法仅获取鼠标在地图上的经度和纬度位置,并将其显示在输入中。
Now that we have a web component in place, there are a couple of things left to do.
现在我们已经有了一个Web组件,还有几件事情要做。
导入<sitepoint-map>组件 (Import the <sitepoint-map> Component)
First let’s create an index.html file inside of the webcomponents folder. This will be used to import all of our custom components. We will enqueue this file once, so we do not have to worry about enqueueing an HTML import every time we add a new component. Instead we can just import it in the index.html file, which is a more convenient syntax than echoing it with PHP to wp_head.
首先,让我们在webcomponents文件夹中创建一个index.html文件。 这将用于导入我们所有的自定义组件。 我们将使该文件入队一次,因此我们不必担心每次添加新组件时都会使HTML导入入队。 相反,我们可以将其导入index.html文件中,这比使用PHP将其回显到wp_head更为方便。
Then, paste this inside the newly created index.html file:
然后,将其粘贴到新创建的index.html文件中:
// webcomponents/index.html

<link rel="import" href="sitepoint-map.html">
Go back into the functions.php file, to where we include the paper button and polymer HTML imports in the head. We do not need the paper button import anymore, so remove that, then include index.html from the webcomponents directory instead:
返回到functions.php文件,在该文件的头部包含纸质按钮和聚合物HTML导入。 我们不再需要纸质按钮导入,因此将其删除,然后从webcomponents目录中包含index.html webcomponents :
<?php
// functions.php

add_action( 'wp_head', 'include_polymer_elements' );
function include_polymer_elements() {
  ?>
  <link rel="import"
        href="<?php echo get_stylesheet_directory_uri() ?>/bower_components/polymer/polymer.html">
  <link rel="import"
        href="<?php echo get_stylesheet_directory_uri() ?>/webcomponents/index.html">
  <?php
}
From now on, you can add all of your custom components to index.html. E.g. if we also had a custom Google Calendar component, or just have to use an out of the box component, like paper-progress, we would do it like this
从现在开始,您可以将所有自定义组件添加到index.html 。 例如,如果我们还有一个自定义的Google Calendar组件,或者只需要使用开箱即用的组件(例如paper-progress) ,我们将这样做
// webcomponents/index.html

<link rel="import" href="sitepoint-map.html">
<link rel="import" href="sitepoint-calendar.html">
<link rel="import" href="../bower_components/paper-progress/paper-progress.html">
Do not copy this in, it is just an example.
不要复制它,这只是一个示例。
输出<sitepoint-map> HTML标记 (Output a <sitepoint-map> HTML Tag)
Now we need to output a <sitepoint-map> HTML Tag in place of the paper input we were using previously.
现在,我们需要输出一个<sitepoint-map> HTML Tag来代替之前使用的纸张输入。
<?php
// lib/sitepoint-map-widget.php

class SitepointMapWidget extends WP_Widget {

  function __construct() {
    // Instantiate the parent object
    parent::__construct( false, 'Google Map' );
  }

  function widget( $args, $instance ) {
    echo '<sitepoint-map client-id="' . GOOGLE_MAP_API_KEY . '"></sitepoint-map>';
  }
}
Also, do not forget to define your own GOOGLE_MAP_API_KEY constant. The best place for this is at the top of the functions.php file in our child theme.
另外,不要忘记定义自己的GOOGLE_MAP_API_KEY常量。 最好的位置是我们子主题中functions.php文件的顶部。
<?php
// functions.php

require_once( 'lib/sitepoint-map-widget.php' );
define('GOOGLE_MAP_API_KEY', '<your-key-here>');
And voila! We now have a fully functional Google Map widget for WordPress. Usually plugins that offer this kind of functionality can contain a few hundreds lines of PHP code. And here we have a very nice setup in our webcomponents folder, where everything is centralized and easily extensible and customizable.
瞧! 现在,我们有了一个功能齐全的适用于WordPress的Google Map小部件。 通常,提供这种功能的插件可以包含数百行PHP代码。 在这里,我们在webcomponents文件夹中有一个非常不错的设置,其中的所有内容都是集中的,易于扩展和自定义。
结论 (Conclusion)
And with that, we come to the end of the tutorial. By now you should know how to integrate Polymer into your WordPress install and how to add a custom component. If you wish to further sharpen your skills, the next step for our Google Maps component would be to map the WordPress widget attributes to the attributes of the component. In this way you would be able to pass in arguments such as marker position, client ID etc. from the Appearance > Widgets configuration screen. Why not have a try at implementing that yourself and let me know how you get on.
至此,我们结束了本教程的结尾。 现在,您应该知道如何将Polymer集成到WordPress安装中以及如何添加自定义组件。 如果您想进一步提高自己的技能,那么Google Maps组件的下一步就是将WordPress小部件属性映射到该组件的属性。 这样,您将能够从“ 外观”>“小部件”配置屏幕中传递诸如标记位置,客户端ID等的参数。 为什么不尝试自己实现,让我知道您的生活。
And while you’re at it, please take some time to dig into the beautiful world of web components, browse around the library and find something fun to integrate into WordPress. Please share your discoveries with us in the comments below. I will be on the lookout!
同时,请花一些时间深入研究Web组件的美丽世界, 在库中浏览并找到一些有趣的东西可以集成到WordPress中。 请在下面的评论中与我们分享您的发现。 我会监视的!
This article was peer reviewed by Simon Codrington. Thanks to all of SitePoint’s peer reviewers for making SitePoint content the best it can be![/special]
本文由Simon Codrington同行评审。 感谢所有SitePoint的同行评审人员使SitePoint内容达到最佳状态![/ special]
翻译自: https://www.sitepoint.com/polymer-wordpress-custom-component/
polymer ajax


 被折叠的 条评论
为什么被折叠?
被折叠的 条评论
为什么被折叠?
 到【灌水乐园】发言


