


 本文介绍了如何使用OAuth.io为网站添加社交登录功能,包括在Facebook和Google上注册开发者帐户,安装OAuth.io,配置API,以及编写代码实现登录逻辑。通过OAuth.io,可以方便地实现合并社交登录,简化用户登录流程。
oauth2.0认证登录
This article was peer reviewed by Wern Ancheta. Thanks to all of SitePoint’s peer reviewers for making SitePoint content the best it can be!
本文由Wern Ancheta进行同行评审。 感谢所有SitePoint的同行评审人员使SitePoint内容达到最佳状态!
Users today often like the idea of logging into websites with a single click using one of their social accounts.
如今,用户经常喜欢使用其社交帐户之一单击即可登录网站的想法。
Given that, today we will look at OAuth.io, which is a multi-platform SDK for more than 120 social login providers like Facebook, Twitter, and Google+. Working with such an SDK is not a difficult task, but there are some prerequisites for using it.
考虑到这一点,今天我们将看一下OAuth.io ,它是一个多平台SDK,适用于Facebook,Twitter和Google+等120多个社交登录提供商。 使用这样的SDK并不是一件容易的事,但是使用它有一些先决条件。

步骤1:安装先决条件 (Step 1: Setup Prerequisites)
The first step is creating:
第一步是创建:
- A developer account with a registered application on Facebook and Google (or on any other supported provider you want to implement). 在Facebook和Google(或您要实施的任何其他受支持的提供商)上注册了应用程序的开发人员帐户。
A registered oauth.io account (30 day free trials supported).
已注册的oauth.io帐户 (支持30天免费试用)。
To create the Facebook application go to the getting started with Facebook apps guide. Do the same for Google by following this link.
要创建Facebook应用程序,请转到Facebook应用程序入门指南 。 通过点击此链接对Google进行相同的操作。
If you get stuck or need more help just leave a comment below.
如果您遇到困难或需要更多帮助,请在下面发表评论。
步骤2:安装OAuth.io (Step 2: Install OAuth.io)
composer require oauth-io/oauth步骤3:在OAuth.io中配置API (Step 3: Configure APIs in OAuth.io)
Regarding OAuth.io configuration and setup, all we need to do is register the provider’s application in their dashboard. This is done by copying the Client ID and Client Secret strings from the provider’s application page.
关于OAuth.io的配置和设置,我们要做的就是在其仪表板中注册提供商的应用程序。 通过从提供商的应用程序页面复制Client ID和Client Secret字符串来完成此操作。
The process of doing this is displayed in the following gif for Google and Facebook only, but it’s pretty much the same for all providers.
下面的gif中仅显示了执行此操作的过程,仅适用于Google和Facebook,但对于所有提供商而言,该过程几乎相同。

步骤4:编码 (Step 4: Code It)
The scope of this step is to code the logic of a merged social login. A demo application was provided by Oauth.io to demonstrate the way the SDK is used.
此步骤的范围是编码合并社交登录名的逻辑。 Oauth.io提供了一个演示应用程序,以演示SDK的使用方式。
The finished project of this demo application has a directory structure like below:
该演示应用程序的完成项目具有如下目录结构:
|-Demo-OAuth-IO/
|--app/
|--public/
|--src/
|--vendor/
|--composer.json
|--composer.lock
The src and vendor directories are created on project creation, while app and public are created along the way.
src和vendor目录是在项目创建时创建的,而app和public是在创建过程中创建的。
Note that this application will be a simple demo – in a real world app, like one we’ll build in a follow up post, you would likely be using a framework.
请注意,此应用程序将是一个简单的演示–在现实世界中的应用程序中,就像我们将在后续文章中构建的那样,您可能会使用框架。
To implement this demo, we started with the creation of a new project using Composer including the OAuth.io PHP SDK.
为了实现此演示,我们首先使用Composer(包括OAuth.io PHP SDK)创建了一个新项目。
composer create-project oauth-io/oauth=0.3.2 Demo-OAuth-IOThen, we continue with the creation of the app directory and its files.
然后,我们继续创建app目录及其文件。
|-app/
|--config.inc.php
|--OAuthIO.php
This directory contains a class called OAuthIO. This class is a facade that simplifies the usage of the SDK. Its source code is:
该目录包含一个名为OAuthIO的类。 此类是简化SDK用法的外观。 它的源代码是:
<?php
require_once '../vendor/autoload.php';
require_once 'config.inc.php';
use OAuth_io\OAuth;
class OAuthIO
{
protected $provider;
protected $oauth;
public function __construct($provider)
{
$this->provider = $provider;
$this->oauth = new OAuth();
}
/**
* init: Initialise the OAuth_io
*/
public function init()
{
$this->oauth->initialize(
PUBLIC_KEY, SECRET_KEY
);
}
/**
* auth: Make the authentication process
* @param: callback => uri to goto after authentication
* @throw: NotInitializedException
*/
public function auth($callback)
{
$this->oauth->redirect(
$this->provider,
$callback
);
}
/**
* getClient: Get a request_object from OAuth_io
* @param: opt => options passed to authenticate process
* @throw: NotAuthenticatedException
* @return: Request object on success
*/
public function getClient($opt = null)
{
if ($opt === null) {
$client = $this->oauth->auth(
$this->provider, [
'redirect' => true,
]
);
} else {
$opt['redirect'] = true;
$client = $this->oauth->auth($this->provider, $opt);
}
return $client;
}
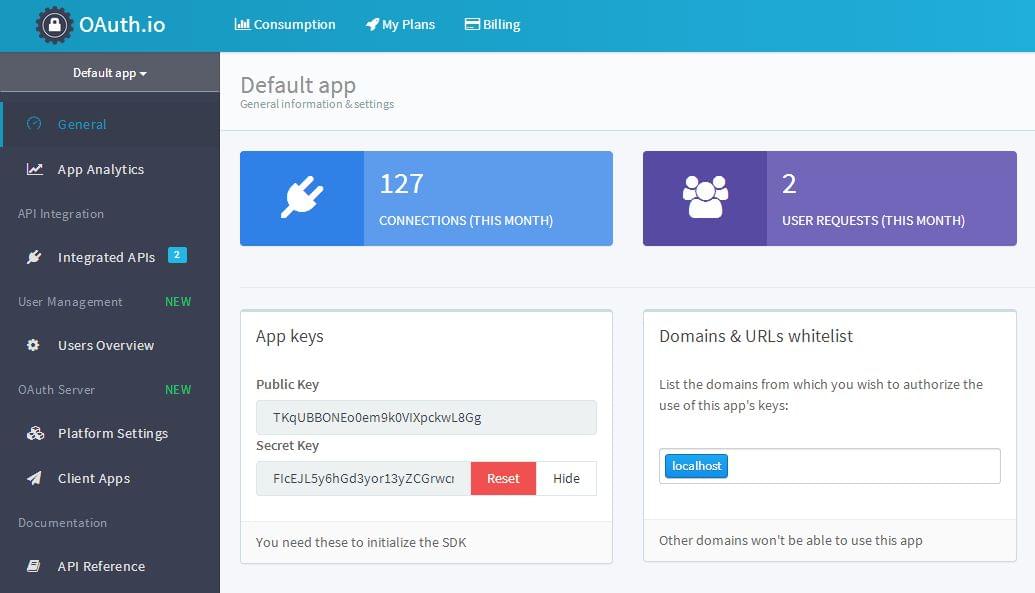
}As you can see, the OAuthIO class requires and loads two files: the autoload.php file which automatically loads the OAuth.io SDK in the class, and the config.inc.php file which contains the definition of public and secret keys necessary to implement and run the application.
如您所见,OAuthIO类需要并加载两个文件: autoload.php文件和config.inc.php文件,该文件自动加载该类中的OAuth.io SDK,而config.inc.php文件包含了定义公共密钥和私有密钥所必需的实施并运行该应用程序。
<?php

define('PUBLIC_KEY', 'TKqUBBONEo0em9k0VIXpckwL8Gg');
define('SECRET_KEY', 'FIcEJL5y6hGd3yor13yZCGrwcrE');
You can find these keys in App Keys on your OAuth.io dashboard page.
您可以在OAuth.io信息中心页面上的“应用程序密钥”中找到这些密钥。
Functions defined in this class are self explanatory and perform the authentication process and the creation of a client, respectively auth() and getClient().
此类中定义的函数不言自明,它们分别执行auth()和getClient()执行身份验证过程和客户端的创建。
The authentication process consists of redirecting the user to the social provider’s login page, and after successfully logging in, redirecting them back to the web app.
身份验证过程包括将用户重定向到社交提供程序的登录页面,并在成功登录后将其重定向回Web应用程序。
The client object is nothing more than an instance of the
RequestObjectclass that comes with the SDK. It is utilized to make the requests to the Oauth.io API. It can be easily created from the credentials that are gained from the authentication process. They are accessed calling thegetCredentials()method on theRequestObjectinstance. Storing these credentials in a database and loading them again and callingauth()is the recommended way to reuse a client without the need for re-authentication.客户对象不过是SDK随附的
RequestObject类的实例。 它用于向Oauth.io API发出请求。 可以使用从身份验证过程中获得的凭据轻松创建该证书。 通过在RequestObject实例上调用getCredentials()方法来访问它们。 建议将这些凭据存储在数据库中,然后再次加载它们,然后调用auth()是重用客户端而不需要重新身份验证的建议方法。
$provider->auth(
    [
        'credentials' => $credentials,
    ]
);
After we’re done in the app directory, we create the public directory.
在app目录中完成操作后,我们将创建public目录。
|-public/
|--tmpl/
|----footer.php
|----header.php
|--index.php
|--login.php
The public directory, as you may guess, contains the files that users can access and view from the browser. These files perform the bulk of the social authentication process.
您可能会猜到, public目录包含用户可以从浏览器访问和查看的文件。 这些文件执行大部分社会认证过程。
login.phpimplements the merged social login page and redirects the user to the index page if the authentication succeeds, otherwise it stops and prints an error message.如果身份验证成功,
login.php实现合并的社交登录页面,并将用户重定向到索引页面,否则它将停止并显示错误消息。<?php session_start(); require '../app/OAuthIO.php'; if (isset($_SESSION['oauthio']['auth']) && count($_SESSION['oauthio']['auth']) > 0 ) {}
if (isset($_GET['p']) && empty($_GET['p']) == false ) {
$provider_name = $_GET['p']; $provider = new OAuthIO($provider_name); $provider->init(); try { // Execute authentication process $provider->auth('/index.php'); } catch (Exception $e) { die($e->getMessage()); }}
index.phpchecks if a user is authenticated, trying to get an instance of RequestObject using thegetClient()method from OAuthIO. If it fails, it prints out the error message plus a link to the login page, otherwise it prints out the provider’s name concatenated to the success message.index.php检查用户是否已通过身份验证,尝试使用OAuthIO的getClient()方法获取RequestObject的实例。 如果失败,则打印出错误消息以及登录页面的链接,否则,打印出与成功消息连接的提供者的名称。<?php session_start(); require '../app/OAuthIO.php'; $provider_name = ''; $errors = []; if (isset($_SESSION['oauthio']['auth']) && count($_SESSION['oauthio']['auth']) > 0 ) {}
$provider = new OAuthIO($provider_name); $provider->init();
try {
$client = $provider->getClient();} catch (\Exception $e) { $errors[] = $e->getMessage(); }
And the message printing part:
和消息打印部分:
if (count($errors) > 0) {

    print '<div class="alert alert-danger" role="alert">' .
        $errors[0] . '. Goto <a href="login.php">login page</a> to authenticate.</div>';

} else {

    if ($client !== false) {

        $me = $client->me();
        print '<div class="alert alert-success" role="alert">' .
            sprintf(
                'Well done %s! You have authenticated using %s.',
                $me['name'], ucfirst($provider_name)
            ) . '</div>';

    }
}
The public directory contains another directory called tmpl. In this directory we can find the static header and footer of the main template of the application. They contain no logic, so their source code is not shown in this tutorial, and they are safe to include in the public folder.
public目录包含另一个名为tmpl目录。 在此目录中,我们可以找到应用程序主模板的静态页眉和页脚。 它们不包含逻辑,因此本教程中不会显示其源代码,并且可以安全地将它们包含在公用文件夹中。
That’s all we had to do – if we test now, we see the following result.
这就是我们要做的–如果现在进行测试,我们将看到以下结果。
结论 (Conclusion)
In this short article, we learned how to implement a merged social login using OAuth.io.
在这篇简短的文章中,我们学习了如何使用OAuth.io实施合并的社交登录。
As the desire to use username/password combinations diminishes, alternatives like these or magic links are becoming more prevalent – if your future app will depend on social network logins, consider applying this process and saving yourself some trouble.
随着使用用户名/密码组合的愿望逐渐减少,诸如此类或魔术链接之类的替代方法正变得越来越普遍-如果您将来的应用程序将依赖于社交网络登录,请考虑应用此过程并为自己省去一些麻烦。
To learn how to make more API calls to providers, check out the documentation. The source code for the app created in this tutorial can be found on Github.
要了解如何对提供程序进行更多API调用,请查看文档 。 在本教程中创建的应用程序的源代码可以在Github上找到。
翻译自: https://www.sitepoint.com/social-logins-with-oauth-io-log-in-with-anything-anywhere/
oauth2.0认证登录


 333
333

 被折叠的 条评论
为什么被折叠?
被折叠的 条评论
为什么被折叠?
 到【灌水乐园】发言


