


谷歌云端硬盘 转存
In this tutorial, we’re going to build an app that talks to the Google Drive API. It will have file search, upload, download and delete features. If you want to follow along, you can clone the repo from Github.
在本教程中,我们将构建一个与Google Drive API对话的应用程序。 它将具有文件搜索,上传,下载和删除功能。 如果您想继续,可以从Github克隆仓库 。

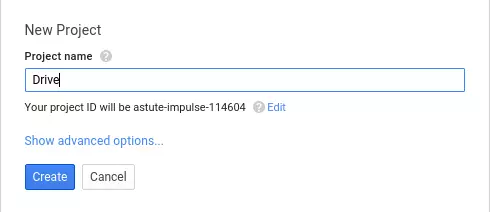
创建一个新的Google项目 (Creating a New Google Project)
The first thing that we need to do when working with any of Google’s APIs is create a new project in the Google Console.
使用任何Google API时,我们要做的第一件事是在Google控制台中创建一个新项目。
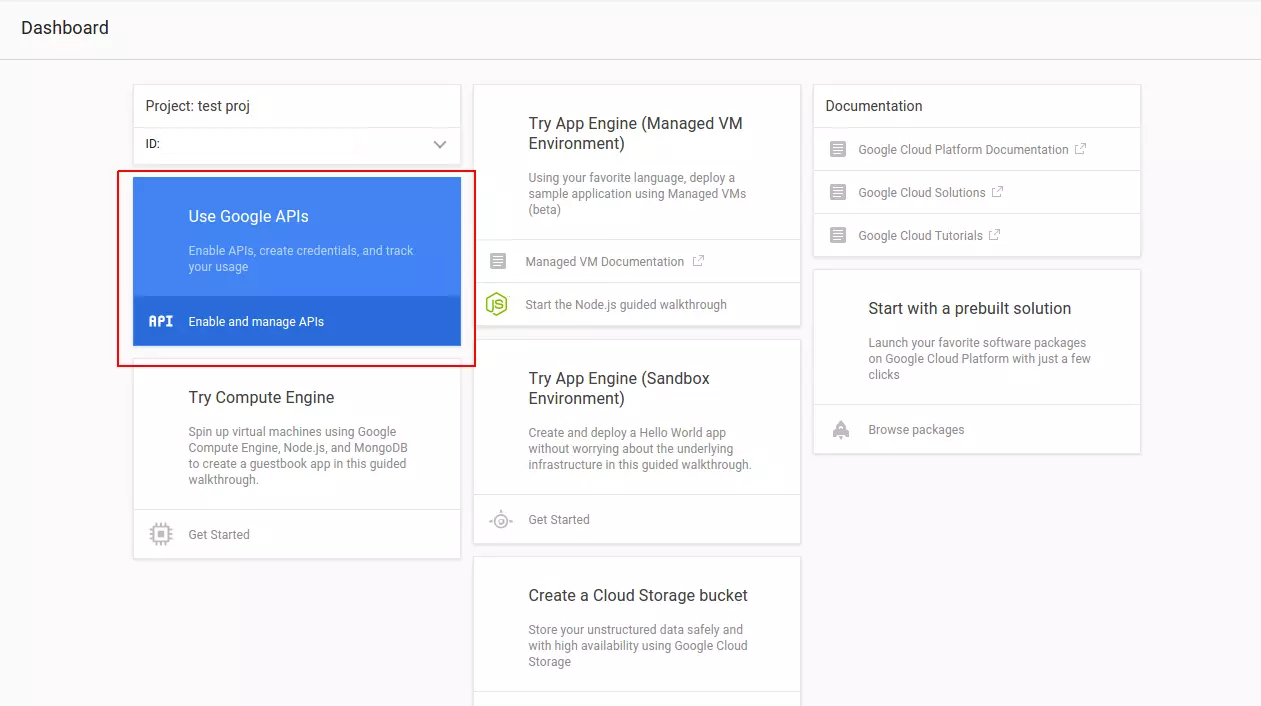
Then, we need to enable the Google+ API and Google Drive API. We’ll need G+ to get the user’s information.
然后,我们需要启用Google+ API和Google Drive API。 我们需要G +才能获取用户的信息。
In the credentials menu, we pick Add credentials, selecting OAuth 2.0 client ID.
在凭证菜单中,我们选择添加凭证 ,然后选择OAuth 2.0客户端ID 。
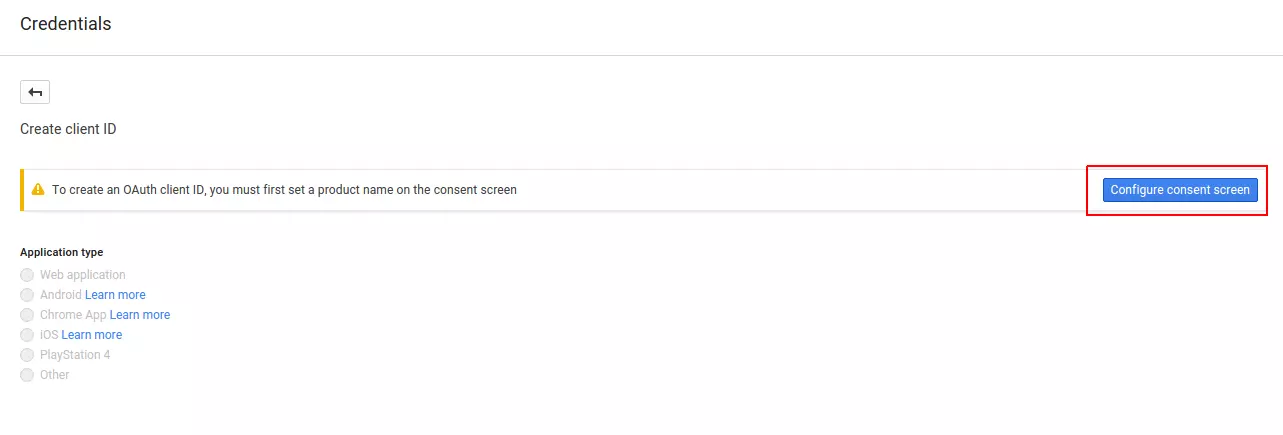
Next is the configure consent screen button. This allows us to enter the details of the project such as the name, homepage URL, and other details that are helpful to the user. For now we only really need to enter the name of the project.
接下来是配置同意屏幕按钮。 这使我们可以输入项目的详细信息,例如名称,主页URL以及对用户有帮助的其他详细信息。 现在,我们只需要输入项目名称即可。

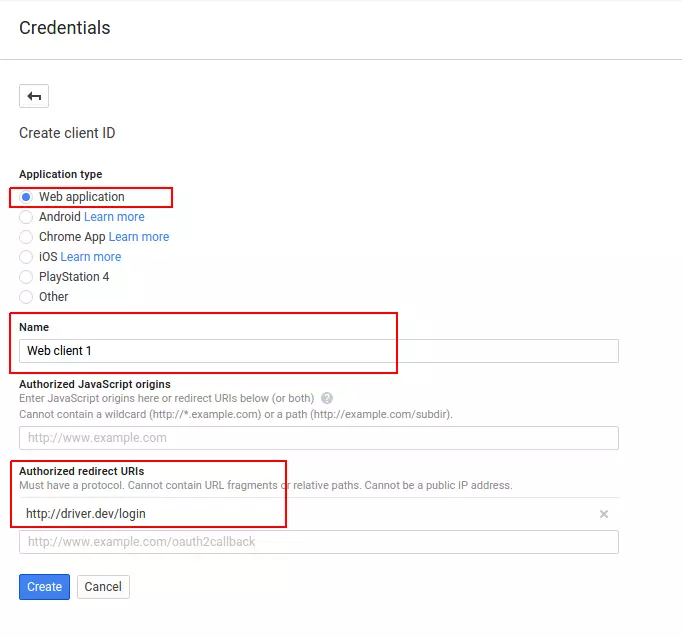
Next, we create a client ID. We need web application for the application type, and then we need to enter a value for the Authorized redirect URIs. This is the URL Google will redirect to after the user gives the app permission.
接下来,我们创建一个客户ID。 我们需要Web应用程序作为应用程序类型,然后我们需要输入Authorized redirect URIs的值。 这是用户授予应用权限后Google将重定向到的URL。
建设项目 (Building the Project)
For this project, we will be using the Laravel Framework.
对于这个项目,我们将使用Laravel Framework 。
composer create-project --prefer-dist laravel/laravel driver安装依赖项 (Installing the Dependencies)
We’re going to need the official Google API client for PHP, as well as the Carbon library. Update composer.json to add those:
我们将需要用于PHP的官方Google API客户端以及Carbon库。 更新composer.json以添加以下内容:
composer require nesbot/carbon google/apiclient配置项目 (Configuring the Project)
We need to specify a few global settings for our project. In Laravel, that is done through the .env file. Let’s edit the file and add the app title, timezone and Google configuration below the default configuration:
我们需要为项目指定一些全局设置。 在Laravel中,这是通过.env文件完成的。 让我们编辑文件,并在默认配置下方添加应用标题,时区和Google配置:
APP_ENV=local
APP_DEBUG=true
APP_KEY=base64:iZ9uWJVHemk5wa8disC8JZ8YRVWeGNyDiUygtmHGXp0=
APP_URL=http://localhost

SESSION_DRIVER=file

#add these:
APP_TITLE=Driver
APP_TIMEZONE="Asia/Manila"
GOOGLE_CLIENT_ID="YOUR GOOGLE CLIENT ID"
GOOGLE_CLIENT_SECRET="YOUR GOOGLE CLIENT SECRET"
GOOGLE_REDIRECT_URL="YOUR GOOGLE LOGIN REDIRECT URL"
GOOGLE_SCOPES="email,profile,https://www.googleapis.com/auth/drive"
GOOGLE_APPROVAL_PROMPT="force"
GOOGLE_ACCESS_TYPE="offline"
Breaking it down we have:
分解我们有:
GOOGLE_CLIENT_IDandGOOGLE_CLIENT_SECRET– the client ID and secret that we got earlier from the Google console.GOOGLE_CLIENT_ID和GOOGLE_CLIENT_SECRET我们之前从Google控制台获取的客户端ID和机密。GOOGLE_REDIRECT_URL– the URL to which Google will redirect after the user gives permission to our app. This should be the same as the one added earlier in the Google console. It should also be a valid route in the app. If we used artisan to serve the project, the redirect URL will be something likehttp://localhost:8000/login.GOOGLE_REDIRECT_URL–用户向我们的应用授予许可后,Google将重定向到的URL。 这应该与之前在Google控制台中添加的内容相同。 这也是应用中的有效路线。 如果我们使用artisan为该项目提供服务,则重定向URL将类似于http://localhost:8000/login。GOOGLE_SCOPES– the permissions that we need from the user.emailgives our app access to the user’s email.profilegives us the basic user info such as the first name and the last name.https://www.googleapis.com/auth/drivegives us permission to manage files on the user’s Google Drive.GOOGLE_SCOPES我们需要用户的权限。email允许我们的应用访问用户的电子邮件。profile为我们提供了基本的用户信息,例如名字和姓氏。https://www.googleapis.com/auth/drive授予我们管理用户Google云端硬盘上文件的权限。
谷歌 (Googl)
The Googl class (app\Googl.php) is used for initializing the Google and Google Drive Client libraries. It has two methods: client and drive.
Googl类( app\Googl.php )用于初始化Google和Google Drive Client库。 它有两种方法: client和drive 。
The client method is where we initialize the Google API client and then set the different options that we’ve added earlier in the .env file. Once all the different options are set, we simply return the newly created client.
使用client方法可以初始化Google API客户端,然后设置之前在.env文件中添加的不同选项。 设置完所有不同的选项后,我们只需返回新创建的客户端。
The drive method is used for initializing the Google Drive service. This accepts the client as its argument.
drive方法用于初始化Google Drive服务。 这接受客户端作为其参数。
<?php
namespace App;

class Googl
{
    public function client()
    {
        $client = new \Google_Client();
        $client->setClientId(env('GOOGLE_CLIENT_ID'));
        $client->setClientSecret(env('GOOGLE_CLIENT_SECRET'));
        $client->setRedirectUri(env('GOOGLE_REDIRECT_URL'));
        $client->setScopes(explode(',', env('GOOGLE_SCOPES')));
        $client->setApprovalPrompt(env('GOOGLE_APPROVAL_PROMPT'));
        $client->setAccessType(env('GOOGLE_ACCESS_TYPE'));

        return $client;
    }


    public function drive($client)
    {
        $drive = new \Google_Service_Drive($client);
        return $drive;
    }
}
路线 (Routes)
The different pages in the app are defined in the app/Http/routes.php file:
应用程序中的不同页面在app/Http/routes.php文件中定义:
// This is where the user can see a login button for logging into Google
Route::get('/', 'HomeController@index');

// This is where the user gets redirected upon clicking the login button on the home page
Route::get('/login', 'HomeController@login');

// Shows a list of things that the user can do in the app
Route::get('/dashboard', 'AdminController@index');

// Shows a list of files in the users' Google drive
Route::get('/files', 'AdminController@files');

// Allows the user to search for a file in the Google drive
Route::get('/search', 'AdminController@search');

// Allows the user to upload new files
Route::get('/upload', 'AdminController@upload');
Route::post('/upload', 'AdminController@doUpload');

// Allows the user to delete a file
Route::get('/delete/{id}', 'AdminController@delete');

Route::get('/logout', 'AdminController@logout');
家庭控制器 (Home Controller)
The Home Controller (app/Http/Controller/HomeController.php) is responsible for serving the home page and handling the user login.
主页控制器( app/Http/Controller/HomeController.php )负责提供主页并处理用户登录。
<?php
namespace App\Http\Controllers;

use Illuminate\Http\Request;
use App\Googl;

class HomeController extends Controller
{
    public function index()
    {
        return view('login');
    }


    public function login(Googl $googl, Request $request)
    {
        $client = $googl->client();

        if ($request->has('code')) {

            $client->authenticate($request->input('code'));
            $token = $client->getAccessToken();

            $plus = new \Google_Service_Plus($client);

            $google_user = $plus->people->get('me');
            $id = $google_user['id'];

            $email = $google_user['emails'][0]['value'];
            $first_name = $google_user['name']['givenName'];
            $last_name = $google_user['name']['familyName'];

            session([
                'user' => [
                    'email' => $email,
                    'first_name' => $first_name,
                    'last_name' => $last_name,
                    'token' => $token
                ]
            ]);

            return redirect('/dashboard')
                ->with('message', ['type' => 'success', 'text' => 'You are now logged in.']);

        } else {
            $auth_url = $client->createAuthUrl();
            return redirect($auth_url);
        }
   }
}
Breaking down the code above, first we return the login view:
分解上面的代码,首先我们返回登录视图:
public function index()
{
    return view('login');
}
The login view is stored in resources/views/login.blade.php and contains the following code:
登录视图存储在resources/views/login.blade.php并包含以下代码:
@extends('layouts.default')

@section('content')
<form method="GET" action="/login">
    <button class="button-primary">Login with Google</button>
</form>
@stop
The login view inherits from the resources/views/layouts/default.blade.php file:
登录视图继承自resources/views/layouts/default.blade.php文件:
<!DOCTYPE html>
<html lang="en">
<head>
    <meta charset="UTF-8">
    <title>{{ env('APP_TITLE') }}</title>
    <link rel="stylesheet" href="{{ url('assets/css/skeleton.min.css') }}">
    <link rel="stylesheet" href="{{ url('assets/css/style.css') }}">
</head>
<body>
    <div class="container">
        <header>
            <h1>{{ env('APP_TITLE') }}</h1>
        </header>
        @include('partials.alert')
        @yield('content')
    </div>
</body>
</html>
We’re using the Skeleton CSS framework for this app. Since Skeleton already has us covered in making things look good, we only have minimal CSS code (public/assets/css/style.css):
我们正在为此应用程序使用Skeleton CSS框架 。 由于Skeleton已经让我们着眼于使事物看起来更好,因此我们只有很少CSS代码( public/assets/css/style.css ):
.file-title {
    font-size: 18px;
}

ul#files li {
    list-style: none;
}

.file {
    padding-bottom: 20px;
}

.file-modified {
    color: #5F5F5F;
}

.file-links a {
    margin-right: 10px;
}

.alert {
    padding: 20px;
}

.alert-success {
    background-color: #61ec58;
}

.alert-danger {
    background-color: #ff5858;
}
Going back to the Home Controller, we have the login method where we check if there is a code passed in as a query parameter. If there isn’t one, we create the authentication URL and redirect the user:
回到本地控制器,我们使用login方法,其中检查是否有code作为查询参数传入。 如果没有,我们创建身份验证URL并重定向用户:
if ($request->has('code')) {
    ...
} else {
    $auth_url = $client->createAuthUrl();
    return redirect($auth_url);
}
The authentication URL is basically a Google login page which the user can use to give permission to the app. After the user has given the permission, Google redirects back to the redirect URL we’ve specified. A code is passed to that URL, which we use to acquire an access token.
身份验证URL基本上是一个Google登录页面,用户可以用来向该应用授予权限。 用户授予权限后,Google重定向回我们指定的重定向URL。 将code传递到该URL,我们使用该code来获取访问令牌。
$client->authenticate($request->input('code'));
$token = $client->getAccessToken();
From there, we get the basic user information which we then save into the session along with the access token:
从那里,我们获得基本的用户信息,然后将其与访问令牌一起保存到会话中:
$plus = new \Google_Service_Plus($client);

$google_user = $plus->people->get('me');
$id = $google_user['id'];

$email = $google_user['emails'][0]['value'];
$first_name = $google_user['name']['givenName'];
$last_name = $google_user['name']['familyName'];

session([
    'user' => [
        'email' => $email,
        'first_name' => $first_name,
        'last_name' => $last_name,
        'token' => $token
    ]
]);
Lastly, we redirect the user to the dashboard page:
最后,我们将用户重定向到仪表板页面:
return redirect('/dashboard')
                ->with('message', ['type' => 'success', 'text' => 'You are now logged in.']);
管理员 (Admin Controller)
The Admin Controller (app/Http/Controllers/AdminController.php) deals with operations that only logged in users can perform. This is where the code for listing, searching, uploading and deleting files resides.
管理控制器( app/Http/Controllers/AdminController.php )处理只有登录用户才能执行的操作。 这是列出,搜索,上传和删除文件的代码所在的位置。
<?php
namespace App\Http\Controllers;

use Illuminate\Http\Request;
use App\Googl;
use Carbon\Carbon;

class AdminController extends Controller
{
    private $client;
    private $drive;

    public function __construct(Googl $googl)
    {
        $this->client = $googl->client();
        $this->client->setAccessToken(session('user.token'));
        $this->drive = $googl->drive($this->client);
    }


    public function index()
    {
        return view('admin.dashboard');
    }


    public function files()
    {
        $result = [];
        $pageToken = NULL;

        $three_months_ago = Carbon::now()->subMonths(3)->toRfc3339String();

        do {
            try {
                $parameters = [
                    'q' => "viewedByMeTime >= '$three_months_ago' or modifiedTime >= '$three_months_ago'",
                    'orderBy' => 'modifiedTime',
                    'fields' => 'nextPageToken, files(id, name, modifiedTime, iconLink, webViewLink, webContentLink)',
                ];

                if ($pageToken) {
                    $parameters['pageToken'] = $pageToken;
                }

                $result = $this->drive->files->listFiles($parameters);
                $files = $result->files;

                $pageToken = $result->getNextPageToken();

            } catch (Exception $e) {
                return redirect('/files')->with('message',
                    [
                        'type' => 'error',
                        'text' => 'Something went wrong while trying to list the files'
                    ]
                );
              $pageToken = NULL;
            }
        } while ($pageToken);

        $page_data = [
            'files' => $files
        ];

        return view('admin.files', $page_data);
   }


    public function search(Request $request)
    {
        $query = '';
        $files = [];

        if ($request->has('query')) {
            $query = $request->input('query');

            $parameters = [
                'q' => "name contains '$query'",
                'fields' => 'files(id, name, modifiedTime, iconLink, webViewLink, webContentLink)',
            ];

            $result = $this->drive->files->listFiles($parameters);
            if($result){
                $files = $result->files;
            }
        }

        $page_data = [
            'query' => $query,
            'files' => $files
        ];

        return view('admin.search', $page_data);
   }


    public function delete($id)
    {
        try {
            $this->drive->files->delete($id);
        } catch (Exception $e) {
            return redirect('/search')
                ->with('message', [
                    'type' => 'error',
                    'text' => 'Something went wrong while trying to delete the file'
                ]);
        }

        return redirect('/search')
            ->with('message', [
                'type' => 'success',
                'text' => 'File was deleted'
            ]);
    }


    public function upload()
    {
        return view('admin.upload');
    }


    public function doUpload(Request $request)
    {
        if ($request->hasFile('file')) {

            $file = $request->file('file');

            $mime_type = $file->getMimeType();
            $title = $file->getClientOriginalName();
            $description = $request->input('description');

            $drive_file = new \Google_Service_Drive_DriveFile();
            $drive_file->setName($title);
            $drive_file->setDescription($description);
            $drive_file->setMimeType($mime_type);

            try {
                $createdFile = $this->drive->files->create($drive_file, [
                    'data' => $file,
                    'mimeType' => $mime_type,
                    'uploadType' => 'multipart'
                ]);

                $file_id = $createdFile->getId();

                return redirect('/upload')
                    ->with('message', [
                        'type' => 'success',
                        'text' => "File was uploaded with the following ID: {$file_id}"
                ]);

            } catch (Exception $e) {

                return redirect('/upload')
                    ->with('message', [
                        'type' => 'error',
                        'text' => 'An error occurred while trying to upload the file'
                    ]);

            }
        }

    }


    public function logout(Request $request)
    {
        $request->session()->flush();
        return redirect('/')->with('message', ['type' => 'success', 'text' => 'You are now logged out']);
    }

}
Breaking down the code above, first we create two private variables for the Google client and the Google Drive Service and initialize them in the constructor.
分解上面的代码,首先我们为Google客户端和Google Drive服务创建两个私有变量,然后在构造函数中对其进行初始化。
private $client;
private $drive;

public function __construct(Googl $googl)
{
    $this->client = $googl->client();
    $this->client->setAccessToken(session('user.token'));
    $this->drive = $googl->drive($this->client);
}
仪表板 (Dashboard)
To build the dashboard, we add the index method which serves the dashboard page:
为了构建仪表板,我们添加了为仪表板页面提供服务的index方法:
public function index()
{
    return view('admin.dashboard');
}
The dashboard page contains the links to the different pages in the app:
仪表板页面包含指向应用程序中不同页面的链接:
@extends('layouts.default')

@section('content')
<h3>What do you like to do?</h3>
<ul>
    <li><a href="/files">List Files</a></li>
    <li><a href="/search">Search File</a></li>
    <li><a href="/upload">Upload File</a></li>
    <li><a href="/logout">Logout</a></li>
</ul>
@stop
列出文件 (Listing Files)
Next we have the files method which is responsible for listing the files that have been recently modified or viewed. In the example, we’re filtering the files that have been modified or viewed during the last three months. We do that by providing the request for listing files with some params.
接下来,我们有files方法,该方法负责列出最近被修改或查看的文件。 在该示例中,我们将过滤过去三个月中已修改或查看的文件。 为此,我们提供了列出带有一些参数的文件的请求。
$three_months_ago = Carbon::now()->subMonths(3)->toRfc3339String();

$parameters = [
    'q' => "viewedByMeTime >= '$three_months_ago' or modifiedTime >= '$three_months_ago'",
    'orderBy' => 'modifiedTime',
    'fields' => 'nextPageToken, files(id, name, modifiedTime, iconLink, webViewLink, webContentLink)',
];
Most of the filtering can be done through the use of the q parameter. Here we’re using viewedByMeTime to specify that the file should have been viewed by the current user during the past three months. We use the modifiedTime to specify that the file should have been modified by any user who has access to the document in that same period. These two conditions are linked together by using the or keyword.
大多数过滤可以通过使用q参数来完成。 在这里,我们使用viewedByMeTime来指定当前用户在过去三个月中应该已经查看过该文件。 我们使用modifiedTime来指定该文件应该由在同一时期内有权访问该文档的任何用户修改。 通过使用or关键字将这两个条件链接在一起。
The results can then be ordered by specifying the orderBy parameter. In this case, we’re ordering the files using the modifiedTime field in descending order. This means that the files that have been recently modified are returned first. Also note that we’re passing in a fields parameter which is used for specifying the fields we want returned.
然后可以通过指定orderBy参数对结果进行排序。 在这种情况下,我们使用modifiedTime字段以降序对文件进行排序。 这意味着将首先返回最近修改过的文件。 还要注意,我们传入的是fields参数,该参数用于指定要返回的字段。
The full list of values usable as the q parameter is in the documentation.
可用作q参数的值的完整列表在文档中 。
We’re also specifying an additional parameter called pageToken. This allows us to paginate through a big result set. So while there’s a page token being returned, we continue fetching results from the API.
我们还指定了另一个名为pageToken参数。 这使我们可以对较大的结果集进行分页。 因此,尽管返回了页面令牌,但我们继续从API获取结果。
if ($pageToken) {
    $parameters['pageToken'] = $pageToken;
}
To perform the request, we use the Google Drive service to get the list of files that meets the criteria that we’ve specified earlier. The page token can also be fetched from the results.
为了执行请求,我们使用Google云端硬盘服务来获取符合我们之前指定的条件的文件列表。 页面令牌也可以从结果中获取。
$result = $this->drive->files->listFiles($parameters);
$files = $result->files;

$pageToken = $result->getNextPageToken();
Note that this is all done inside a do..while loop. So while the page token is not null it continues to execute.
请注意,这都是在do..while循环内完成的。 因此,尽管页面令牌不为null它将继续执行。
do {
    ...
} while ($pageToken);
The following (resources/views/admin/files.blade.php) is the view used for listing the files:
以下( resources/views/admin/files.blade.php )是用于列出文件的视图:
@extends('layouts.default')

@section('content')
<h3>List Files</h3>
<ul id="files">
    @foreach($files as $file)
    <li>
        <div class="file">

            <div class="file-title">
                <img src="{{ $file->iconLink }}">
                {{ $file->name }}
            </div>
            <div class="file-modified">
                last modified: {{ Date::format($file->modifiedTime) }}
            </div>
            <div class="file-links">
                <a href="{{ $file->webViewLink }}">view</a>
                @if(!empty($file->webContentLink))
                <a href="{{ $file->webContentLink }}">download</a>
                @endif
            </div>
        </div>
    </li>
    @endforeach
</ul>
@stop
Here we’re looping through the files and then outputting them inside a list. Each list item contains the Google drive icon associated with the file, the title, the modification date, and a couple of links for viewing and downloading the file. Note that we’re using a custom helper class called Date. We’ll take a look at that in the Date Helper section.
在这里,我们遍历文件,然后将它们输出到列表中。 每个列表项都包含与文件关联的Google驱动器图标,标题,修改日期,以及几个用于查看和下载文件的链接。 请注意,我们正在使用名为Date的自定义帮助程序类。 我们将在“ 日期帮助器”部分中进行介绍。
搜索文件 (Searching for Files)
The search method is responsible for returning the search page. Inside, we check if the query is passed in as a request parameter. Then we we use that as the value for the filename to be searched for. Note that this time we’re not passing in nextPageToken and orderBy as parameters because we’re assuming that there will only be a few items in the result set.
search方法负责返回搜索页面。 在内部,我们检查query是否作为请求参数传入。 然后,我们将其用作要搜索的文件名的值。 请注意,这一次我们不传递nextPageToken和orderBy作为参数,因为我们假设结果集中将只有很少的项目。
if ($request->has('query')) {
    $query = $request->input('query');

    $parameters = [
        'q' => "name contains '$query'",
        'fields' => 'files(id, name, modifiedTime, iconLink, webViewLink, webContentLink)',
    ];

    $result = $this->drive->files->listFiles($parameters);
    if($result){
        $files = $result->files;
    }
}
The following (resources/views/admin/search.blade.php) is the corresponding view:
以下( resources/views/admin/search.blade.php )是相应的视图:
@extends('layouts.default')

@section('content')
<h3>Search Files</h3>
<form method="GET">
    <div class="row">
        <label for="query">Query</label>
        <input type="text" name="query" id="query" value="{{ $query }}">
    </div>
    <button class="button-primary">Search</button>
</form>
@if(!empty($files))
<ul id="files">
    <h4>Search results for: {{ $query }}</h4>
    @foreach($files as $file)
    <li>
        <div class="file">

            <div class="file-title">
                <img src="{{ $file->iconLink }}">
                {{ $file->name }}
            </div>
            <div class="file-modified">
                last modified: {{ Date::format($file->modifiedTime) }}
            </div>
            <div class="file-links">
                <a href="{{ $file->webViewLink }}">view</a>
                @if(!empty($webContentLink))
                <a href="{{ $file->webContentLink }}">download</a>
                @endif
                <a href="/delete/{{ $file->id }}">delete</a>
            </div>
        </div>
    </li>
    @endforeach
</ul>
@else
No results for your query: {{ $query }}
@endif
@stop
删除文件 (Deleting Files)
When the delete link is clicked, the delete method is executed. It accepts the ID as the parameter. This is the ID of the file in Google Drive.
单击删除链接后,将执行delete方法。 它接受ID作为参数。 这是Google云端硬盘中文件的ID。
public function delete($id)
{
    try {
        $this->drive->files->delete($id);
    } catch (Exception $e) {
        return redirect('/search')
            ->with('message', [
                'type' => 'error',
                'text' => 'Something went wrong while trying to delete the file'
            ]);
    }

    return redirect('/search')
        ->with('message', [
            'type' => 'success',
            'text' => 'File was deleted'
        ]);
}
上载档案 (Uploading Files)
Uploading files requires a different method for showing the view and actually uploading the file. This is because we need to use the POST method for uploading the file and GET method for showing the view.
上载文件需要另一种显示视图和实际上载文件的方法。 这是因为我们需要使用POST方法上传文件,而使用GET方法显示视图。
The upload view (resources/views/admin/upload.blade.php) contains the form for uploading a single file:
上传视图( resources/views/admin/upload.blade.php )包含用于上传单个文件的表格:
@extends('layouts.default')

@section('content')
<h3>Upload Files</h3>
<form method="POST" enctype="multipart/form-data">
    <input type="hidden" name="_token" value="{{ csrf_token() }}">
    <div class="row">
        <label for="file">File</label>
        <input type="file" name="file" id="file">
    </div>
    <div class="row">
        <label for="description">Description</label>
        <input type="text" name="description" id="description">
    </div>
    <button class="button-primary">Upload</button>
</form>
@stop
Once the form is submitted, the doUpload method is executed. This checks if a file was uploaded. We then get the file and its info (mime type, file name). That information is then used to create a new Google Drive File.
提交表单后,将执行doUpload方法。 这将检查文件是否已上传。 然后,我们获取文件及其信息(MIME类型,文件名)。 然后,该信息将用于创建新的Google云端硬盘文件。
if ($request->hasFile('file')) {

    $file = $request->file('file');

    $mime_type = $file->getMimeType();
    $title = $file->getClientOriginalName();
    $description = $request->input('description');

    $drive_file = new \Google_Service_Drive_DriveFile();
    $drive_file->setName($title);
    $drive_file->setDescription($description);
    $drive_file->setMimeType($mime_type);
}
Next, we upload the file to Google drive by using the files->create method. This accepts the drive file as its first argument and an array containing the actual contents of the file, mime type and upload type as its second argument. The upload type can either have a value of media, multipart or resumable. You can check out the documentation for uploads if you want to explore those upload types. For our example though, we’re only going to use multipart since we are directly uploading the files to Google Drive by submitting a form. The create method returns the ID of the file if the upload was successful.
接下来,我们使用files->create方法将文件上传到Google驱动器。 它将驱动器文件作为其第一个参数,并将包含文件实际内容,mime类型和上载类型的数组作为第二个参数。 上传类型可以具有media , multipart或resumable 。 如果要浏览这些上传类型,可以查阅有关上传的文档 。 不过,在我们的示例中,由于要通过提交表单将文件直接上传到Google云端硬盘,因此我们只会使用multipart 。 如果上传成功,则create方法将返回文件的ID。
try {
    $createdFile = $this->drive->files->create($drive_file, [
        'data' => $file,
        'mimeType' => $mime_type,
        'uploadType' => 'multipart'
    ]);

    $file_id = $createdFile->getId();

    return redirect('/upload')
        ->with('message', [
            'type' => 'success',
            'text' => "File was uploaded with the following ID: {$file_id}"
    ]);

} catch (Exception $e) {

    return redirect('/upload')
        ->with('message', [
            'type' => 'error',
            'text' => 'An error occured while trying to upload the file'
        ]);

}
日期助手 (Date Helper)
The Date helper is used for formatting the dates returned by the Google Drive API. Here we only have one static method called format which accepts two arguments: date and format. The date is required and for the format we specify a default: M j, which outputs the date in the following format: Feb 28. Carbon is used to do the formatting.
Date帮助程序用于格式化Google云端硬盘API返回的日期。 在这里,我们只有一个称为format静态方法,该方法接受两个参数:date和format。 日期是必需的,对于格式我们指定一个默认值: M j ,它以以下格式输出日期: 2月28日 。 Carbon用于进行格式化。
<?php

use Carbon\Carbon;

class Date {

    public static function format($date, $format = 'M j'){

        return Carbon::parse($date)->format($format);
    }
}
In order to autoload the helper, we need to add the path app/Helpers to the classmap array in the composer.json file. Once that’s done, executing composer dump-autoload will apply the changes.
为了自动加载帮助程序,我们需要将路径app/Helpers添加到composer.json文件中的classmap数组。 完成后,执行composer dump-autoload将应用更改。
"autoload": {
    "psr-4": {
        "App\\": "app/"
    },
    "classmap": [
        "database/",
        "app/Helpers"
    ]
},
结论 (Conclusion)
That’s it! In this tutorial we’ve seen how to work with the Google Drive API using PHP. Specifically, we looked at how to list, search, upload and delete files from a user’s Google drive.
而已! 在本教程中,我们已经了解了如何使用PHP使用Google Drive API。 具体来说,我们研究了如何列出,搜索,上传和删除用户Google驱动器中的文件。
We’ve barely scratched the surface in this tutorial. There’s so much more you can do: there are file revisions and real-time capabilities, to name a few. Be sure to check out the docs if you want to learn more.
在本教程中,我们几乎没有涉及任何内容。 您可以做很多事情: 文件修订和实时功能 ,仅举几例。 如果您想了解更多信息,请务必查看文档 。
Questions? Comments? Leave your feedback below!
有什么问题吗 注释? 在下面留下您的反馈!
翻译自: https://www.sitepoint.com/is-laravel-good-enough-to-power-a-custom-google-drive-ui/
谷歌云端硬盘 转存


 1357
1357

 被折叠的 条评论
为什么被折叠?
被折叠的 条评论
为什么被折叠?
 到【灌水乐园】发言


