varnish缓存
Previously, we looked at some common caching mechanisms we can easily utilize to make our apps faster. In this part, we’ll walk through some of the additional software that we can use with PHP for caching.
以前,我们研究了一些常见的缓存机制,可以轻松利用这些机制来使我们的应用程序更快。 在这一部分中,我们将逐步介绍一些可与PHP一起用于缓存的附加软件。

记忆快取 (Memcached)
Memcached is an in-memory key-value store. You can use it to store things like strings, numeric values, objects and arrays.
Memcached是内存中的键值存储。 您可以使用它来存储诸如字符串,数值,对象和数组之类的东西。
安装Memcached (Installing Memcached)
You can execute the command below to install memcached on ubuntu or other debian based OS:
您可以执行以下命令以在ubuntu或其他基于debian的操作系统上安装memcached:
sudo apt-get install memcachedTo make it work with PHP, you also need to install the PHP extension:
要使其与PHP一起使用,还需要安装PHP扩展:
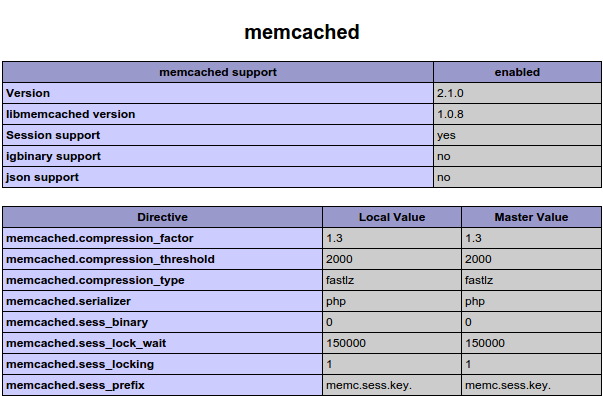
sudo apt-get install php5-memcachedTo check if memcached is working, look for ‘memcached’ in the output returned when you call the phpinfo() method from a page. You should see something similar to the following:
要检查memcached是否正常工作,请在从页面调用phpinfo()方法时在返回的输出中查找“ memcached”。 您应该看到类似于以下内容:
使用Memcached (Using Memcached)
To use memcached, first we create a new instance of the Memcached class. We then specify which server we want to connect to by calling the addServer method. $memcached_host is the IP or domain name of the server and the $memcached_port is the port where the memcached server runs. The default is 11211.
要使用memcached,首先我们创建一个Memcached类的新实例。 然后,我们通过调用addServer方法指定要连接的服务器。 $memcached_host是服务器的IP或域名,而$memcached_port是运行memcached服务器的端口。 默认值为11211。
$mem = new Memcached();
$memcached_host = '127.0.0.1';
$memcached_port = 11211;
$mem->addServer($memcached_host, $memcached_port);
Once that’s done, you can use the set method to cache a specific key-value pair. The set method accepts a unique key as its first argument, and the data that you want to cache as the second, while the third is the duration of the data’s lifetime, in seconds:
完成后,您可以使用set方法来缓存特定的键值对。 set方法将唯一键作为第一个参数,将要缓存的数据作为第二个参数,而第三个是数据生命周期的持续时间(以秒为单位):
$id = 23;
$my_data = array('name' => 'gon', 'occupation' => 'hunter');
$ttl = 60;
$mem->set($id, $my_data, $ttl);
If you want to get the data back, you can use the get method. Just use the unique key as the query:
如果要取回数据,可以使用get方法。 只需使用唯一键作为查询:
$my_data = $mem->get(23);
if($my_data){
    return $my_data;
}else{
    //fetch data from database
}
To further optimize memcached, you can configure its settings. You can do that by editing the memcached configuration file: /etc/memcached.conf.
要进一步优化memcached,可以配置其设置。 您可以通过编辑memcached配置文件/etc/memcached.conf 。
Here are some of the options that you might find useful. Just uncomment them or edit the existing values:
以下是一些可能有用的选项。 只需取消注释它们或编辑现有值即可:
-v – if you want to show more information while memcached is running. -vv – if you can’t find what you’re looking for in verbose mode, you can see even more information when you set this option. Very useful when debugging. -m – the maximum amount of memory that memcached can use. By default this is set to 64mb. -M – tells memcached to return an error when the maximum amount of memory is already exhausted. By default this option is not set. Instead, it automatically removes items from the cache. -c – the maximum number of simultaneous connections allowed. The default is 1024.
-v –如果要在运行memcached时显示更多信息。 -vv –如果在详细模式下找不到所需的内容,则在设置此选项时可以看到更多信息。 调试时非常有用。 -m – memcached可以使用的最大内存量。 默认情况下,此设置为64mb。 -M –告诉memcached当最大内存量已用完时返回错误。 默认情况下,未设置此选项。 相反,它会自动从缓存中删除项目。 -c –允许的最大同时连接数。 默认值为1024。
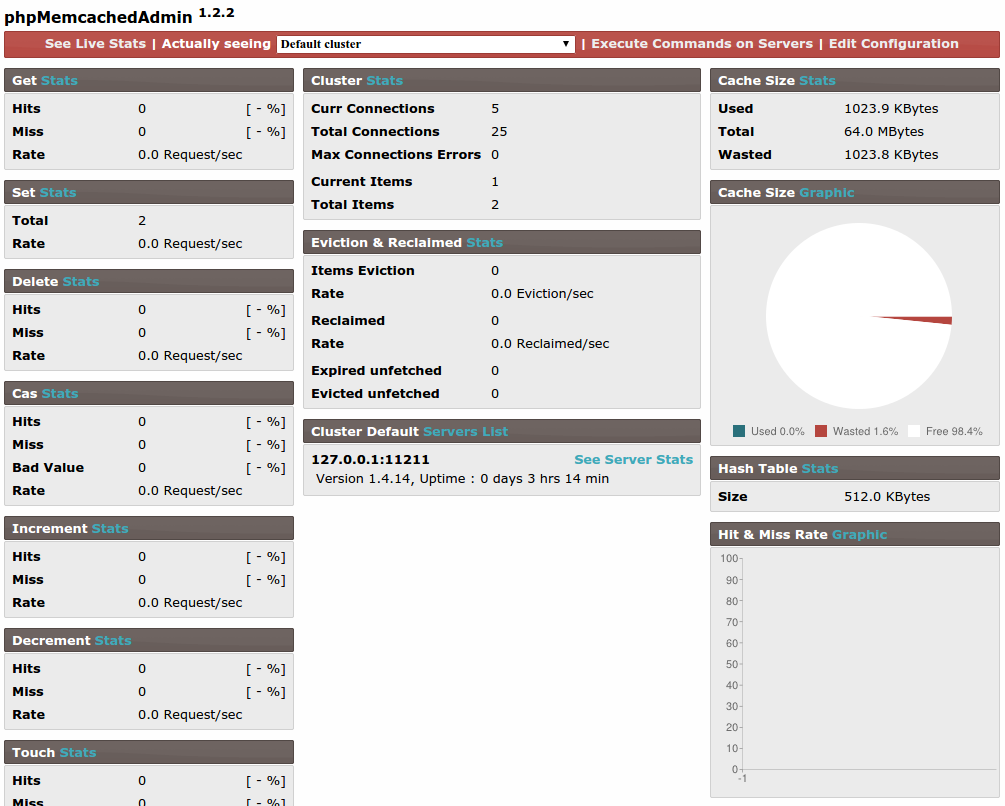
You can also install phpMemcachedAdmin on your memcached server. It will show you things like the total number of current connections, connection errors, current items, the total amount of memory used and more data that you might find useful. Here’s a screenshot:
您也可以在memcached服务器上安装phpMemcachedAdmin 。 它将显示诸如当前连接总数,连接错误,当前项,已使用的内存总量以及可能有用的更多数据之类的信息。 这是屏幕截图:
漆 (Varnish)
Varnish is a program that sits in front of the web server and speeds up web applications. This means that when a user accesses your website, Varnish receives the initial request instead of the web server. If the content being requested already exists in the cache, Varnish gets it from the cache and serves it. If it doesn’t exist, it asks the web server to serve it, puts the response into the cache, and then sends it to the user. The next time the same page is requested, it will pull it from the cache instead.
Varnish是一个位于Web服务器前面的程序,可加快Web应用程序的速度。 这意味着,当用户访问您的网站时,Varnish会收到初始请求,而不是Web服务器。 如果所请求的内容已存在于缓存中,则Varnish将从缓存中获取内容并提供服务。 如果不存在,它将要求Web服务器为其提供服务,将响应放入缓存中,然后将其发送给用户。 下次请求相同页面时,它将从高速缓存中拉出它。
安装清漆 (Installing Varnish)
To install Varnish, you first have to add the repository to your sources:
要安装Varnish,首先必须将存储库添加到源中:
sudo curl http://repo.varnish-cache.org/debian/GPG-key.txt | sudo apt-key add -Next execute the following to install Varnish:
接下来执行以下操作以安装Varnish:
sudo apt-get update
sudo apt-get install varnish
配置清漆 (Configuring Varnish)
Next you need to configure Varnish based on your web server. For this tutorial, I’m going to assume that the web server is Apache. Start by opening up the Varnish configuration file at /etc/default/varnish.
接下来,您需要基于Web服务器配置Varnish。 对于本教程,我将假定Web服务器是Apache。 首先打开/etc/default/varnish的Varnish配置文件。
Look for ‘DAEMON_OPTS’, the uncommented one. Make sure it’s the same as the one below:
寻找未注释的“ DAEMON_OPTS”。 确保与下面的相同:
DAEMON_OPTS="-a :80 \
             -T localhost:6082 \
             -f /etc/varnish/default.vcl \
             -S /etc/varnish/secret \
             -s malloc,256m"
Here’s the breakdown of the options we’ve used above:
这是我们上面使用的选项的细分:
-a– this is the address and the port Varnish listens to. In the configuration above, we didn’t specify the address. This means that Varnish will listen for requests on the same server where the web server is installed. Usually, you have to install Varnish on a different server, so that it’s not subjected to the same load as the web server.-a–这是Varnish侦听的地址和端口。 在上面的配置中,我们没有指定地址。 这意味着Varnish将在安装Web服务器的同一服务器上侦听请求。 通常,您必须在其他服务器上安装Varnish,以免与Web服务器承受相同的负载。-T– the address and the port the management interface listens to.-T–管理接口侦听的地址和端口。-f– allows you to specify your own VCL configuration file instead of the default.-f–允许您指定自己的VCL配置文件而不是默认文件。S– the path to the file containing the secret used for authorizing access to the management port.S–包含用于授权访问管理端口的机密的文件的路径。-s– used for specifying the storage backend. You can use any of the options on this page. Usually itsmalloc, which uses memory as the cache. This asks for the maximum memory size to be specified. In this case its256mwhich is 256MB.-s–用于指定存储后端。 您可以使用此页面上的任何选项。 通常是它的malloc,它使用内存作为缓存。 这要求指定最大内存大小。 在这种情况下,其256m为256MB。
Next, we need to edit the Varnish VCL Configuration file (/etc/varnish/default.vcl). This allows us to set the server that will serve as the source.
接下来,我们需要编辑Varnish VCL配置文件( /etc/varnish/default.vcl )。 这使我们可以设置将用作源的服务器。
In this case, we’re using Apache on the same machine where Varnish is installed so we can set the host to localhost and the port to 8888.
在这种情况下,我们在安装Varnish的同一台机器上使用Apache,因此我们可以将主机设置为localhost ,将端口设置为8888 。
backend default {
    .host = "localhost";
    .port = "8888";
}
By default Apache runs on port 80. Earlier, we configured Varnish to listen to port 80 so we need to replace Apache’s 80 with something else, otherwise there would be a conflict between Apache and Varnish.
默认情况下,Apache在端口80上运行。之前,我们将Varnish配置为侦听端口80,因此我们需要用其他端口代替Apache 80,否则Apache和Varnish之间会发生冲突。
We update the Apache configuration: /etc/apache2/sites-enabled/000-default.conf. We make sure that the virtual host is now set to port 8888.
我们更新Apache配置: /etc/apache2/sites-enabled/000-default.conf 。 我们确保现在将虚拟主机设置为端口8888。
<VirtualHost 127.0.0.1:8888>Next we also have to update the ports config file: /etc/apache2/ports.conf
接下来,我们还必须更新端口配置文件: /etc/apache2/ports.conf
We make sure it has a virtual host definition using the same host and port used in the Apache configuration file:
我们确保它具有虚拟主机定义,使用的主机和端口与Apache配置文件中使用的主机和端口相同:
Listen 127.0.0.1:8888We then restart Apache for changes to take effect.
然后,我们重新启动Apache以使更改生效。
sudo service apache2 restart使用清漆 (Using Varnish)
Once that’s done, Varnish is now ready to do some caching. Let’s give it a try by creating a new PHP file that would show us some news from the database. If you want to follow along, use this github gist to get the data. Below you’ll find the PHP file that we will use for testing. It fetches the title and url of the article from the news table and outputs them in a table:
完成后,Varnish现在可以进行一些缓存了。 让我们通过创建一个新PHP文件进行尝试,该文件将向我们显示数据库中的一些消息。 如果您想继续,请使用此github要点来获取数据。 在下面,您将找到我们将用于测试PHP文件。 它从新闻表中获取文章的title和url ,并将它们输出到表中:
<?php
$db = new Mysqli(DB_HOST, DB_USER, DB_PASSWORD, DB_NAME);

$results = $db->query("SELECT title, url FROM news");
?>

<table border="1">
    <thead>
        <tr>
            <th>title</th>
            <th>url</th>
        </tr>
    </thead>
    <tbody>
    <?php
    while($row = $results->fetch_object()){
    ?>
        <tr>
            <td><?php echo $row->title; ?></td>
            <td><?php echo $row->url; ?></td>
        </tr>
    <?php
    }
    ?>
    </tbody>
</table>
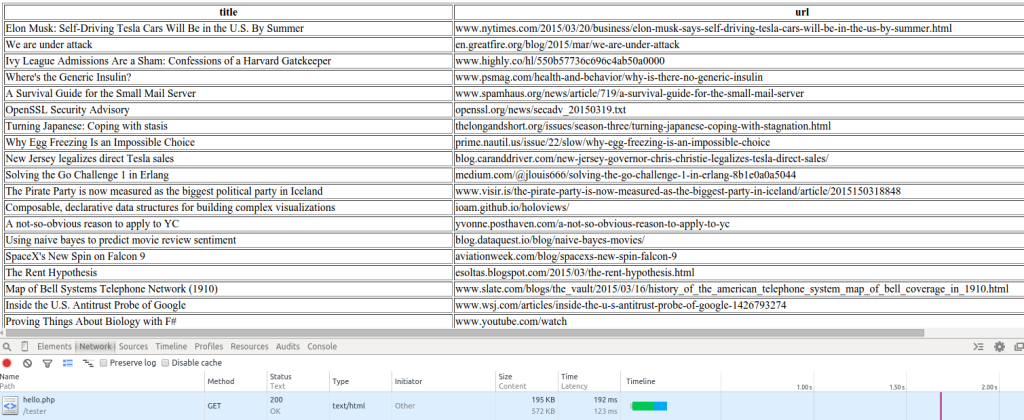
Open up the network panel in chrome dev tools and check the total time it takes to get the whole page. In my test it took 192 ms:
在chrome开发工具中打开网络面板,并检查获取整个页面所需的总时间。 在我的测试中花了192毫秒:
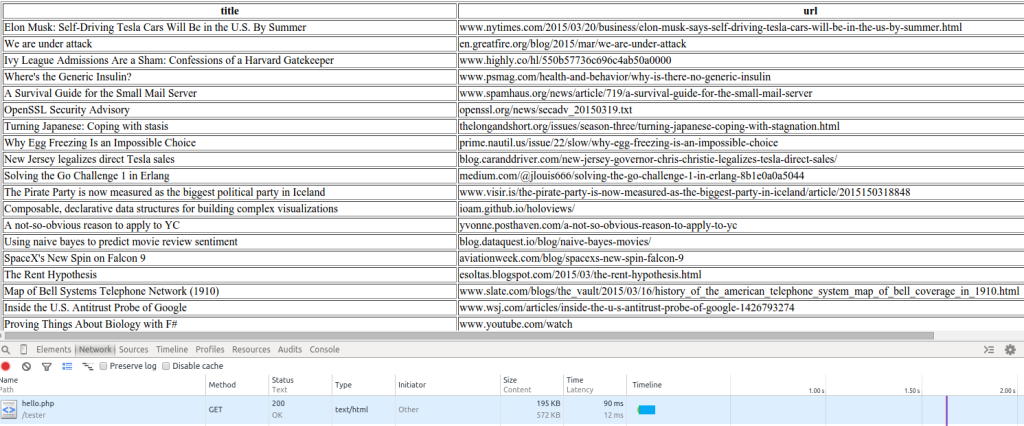
Now refresh the page and check the total time it takes again. It took 90 ms for me:
现在刷新页面并再次检查总时间。 我花了90毫秒:
Let’s also inspect the response headers that we get from the second request:
我们还要检查从第二个请求获得的响应头:
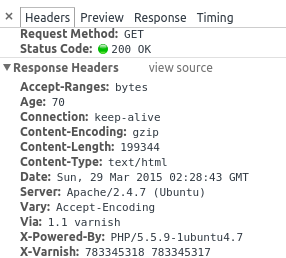
The important thing to note here is the Age and the X-Varnish headers. On the initial request for a specific page, the Age has a value of 0, and it will increment on subsequent requests. You know that Varnish is working when you can see that the Age increments every time you refresh the same page. The X-Varnish header has one value in it the very first time the page is requested. It will have two values when it’s getting something from the cache. The first value is the request ID – a unique ID assigned by varnish to that specific page request. The second value is the request ID of the request from which the cached response was populated, which is basically the request ID from the initial page request.
这里要注意的重要事项是Age和X-Varnish标头。 在对特定页面的初始请求中, Age的值为0 ,它将在后续请求中递增。 当您看到每次刷新同一页面时Age都会增加时,您就知道Varnish正在工作。 第一次请求页面时, X-Varnish标头中就有一个值。 从缓存中获取内容时,它将具有两个值。 第一个值是请求ID-清漆分配给该特定页面请求的唯一ID。 第二个值是从中填充缓存的响应的请求的请求ID,它基本上是来自初始页面请求的请求ID。
图书馆 (Libraries)
In this section I’ll do a quick walkthrough of some of the PHP libraries that you can use for caching.
在本节中,我将快速介绍一些可用于缓存PHP库。
教义缓存 (Doctrine Cache)
Doctrine is the caching component of the Doctrine Object Relational Mapper. It allows you to use different drivers for caching custom data. Drivers include APC, Memcache, Memcached, XCache and Redis.
原则是“原则对象关系映射器”的缓存组件。 它允许您使用不同的驱动程序来缓存自定义数据。 驱动程序包括APC,Memcache,Memcached,XCache和Redis。
You can install it by executing the following command from your terminal:
您可以通过从终端执行以下命令来安装它:
composer require doctrine/cacheHere’s an example on how to cache custom data on a memcached server:
这是有关如何在memcached服务器上缓存自定义数据的示例:
require 'vendor/autoload.php';

$memcached = new Memcached();
$port = 11211;
$memcached->addServer($memcache_host, $port);

$cacheDriver = new \Doctrine\Common\Cache\MemcachedCache();
$cacheDriver->setMemcached($memcached);
$cacheDriver->save($cache_id, $my_data);
First, we initialize memcached. Then we set the memcached server by calling the setMemcached method and pass the memcached instance that we declared earlier to it. Finally, we cache the data by calling the save method. This function requires a unique id as its first argument, and the data as its second argument.
首先,我们初始化memcached。 然后,我们通过调用setMemcached方法设置memcached服务器,并将之前声明的memcached实例传递给它。 最后,我们通过调用save方法来缓存数据。 此函数需要唯一的id作为其第一个参数,而数据则作为其第二个参数。
You can find more information about how to connect using a specific driver in their official documentation.
您可以在其官方文档中找到有关如何使用特定驱动程序进行连接的更多信息。
藏 (Stash)
Just like Doctrine Cache, Stash is a caching library for PHP. It allows us to cache results from database calls, expensive computations, and data that we can reuse throughout the whole app. It also supports different drivers:
就像Doctrine Cache一样,Stash是PHP的缓存库。 它使我们能够缓存数据库调用,昂贵的计算和可在整个应用程序中重复使用的数据的结果。 它还支持不同的驱动程序:
FileSystem – stores items in the filesystem.
FileSystem –将项目存储在文件系统中。
Sqlite – stores items in an sqlite database.
Sqlite –将项目存储在sqlite数据库中。
APC – a memory-based cache that uses the APC PHP extension.
APC –使用APC PHP扩展的基于内存的缓存。
Memcached – uses a memcached server for storing items.
Memcached –使用Memcached服务器存储项目。
Redis – stores items in a key/value storage system.
Redis –将项目存储在键/值存储系统中。
Ephemeral – caches item for the lifetime of the script.
临时 -在脚本的生存期内缓存项目。
Composite – allows the use of the drivers above as a single cache.
组合 –允许将上述驱动程序用作单个缓存。
In this article, I’m only going to walk you through the use of Stash with Memcached since we already used it earlier.
在本文中,由于我们之前已经使用过Stash和Memcached,因此我仅向您介绍。
安装隐藏 (Installing Stash)
You can install Stash with Composer:
您可以使用Composer安装Stash:
composer require tedivm/stash尝试藏匿 (Trying Stash)
If you have followed along in the Varnish section earlier and inserted the SQL data, you can connect to the same database. Next, connect to the Memcached server. Unlike Doctrine Cache, Stash provides its own wrapper for connecting to Memcached, so we’ll use that instead of the class provided by the Memcached PHP extension.
如果您在前面的“清漆”部分中进行了后续操作并插入了SQL数据,则可以连接到同一数据库。 接下来,连接到Memcached服务器。 与Doctrine Cache不同,Stash提供了自己的包装器来连接到Memcached,因此我们将使用它而不是Memcached PHP扩展提供的类。
$driver = new Stash\Driver\Memcache();
$driver->setOptions(array('servers' => array(MEMCACHED_HOST, MEMCACHED_PORT)));
Now we can declare a new Pool to use the memcached driver. The Pool is a representation of the caching system. We use it for pushing in or pulling out items from the cache. Each item is represented by a unique key, and the value can be any datatype supported in PHP. That includes integers, booleans, strings, arrays and objects. From that pool we use the getItem method to pull out a specific item.
现在我们可以声明一个新的Pool以使用memcached驱动程序。 池代表了缓存系统。 我们使用它来从缓存中推入或拉出项目。 每个项目均由唯一键表示,其值可以是PHP支持的任何数据类型。 其中包括整数,布尔值,字符串,数组和对象。 从该池中,我们使用getItem方法提取特定项。
We then check whether the item that we are fetching already exists in the cache by using the isMiss() method. If this method returns true then the item doesn’t exist in the cache yet and we need to fetch it from its original source. In this case, the database. We loop through the results returned and store them in an array.
然后,使用isMiss()方法检查要获取的项目是否已存在于缓存中。 如果此方法返回true则该项目在缓存中尚不存在,我们需要从其原始来源中获取该项目。 在这种情况下,数据库。 我们遍历返回的结果并将它们存储在数组中。
Once we’ve looped through all the items, we call the lock() method on the pool. This informs other processes that the current process is generating a new set of data. We then call the set() method to assign the data that we have fetched from the database to the pool. Once that’s done we call the get() method so we can extract the data that we have cached.
遍历所有项目后,我们将在池上调用lock()方法。 这通知其他进程当前进程正在生成新的数据集。 然后,我们调用set()方法将从数据库中获取的数据分配给池。 完成此操作后,我们将调用get()方法,以便提取已缓存的数据。
$pool = new Stash\Pool($driver);
$item = $pool->getItem('news');

if($item->isMiss()){

    $results = $db->query("SELECT title, url FROM news");

    while($row = $results->fetch_object()){
        $data[] = array(
            'title' => $row->title,
            'url' => $row->url
        );
    }

    $item->lock();
    $item->set($data);
}

$news_items = $item->get();
?>

<table border="1">
    <thead>
        <tr>
            <th>title</th>
            <th>url</th>
        </tr>
    </thead>
    <tbody>
    <?php
    foreach($news_items as $row){
    ?>
        <tr>
            <td><?php echo $row['title']; ?></td>
            <td><?php echo $row['url']; ?></td>
        </tr>
    <?php
    }
    ?>
    </tbody>
</table>
结论 (Conclusion)
In this article we’ve seen some more of the techniques, software and libraries that we can use to improve the performance of apps and websites that we develop using PHP. Which caching approaches do you use? Let us know!
在本文中,我们看到了更多可用于提高使用PHP开发的应用程序和网站的性能的技术,软件和库。 您使用哪种缓存方法? 让我们知道!
翻译自: https://www.sitepoint.com/caching-hat-trick-varnish-memcached-and-php-libraries/
varnish缓存


 452
452

 被折叠的 条评论
为什么被折叠?


