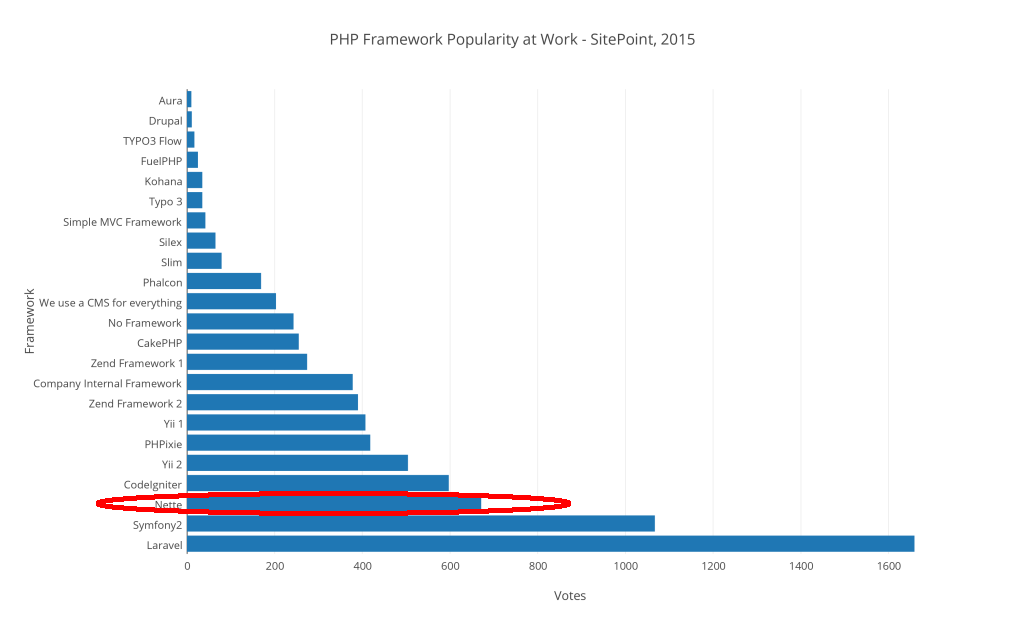
SitePoint’s PHP channel conducted its annual survey on the most popular framework of 2015 and the results were discussed here.
SitePointPHP频道针对2015年最受欢迎的框架进行了年度调查,并在此处讨论了结果 。
We saw some familiar names: Laravel, Symfony2, Phalcon, Silex, Slim, etc. But wait, what is this: Nette?
我们看到了一些熟悉的名称:Laravel,Symfony2,Phalcon,Silex,Slim等。但是等等,这是什么: Nette ?

According to the survey result, it ranked number 3 in both “at Work” and “in Personal Projects”, just tailing the two giants: Laravel and Symfony2.
根据调查结果,它在“工作中”和“个人项目”中均排名第三,仅次于两个巨头:Laravel和Symfony2。
I had never heard of this framework before the survey results got published. A framework so popular is worth looking into. Thus, in this article, we will take a look at Nette, see what it can do and discuss some of the features.
在调查结果发布之前,我从未听说过这个框架。 如此流行的框架值得研究。 因此,在本文中,我们将看一下Nette,看看它可以做什么并讨论一些功能。

NOTE: We will base our review on the official Getting Started tutorial.
注意:我们将基于官方的“ 入门指南”进行审查。
安装和引导 (Installation and bootstrapping)
Nette uses a self-bootstrap approach (similar to Laravel) with the support of composer:
•奈特使用与支持的自引导方式(类似于Laravel) composer :
composer create-project nette/sandbox demoThis will create a demo directory in the current one, and a sandbox project will be loaded into said folder.
这将在当前目录中创建一个demo目录,并将沙箱项目加载到该文件夹中。
Nette’s Getting Started tutorial guides us through building a simple blog app which features basic blog functions like: list all posts, view an individual post, create/edit a post, comments, security etc.
Nette的入门教程将指导我们构建一个简单的博客应用程序,该应用程序具有基本的博客功能,例如:列出所有帖子,查看单个帖子,创建/编辑帖子,评论,安全性等。
Let me show you what the app will look like when you finish the tutorial (I have not added any CSS to it so the overall appearance is quite rudimentary):
让我向您展示完成教程后该应用程序的外观(我尚未向其中添加任何CSS,因此整体外观非常基本):

NOTE: This is served in a Vagrant box.
注意:这是在“ 无家可归者”框中提供的 。
In the next few sections, we will look at some of the fundamental concepts in Nette. As I am a long-time user of Symfony2 (SF2), I will use that for comparison most of the time. Please note that the comparison notes are purely my personal view.
在接下来的几节中,我们将介绍Nette的一些基本概念。 由于我是Symfony2(SF2)的长期用户,因此在大多数情况下,我将使用它进行比较。 请注意,比较说明纯属我个人观点。
项目结构 (Project structure)
Nette is considered to be an MVC framework, though its “Model” layer is almost missing. Its project structure also reflects this but is organized in a very different way:
Nette被认为是MVC框架,尽管它的“模型”层几乎缺失了。 它的项目结构也反映了这一点,但组织方式却截然不同:

Above project structure is taken from Nette’s tutorial
以上项目结构取自Nette的教程
Like in SF2, a dedicated www (web in SF2) directory is there to hold the entry PHP file: index.php and also .htaccess rules to provide rewrite instructions for Apache. It will also contain static resources (CSS, JS, fonts, images, etc).
与SF2中一样,专用的www (SF2中的web )目录也位于其中,用于保存条目PHP文件: index.php以及.htaccess规则,以为Apache提供重写指令。 它还将包含静态资源(CSS,JS,字体,图像等)。
vendor will hold all the vendor libraries, as usual.
vendor将照常保存所有供应商库。
Many other folders will go under app:
许多其他文件夹将位于app下:
config: As its name suggests, all the configuration resides here. Nette usesconfig.neonandconfig.local.neonto provide configuration information related to database, security, services, app-wide parameters, etc. Nette will loadconfig.neonfirst and thenconfig.local.neon. The latter will override the same parameters defined in the former, as is common in other frameworks as well. You can find out about the Neon file format here.config:顾名思义,所有配置都位于此处。 Nette使用config.neon和config.local.neon提供与数据库,安全性,服务,应用程序范围的参数等有关的配置信息。Nette将首先加载config.neon,然后再加载config.local.neon。 后者将覆盖前者中定义的相同参数,这在其他框架中也很常见。 您可以在此处找到有关Neon文件格式的信息 。presentersandpresenters/templates: these two folders cover the controller and the template (view) portion. Nette uses Latte as its template engine. More on Latte later, and no Cappuccino – sorry.presenters和presenters/templates:这两个文件夹涵盖控制器和模板(视图)部分。 Nette使用拿铁作为模板引擎。 稍后会更多地介绍拿铁咖啡,而不是卡布奇诺咖啡–对不起。router: it holds the route factory class to customize pretty URIs and thus creates a bridge between a URI and a controller/action. More on this later.router:它保存路由工厂类以自定义漂亮的URI,从而在URI和控制器/动作之间建立桥梁。 稍后再详细介绍。
从数据库开始 (Start from database)
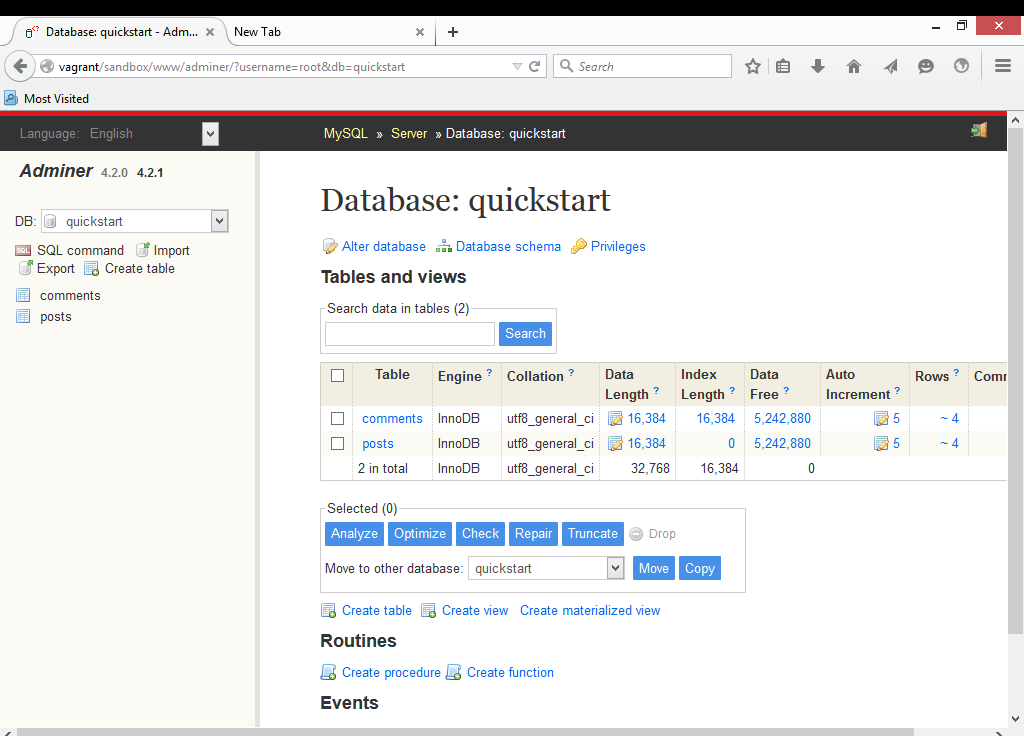
Nette comes with a handy tool called “Adminer” to mimic a PHPMyAdmin kind of functionality. The interface is clean and easy to use:
Nette带有一个方便的工具,称为“ Adminer”,可以模仿PHPMyAdmin某种功能。 界面干净,易于使用:

As an “embedded” tool, Adminer’s capability is limited so you may want to switch to your preferred database administration tool if this one doesn’t cut it. Also, it should be noted that we access Adminer from the adminer sub-directory in www. This may not be a good approach, especially in a production environment. This folder should be ignored in deployment phases – either via .gitignore, .gitattributes or otherwise and Nette should point this out in their docs.
作为“嵌入式”工具,Adminer的功能受到限制,因此,如果此工具不起作用,您可能希望切换到首选的数据库管理工具。 另外,应该注意,我们从www的adminer子目录访问Adminer。 这可能不是一个好方法,尤其是在生产环境中。 在部署阶段应忽略此文件夹-通过.gitignore , .gitattributes或其他方式,Nette应该在其文档中指出这一点。
路由器 (Router)
We are developing a simple blog app. We would want a URI showing a specific post (identified by its postId) to look like this: post/show/4 but not like this: post/show?postId=4.
我们正在开发一个简单的博客应用程序。 我们希望显示特定帖子(由其postId标识)的URI看起来像这样: post/show/4但不像这样: post/show?postId=4 。
Nette recommends using a router factory to manage the link between a URI (or a URI pattern) and its corresponding controllers/actions. The router factory is defined in app/router/RouterFactory.php:
Nette建议使用路由器工厂来管理URI(或URI模式)与其相应的控制器/操作之间的链接。 路由器工厂在app/router/RouterFactory.php定义:
class RouterFactory
{

	/**
	 * @return \Nette\Application\IRouter
	 */
	public static function createRouter()
	{
		$router = new RouteList();
        $router[] = new Route('post/show/<postId>', 'Post:Show');
		$router[] = new Route('<presenter>/<action>[/<id>]', 'Homepage:default');
		return $router;
	}
}
The definition of a route is straightforward:
路线的定义很简单:
A URI “pattern” with parameter(s):
post/show/<postId>.带有参数的URI“模式”:
post/show/<postId>。and a string in the form of “Controller:Action”:
Post:Show.并以“ Controller:Action”形式的字符串:
Post:Show。
The detailed Nette routing documentation can be found here.
详细的Nette路由文档可在此处找到。
To use this router factory, we must register a service in app/config/config.neon:
要使用此路由器工厂,我们必须在app/config/config.neon注册一个服务:
services:
	router: App\RouterFactory::createRouter
To generate a link in our template based on a route, we can use the syntax below:
要基于路线在模板中生成链接,我们可以使用以下语法:
<a href="{link Post:Show $post->id}">{$post->title}</a>I must admit this Latte syntax is a bit shorter than the corresponding Twig syntax. It uses {} for both echo statement and control statement. For example:
我必须承认,这种Latte语法比相应的Twig语法短一些。 它对回显语句和控制语句都使用{} 。 例如:
//To display a variable
{$var1}

//To run a foreach loop
{foreach $items as $item}
    ...
{/foreach}
Latte also has a powerful macro system to facilitate some common tasks. For example, the below code snippet will only display a list when $items is not null:
拿铁咖啡也有一个强大的宏系统来完成一些常见任务。 例如,下面的代码片段仅在$items不为null时显示列表:
<ul n:if="$items">
...
</ul>
This can be handy when the user wants to display a certain section based on a returned result set.
当用户希望基于返回的结果集显示某个部分时,这可能很方便。
控制器和动作 (Controllers and Actions)
A presenter in Nette is the controller. All presenters are in the app/presenters folder and the file name should end with Presenter.php. As an example, we have PostPresenter for post related actions, SignPresenter for sign in / sign out related actions.
Nette的演示者是控制器。 所有演示者都位于app/presenters文件夹中,文件名应以Presenter.php结尾。 例如,我们有PostPresenter用于发布相关操作, SignPresenter用于登录/注销相关操作。
In a presenter file, we define a class to hold all the actions (methods) that can be invoked. For example, to show a particular post identified by its postId (and its related comments), the method will look like this:
在presenter文件中,我们定义一个类来保存所有可以调用的动作(方法)。 例如,要显示由其postId (及其相关注释)标识的特定帖子,该方法将如下所示:
namespace App\Presenters;

use Nette;
use Nette\Application\UI\Form;

class PostPresenter extends BasePresenter
{

    private $database;

    public function __construct(Nette\Database\Context $database)
    {
        $this->database = $database;
    }

    public function renderShow($postId)
    {
        $post = $this->database->table('posts')->get($postId);

        if (!$post)
        {
            $this->error('Post not found');
        }

        $this->template->post     = $post;
        $this->template->comments = $post->related('comments')->order('created_at');
    }
    ... ...
}
In renderShow($postId), a $post is grabbed from the database by matching $postId. Then, a template will be rendered with variables (the post and related comments in this case).
在renderShow($postId) ,通过匹配$postId从数据库中获取一个$post 。 然后,将使用变量(在这种情况下为帖子和相关注释)呈现模板。
We notice that this process is simple but hides a lot of details. For example, where is this database coming from?
我们注意到这个过程很简单,但是隐藏了很多细节。 例如,此database来自哪里?
In app/config/config.local.neon, we can see this section (following the tutorial):
在app/config/config.local.neon ,我们可以看到此部分(在教程之后):
database:
	dsn: 'mysql:host=127.0.0.1;dbname=quickstart'
	user: root
	password: xxxxxx
	options:
		lazy: yes
This is a familiar database connection setup. When a controller/action is to be invoked, Nette transforms this DSN into a database object (or database context) and injects it into the constructor of that controller class. Thus, the database is accessible to all methods by means of Dependency Injection.
这是一个熟悉的数据库连接设置。 当要调用控制器/动作时,Nette将此DSN转换为数据库对象(或数据库上下文),并将其注入该控制器类的构造函数中。 因此,所有方法都可以通过依赖注入来访问数据库。
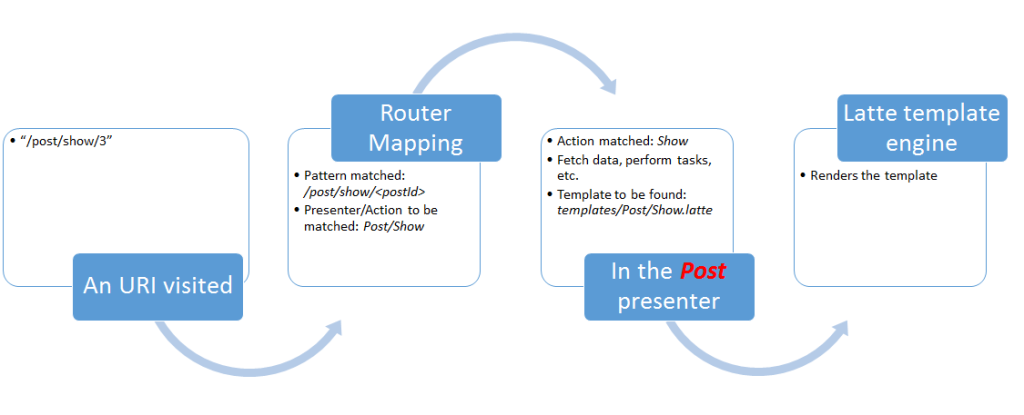
What about the template rendering? We just see the variable assignments but no explicit call to a “render” method. Well, this is also part of the Nette convention. When an action is given a render prefix, this action will render a template at the return of the method call.
模板渲染呢? 我们只看到变量分配,但没有显式调用“ render”方法。 好吧,这也是Nette约定的一部分。 给动作提供render前缀后,该动作将在方法调用返回时渲染模板。
In this case, the method is renderShow. This method is linked to URI like “post/show/3” as we defined earlier (in route definitions, the render prefix is ignored): $router[] = new Route('post/show/<postId>', 'Post:Show');.
在这种情况下,方法是renderShow 。 此方法链接到我们先前定义的URI,如“ post / show / 3”(在路由定义中, render前缀被忽略): $router[] = new Route('post/show/<postId>', 'Post:Show'); 。
renderShow will start to look for a template under app/presenters/templates looking for:
renderShow将开始在app/presenters/templates寻找app/presenters/templates寻找:
A directory named “Post” because this is the controller name of this
renderShowaction.一个名为“ Post”的目录,因为这是此
renderShow操作的控制器名称。Then a template named
Show.latteto populate all the variables and display it.然后,使用名为
Show.latte的模板填充所有变量并显示它。
So let’s summarize the naming and mapping conventions used in Nette in the below chart:
因此,让我们在下表中总结Nette中使用的命名和映射约定:

拿铁模板引擎 (The Latte template engine)
If you are familiar with Twig, you will find that Latte is quite easy to learn.
如果您熟悉Twig,您会发现Latte很容易学习。
It uses {...} pair to escape from the regular HTML parsing and does not differentiate from a pure print (Twig equivalent: {{...}}) or a control ({%...%}). Also, a variable must be prefixed with the $ sign, or a string literal inside the { } pair will be treated as a macro and most likely cause a syntax error, saying “Unknown macro {xxxx}”.
它使用{...}对来逃避常规HTML解析,并且与纯打印(等效于Twig的{{...}} )或控件( {%...%} )没有区别。 另外,变量必须以$符号为前缀,否则{ }对内的字符串文字将被视为宏,并且很可能导致语法错误,并显示“未知宏{xxxx}”。
There’s a handy feature when we’re dealing with an iteration on a result set, which is very common:
当我们处理结果集上的迭代时,有一个方便的功能,这很常见:
<ul n:if="$items">
{foreach $items as $item}
    <li id="item-{$iterator->counter}">{$item|capitalize}</li>
{/foreach}
</ul>
Besides the regular usage of a foreach loop, a condition has been put in place to decide if the below <ul> section should be displayed or not. The <ul> section will only be there when there is at least one item in $items. With the help of this macro, we can save some lines and avoid using an if...endif pair.
除了常规使用foreach循环外,还设置了一个条件来决定是否应显示以下<ul>部分。 仅当$items中至少有一项时, <ul>部分才会存在。 借助此宏,我们可以保存一些行,并避免使用if...endif对。
Latte supports template inheritance, template including, filters, and many other cool features. Please visit its official documentation for details.
Latte支持模板继承,模板包括,过滤器和许多其他很酷的功能。 有关详细信息,请访问其官方文档 。
身份验证和表格 (Auth and Forms)
The official documentation on access control is a good starting point for us.
对于我们来说,访问控制的官方文档是一个很好的起点。
Nette supports in-memory and database credentials. By using in-memory authentication, we use the below snippet:
Nette支持内存和数据库凭据。 通过使用内存中身份验证,我们使用以下代码段:
$authenticator = new Nette\Security\SimpleAuthenticator(array(
    'john' => 'IJ^%4dfh54*',
    'kathy' => '12345', // Kathy, this is a very weak password!
));
$user->setAuthenticator($authenticator);
Then, the system can explicitly make a user log in using:
然后,系统可以使用以下命令明确地使用户登录:
$user->login($username, $password);where the username and password can be obtained from a form submission.
可以从表单提交中获取用户名和密码。
Nette supports roles and ACL (Access Control List) and uses an “Authorizator” to enforce the authorization.
Nette支持角色和ACL(访问控制列表),并使用“ Authorizator”来执行授权。
Firstly, we can create some roles with hierachy:
首先,我们可以使用hierachy创建一些角色:
$acl = new Nette\Security\Permission;

//Define a guest role and a registered user role

$acl->addRole('guest');
$acl->addRole('registered', 'guest');
In the above code, role register inherits from guest.
在上面的代码中,角色register从guest继承的。
Then, we define a few resources that a user may access:
然后,我们定义用户可以访问的一些资源:
$acl->addResource('article');
$acl->addResource('comments');
$acl->addResource('poll');
Finally, we set authorization rules:
最后,我们设置授权规则:
$acl->allow('guest', array('article', 'comments', 'poll'), 'view');
$acl->allow('registered', 'comments', 'add');
So a guest can view an article, comments and a poll and a registered user, besides the privileges inherited from guest, can also add a comment.
这样, guest可以查看文章,评论和民意测验,并且registered用户除了从guest继承的特权外,还可以添加评论。
I really don’t like this kind of access control. Even an annotation outside of a controlled method itself or the use of a decorator would be better than this, in my opinion. And I would say a centralized file (SF2’s security.yml) is the best practice: neat, clean, and flexible.
我真的不喜欢这种访问控制。 我认为,即使是在受控方法本身之外的注释或使用装饰器,也比这更好。 我想说一个集中式文件(SF2的security.yml )是最佳实践:简洁,整洁且灵活。
The forms are generated in their respective presenters. In particular, the form creation includes a callback event handler to process a successful form submission.
表单在其各自的演示者中生成。 特别地,表单创建包括回调事件处理程序,以处理成功的表单提交。
protected function createComponentCommentForm()
    {
        $form              = new Form;
        $form->addText('name', 'Your name:')->setRequired();
        $form->addText('email', 'Email:');
        $form->addTextArea('content', 'Comment:')->setRequired();
        $form->addSubmit('send', 'Publish');
        $form->onSuccess[] = [$this, 'commentFormSucceeded'];

        return $form;
    }
But, this is not the action of that form to be rendered.
但是,这不是要呈现的表单的action 。
For example, let’s look at the above code for renderShow to display a post detail page and a form for readers to enter comments. In the presenter, we only assigned a post variable and a comments variable to hold related comments. The comment input form is rendered in the template app/presenters/templates/Post/Show.latte:
例如,让我们看一下上面的renderShow代码,以显示帖子详细信息页面和供读者输入评论的表单。 在演示者中,我们仅分配了一个post变量和一个comments变量来保存相关评论。 评论输入表单呈现在模板app/presenters/templates/Post/Show.latte :
<h2>Post new comments</h2>
{control commentForm}
The source of that page is extracted below:
该页面的来源摘录如下:
<h2>Post new comments</h2>
<form action="/sandbox/www/post/show/4" method="post" id="frm-commentForm">

<table>
<tr class="required">
	<th><label for="frm-commentForm-name" class="required">Your name:</label></th>

	<td><input type="text" name="name" id="frm-commentForm-name" required data-nette-rules='[{"op":":filled","msg":"This field is required."}]' class="text"></td>
</tr>

...
<tr>
	<th></th>

	<td><input type="submit" name="send" value="Publish" class="button"></td>
</tr>
</table>

<div><input type="hidden" name="do" value="commentForm-submit"></div>
</form>
We see clearly that the form action assigned is /sandbox/www/post/show/4, which is essentially the URI that displays the post itself. There is no place in the source code to indicate that a hook to the commentFormSucceeded method exists.
我们清楚地看到,分配的表单操作是/sandbox/www/post/show/4 ,本质上是显示帖子本身的URI。 源代码中没有任何地方可以指示存在对commentFormSucceeded方法的钩子。
This kind of “inside linking” may confuse Nette beginners a lot. I mean, to have a separate method to process the form is a common practice, and thus to have a URI assigned for such a process is also reasonable.
这种“内部链接”可能会使Nette初学者感到困惑。 我的意思是,有一种单独的方法来处理表格是一种常见的做法,因此为这种处理分配一个URI也很合理。
Nette using a callback/event handler to do this is also fine but there is certainly something missing or not clearly explained between when a user clicks the “Submit” button and the input is persisted in the database.
Nette使用回调/事件处理程序执行此操作也很好,但是在用户单击“提交”按钮与输入保持在数据库之间之间,肯定存在一些缺失或无法清楚解释的问题。
We know the persistence is performed in a method called commentFormSucceeded and we implemented that feature by ourselves. But how they are hooked up is not clear.
我们知道持久性是通过一种称为commentFormSucceeded的方法执行的,我们自己实现了该功能。 但是,如何将它们连接起来还不清楚。
其他酷功能 (Other cool features)
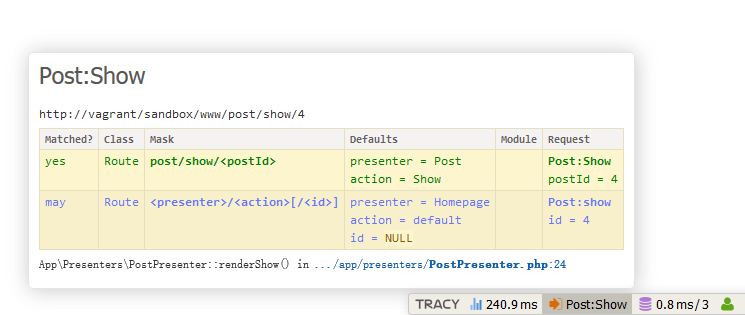
Nette comes with a debugger called “Tracy“. In debug mode, we will see a small toolbar at the bottom right corner of our page, telling us important page information:
Nette带有一个名为“ Tracy ”的调试器。 在调试模式下,我们将在页面的右下角看到一个小的工具栏,告诉我们重要的页面信息:

It can be disabled in production mode by changing app/bootstrap.php:
可以通过更改app/bootstrap.php在生产模式下将其禁用:
$configurator->setDebugMode(false); // "true" for debug modeNOTE: Please purge the temp/cache folder contents if you encounter any issues after changing from development mode to production mode.
注意:如果从开发模式更改为生产模式后遇到任何问题,请清除temp/cache文件夹的内容。
Nette also includes a test suite called “Tester”. The usage is also straightforward. See here for details.
Nette还包括一个称为“ Tester”的测试套件。 用法也很简单。 有关详细信息,请参见此处 。
最后的想法 (Final Thoughts)
Nette is a relatively new framework. Its 2.0 release was about 3 years ago. It came to be noticed by many of us thanks to the SitePoint survey.
Nette是一个相对较新的框架。 它的2.0版本大约在3年前。 感谢SitePoint的调查,这让我们许多人注意到了它。
Its Github issue tracker is very active. My two questions posted there got answered in less than 10-30 minutes and both lead to the correct solution, but its documentation needs a lot of work. During my attempts to set up the tutorial app following its docs, I found a lot of typos and missing explanations.
它的Github问题跟踪器非常活跃。 我在此处发布的两个问题在不到10-30分钟的时间内得到了回答,并且都可以找到正确的解决方案,但其文档需要大量工作。 在尝试根据其文档设置教程应用程序的过程中,我发现很多错别字和缺少说明。
If I could give SF2 a score of 10 – not saying SF2 is perfect but just for comparison’s sake – my initial score for Nette is between 7 to 8. It is mature, well written, easy to learn, equipped with advanced features but also has a few areas that need improving.
如果我能给SF2满分10(不是说SF2是完美的,而是为了比较),我对Nette的初始分数是7到8。它成熟,写得很好,易学,具有高级功能,但还具有一些需要改进的地方。
Are you familiar with Nette? Feel free to share your views and comments, too.
您对Nette熟悉吗? 也可以随意分享您的观点和评论。
翻译自: https://www.sitepoint.com/nette-framework-first-impressions/


 113
113

 被折叠的 条评论
为什么被折叠?


