For a freelancer, nothing is more important than time. Tracking invoices or doing paperwork can quickly become tedious and occupy a large portion of that. In March, I showed you FusionInvoice, a tool to keep track of your clients and invoices. Although it’s a nice and easy to use tool, its open-source version has since been discontinued and in part taken over by InvoicePlane. In this post, however, I’d like to introduce you to InvoiceNinja.
对于自由职业者来说,没有什么比时间更重要。 跟踪发票或做文书工作会很快变得乏味,并占据了很大一部分。 三月份,我向您展示了FusionInvoice ,该工具可跟踪您的客户和发票。 尽管它是一个很好用且易于使用的工具,但其开源版本已停止使用,部分已由InvoicePlane接管 。 但是,在这篇文章中,我想向您介绍InvoiceNinja 。
介绍发票忍者 (Introducing InvoiceNinja)
InvoiceNinja is an open-source self-hosted and cloud hosted invoicing platform.
InvoiceNinja是一个开源的自托管和云托管的开发票平台。
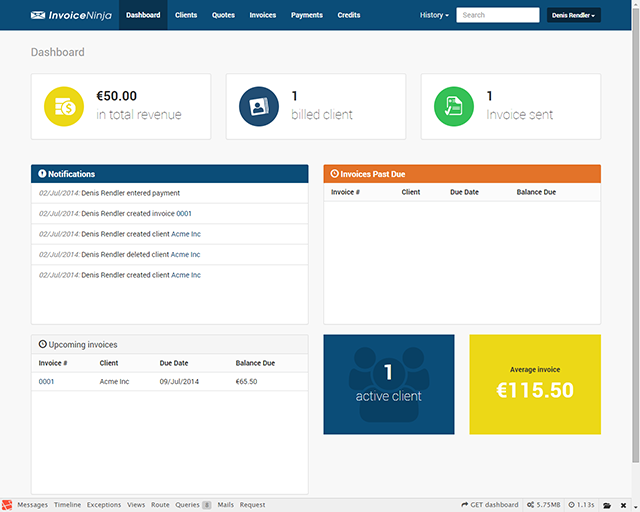
True to its motto, InvoiceNinja’s interface is simple and intuitive making creating invoices a breeze. Tasks like managing clients, issuing a new invoice or adding a payment are just simple actions that even an inexperienced user will feel comfortable doing. Its simplistic dashboard greets the user displaying relevant information about the invoices created and their status. The live preview of the invoice will help you to easily review it before sending it to your clients.
秉承其座右铭,InvoiceNinja的界面简单直观,使创建发票变得轻而易举。 诸如管理客户,开具新发票或添加付款之类的任务只是简单的操作,即使没有经验的用户也可以轻松进行。 其简单的仪表板可以向用户显示有关所创建发票及其状态的相关信息。 发票的实时预览将帮助您在将其发送给客户之前轻松地对其进行检查。
Through integration with PayPal, Google Wallet and 21 other payment processors, InvoiceNinja makes it very easy for your clients to reimburse you for your work directly through the application.
通过与PayPal,Google Wallet和其他21个付款处理程序的集成,InvoiceNinja使您的客户可以非常轻松地直接通过该应用程序向您偿还您的工作。
Getting down on the technical level, InvoiceNinja has, at its core, the latest version of the Laravel framework while its UI is built on the Twitter Bootstrap library. This integration makes it easy to update the self-hosted version’s theme exactly to your requirements as well as having a responsive layout and being mobile friendly out-of-the-box.
在技术层面上,InvoiceNinja的核心是最新版本的Laravel框架,而其UI则基于Twitter Bootstrap库构建。 通过这种集成,可以轻松地完全根据您的要求更新自托管版本的主题,并具有自适应的布局和开箱即用的移动友好性。
Knockout.js, a Javascript MVVM library, connects the rich UI to the business logic – and with the help of the jsPDF Javascript library you can easily export the invoice directly as a PDF file or send it via email to your customers with just a few clicks of the mouse.
Knockout.js,一个Javascript MVVM库,将丰富的UI连接到业务逻辑–在jsPDF Javascript库的帮助下,您可以轻松地将发票直接导出为PDF文件,也可以通过电子邮件将发票发送给客户,只需几个点击鼠标。
安装步骤 (Installation steps)
Installation to a local environment is very simple when using Laravel’s Homestead pre-packaged Vagrant box. Homestead runs on any Windows, Mac, or Linux host system and includes the Nginx web server, PHP 5.5 and the MySQL 5.5 database server already installed and configured.
使用Laravel的Homestead预包装的Vagrant包装盒,安装到本地环境非常简单。 Homestead可在任何Windows,Mac或Linux主机系统上运行,并包括已安装和配置的Nginx Web服务器,PHP 5.5和MySQL 5.5数据库服务器。
Bruno Škvorc makes a great job explaining how to get Homestead up and running in just 5 simple steps. You can check out his article if you are unfamilliar to Homestead as we won’t go in to much detail here. Just make sure you follow his steps but skip the 5th step and do not boot the VM before we customize it for our application.
BrunoŠkvorc出色地解释了如何通过5个简单的步骤来安装和运行Homestead。 如果您不熟悉Homestead,可以查看他的文章,因为我们在这里不做过多介绍。 只要确保遵循他的步骤,但跳过第五步,并且在为我们的应用程序自定义VM之前,不要启动VM。
Now if you followed Bruno’s instructions and you have downloaded the Homestead VM on your machine customizing it for our InvoiceNinja installation it is a simple 4 line change.
现在,如果您按照Bruno的说明进行操作,并且已将Homestead VM下载到您的计算机上以针对我们的InvoiceNinja安装对其进行自定义,则只需进行4行更改即可。
Open the Homestead.yaml file in your preferred editor and change the next few lines according to your installation paths:
在首选编辑器中打开Homestead.yaml文件,然后根据安装路径更改以下几行:
folders:
  - map: /path/to/your_installation
    to: /home/vagrant/invoice-ninja
and
和
sites:
  - map: invoice.ninja.dev
    to: /home/vagrant/invoice-ninja/public
The folders/map: /path/to/your_installation refers to the path you set on your host machine. This is where the files will ultimately be downloaded although to the VM they will appear as being installed inside of the Vagrant box.
folders/map: /path/to/your_installation指的是您在主机上设置的路径。 尽管文件将显示为已安装在“ Vagrant”框内,但最终将在此处下载文件。
Those are all the modifications we need. Now just boot your VM using the vagrant up command and let it finish installing.
这些都是我们需要的修改。 现在,只需使用vagrant up命令启动您的VM vagrant up并使其完成安装。
When the installation of the VM is done, and it should not take more than just a few minutes, we will start downloading InvoiceNinja along with all its dependecies from Github.
完成VM的安装后,并且只需几分钟,我们将开始从Github下载InvoiceNinja及其所有依赖项。
To start downloading the application, just SSH into the Homestead VM using the vagrant ssh command. After you are logged in run the next command at the prompt:
要开始下载应用程序,只需使用vagrant ssh命令将SSH SSH到Homestead VM中。 登录后,在提示符下运行下一个命令:
$ cd ~/invoice-ninjaThis will change the working directory to the folder we previously set to host our application inside the VM.
这会将工作目录更改为我们先前设置的文件夹,以将应用程序托管在VM中。
To begin downloading InvoiceNinja to our local environmnent run the next command:
要开始将InvoiceNinja下载到我们的本地环境,请运行以下命令:
$ git clone https://github.com/hillelcoren/invoice-ninja.git .Note: Make sure you include the dot at the end of the clone command otherwise Git will create a subfolder which will break the path we set earlier for our Nginx sites config.
注意:确保在clone命令的末尾包含点号,否则Git将创建一个子文件夹,该子文件夹将破坏我们之前为Nginx网站配置设置的路径。
In order to keep up-to-date any third-party dependencies used by the project, the development team is using Composer. (If you are not familiar with Composer, Sitepoint has a very good article written by Alexander Cogneau that will quickly get you up to speed with using Composer).
为了保持项目所使用的任何第三方依赖关系的最新状态,开发团队正在使用Composer。 (如果您不熟悉Composer,Sitepoint会撰写一篇由Alexander Cogneau撰写的很好的文章,它将使您快速掌握Composer的使用知识)。
Now let’s install the rest of the libraries by running the next command:
现在,通过运行下一个命令来安装其余的库:
$ composer installNote: Github is limited to 60 request per hour for unauthenticated users. Because of this limitation you will have to log in with your Github account when asked to be able to install the rest of the components. If you don’t have a Github account, create one.
注意:Github对于未经身份验证的用户,每小时的请求限制为60个。 由于这个限制,当您被要求能够安装其余组件时,必须使用Github帐户登录。 如果您没有Github帐户,请创建一个。
After we finished downloading all the dependencies, let’s prepare the database by running the next command:
在下载完所有依赖项之后,让我们通过运行下一个命令来准备数据库:
$ mysql -u root -psecretThe Homestead box comes with MySQL pre-installed and configured. The default configuration created a user called “homestead” with the password “secret”. This user will have most of the administrative rights but in our case we will need the “root” user in order to create and assign to our database the “ninja” user which is configured by default in the InvoiceNinja application. By adding the ninja user we will avoid changing the default configuration of our application, but you are free to skip the last 2 commands in this step if you feel comfortable quickly changing the database connection settings in InvoiceNinja’s config files.
Homestead盒预装和配置了MySQL。 默认配置创建了一个名为“ homestead”的用户,其密码为“ secret”。 该用户将拥有大多数管理权限,但在我们的情况下,我们需要“ root”用户才能创建“ ninja”用户并将其分配给我们的数据库,该用户在InvoiceNinja应用程序中默认配置。 通过添加ninja用户,我们将避免更改应用程序的默认配置,但如果您愿意在InvoiceNinja的配置文件中快速更改数据库连接设置,则可以跳过此步骤中的最后两个命令。
Once you have successfully logged in to the MySQL prompt run the next series of commands:
成功登录到MySQL提示符后,运行以下一系列命令:
mysql > CREATE DATABASE `ninja` DEFAULT CHARACTER SET utf8 COLLATE utf8_general_ci;
mysql > CREATE USER 'ninja'@'localhost' IDENTIFIED BY 'ninja';
mysql > GRANT ALL PRIVILEGES ON `ninja`.* TO 'ninja'@'localhost';
mysql > FLUSH PRIVILEGES;
That’s it. We created the database and configured the “ninja” user with all the required access to the database.
而已。 我们创建了数据库,并为“忍者”用户配置了对数据库的所有必需访问权限。
Once we’ve finished with the setup let’s seed the database by running the next command:
完成设置后,让我们通过运行下一个命令为数据库添加种子:
$ php artisan migrate --seed创建我们的第一张发票 (Create our first invoice)
Now that we successfully installed InvoiceNinja on our system let’s create our first invoice made to ACME Inc.
现在,我们已经在系统上成功安装了InvoiceNinja,让我们创建第一个发给ACME Inc.的发票。
After you log in, if you choose to create a company profile, you are welcomed by the well designed dashboard.
登录后,如果选择创建公司资料,则会受到精心设计的仪表板的欢迎。

As you may notice, the design is simple yet elegant and provides the user with all the necessary information upfront. This design becomes quite handy on mobile devices which lack in page real-estate that desktops have in abundance.
您可能会注意到,该设计既简单又优雅,可以为用户提供所有必要的信息。 这种设计在缺少桌面资源丰富的页面不动产的移动设备上变得非常方便。
InvoiceNinja is able to maintain client lists, invoice and item tax rates, services and products all of which you can easily link to a new invoice.
Ninja能够维护客户列表,发票和项目税率,服务和产品,您可以轻松地将所有这些链接链接到新发票。
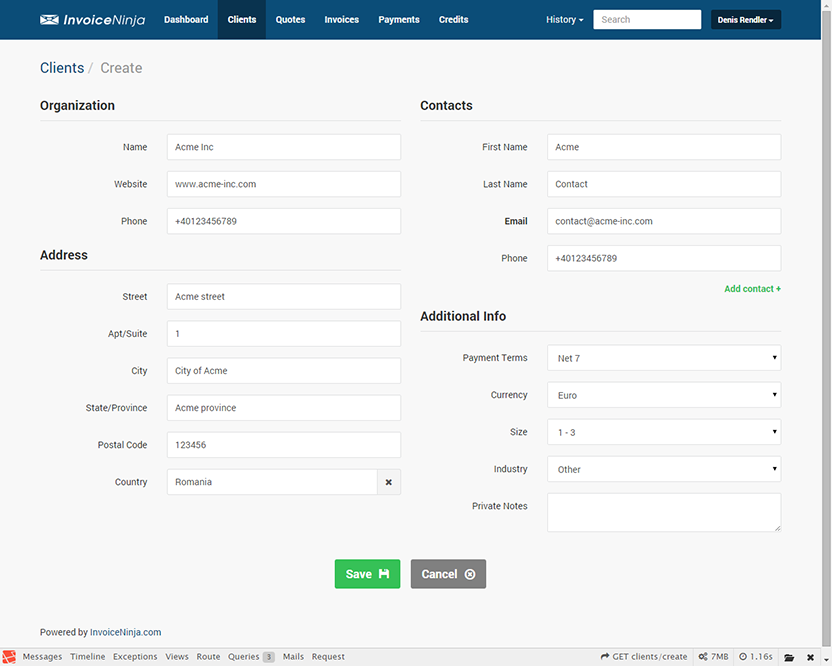
To add a client you can either add him while creating your invoice or by selecting the Clients > New Client command from the main menu at the top of the page.
要添加客户,您可以在创建发票时添加他,也可以从页面顶部的主菜单中选择“ Clients > New Client命令。
Now let’s create a new client called ACME Inc. and fill in the details as shown in the screenshot below.
现在,让我们创建一个名为ACME Inc.的新客户端,并填写下面的屏幕快照中所示的详细信息。

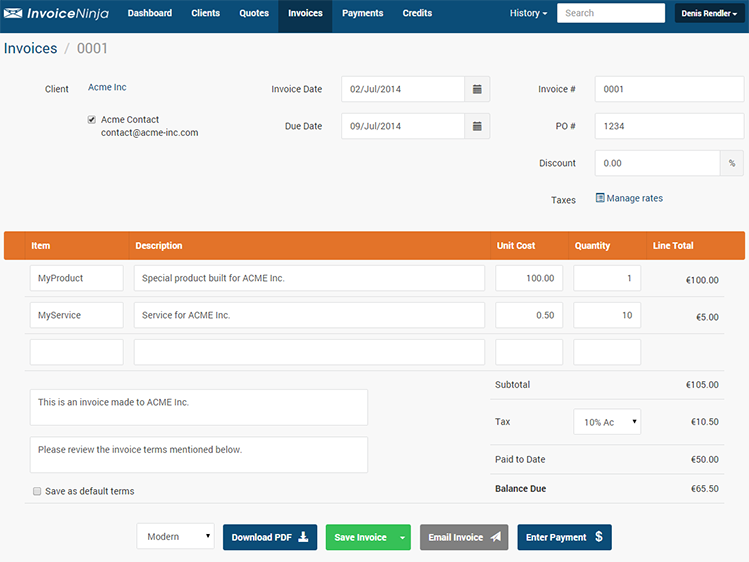
Once you filled all the fields and saved the client proceed to Invoices > New Invoice to create our first invoice as displayed in the next screenshot.
填写完所有字段并保存客户后,进入“ Invoices > New Invoice以创建我们的第一张发票,如以下屏幕截图所示。

Tax rates can be easily managed while creating the invoice by selecting Manage rates and adding the tax rate details.
通过选择Manage rates并添加税率明细,可以轻松地在创建发票时Manage rates 。
With InvoiceNinja you can also add a percentage discount applicable directly to the invoice.
使用InvoiceNinja,您还可以添加直接适用于发票的百分比折扣。
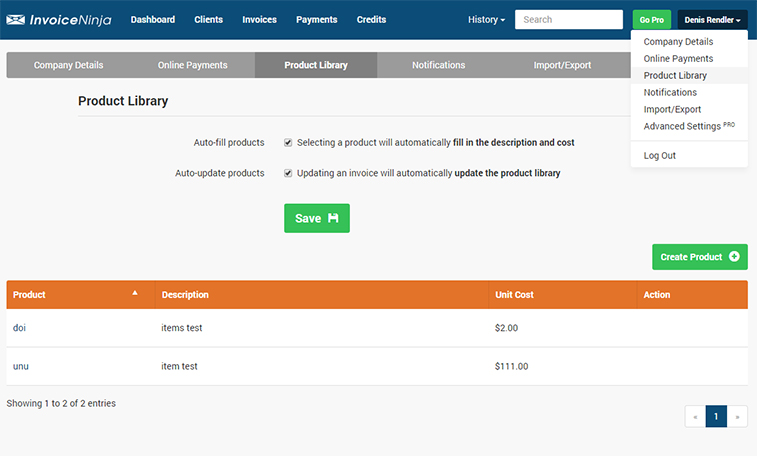
Products and services can be managed by selecting the Product Library from the upper right menu displayed when you click your user name.
通过单击用户名时显示的右上方菜单中的Product Library可以管理产品和服务。

Simple, right?
简单吧?
结论 (Conclusion)
With the client’s data and products already saved, creating a new invoice is just a matter of a adding the quantity for each product or service and choose the method of delivery – either as PDF or e-mail a link to the invoice.
在已经保存了客户的数据和产品的情况下,只需为每个产品或服务添加数量并选择交货方式即可(为PDF或通过电子邮件将发票链接发送至此)来创建新发票。
There is however a downside to all of this simplicity and speed. There are only 4 templates for the invoice and the only customization you can do without diving into the code is change the primary and secondary colors. The currency is saved on a per client basis which means that you will not have the option to use a different currency for a certain invoice to the same client. Other options like managing tax rates are accessible only when you create an invoice or quote. You will also not have the option to apply a fixed discount. One of the biggest problems I noticed is that if you delete a client, all invoices associated to that client will also be deleted but the application doesn’t warn you about this.
但是,所有这些简单性和速度都有不利之处。 发票只有4个模板,您无需更改代码即可进行的唯一自定义操作就是更改原色和副色。 货币是按每个客户保存的,这意味着您将无法选择对同一客户使用特定发票的其他货币。 仅当您创建发票或报价时,才能访问诸如管理税率之类的其他选项。 您也不会选择应用固定折扣。 我注意到的最大问题之一是,如果删除客户端,与该客户端关联的所有发票也将被删除,但是应用程序不会对此发出警告。
In future posts, we’ll see how we can fix some of these issues and make the application suit our needs. Have you given it a go? Done any extensions? Let us know!
在以后的文章中,我们将看到如何解决其中的一些问题并使应用程序适合我们的需求。 你试过了吗? 做任何扩展吗? 让我们知道!
翻译自: https://www.sitepoint.com/introducing-invoiceninja-self-hosted-invoicing/


 本文介绍了开源自托管发票平台InvoiceNinja,它使用Laravel框架和Twitter Bootstrap构建,提供简单直观的界面。文章详细阐述了安装步骤,包括使用Homestead Vagrant box,以及如何创建和管理发票。InvoiceNinja还支持与多种支付处理器集成,便于客户直接通过应用付款。然而,它的模板定制有限,缺乏某些高级功能,如自定义税率管理和固定折扣。


 被折叠的 条评论
为什么被折叠?


