


This article is shared from one of our sister sites, CloudSpring. If you find it helpful, be sure to give them a visit!
本文是从我们的姊妹网站CloudSpring共享的 。 如果您觉得有帮助,请务必拜访他们!
This tutorial will show you how to use Amazon DynamoDB as a storage facility for PHP sessions. This method becomes very useful when your applications take advantage of the Elastic Load Balancing and Autoscaling services. You will need Amazon AWS account enabled to use EC2, Elastic Load Balancer and DynamoDB as a prerequisite to play along the tutorial.
本教程将向您展示如何使用Amazon DynamoDB作为PHP会话的存储工具。 当您的应用程序利用Elastic Load Balancing和Autoscaling服务时,此方法非常有用。 您需要先启用Amazon AWS帐户才能使用EC2,Elastic Load Balancer和DynamoDB作为继续学习本教程的前提条件。
什么是弹性负载均衡器 (What is an Elastic Load Balancer)
Elastic Load Balancer acts as a front end for one or many of your virtual servers. It accepts requests and distributes them among virtual servers. Virtual servers can be created by cloning a machine template (AMI) or can be destroyed if needed. Processing power if your application can be varied by adding or reducing the virtual servers dynamically.
Elastic Load Balancer充当一个或多个虚拟服务器的前端。 它接受请求并在虚拟服务器之间分发请求。 可以通过克隆机器模板(AMI)来创建虚拟服务器,也可以根据需要将其销毁。 如果可以通过动态添加或减少虚拟服务器来改变应用程序的处理能力。
和自动缩放? (And Autoscaling?)
When Autoscaling joins the game the system can also:
当Autoscaling加入游戏时,系统还可以:
- Start more clones of the web servers when there is high traffic 高流量时启动更多的Web服务器克隆
- Shutdown some of them when the traffic drops below a predefined threshold 当流量降至预定义的阈值以下时,关闭其中的一些
- Terminate unhealthy instances and replace them if needed 终止不正常的实例,并在需要时更换它们
我该怎么做? (How do I do it?)
Can any of your applications work in this environment? Yes if it satisfies two critical requirements:
您的任何应用程序都可以在此环境中工作吗? 是的,如果它满足两个关键要求:
- Since virtual servers are created dynamically, the servers should contain only the application code and not any data. This is easily doable with a DB service. 由于虚拟服务器是动态创建的,因此服务器应仅包含应用程序代码,而不包含任何数据。 使用数据库服务很容易做到这一点。
- Any user session state should be persisted outside of virtual server. This is a little more tricky, because by default the PHP Module stores these data into che web server’s filesystem. 任何用户会话状态都应保留在虚拟服务器之外。 这有点棘手,因为默认情况下,PHP模块将这些数据存储到Web服务器的文件系统中。
And this is the problem we’ll try to solve in this… uhm, session.
这就是我们在本次会议中将尝试解决的问题。
不应该做的事情:粘性会议 (What not to do: sticky sessions)
Sticky session is a feature of the Elastic Load Balancer service that binds a user’s session to a specific application instance, so that all requests coming from the user during the session will be sent to the same virtual server. The session cookie can be generated by either the load balancer or the application, but: this is considered a bad practice. The ideal thing would be to design the application as stateless, but this is not always possible.
粘性会话是Elastic Load Balancer服务的一项功能,该功能将用户的会话绑定到特定的应用程序实例,以便在会话期间来自用户的所有请求都将发送到同一虚拟服务器。 会话cookie可以由负载平衡器或应用程序生成,但是:这被认为是不好的做法。 理想的情况是将应用程序设计为无状态,但这并非总是可能的。
将会话存储在数据库中 (Store your sessions in a database)
Other option is: store our sessions inside a database. It could be the same external SQL database used by the application or a Memcache instance or another NoSQL database. In this case DynamoDB seems very interesting because it’s a powerful and fast NoSQL database, it’s managed by Amazon itself and is also easy accessible from our virtual servers. Also, AmazonDynamoDB class of the official PHP SDK is already equipped to register itself as session manager. If you never heard of DynamoDB I recommend you to watch this introductory video.
其他选择是:将我们的会话存储在数据库中。 它可以是应用程序使用的相同外部SQL数据库,Memcache实例或另一个NoSQL数据库。 在这种情况下,DynamoDB似乎非常有趣,因为它是功能强大且快速的NoSQL数据库,由Amazon本身管理,并且还可以从我们的虚拟服务器轻松访问。 此外,官方PHP SDK的AmazonDynamoDB类已经准备好将自己注册为会话管理器。 如果您从未听说过DynamoDB,建议您观看此介绍性视频 。
演示应用 (The demo application)
I’ve put together a simple application to test the entire mechanism, you can download the source code from our Github repository. We will run this application using an elastic load balancer and at least two instances. We will not use autoscaling for now.
我整理了一个简单的应用程序来测试整个机制,您可以从我们的Github存储库下载源代码。 我们将使用弹性负载平衡器和至少两个实例来运行此应用程序。 我们暂时不会使用自动缩放。
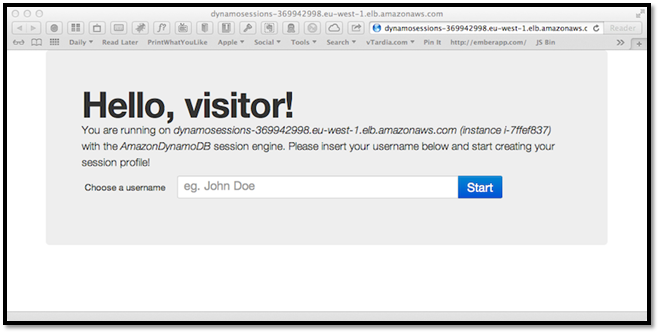
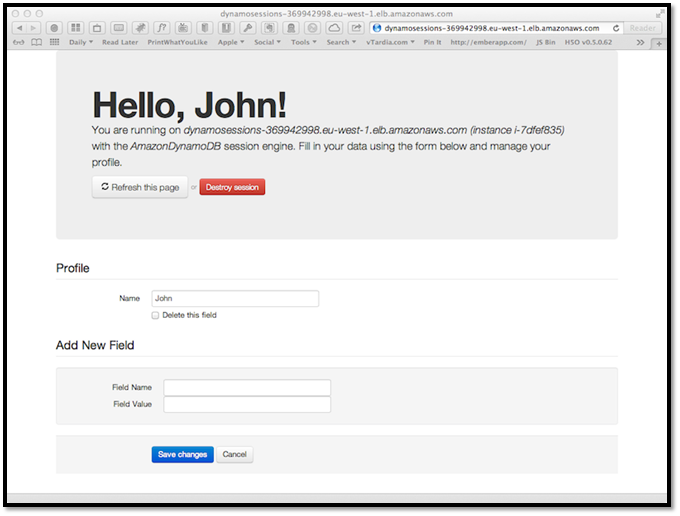
The application asks the user to choose a username that is stored into the current session and acts as a “login”. If a username is present in the session the application allows the user to insert a kind of “profile”, essentially a series of key/value information such as name, last name, email etc (both key and value are strings). All this logic is included in the index.php file.
该应用程序要求用户选择存储在当前会话中的用户名,并充当“登录名”。 如果会话中存在用户名,则应用程序允许用户插入一种“配置文件”,本质上是一系列键/值信息,例如名称,姓氏,电子邮件等(键和值均为字符串)。 所有这些逻辑都包含在index.php文件中。
The session.php file contains a simple Session library. This library allows us to manage session data with friendly methods such as $session->read('some_var') and $session->write('some_key', 'some_value'). This session object can be configured to use the default PHP session mechanism (if we are an a local testing server) or a custom class. The first step of our application file is session startup:
session.php文件包含一个简单的Session库。 这个库允许我们使用友好的方法来管理会话数据,例如$session->read('some_var') and $session->write('some_key', 'some_value') 。 可以将该会话对象配置为使用默认PHP会话机制(如果我们是本地测试服务器)或自定义类。 我们的应用程序文件的第一步是会话启动:
require_once 'lib/session.php';
try {
 // Engine can be PHP or AmazonDynamoDB
 $session = new Session($config['session']['engine'], $config['session']['params']);
} catch (Exception $e) {
 exit($e->getMessage());
} // end try
The default engine value is PHP which needs no parameters. If we choose the ‘AmazonDynamoDB’ engine, the session constructor will execute some additional code:
引擎的默认值为PHP,不需要任何参数。 如果我们选择“ AmazonDynamoDB”引擎,则会话构造函数将执行一些其他代码:
switch ($engine) {
case 'AmazonDynamoDB':
// Load AWS SDK
require_once 'AWSSDKforPHP/sdk.class.php';
// Create a list of credential sets that can be used with the SDK.
CFCredentials::set($params['credentials']);
// Instantiate a DynamoDB client
$dynamodb = new AmazonDynamoDB();
$dynamodb->set_region($params['region']);
// Instantiate, configure, and register the session handler
$this->handler = $dynamodb->register_session_handler(array(
'table_name'       => $params['table_name'],
'lifetime'         => $params['lifetime'],
));
break;
First we load the AWS SDK which must be already installed and reachable, then our credentials are loaded into the AWS environment. From this point on we can use AWS classes, so a new instance of AmazonDynamoDB is created and setup with the correct region where our table resides. Finally we tell our DynamoDB object to register himself as session manager passing the name of the table to use, and that’s really what we need.
首先,我们加载必须已经安装并且可以访问的AWS开发工具包,然后将我们的凭证加载到AWS环境中。 从这一点开始,我们可以使用AWS类,因此将创建一个新的AmazonDynamoDB实例并使用表所在的正确区域进行设置。 最后,我们告诉DynamoDB对象将自己注册为会话管理器,并传递要使用的表名,这确实是我们所需要的。
The config.php file is where we tell the application which engine we want to use, also our AWS credentials and DynamoDB settings are saved here. In the index.php I’ve also included a little utility function that, if we are not in the local server, fetches the name of the instance in which is currently running. This is useful to check that the session is kept consistent across our servers.
config.php文件是我们告诉应用程序要使用哪个引擎的地方,我们的AWS凭证和DynamoDB设置也保存在此处。 在index.php我还包含了一个小的实用程序函数,如果我们不在本地服务器中,则会获取当前正在其中运行的实例的名称。 这对于检查会话在我们的服务器上是否保持一致很有用。
function getServerName() {
 $host = $_SERVER['SERVER_NAME'];
 if ('localhost' != $host) {
 // Maybe we are on EC2, trying to catch the current instance ID
 $ch = curl_init('http://169.254.169.254/latest/meta-data/instance-id');
 curl_setopt($ch, CURLOPT_FAILONERROR, true);
 curl_setopt($ch, CURLOPT_RETURNTRANSFER, true);
 curl_setopt($ch, CURLOPT_CONNECTTIMEOUT, 2);
 if ($ret = curl_exec($ch)) {
 $host .= ' (instance ' . $ret . ')';
 } // end if
 curl_close($ch);
 } // end if
 return $host;
} // end function
The function getServerName() uses the EC2 Metadata API to find the instance’s name.
函数getServerName()使用EC2元数据API查找实例的名称。
Run the app on your fleet
在您的车队上运行该应用程序
In order to test this application we need a fleet of at least two web servers behind a load balancer. The server I used is an Ubuntu GNU/Linux instance equipped with:
为了测试此应用程序,我们需要在负载均衡器后面至少有两个Web服务器。 我使用的服务器是配备以下功能的Ubuntu GNU / Linux实例:
- the Apache web server, Apache Web服务器,
- PHP 5.3 (both command line and apache module), PHP 5.3(命令行和apache模块),
- the cURL program and PHP extension, cURL程序和PHP扩展,
- the Pear package manager (needed to install the SDK easily), Pear软件包管理器(需要轻松安装SDK),
the AWS SDK for PHP (I suggest the installation by Pear).
If you know how to build an AMI, you can build yours from scratch. But you can also use the one I’ve prepared and made public: ami-4b42443f. This machine already contains the PHP source code for the application and all the other dependencies. Once you have your AMI ready… let’s go!
如果您知道如何构建AMI,则可以从头开始构建。 但是您也可以使用我准备并公开的一种:ami-4b42443f。 该机器已经包含该应用程序PHP源代码以及所有其他依赖项。 准备好AMI之后,就开始吧!
初始化会话存储 (Initialize the session storage)
Go to your AWS console, select the DynamoDB service and your favorite region (mine is EU West – Ireland). Click on the “Create Table” button.
转到您的AWS控制台,选择DynamoDB服务,然后选择您喜欢的区域(我的区域是EU West – Ireland)。 点击“创建表格”按钮。
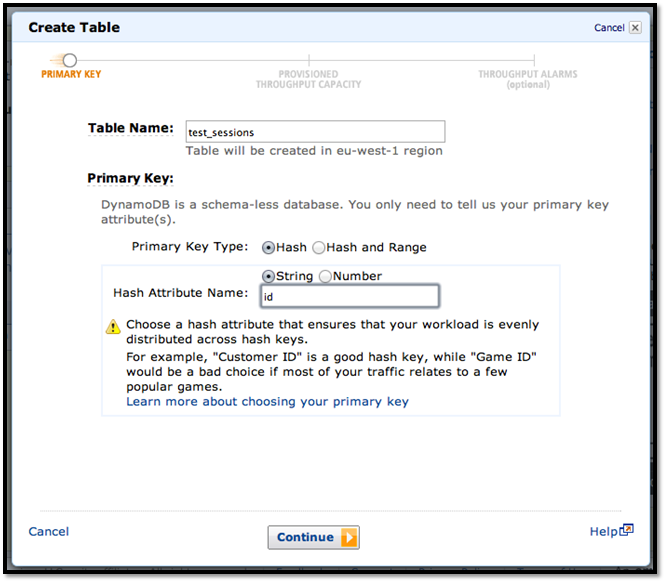
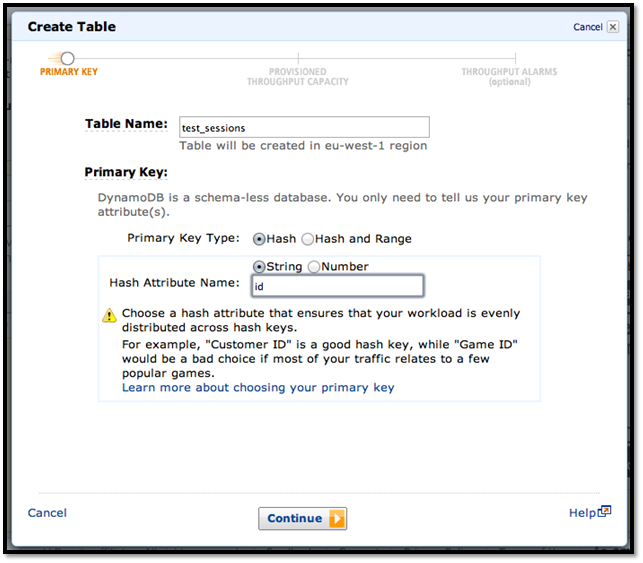
Enter “test_sessions” as table name and chose a string primary key called “id”, the key type must be “hash”. If you choose another name it must be copied in the config.php file later. Enter “10” for both the read and write capacity units fields (eg. how fast is your table), this is enough to test.
输入“ test_sessions”作为表名,并选择一个名为“ id”的字符串主键,该键的类型必须为“ hash”。 如果选择其他名称,则必须稍后将其复制到config.php文件中。 在读取和写入容量单位字段中输入“ 10”(例如,表的速度),这足以进行测试。
Now you have a NoSQL table where each row have a mandatory id field but can have a variable number of other different fields of type string, number, string set or number set. The session manager object will use a string field named “data” to store the session’s variables and a number field named “expires” for the expiration timestamp of the session.
现在,您有了一个NoSQL表,其中每行都有一个必填的id字段,但可以具有可变数量的其他不同字段,类型为字符串,数字,字符串集或数字集。 会话管理器对象将使用一个名为“ data”的字符串字段来存储该会话的变量,并使用一个名为“ expires”的数字字段作为会话的到期时间戳。
启动和配置服务器 (Launch and configure the servers)
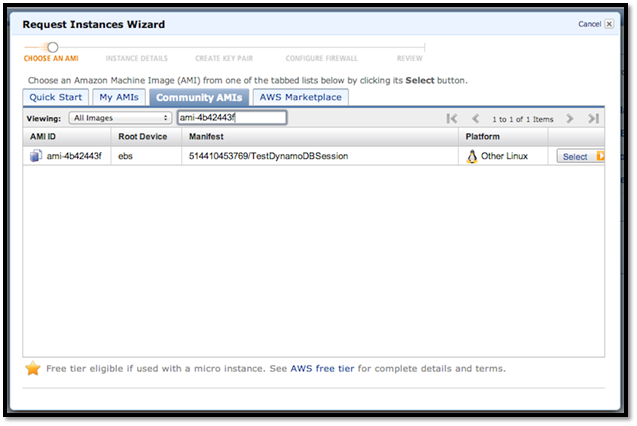
Now select the EC2 service and the same region you chose for the DynamoDB table. Click on the “Launch Instance” button from either the Dashboard or the “Instances” section. Select your custom AMI or, with the classic wizard, go to the “Community AMIs” tab and enter “ami–4b42443f”.
现在,选择EC2服务以及为DynamoDB表选择的相同区域。 单击仪表板或“实例”部分中的“启动实例”按钮。 选择您的自定义AMI,或者使用经典向导,转到“社区AMI”选项卡,然后输入“ ami-4b42443f”。
In the next screen enter at least “2” for the number of instances and choose your instance type, I chose Micro (t1.micro). You can leave “no preference” in the availability zone dropdown, but in a production environment it’s better if the various instances are distributed between two or more zones inside the same region. Accept the default settings for both the “Instance Details” and the “Storage Device” configuration panels, then continue. Enter one or more optional tags if you want. Choose a keypair or create a new one and choose a security group which allows at least HTTP on port 80 and SSH on port 22.
在下一个屏幕中,至少要输入2作为实例数量,然后选择您的实例类型,我选择了Micro(t1.micro)。 您可以在可用性区域下拉列表中保留“无首选项”,但是在生产环境中,最好将各种实例分布在同一区域内的两个或多个区域之间。 接受“实例详细信息”和“存储设备”配置面板的默认设置,然后继续。 如果需要,输入一个或多个可选标签。 选择一个密钥对或创建一个新的密钥对,然后选择一个安全组 ,该安全组至少在端口80上允许HTTP,在端口22上至少允许SSH。
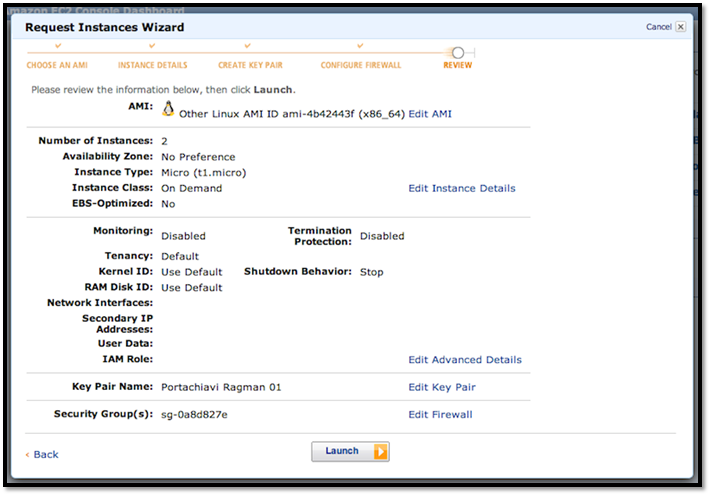
Review your settings then launch the instances. When the instances state is “running” they can be configured via SSH. Each instance has a public DNS name similar to ec2-xxx-xxx-xx-xx.region.compute.amazonaws.com. You’ll need to edit the config.php file on each instance you created. Connect to the instance with SSH or with an SFTP client using your public key and the username “ubuntu” (if you used my public AMI):
查看您的设置,然后启动实例。 当实例状态为“运行”时,可以通过SSH对其进行配置。 每个实例都有一个类似于ec2-xxx-xxx-xx-xx.region.compute.amazonaws.com的公共DNS名称。 您需要在创建的每个实例上编辑config.php文件。 使用公共密钥和用户名“ ubuntu”(如果使用公共AMI),通过SSH或SFTP客户端连接到实例:
$ ssh -i /path/to/key.pem ubuntu@ec2-X-X-X-X.region.compute.amazonaws.com
$ ssh -i /path/to/key.pem ubuntu@ec2-XXXX.region.compute.amazonaws.com
Change the current directory to /var/www where the test application is located. Edit the config.php file inserting your AWS key and secret. Then check if your DynamoDB table settings matches, you will surely have to edit the region with the appropriate value that can be found in this reference.
将当前目录更改为测试应用程序所在的/ var / www。 编辑config.php文件,插入您的AWS密钥和机密。 然后检查您的DynamoDB表设置是否匹配,您肯定必须使用可以在此参考中找到的适当值来编辑区域。
Then create an empty file called ping.html inside /var/www: this file will be used by the load balancer to test the reachability of each instance.
然后在/ var / www内创建一个名为ping.html的空文件:负载均衡器将使用此文件来测试每个实例的可达性。
设置负载均衡器 (Setting up the load balancer)
With the database and all the instances in place we can now setup the frontend load balancer. In the EC2 navigation menu, under “Network & Security” choose “Load Balancers” and click on the “Create Load Balancer” button.
有了数据库和所有实例之后,我们现在可以设置前端负载均衡器。 在EC2导航菜单的“网络和安全性”下,选择“负载均衡器”,然后单击“创建负载均衡器”按钮。
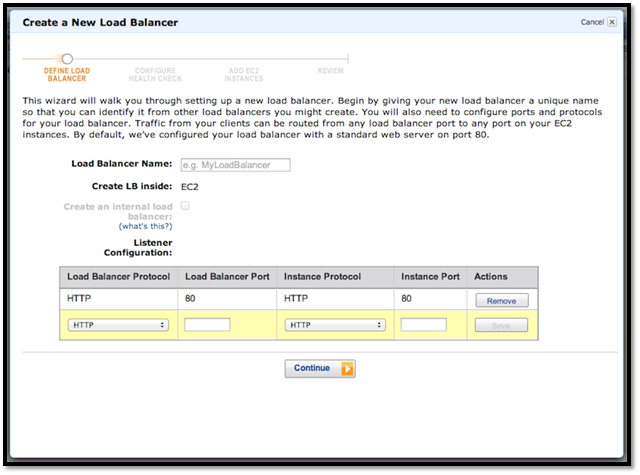
Choose a name for the load balancer and verify that the listener configuration matches that of the screenshot, that basically says: forward all the HTTP traffic on port 80 of the load balancer to HTTP on port 80 of the instances.
为负载均衡器选择一个名称,并验证侦听器配置是否与屏幕快照的配置匹配,该基本含义是:将负载均衡器的端口80上的所有HTTP通信转发到实例的端口80上的HTTP。
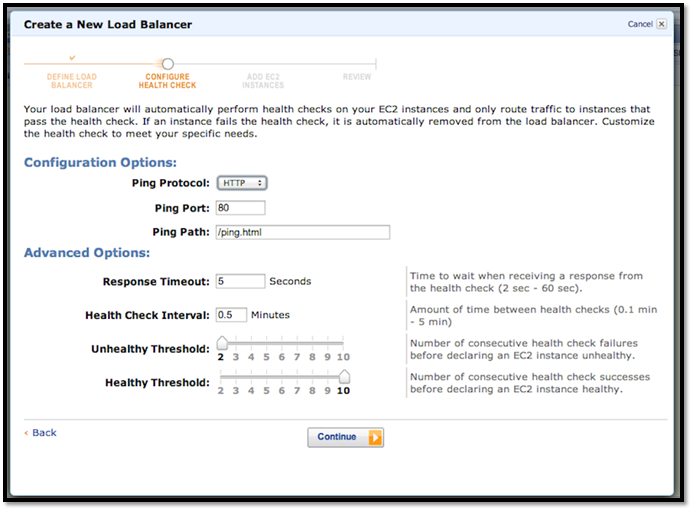
In the health check panel enter /ping.html in the ping path field and leave the other settings as default. This means: call the /ping.html resource of each instance every 30 seconds, if the response time is longer then 5 seconds the check fails, if the instance fails two consecutive health checks it’s unhealthy, if it passes 10 consecutive checks the instance is healthy. The load balancer will not forward traffic to an unhealthy instance and if autoscale is in place the unhealthy instances can be terminated and replaced by new fresh ones.
在运行状况检查面板中,在ping路径字段中输入/ping.html,并将其他设置保留为默认设置。 这意味着:每30秒调用每个实例的/ping.html资源,如果响应时间长于5秒,则检查失败;如果该实例两次连续运行状况检查失败,则它是不健康的;如果它通过10次连续检查,则实例为健康。 负载平衡器将不会将流量转发到运行状况不佳的实例,并且如果具备自动缩放功能,则可以终止运行状况不佳的实例并用新的实例替换。
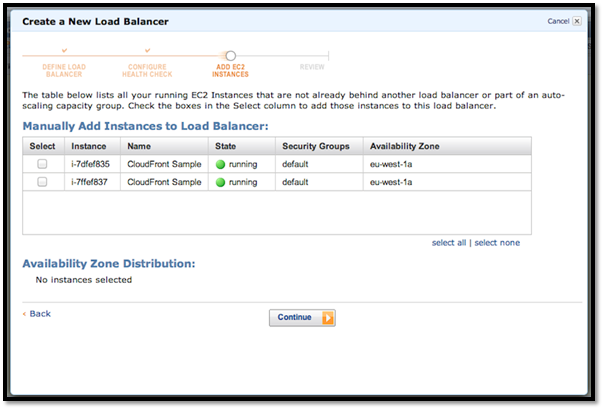
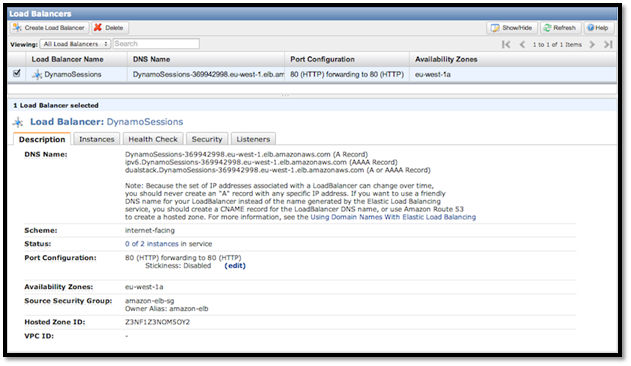
The next screen lets you choose which of the currently running instances can be added to the load balancer. Select the two instances created previously and go on. Review the final configuration and confirm if it’s ok for you. Now, you should be able to see the load balancer’s details and the status of all the connected instances.
在下一个屏幕中,您可以选择可以将哪些当前正在运行的实例添加到负载均衡器。 选择先前创建的两个实例,然后继续。 查看最终配置并确认是否适合您。 现在,您应该能够看到负载均衡器的详细信息以及所有已连接实例的状态。
You can test the application by putting the load balancer’s DNS name (something like yourname-12345678.region.elb.amazonaws.com) into a browser. You can also configure a domain or subdomain (eg. dynamo.yourdomain.com) by adding a CNAME in your DNS panel that points to the load balancer URL. It’s not recommended to use the IP with an A record because the IP can change overtime.
您可以通过将负载平衡器的DNS名称(例如yourname-12345678.region.elb.amazonaws.com之类)放入浏览器来测试该应用程序。 您还可以通过在DNS面板中添加一个指向负载均衡器URL的CNAME来配置域或子域(例如dynamo.yourdomain.com)。 不建议将IP与A记录一起使用,因为IP会随着时间变化。
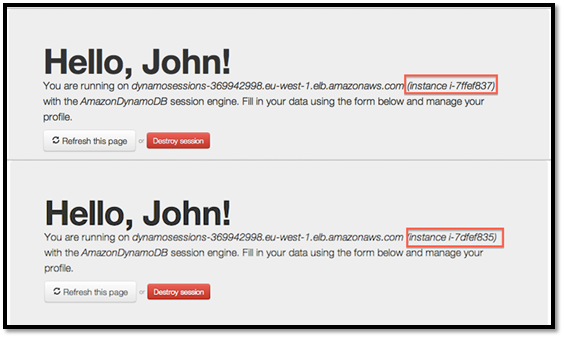
Each time you submit the form or refresh the page you request can be processed by a different instance. You can check which instance is serving you by the name displayed through the getServerName() utility.
每次您提交表单或刷新页面时,您所请求的页面都可以由其他实例处理。 您可以通过getServerName()实用程序显示的名称来检查哪个实例为您服务。
摘要 (Summary)
And that’s all for now. We’ve covered an important topic in the AWS ecosystem, but this is just the beginning. All this stuff is entirely programmable, for example: you can add autoscaling and design your instances to be self-configurable and download AWS credentials and other data from a trusted place. Or you can use Cloud Formation to create a reusable template for the entire infrastructure.
到此为止。 我们已经介绍了AWS生态系统中的一个重要主题,但这仅仅是个开始。 例如,所有这些东西都是完全可编程的:您可以添加自动缩放并将实例设计为可自配置的,并从受信任的位置下载AWS凭证和其他数据。 或者,您可以使用Cloud Formation为整个基础架构创建可重用的模板。
The starting point to check is the AWS Homepage. And now if you’ve finished testing don’t forget to terminate all your stuff, if not Happy Coding!
检查的起点是AWS主页 。 现在,如果您已完成测试,请别忘了终止所有内容,如果不满意的话!
Image via Fotolia
图片来自Fotolia
翻译自: https://www.sitepoint.com/amazon-dynamodb-store-php-sessions-with-load-balancer/


 123
123

 被折叠的 条评论
为什么被折叠?
被折叠的 条评论
为什么被折叠?
 到【灌水乐园】发言


