


raspberry pi
A Raspberry Pi is a brilliant tiny computer that you can power off of a micro USB cable. The most recent model has WiFi, an ethernet port, 4 USB ports and an HDMI port. There’s also a micro SD card slot, which is where the “hard drive” goes.
Raspberry Pi是一款出色的微型计算机,您可以通过微型USB电缆关闭电源。 最新型号有WiFi,以太网端口,4个USB端口和HDMI端口。 还有一个微型SD卡插槽,这是“硬盘驱动器”所在的位置。

It’s capable of running Raspbian Linux, which is a Debian based Linux distribution. This makes it familiar to Ubuntu users who can then just sudo apt-get install all the things.
它能够运行Raspbian Linux,这是基于Debian的Linux发行版。 这使Ubuntu用户熟悉,然后他们可以sudo apt-get install所有内容。
Like with any Linux machine, you can install PHP on it and make a website – but we can do so much more than that!
像在任何Linux机器上一样,您可以在其上安装PHP并创建网站-但是我们可以做的还远远不够!
设备 (Equipment)
Firstly, we will need a Raspberry Pi. The most recent model has onboard WiFi, which is very useful for easy SSH access. We will also need some electronics equipment. It is a really good idea to obtain a starter kit containing a breadboard, jumper wires, resistors, LEDs and push buttons. You can buy these sorts of kits on adafruit and similar packs can be found much cheaper on Amazon and eBay.
首先,我们需要Raspberry Pi。 最新型号具有板载WiFi,这对于轻松进行SSH访问非常有用。 我们还将需要一些电子设备。 获得包含面包板,跳线,电阻器,LED和按钮的入门套件是一个非常好的主意。 您可以在adafruit上购买这些工具包,在Amazon和eBay上可以找到便宜得多的类似包装。
建立 (Setup)
The Raspberry Pi official website has an excellent quick start guide to help you get up and running. Once you have Raspbian Linux running on your machine, you can use this command to install PHP:
Raspberry Pi官方网站提供了出色的快速入门指南 ,可帮助您入门和运行。 一旦在计算机上运行了Raspbian Linux,就可以使用以下命令来安装PHP:
sudo apt-get install php5Alternatively, install PHP7. It’s a bit more complicated, but performs better. This guide explains it well.
或者,安装PHP7。 它有点复杂,但性能更好。 本指南对此进行了很好的解释 。
通用输入输出(GPIO)引脚 (General Purpose Input Output (GPIO) Pins)
On the corner of a Raspberry Pi board are two rows of metal pins that we can connect electronic circuits to. Some of the pins are grounded, some are 5V, some are 3.3V and most of them are GPIO pins.
在Raspberry Pi板的角上是两行金属引脚,我们可以将其连接到电子线路。 一些引脚接地,一些为5V,一些为3.3V,其中大多数为GPIO引脚 。
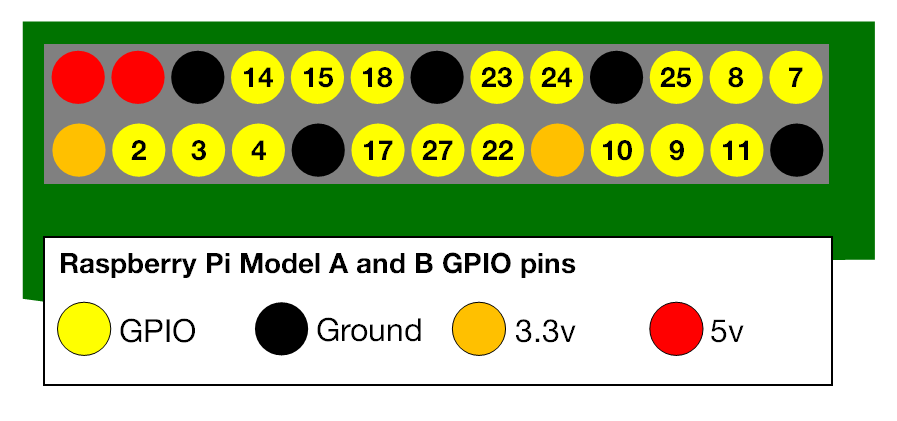
Credit: www.raspberrypi.org
图片来源: www.raspberrypi.org
When a GPIO pin is configured as an output pin, we can tell the Pi to set its voltage to be high (3.3V) or low (0V). This allows us to turn things on and off.
当GPIO引脚配置为输出引脚时,我们可以告诉Pi将其电压设置为高(3.3V)或低(0V)。 这使我们可以打开和关闭事物。
When a GPIO pin is configured as an input pin, we can check to see the voltage on that pin and also detect when that voltage changes. This allows us to read sensors and also detect things like button presses.
当GPIO引脚配置为输入引脚时,我们可以检查该引脚上的电压,并检测该电压何时变化。 这使我们能够读取传感器并检测按钮按下之类的东西。
There is plenty more that we can use these pins for, such as communication via Serial, i2c or SPI – but for now, this is all we are required to know.
我们可以使用这些引脚做更多的事情,例如通过串行,i2c或SPI进行通信-但就目前而言,这是我们所需要知道的。
PiPHP入门 (Getting Started with PiPHP)
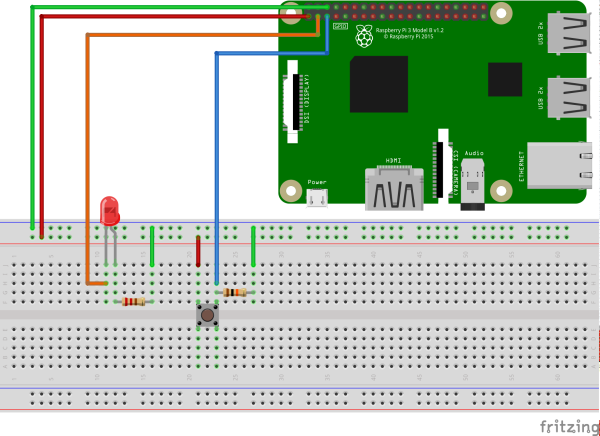
PiPHP: GPIO is a PHP library that can be installed via composer that allows you to control these GPIO pins. Here is an example of how we might use the library to blink an LED a few times when a button press is detected. The diagram below shows how you could connect an LED to GPIO pin 2 and a push button to GPIO pin 3 using a breadboard. A breadboard is a reusable base for making electronic circuits. The rows are electronically connected, as are the two rails that span the length of the board on each of its sides. We connect the first two rails to the ground and 3.3V pins in the Raspberry Pi.
PiPHP:GPIO是一个PHP库,可以通过composer安装,该库允许您控制这些GPIO引脚。 这是一个示例,当检测到按下按钮时,我们如何使用该库使LED闪烁几次。 下图显示了如何使用面包板将LED连接到GPIO引脚2并将按钮连接到GPIO引脚3。 面包板是制造电子电路的可重复使用的基础。 这些行是电子连接的,横跨板的每一侧的两个导轨也是如此。 我们将前两个电源轨连接到Raspberry Pi的地面和3.3V引脚。
The two resistors are important. The first resistor (~220 Ω) limits the current to the LED. The second resistor (~10 kΩ) is a pull-up resistor for the button.
这两个电阻很重要。 第一个电阻(约220Ω)限制了流向LED的电流。 第二电阻(〜10kΩ)是按钮的上拉电阻 。
Note: Some of the pins on the Raspberry Pi have internal pull-up resistors, so this is not always required (but it does not harm).
注意:Raspberry Pi上的某些引脚具有内部上拉电阻,因此并不总是必须这样做(但这不会造成损害)。
Back on the Raspberry Pi, make yourself a project directory and then use composer to install piphp/gpio:
回到Raspberry Pi,将您自己设置为项目目录,然后使用composer安装piphp/gpio :
composer require piphp/gpioIf you place the file below inside your project directory and then execute it (php led-blink.php) you should find that pressing the button causes the LED to blink 5 times, as it does in the video.
如果将文件放在项目目录下,然后执行它( php led-blink.php ),您会发现按按钮会使LED闪烁5次,就像视频中一样。
<?php // led-blink.php

require_once 'vendor/autoload.php';

use PiPHP\GPIO\GPIO;
use PiPHP\GPIO\Pin\InputPinInterface;
use PiPHP\GPIO\Pin\OutputPinInterface;

// This GPIO object can be used to retrieve pins and create interrupt watchers
$gpio = new GPIO();

// Configure pin 2 as an output pin and retrieve an object that we can use to change it
$ledPin = $gpio->getOutputPin(2);

// Configure pin 3 as an input pin and retrieve an object that we can use to observe it
$buttonPin = $gpio->getInputPin(3);

// Configure this pin to trigger interrupts when the voltage rises.
// ::EDGE_FALLING and ::EDGE_BOTH are also valid.
$buttonPin->setEdge(InputPinInterface::EDGE_RISING);

// Create an interrupt watcher (this is a type of event loop)
$interruptWatcher = $gpio->createWatcher();

// Register a callback for handling interrupts on the button pin
$interruptWatcher->register($buttonPin, function () use ($ledPin) {
    echo 'Blinking LED...' . PHP_EOL;

    // Toggle the value of the LED five times
    for ($i = 0; $i < 5; $i++) {
        $ledPin->setValue(OutputPinInterface::VALUE_HIGH);
        usleep(100000);
        $ledPin->setValue(OutputPinInterface::VALUE_LOW);
        usleep(100000);
    }

    // Returning false would cause the loop below to exit
    return true;
});

// Loop until an interrupt callback returns false, this code will iterate every 5 seconds
while ($interruptWatcher->watch(5000));
更进一步 (Going Further)
We have seen how we can use PHP to respond to electronic inputs and control electronic outputs. Once we have this understanding, we can get more and more adventurous with our inputs and outputs to create more and more awesome projects.
我们已经了解了如何使用PHP响应电子输入并控制电子输出。 一旦有了这种理解,我们就可以通过投入和产出获得越来越多的冒险,以创建越来越多的出色项目。
Speaking personally, I had great fun making a drinks machine using a flow sensor and a windscreen washer fluid pump.
就个人而言,我很高兴使用流量传感器和挡风玻璃清洗液泵制造饮料机 。
Talk preparation for @phpday could be going better. pic.twitter.com/Z9IWGEQftq
@phpday的谈话准备可能会更好。 pic.twitter.com/Z9IWGEQftq
— Andrew Carter (@AndrewCarterUK) May 13, 2016
—安德鲁·卡特(@AndrewCarterUK) 2016年5月13日
I used some nifty electronics with a TIP120 transistor so that I could control the higher voltage and current that the pump needed from the Raspberry Pi. The flow sensor outputs a pulse after a specific volume of fluid has flown through it. All my code had to do was count the interrupts from the flow sensor and then turn the pump off. The gardeners amongst us could use a similar arrangement to automate the watering of plants!
我将一些精美的电子设备与TIP120晶体管配合使用,以便可以控制Raspberry Pi泵所需的更高电压和电流。 在特定体积的流体流过后,流量传感器会输出一个脉冲。 我要做的所有代码就是计算流量传感器的中断,然后关闭泵。 我们中间的园丁们可以使用类似的方法来自动浇水!
Have any Raspberry PI + PHP projects you’d like to share? Let us know!
您有想要共享的Raspberry PI + PHP项目吗? 让我们知道!
翻译自: https://www.sitepoint.com/powering-raspberry-pi-projects-with-php/
raspberry pi


 1890
1890

 被折叠的 条评论
为什么被折叠?
被折叠的 条评论
为什么被折叠?
 到【灌水乐园】发言


