


This article was peer reviewed by Christopher Pitt, @jubianchi, and Ivan Enderlin. Thanks to all of SitePoint’s peer reviewers for making SitePoint content the best it can be!
这篇文章由Christopher Pitt , @ jubianchi和Ivan Enderlin进行了同行评审。 感谢所有SitePoint的同行评审人员使SitePoint内容达到最佳状态!
If you’ve been around PHP for more than a little while, you’ve no doubt started to test your code. And if you ask anyone in the PHP space what to use for writing unit tests, likely the first answer that they’ll give you is PHPUnit.
如果您使用PHP已经有一段时间了,那么您无疑已经开始测试您的代码。 而且,如果您问PHP领域的任何人用来编写单元测试的内容,那么他们给您的第一个答案可能就是PHPUnit。
It’s the de facto standard in the PHP community, and with good reason. But it’s not the only choice. Whilst it does command the lion’s share, other choices abound, one of which I’m going to take you through in this tutorial; it’s called atoum.
这是PHP社区中的事实上的标准,并且有充分的理由。 但这不是唯一的选择。 虽然它确实占据了很大的份额,但还有很多其他选择,在本教程中,我将带您进行选择。 它叫做atoum 。
If this is your first time hearing about it, it is self-described as:
如果这是您第一次听说,则自我描述为:
A simple, modern, and intuitive unit testing framework for PHP!
一个简单,现代,直观PHP单元测试框架!

I can’t necessarily vouch for it being all that intuitive, but it definitely is reasonably simple to use. And whilst its composer.json currently specifies a minimum version of PHP 5.3.3, one of the core developers told me that from version 3.0 support for PHP 5.3 will be officially dropped in favor of PHP 5.6. So don’t be fooled, it is a modern take on testing in PHP.
我不一定要保证它这么直观,但是使用起来肯定很简单。 尽管其composer.json当前指定了PHP 5.3.3的最低版本,但一位核心开发人员告诉我,从3.0版起,对PHP 5.3的支持将正式放弃,而支持PHP 5.6。 因此,不要被愚弄了,这是用PHP进行测试的现代方式。
Recently, I decided to give it a test run on an existing codebase of mine, a health monitoring application which I’ve been writing to help me deal with some health problems I’ve had over the last 12 – 24 months. I found it to be an interesting take on software testing, combining several different styles into the one package.
最近,我决定在现有的我的代码库上进行测试,这是一个健康监控应用程序,我一直在编写该程序以帮助我解决过去12到24个月中遇到的一些健康问题。 我发现这是对软件测试的一种有趣尝试,它将几种不同的样式组合到一个软件包中。
安装Atoum (Installing Atoum)
Like all modern PHP software, we install it with Composer.
像所有现代PHP软件一样,我们使用Composer进行安装。
composer require atoum/atoumFor the purposes of this tutorial, I’ll assume that you’re following along using PhpStorm. No offense meant to Vim, Emacs, and other editors.
出于本教程的目的,我假设您正在使用PhpStorm。 对Vim , Emacs和其他编辑者而言,并不构成冒犯。
Given that, and given how atoum’s source code is structured, we should also install a supplementary library called atoum/stubs.
鉴于此,并考虑了atoum的源代码的结构,我们还应该安装一个称为atoum / stubs的补充库。
Without it, attempting to perform any kind of code completion in your IDE with atoum is less than straight-forward. Stubs make working with atoum much more user-friendly, as the graphic below will attest.
如果没有它,尝试使用atoum在IDE中执行任何类型的代码完成都不会很简单。 存根使使用Atoum更加用户友好,如下图所示。

composer require atoum/stubs配置Atoum (Configuring Atoum)
Now that it’s installed, let’s perform some preliminary configuration. Specifically, what we’re going to do is to configure how code coverage will reported, as well as what the test reporting will look like when run from the terminal.
现在已经安装了,让我们执行一些初步配置。 具体来说,我们要做的是配置如何报告代码覆盖率以及从终端运行时测试报告的外观。
This isn’t strictly necessary, but as we may be looking at the test output in the terminal a lot, it helps to give a bit of life to it. Second, whilst the built-in code coverage is pretty good, sometimes viewing it through a browser is just easier to do, as we’ll see in a little while.
这不是严格必要的,但是由于我们可能会经常查看终端中的测试输出,因此有助于延长使用寿命。 其次,尽管内置代码覆盖范围非常好,但是有时通过浏览器查看它只是更容易完成,我们将在稍后看到。
If this is your first time hearing about code coverage, code coverage reports the percentage of the codebase which is covered by tests. Code coverage reports help us know how complete our tests are, and how confident we can feel when making changes to the code. So, while there is some work involved in getting code coverage set up, it’s worth having in place.
如果这是您第一次了解代码覆盖率,则代码覆盖率将报告测试覆盖的代码库百分比。 代码覆盖率报告可帮助我们了解测试的完成程度以及对代码进行更改时的信心。 因此,尽管需要进行一些工作来设置代码覆盖率,但是值得一试。
To begin configuring atoum, create a new file in the root directory of your project, called .atoum.php. There, add the following contents:
要开始配置Atoum,请在项目的根目录中创建一个名为.atoum.php的新文件。 在那里,添加以下内容:
<?php

use mageekguy\atoum;

$stdout = new atoum\writers\std\out;
$report = new atoum\reports\realtime\santa;
$script->addReport(
    $report->addWriter($stdout)
);
No, you’re not dreaming that the reporting style is set to Santa. If you’re groaning that it’s still a few months until Christmas, it is already October. I’m sure that the shops in your area will soon be filled with all the tacky Christmas merchandise.
不,您不是在梦想将报告样式设置为圣诞老人。 如果您抱怨到圣诞节还有几个月,那已经是十月了。 我相信您附近的商店很快就会堆满所有俗气的圣诞节商品。
But before you groan too much, there are a number of other options; these include: cli, phing, tap, and NyanCat.
但是,在您吟过多之前,还有许多其他选择。 其中包括: cli,phing,tap和NyanCat 。
With that done, let’s set code coverage to export to HTML format. Create a new directory structure, /coverage/html, off the root directory of your project.
完成后,让我们设置代码覆盖率以导出为HTML格式。 在项目的根目录下创建一个新的目录结构/coverage/html 。
Then, copy vendor/atoum/resources/configurations/runner/coverage.php.dist to the root directory of your project as coverage.php. In there, we need to update the configuration entries, listed in the code snippet below:
然后,将vendor/atoum/resources/configurations/runner/coverage.php.dist复制到项目的根目录,作为coverage.php 。 在这里,我们需要更新配置条目,列在下面的代码片段中:
<?php

use \mageekguy\atoum\report\fields\runner\coverage;

$coverageHtmlField = new coverage\html(
    'Your project name',
    '/path/to/destination/directory'
);
$coverageHtmlField->setRootUrl('http://url/of/web/site');
$coverageTreemapField = new coverage\treemap(
    'Your project name',
    '/path/to/destination/directory'
);

$coverageTreemapField
    ->setTreemapUrl('http://url/of/treemap')
    ->setHtmlReportBaseUrl($coverageHtmlField->getRootUrl());

$script
    ->addDefaultReport()
    ->addField($coverageHtmlField)
    ->addField($coverageTreemapField);
After that, we’re ready to start writing tests.
之后,我们准备开始编写测试。
我们的第一个测试 (Our First Test)
In my application’s source code, I have an entity called Journal, which stores a daily food intake entry which I write to track what I’ve eaten, and how I’ve reacted to it. In it, I have the following function:
在应用程序的源代码中,我有一个名为Journal的实体,该实体存储我每天编写的食物摄入条目,以跟踪我吃了什么以及对它的React。 在其中,我具有以下功能:
public function populate(array $data)
{
    if (empty($data)) {
        throw new HydrationException();
    }

    $this->id = $data['id'];
    $this->userId = $data['userId'];
    $this->entry = $data['entry'];
    $this->created = $data['created'];
    $this->updated = $data['updated'];
}
You can see that it takes one parameter, $data, which is an array. If $data is empty, then it throws a HydrationException, which is a custom exception.
您可以看到它带有一个参数$data ,它是一个数组。 如果$data为空,则抛出HydrationException ,这是一个自定义异常。
If $data’s not empty, then it populates each of the five private member variables using the key of the same name from $data. Nothing too special, yet enough to test with.
如果$data不为空,则使用$data中具有相同名称的键填充五个私有成员变量中的每一个。 没什么特别的,但足以进行测试。
To create the first test, by default, we don’t follow the same approach which you might find in many other projects such as Zend Framework, Symfony, or Laravel.
默认情况下,要创建第一个测试,我们不遵循您在许多其他项目(例如Zend Framework,Symfony或Laravel)中可能发现的相同方法。
Out of the box, atoum suggests a different style – creating a directory called tests/units, relative to the classes which you are going to test.
开箱即用,atoum提出了另一种风格–创建一个名为tests/units的目录,相对于要测试的类。
So, in the case of my Journal entity, which is located at src/App/Entity, I’d then create a new test class, also named Journal, in tests/units/Entity/Journal.php.
因此,对于我的Journal实体(位于src/App/Entity ,我将在tests/units/Entity/Journal.php创建一个新的测试类,也称为Journal 。
Then, I’d give it a PSR-4 type namespace, namespace App\Entity\tests\units;. After that, I only need to use the atoum namespace and I can begin writing tests.
然后,给它一个PSR-4类型的名称空间, namespace App\Entity\tests\units; 。 之后,我只需要使用atoum命名空间,就可以开始编写测试了。
<?php

namespace App\Entity\tests\units;

use App\Entity\Exception\HydrationException;
use App\Entity\Journal as Entity;
use Faker\Factory;
use Faker\Generator;
use atoum;
I’ll start off by including all of the namespaces and classes which the test will need. After that, as with PHPUnit, I’ve created the first test, following the standard naming style of prefixing a test with test, which identifies it as a test.
首先,我将包括测试所需的所有名称空间和类。 之后,与PHPUnit一样,我按照将测试加前缀test的标准命名样式创建了第一个测试,该test其标识为测试。
Then, using the excellent Faker library, I’ve created an array of test data to populate the entity with. With that ready, we next step through the test.
然后,使用出色的Faker库 ,我创建了一组测试数据来填充实体。 准备就绪后,我们下一步将通过测试。
class Journal extends atoum
{
    public function testHydration()
    {
        $faker = Factory::create();

        $data = [
          'id' => $faker->randomDigitNotNull,
          'userId' => $faker->randomDigitNotNull,
          'entry' => $faker->text,
          'created' => $faker->dateTime,
          'updated' => $faker->dateTime,
        ];

        $this
            ->given($entity = new Entity())
            ->when($entity->populate($data))
            ->then
                ->integer($entity->getId())
                ->isEqualTo($data['id']);
    }
}
Atoum has a number of styles for writing tests. You can use the BDD/Gherkin-style of given -> when -> then, as I have above. Or, you can take a more direct approach, which you can see in the example below.
Atoum有多种编写测试的样式。 您可以使用given -> when -> then 的BDD / Gherkin样式 ,如我上面所述。 或者,您可以采用更直接的方法,在下面的示例中可以看到。
faker = Factory::create();
$entity = new Entity();
$data = [
    'id' => faker->randomDigitNotNull,
    'userId' => faker->randomDigitNotNull,
    'entry' => faker->text,
    'created' => faker->dateTime,
    'updated' => faker->dateTime,
];
$entity->populate($data);
$this
    ->object($entity)
    ->integer($entity->getId())
    ->isEqualTo($this->data['id']);
Personally, whilst a bit more verbose, I prefer the former style to the latter. I find it more readable and intuitive. The choice is yours.
就个人而言,虽然有点冗长,但我更喜欢前一种风格。 我发现它更具可读性和直观性。 这是你的选择。
Now let’s look a bit deeper at the tests. We used the given method to establish the preamble, or set up the system under test (SUT), that being a Journal entity object. We then used the when method to run the SUT and get a result, specifically by calling its populate() method to hydrate it with test data.
现在让我们对测试进行更深入的了解。 我们使用given方法来建立作为Journal实体对象的前导或建立被测系统(SUT)。 然后,我们使用when方法来运行SUT并获得结果,特别是通过调用其populate()方法将其与测试数据进行水合。
With the object hydrated, we then computed the test verdict using then() along with two assertions, comparing the post-state of the object, with the data used to hydrate it. In this assessment of the SUT’s post-state, we’re only checking if the Journal’s id member variable, returned by calling $entity->getId(), is both an integer, and is equal to the value in $data’s id element.
在水化对象后,我们使用then()以及两个断言来计算测试结论,将对象的后状态与用于水化的数据进行比较。 在对SUT后状态的评估中,我们仅检查通过调用$entity->getId()返回的Journal的id成员变量是否既是整数,又等于$data的值, s id元素。
As there are a number of properties which can be set on the object, we could have continued to use the fluent interface to test them all, such as in the example below:
由于可以在对象上设置许多属性,因此我们可以继续使用fluent接口来测试它们,例如下面的示例:
$this->object($entity)
    ->integer($entity->getId())->isEqualTo(data['id'])
    ->integer($entity->getUserId())->isEqualTo(data['userId'])
    ->string($entity->getEntry())->isEqualTo(data['entry'])
    ->dateTime($entity->getCreated())->isEqualTo(data['created'])
    ->dateTime($entity->getUpdated())->isEqualTo(data['updated']);
Here we’ve used another assertion method, string(), on the values which return a string, and dateTime() for the dateTime values, instead of integer(). However, as you might expect from a comprehensive testing library, there are a range of other assertion options.
在这里,我们在返回字符串的值上使用了另一个断言方法string() ,对于dateTime值使用了dateTime dateTime() ,而不是integer() 。 但是,正如您可能希望从全面的测试库中获得的那样,还有许多其他断言选项。
运行测试 (Running the Tests)
With the test ready, it’s time to run it. From the command line, in the root directory of your project, run the following command:
准备好测试之后,就该运行它了。 在命令行中,在项目的根目录中,运行以下命令:
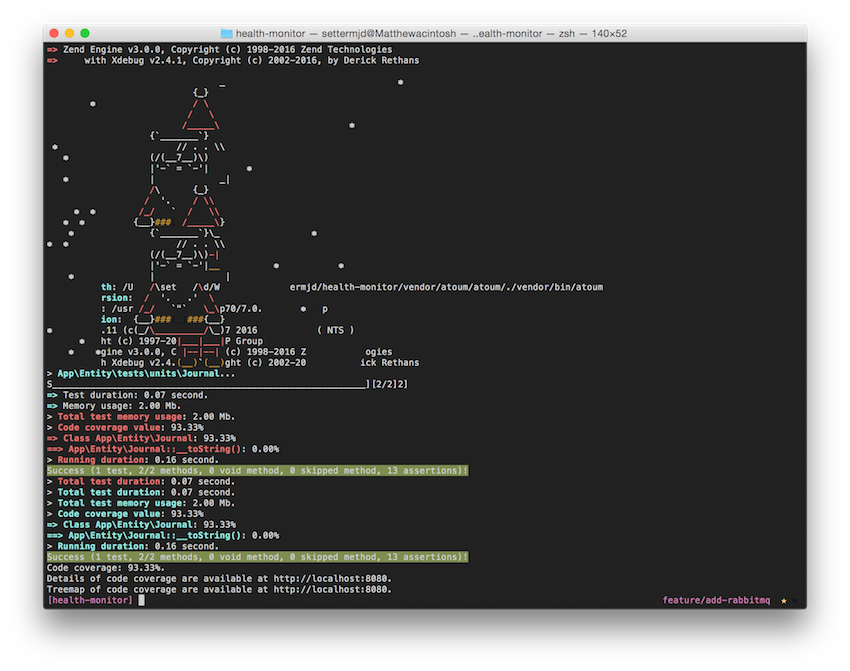
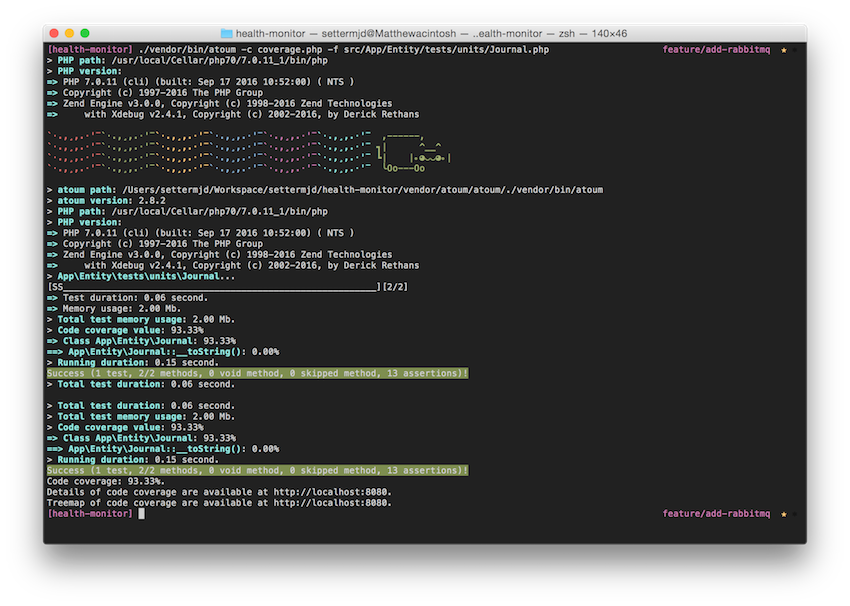
./vendor/bin/atoum -c coverage.php -f src/App/Entity/tests/units/Journal.phpThis will run just the test that we’ve created, using the -f switch, and enable code coverage using the -c switch. When you run it, you should see output similar to that in the image below – ho ho ho!
这将使用-f开关仅运行我们创建的测试,并使用-c开关启用代码覆盖率。 运行它时,您应该看到与下图类似的输出– ho ho ho !
If you want though, feel free to change the output style to anything else; my personal favorite is NyanCat. Who wouldn’t love crazy output like this:
如果需要,请随时将输出样式更改为其他样式。 我个人最喜欢的是NyanCat 。 谁不会喜欢这样的疯狂输出:
代码覆盖率 (Code Coverage)
Now that we have a working test, let’s take a closer look at the code coverage reporting, starting with the command-line output. We can see, in the abridged sample output below, that for the class tested, App\Entity\Journal, it has total code coverage of 93.33%. This is because its __toString method has no coverage at all.
既然我们已经有了一个有效的测试,让我们从命令行输出开始,仔细看一下代码覆盖率报告。 我们可以在下面的简短示例输出中看到,对于测试的类App\Entity\Journal ,其总代码覆盖率为93.33%。 这是因为其__toString方法完全没有覆盖范围。
> Code coverage value: 93.33%
=> Class App\Entity\Journal: 93.33%
==> App\Entity\Journal::__toString(): 0.00%
Success (1 test, 2/2 methods, 0 void method, 0 skipped method, 13 assertions)!
> Code coverage value: 93.33%
=> Class App\Entity\Journal: 93.33%
==> App\Entity\Journal::__toString(): 0.00%
> Running duration: 0.15 second.
Now let’s look at the HTML coverage output. Firing up PHP’s web server using the command php -S 127.0.0.1:8080 -t ./coverage/html, we can see the HTML report at http://localhost:8080:
现在让我们看一下HTML coverage输出。 使用命令php -S 127.0.0.1:8080 -t ./coverage/html启动PHP的Web服务器,我们可以在http://localhost:8080看到HTML报告:

There, we see a list of all classes covered in the coverage report and their level of code coverage. By clicking on it, we then see how the code coverage level is assessed.
在这里,我们可以看到覆盖率报告中涵盖的所有类的列表及其代码覆盖率级别。 通过单击它,我们然后看到如何评估代码覆盖率级别。
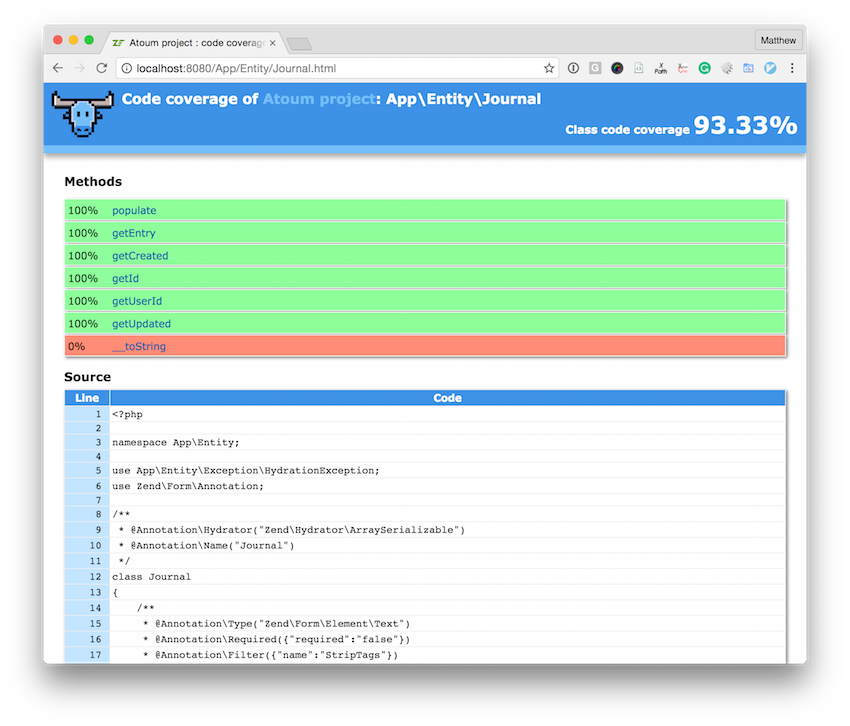
Each of the methods, bar __toString(), has 100% code coverage. Looking through the source, we see, highlighted in green, what has been covered, and in orange what is yet to be.
每个方法bar __toString()都有100%的代码覆盖率。 从源头上看,我们看到绿色覆盖了已覆盖的内容,橙色尚未显示。
This is why using a generated report is much more effective, because it provides a better understanding than the command line output.
这就是为什么使用生成的报告要有效得多的原因,因为与命令行输出相比,它提供了更好的理解。
调试测试 (Debugging Tests)
But, what if something goes wrong? Say for example, I hadn’t set a value for id in the $data array, or I expected it to match a different value. Given that, when I run it I’d expect to see an error like this one:
但是,如果出现问题怎么办? 例如,我没有在$data数组中为id设置值,或者我希望它与其他值匹配。 鉴于此,当我运行它时,我希望看到这样的错误:
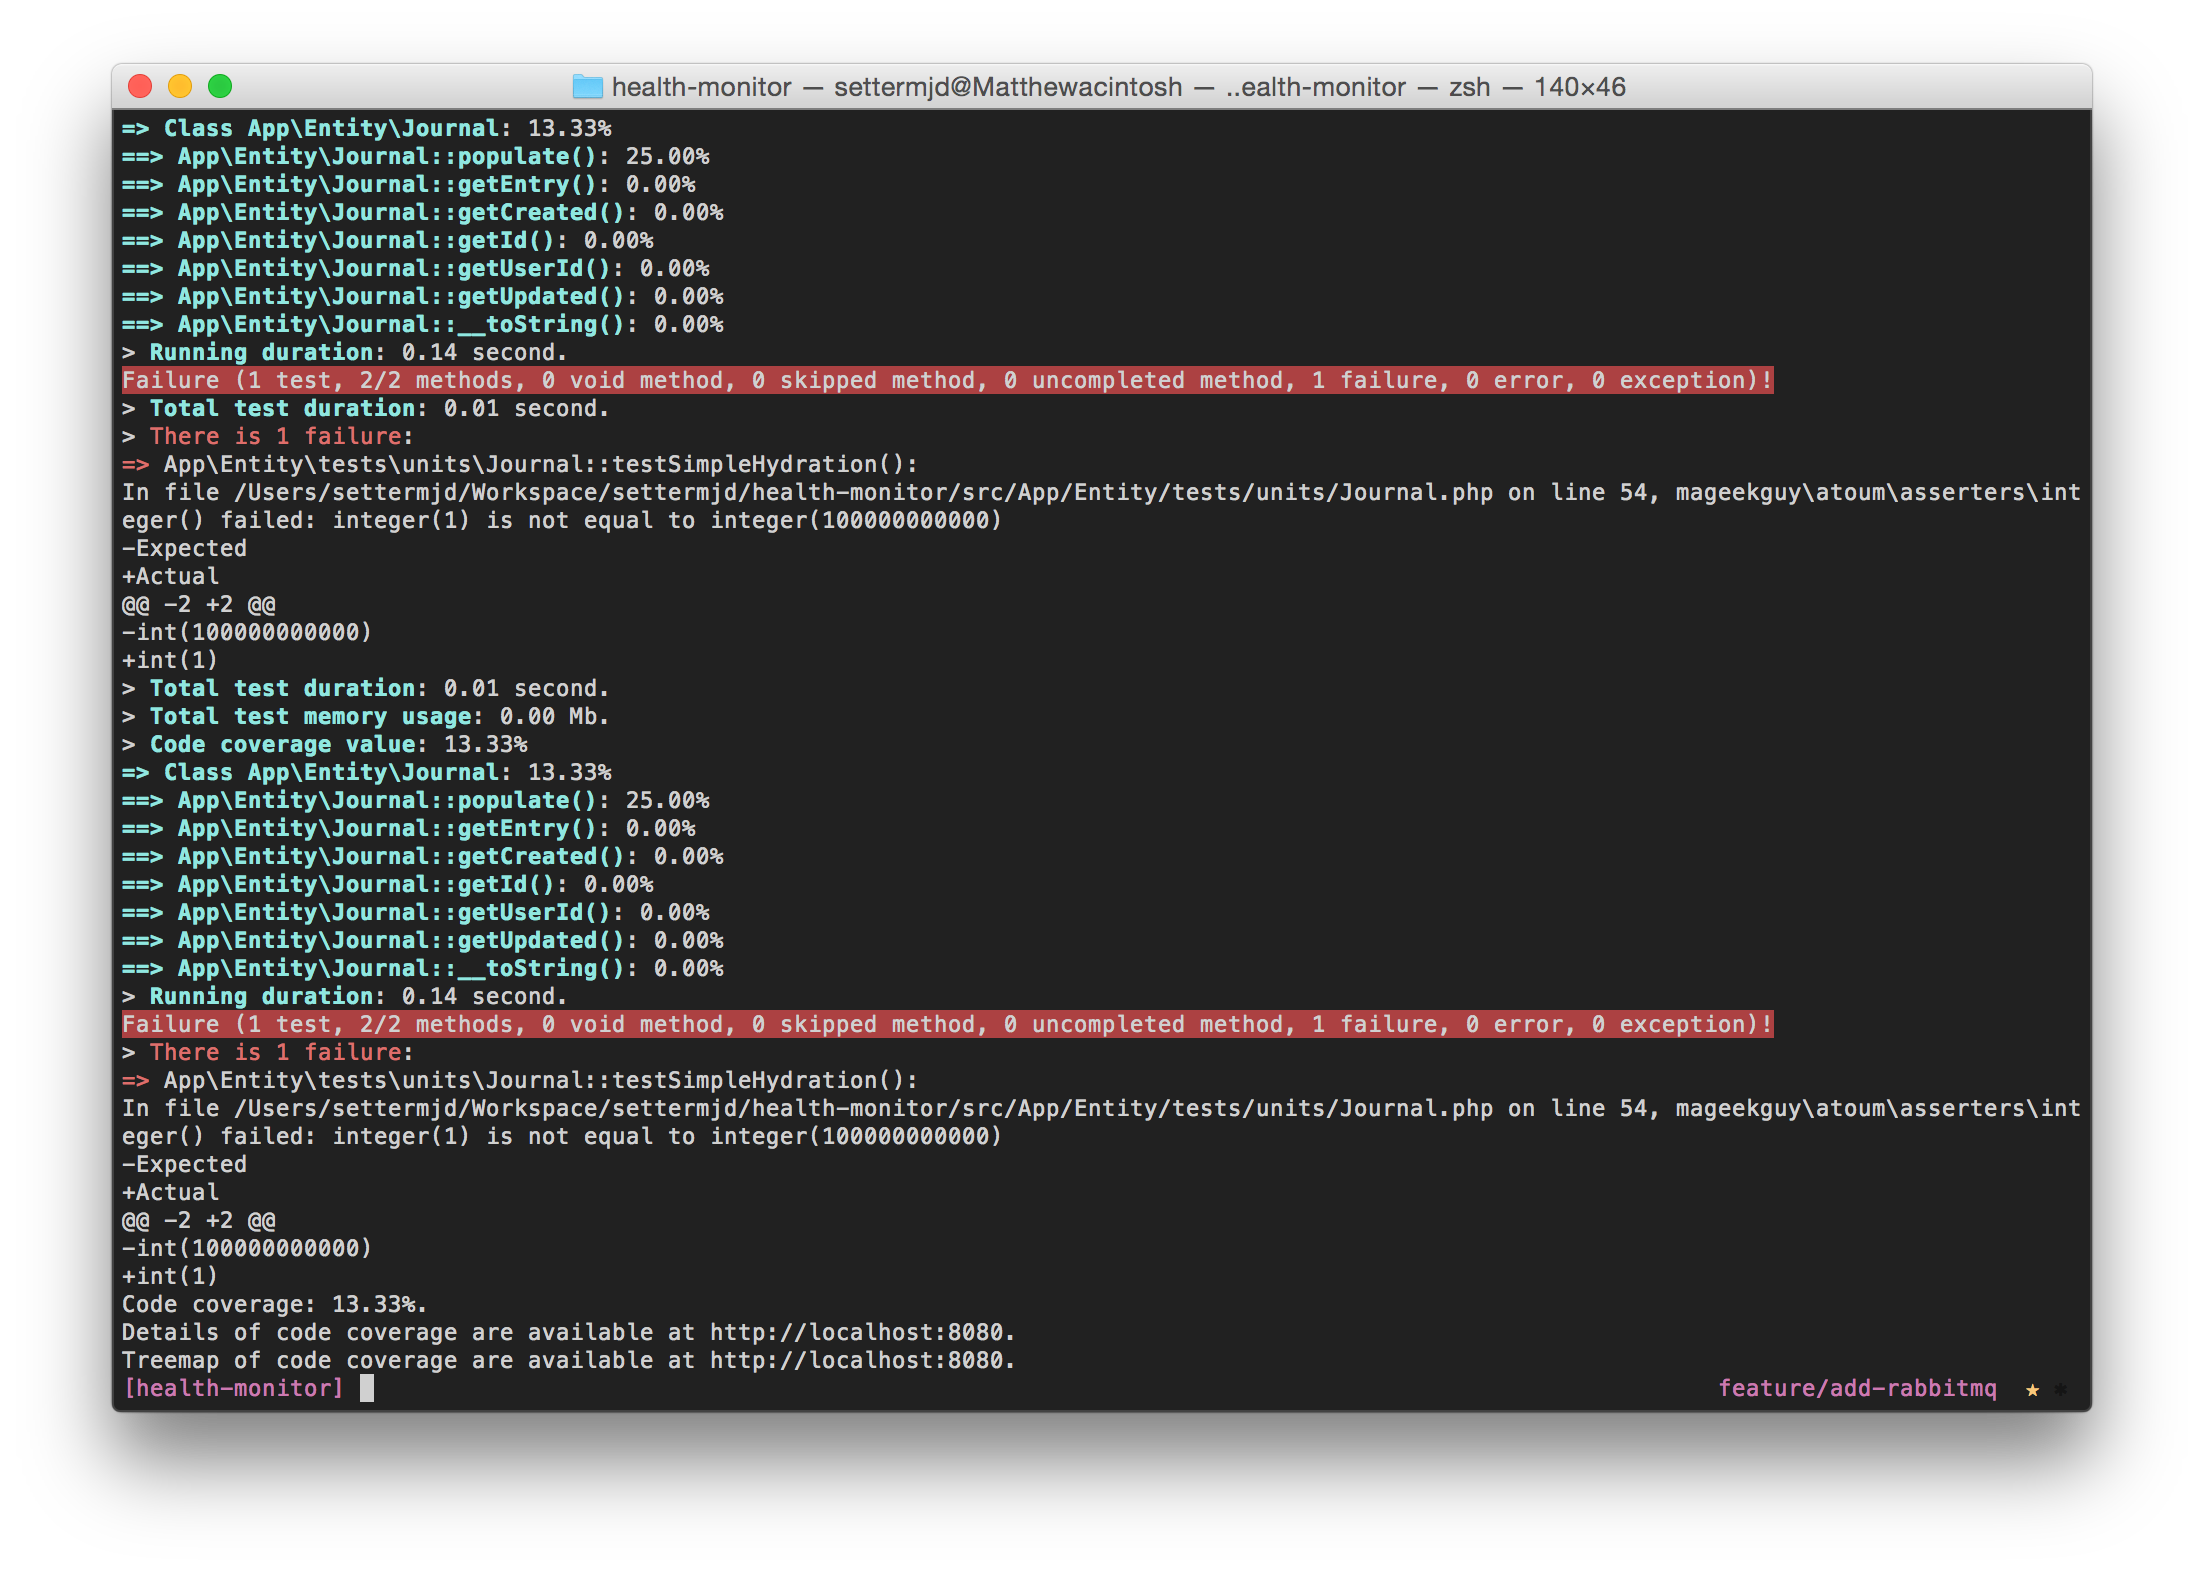
In this situation, it’s not always easy to see what’s going wrong. However, atoum offers a couple of options in this case. These come in the form of the dump(), stop(), and executeOnFailure() methods.
在这种情况下,很难总是看到问题所在。 但是,在这种情况下,atoum提供了两种选择。 这些以dump() , stop()和executeOnFailure()方法的形式出现。
I’ll focus on dump(), but feel free to have a look at the other two on your own. Dump, similar to PHP’s var_dump(), will dump out the contents of a variable to stdout, as part of running the test. To use it, I just have to add a call to it in the test, like so:
我将重点介绍dump() ,但您可以自己看看其他两个。 类似于PHP的var_dump() ,转储会将变量的内容转储到stdout ,作为运行测试的一部分。 要使用它,我只需要在测试中向它添加一个调用,如下所示:
$this
    ->dump($entity)
    ->object($entity)
    ->integer($entity->getId())->isEqualTo(100000000000)
    ->integer($entity->getUserId())->isEqualTo($data['userId'])
    ->string($entity->getEntry())->isEqualTo($data['entry'])
    ->dateTime($entity->getCreated())->isEqualTo($data['created'])
    ->dateTime($entity->getUpdated())->isEqualTo($data['updated'])
    ->dump($entity)
There is one thing to remember, though: the debug methods will only work if the tests are run in debug mode. To do that, we have to use either the -d or --debug switches when calling atoum. When you do so, you’ll see output similar to the following.
但是,要记住一件事:仅当测试以调试模式运行时,调试方法才有效。 为此,我们必须在调用atoum时使用-d或--debug开关。 这样做时,您将看到类似于以下的输出。
=> In App\Entity\tests\units\Journal::testSimpleHydration():
/Users/settermjd/Workspace/settermjd/health-monitor/vendor/atoum/atoum/classes/test.php:429:
class App\Entity\Journal#195 (5) {
  private $id =>
  int(1)
  private $userId =>
  int(3)
  private $entry =>
  string(165) "Reiciendis quod at voluptatem cupiditate error exercitationem at.
  Deserunt quos vero omnis est aliquam qui. Esse at quo dolorum fugit.
  Qui voluptas omnis amet nihil."
  private $created =>
  class DateTime#194 (3) {
    public $date =>
    string(26) "1992-06-18 01:55:51.000000"
    public $timezone_type =>
    int(3)
    public $timezone =>
    string(3) "UTC"
  }
  private $updated =>
  class DateTime#193 (3) {
    public $date =>
    string(26) "2016-09-28 08:27:18.000000"
    public $timezone_type =>
    int(3)
    public $timezone =>
    string(3) "UTC"
  }
}
You can see here the structure of the Journal entity and compare what you expected to receive to what was received.
您可以在此处查看Journal实体的结构,并将您希望收到的内容与收到的内容进行比较。
利用注释 (Making Use of Annotations)
针对不同版本PHP进行测试 (Testing against Different Versions of PHP)
What we’ve seen so far, could be argued, is fairly standard for a unit testing library. Now let’s finish up our initial tour of atoum, by looking at how it starts to come in to its own.
到目前为止,我们可以看到,对于单元测试库来说,这是相当标准的。 现在,让我们看一下它是如何开始成为自己的原子的,从而结束我们的初始原子之旅。
Say that you’re starting to refactor some of the existing libraries of your application to work with PHP 7, but they’re not ready for introduction in to the main branch, as that’s still highly dependent on PHP 5.6. Atoum can filter out tests for those aspects of code that can’t be tested against a given PHP runtime by using the @php annotation.
假设您已经开始重构应用程序中的某些现有库以与PHP 7一起使用,但是它们尚未准备好引入主分支,因为它仍然高度依赖PHP 5.6。 通过使用@php批注,Atoum可以筛选出无法针对给定PHP运行时进行测试的那些代码方面的测试。
Atoum, via the use of annotations, lets you specify the version of PHP in effect for a test to run. It does this via the @php annotation. For the methods that require PHP 7, we specify @php 7.0 in the PhpDoc block header. For all the other methods, we can leave them as is. If an entire test class required PHP 7, we could use this in the class’ annotation instead of using it for every test contained in the class.
通过使用批注,Atoum允许您指定有效PHP版本以运行测试。 它通过@php注释来实现。 对于需要PHP 7的方法,我们在PhpDoc块标题中指定@php 7.0 。 对于所有其他方法,我们可以保持原样。 如果整个测试类都需要PHP 7,则可以在类的批注中使用它,而不是对类中包含的每个测试都使用它。
Now this might seem like a strange thing to want to do. Naturally, if you have a class which makes more than a passing use of PHP 7, such as scalar type hints, if you run the script (or application) with anything other than PHP 7, then it will result in fatal errors. So I would suggest that this feature would be used when you are working through a porting process.
现在,这似乎是一件很奇怪的事情。 自然地,如果您拥有一个类,而不是仅仅使用了PHP 7,例如标量类型提示,那么,如果您使用PHP 7以外的任何内容运行脚本(或应用程序),则将导致致命错误。 因此,我建议您在移植过程中使用此功能。
扩展名 ( Extensions)
Now what if you need specific extensions for a test method to work? As with @php, we can specify @extensions. Say we need one, or a combination of the mbstring, PDO, and Xdebug extensions. We could use the @extensions annotation, as below, to require these extensions.
现在,如果您需要特定的扩展名才能使测试方法起作用,该怎么办? 与@php ,我们可以指定@extensions 。 假设我们需要mbstring,PDO和Xdebug扩展之一,或将其组合。 我们可以使用@extensions批注(如下所示)来要求这些扩展名。
/**
   * @extensions mbstring
   * Or
   * @extensions pdo xdebug
 */
Through making astute use of these annotations, we can start to create more sophisticated tests, as well as a more sophisticated test automation infrastructure; one which allows us to seamlessly migrate our application from PHP 5.6, through to 7.0 (or 7.1).
通过巧妙地使用这些注释,我们可以开始创建更复杂的测试以及更复杂的测试自动化基础结构。 一种允许我们将应用程序从PHP 5.6无缝移植到7.0(或7.1)的方法。
结论 (In Conclusion)
This has been a high-level overview of atoum, with some deep diving into a number of areas. There is far more on offer which I’ve not been able to cover, such as the extensions.
这是对原子层的高层次概述,并深入了许多领域。 还有很多我无法涵盖的内容,例如扩展名。
There’s [the visibility extension])(https://github.com/atoum/visibility-extension) which allows for testing protected and private methods. There’s the ruler extension which allows for filtering the tests which are run. Then there’s the Blackfire extension, which allows you to write Blackfire test suites using atoum.
[可见性扩展])(https://github.com/atoum/visibility-extension)允许测试受保护的方法和私有方法。 标尺扩展允许过滤运行的测试。 然后是Blackfire扩展程序 ,该扩展程序允许您使用atoum编写Blackfire测试套件。
On top of that, there’s CI server integration, as atoum can be integrated with Hudson, Jenkins, and TravisCI, amongst others.
最重要的是,还有CI服务器集成 ,因为atoum可以与Hudson,Jenkins和TravisCI等集成。
But don’t let this introduction be all that you discover. Whilst atoum is newer than PHP’s de facto testing library, PHPUnit, I think it’s a library well worth considering — especially if the way PHPUnit works isn’t quite how you like it.
但是,不要让此介绍成为您发现的全部。 尽管atoum比PHP的事实上的测试库PHPUnit更新,但我认为这是一个值得考虑的库-特别是如果PHPUnit的工作方式并不完全符合您的喜好。
Keep in mind that this project has a strong community, several release managers, and a core development team. There’s a lot to it, and getting started is not as intuitive as I’d have liked. However — once you’re up and running, it can really grow on you!
请记住,这个项目有一个强大的社区,几个发布经理和一个核心开发团队。 有很多东西,而且入门并不像我想要的那样直观。 但是,一旦您启动并运行,它便可以真正在您身上成长!
If this tutorial’s whet your appetite, be sure to check out the online documentation, where you can find much more information about all aspects of the library.
如果您对本教程感兴趣,请务必查看在线文档 ,在该文档中您可以找到有关库的所有方面的更多信息。
What do you think about atoum? Did you give it a go? Will you?
您如何看待原子核? 你有去吗? 你会?
链接 (Links)
- https://github.com/atoum/bdd-extension https://github.com/atoum/bdd-extension
- https://github.com/atoum/visibility-extension https://github.com/atoum/visibility-extension
- https://github.com/atoum/json-schema-extension https://github.com/atoum/json-schema-extension
- https://github.com/atoum/ruler-extension https://github.com/atoum/ruler-extension
- https://github.com/atoum/atoum https://github.com/atoum/atoum
翻译自: https://www.sitepoint.com/testing-php-code-with-atoum-an-alternative-to-phpunit/


 135
135

 被折叠的 条评论
为什么被折叠?
被折叠的 条评论
为什么被折叠?
 到【灌水乐园】发言


