In Part 1 of this tutorial – the Retro Revolution: Building a Pong Clone in Unity – we created a Pong clone with basic artificial intelligence (AI) and almost no user interface (UI).
在本教程的第1部分(《 复古革命:在Unity中构建Pong克隆》)中 ,我们创建了具有基本人工智能(AI)和几乎没有用户界面(UI)的Pong克隆。
In this tutorial, we’ll build upon our previously created clone and update it so that it will look identical to classic Pong, have basic UI, and have improved gameplay.
在本教程中,我们将基于之前创建的克隆并进行更新,使其与经典Pong相同,具有基本的UI,并改善了游戏玩法。
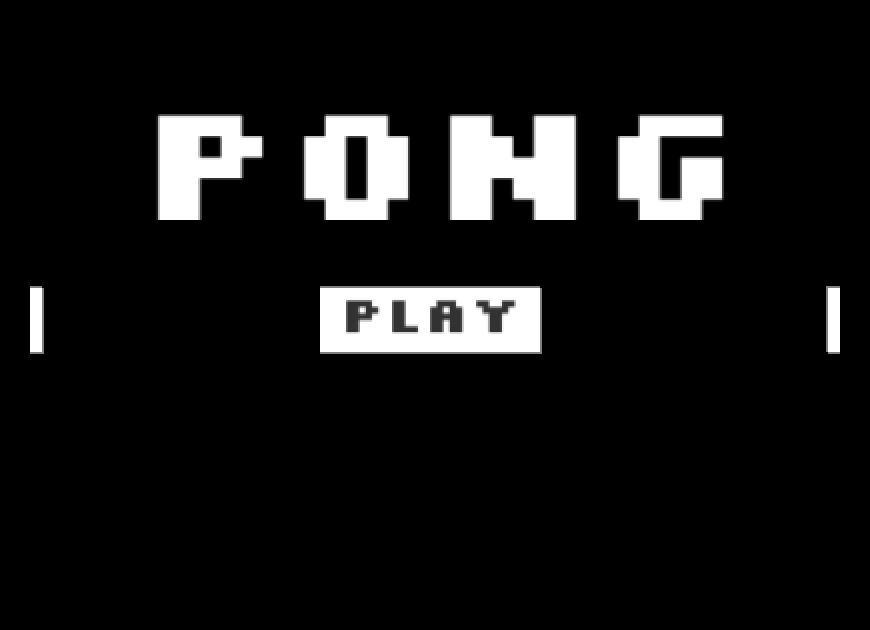
Let’s jump right in, but first, please either go through the original tutorial, or just download the resulting project from GitHub if you’d like to follow along. (You can also view the working demo. Or, if you prefer, play the improved game, which is the result of this article.
让我们开始吧,但是首先,如果您想继续学习,请阅读原始教程,或者直接从GitHub 下载生成的项目 。 (您也可以查看正在运行的演示 。或者,如果愿意,可以玩改进的游戏 ,这是本文的结果。
造型游戏 (Styling the Game)
Classic Pong is traditionally black and white, so we must get rid of the colored elements in our Pong.
传统乒乓球传统上是黑白的,因此我们必须摆脱乒乓球中的彩色元素。
This also means we need to import new sprites into the Unity project (by dragging them into the Sprites folder in the Assets pane). If you’re following along, feel free to use these examples from the demo code.
这也意味着我们需要将新的精灵导入Unity项目中(通过将它们拖动到Assets窗格的Sprites文件夹中)。 如果您要继续学习,请随时使用演示代码中的这些示例 。
After importing the new sprites into Unity, we should select both sprites in the Assets pane and change their pixels per unit to 64. We must also hit Apply for the changes to take effect.
将新的精灵导入Unity之后,我们应该在Assets窗格中选择两个Sprite,并将其每单位像素更改为64 。 我们还必须点击“ 应用”以使更改生效。
Now that we have our images, we can start updating our Pong Clone. First, we should change the color of the Main Camera’s background to black. This can be done by clicking on the color bar next to the word Background in the Main Camera’s inspector pane. Next, we need to change the color of the paddles. We should select the Player game object in the hierarchy pane and drag the white square sprite into the Sprite attribute’s value in the Sprite Renderer element. Now we should do the same for the Enemy game object.
现在我们有了图像,我们可以开始更新Pong Clone。 首先,我们应该将主摄像机背景的颜色更改为黑色。 这可以通过单击“主摄像机”检查器窗格中“ 背景 ”一词旁边的颜色栏来完成。 接下来,我们需要更改桨的颜色。 我们应该在层次结构窗格中选择“ Player”游戏对象,然后将白色方形Sprite拖动到Sprite Renderer元素中Sprite属性的值中。 现在,我们应该对敌人游戏对象执行相同的操作。
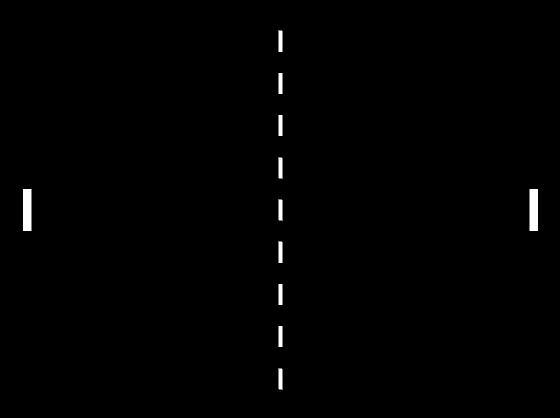
In order to create the nice middle bar in Pong (see below), we need to create an empty game object (right-click in hierarchy -> create empty) and name it MiddleBar
. The Middle Bar game object should have an X of 0 and a Y of 0, so that it’s located in the center of the screen. We can now drag the white square sprite onto the Middle Bar game object to make white squares that are children of the Middle Bar Game object. All of the children’s X scales should be low so that they look like skinny, white sticks.
为了在Pong中创建漂亮的中间条( 请参见下文 ),我们需要创建一个空的游戏对象(在层次结构中单击鼠标右键-> create empty )并将其命名为MiddleBar
。 Middle Bar游戏对象的X应该为0 ,Y应该为0 ,以便它位于屏幕的中心。 现在,我们可以将白色正方形精灵拖动到“中间条游戏”对象上,以制作作为“中间条游戏”对象的子级的白色正方形。 所有儿童的X刻度都应低一些,以使其看起来像是瘦的白色棍子。
Finally, we need to change the ball’s sprite so that instead of a grey circle it will be a white circle. If we go to the the ball prefab (located in the Prefabs folder), we can select it and change its sprite as we did with the Player and Enemy, except using the white circle sprite.
最后,我们需要更改球的精灵,以使它不是白色的圆圈而是白色的圆圈。 如果转到球形预制件(位于Prefabs文件夹中),则可以选择它并像使用Player和Enemy一样更改其精灵,除了使用白色圆圈精灵。
改善碰撞 (Making Collision Better)
When playing the Pong clone from the last tutorial we can observe a few bugs with the collisions. Sometimes the ball may shoot off at a weird angle, or the ball’s reaction to hitting an object may make the ball fly straight back instead of at an angle. To fix this, we need to add code to the ball that allows the ball to calculate the angle it hits a paddle at and bounce off the paddle according to that angle. Let’s open the BallController script located in the Scripts folder. With the BallController script open, we should make its OnCollisionEnter2D method look like the one below:
在上一教程中播放Pong克隆时,我们可以观察到一些与碰撞有关的错误。 有时,球可能会以怪异的角度射出,或者球对撞击物体的React可能会使球笔直向后飞,而不是成一定角度。 要解决此问题,我们需要向球添加代码,以使球能够计算出球击中桨的角度并根据该角度弹起桨。 让我们打开位于Scripts文件夹中的BallController脚本。 在BallController脚本打开的情况下,我们应使其OnCollisionEnter2D方法类似于以下方法:
void OnCollisionEnter2D(Collision2D col) {

        //tag check
        if (col.gameObject.tag == "Enemy") {
            //calculate angle
            float y = launchAngle(transform.position,
                                col.transform.position,
                                col.collider.bounds.size.y);

            //set angle and speed
            Vector2 d = new Vector2(1, y).normalized;
            rig2D.velocity = d * speed * 1.5F;
        }

        if (col.gameObject.tag == "Player") {
            //calculate angle
            float y = launchAngle(transform.position,
                                col.transform.position,
                                col.collider.bounds.size.y);

            //set angle and speed
            Vector2 d = new Vector2(-1, y).normalized;
            rig2D.velocity = d * speed * 1.5F;
        }
    }

    //calculates the angle the ball hits the paddle at
    float launchAngle(Vector2 ball, Vector2 paddle,
                    float paddleHeight) {
        return (ball.y - paddle.y) / paddleHeight;
    }
All we need to do now is create a tag for the Enemy paddle and add a tag to the Player paddle so that the ball can know which is which. If we select the Enemy game object from the hierarchy pane and click Untagged in the Inspector pane under the Enemy’s name, a drop down will appear. We can click on Add Tag to view the Tags and Layers menu. By clicking on the + symbol we can add a tag named Enemy to our list of tags. Now let’s select the Enemy game object again, click untagged, and then click Enemy to set its tag to Enemy. For the Player game object, all we have to do is select the game object, click untagged, and then click the Player tag, since Unity creates a Player tag for us when the project is first created.
现在我们需要做的就是为敌人球拍创建一个标签,并向玩家球拍添加一个标签,以便球可以知道是哪个。 如果我们从层次结构窗格中选择“敌人”游戏对象,然后在“检查器”窗格中单击“敌人”名称下的“未标记” ,则会出现一个下拉列表。 我们可以单击“ 添加标签”以查看“标签和图层”菜单。 通过单击+符号,我们可以将名为Enemy的标签添加到标签列表中。 现在,让我们再次选择“敌人”游戏对象,单击“未加标签”,然后单击“敌人”以将其标签设置为“敌人”。 对于Player游戏对象,我们要做的就是选择游戏对象,单击untagged,然后单击Player标签,因为在首次创建项目时Unity为我们创建了Player标签。
改善敌人的AI (Improving Enemy AI)
The previous tutorial’s enemy AI was a simplified version of the AI we’ll be using in this tutorial. The old AI moved based on the ball’s Y position, but had a low speed so that the paddle wouldn’t bounce or shake. In the new AI, we’ll still be using the ball’s Y position as the basis for our code, but we’ll make it so that the paddle moves based on time. This allows for the paddle to be able to move in quick bursts that human eyes will barely be able to follow. If the timing and speed values are done correctly (or even close enough to perfect) the enemy paddle’s movement will look almost completely smooth.
上一个教程的敌人AI是我们将在本教程中使用的AI的简化版本。 旧的AI根据球的Y位置移动,但是速度较慢,因此桨叶不会反弹或摇动。 在新的AI中,我们仍将球的Y位置用作代码的基础,但我们将其设置为使桨根据时间移动。 这使桨能够快速爆发,而人眼几乎无法跟随。 如果正时和速度值正确设置(甚至足够接近以至完美),敌人的桨叶运动将看起来几乎完全平滑。
We’ll also be adding a bit of range to the enemy paddle’s movement, so that instead of being directly equal to the ball’s Y position, the paddle will have a slight range that still allows the paddle to hit the ball and also allows the ball to hit different spots on the paddle.
我们还将在敌方球拍的运动中增加一点射程,以使球拍不会直接等于球的Y位置,而是会具有一个很小的范围,该范围仍然允许球拍击球并且还允许球打在桨上的不同位置。
If we open the EnemyController script and change it to look like the code below, we’ll get the results that we want:
如果打开EnemyController脚本并将其更改为类似于下面的代码,我们将获得所需的结果:
// Use this for initialization
    void Start () {
        //Continuously Invokes Move every x seconds (values may differ)
        InvokeRepeating("Move", .02F, .02F);
    }

    // Movement for the paddle
    void Move () {

        //finding the ball
        if(ball == null){
            ball = GameObject.FindGameObjectWithTag("Ball").transform;
        }

        //setting the ball's rigidbody to a variable
        ballRig2D = ball.GetComponent<Rigidbody2D>();

        //checking x direction of the ball
        if(ballRig2D.velocity.x < 0){

            //checking y direction of ball
            if(ball.position.y < this.transform.position.y-.5F){
                //move ball down if lower than paddle
                transform.Translate(Vector3.down*speed*Time.deltaTime);
            } else if(ball.position.y > this.transform.position.y+.5F){
                //move ball up if higher than paddle
                transform.Translate(Vector3.up*speed*Time.deltaTime);
            }

        }

        //set bounds of enemy
        if(transform.position.y > topBound){
            transform.position = new Vector3(transform.position.x, topBound, 0);
        } else if(transform.position.y < bottomBound){
            transform.position = new Vector3(transform.position.x, bottomBound, 0);
        }
    }
Note: Making the InvokeRepeating method’s time longer slows the paddle down but adds a jittery effect. Mixing the paddle’s speed between 1 and 4 (floating point numbers) and the InvokeRepeating’s time between .1 and .3 has worked best from my testing.
注意:延长InvokeRepeating方法的时间会减慢拨片的速度,但会增加抖动效果。 在我的测试中,最好将桨叶的速度混合在1和4(浮点数)之间,将InvokeRepeating的时间混合在.1和.3之间。
Even though this updated code is better than the old code, we still want the enemy paddle to be able to get to the ball when the ball first spawns. To fix this, we’ll need the enemy paddle to reset its position once the ball is destroyed. We can accomplish this by opening the BoundsController script and changing it to look like this:
尽管此更新的代码比旧代码更好,但是我们仍然希望在球第一次生成时,敌人的桨能够到达球上。 要解决此问题,一旦球被破坏,我们将需要敌人的桨来重置其位置。 我们可以通过打开BoundsController脚本并将其更改为以下形式来完成此操作:
//enemy transform
public Transform enemy;

    void OnTriggerEnter2D(Collider2D other){
        if(other.gameObject.tag == "Ball"){

            //Destroys other object
            Destroy(other.gameObject);

            //sets enemy's position back to original
            enemy.position = new Vector3(-6,0,0);

            //pauses game
            Time.timeScale = 0;
        }
    }
We also need to make sure to drag the Enemy paddle from the hierarchy into the Enemy transform value on both bounding objects, or else we’ll get a Null Reference Exception.
我们还需要确保将Enemy桨从层次结构中拖动到两个边界对象上的Enemy变换值中,否则我们将获得Null Reference Exception。
创建暂停菜单 (Creating a Pause Menu)
The pause functionality for this Pong clone is going to be slightly different from the functionality in my Dodger tutorial. Since this game has text that will appear when the ball is destroyed and when the player pauses the game, we have to specifically target this text using Unity’s gameObject.name variable to set its active state. We’ll also be adding a custom font from Font Squirrel to the game, to give it a more retro feel.
此Pong克隆的暂停功能将与我的Dodger教程中的功能稍有不同。 由于此游戏中的文字会在球被破坏且玩家暂停游戏时出现,因此我们必须使用Unity的gameObject.name变量来专门针对此文字设置其活动状态。 我们还将在游戏中添加Font Squirrel的自定义字体,以使其具有更复古的感觉。
制作复古暂停菜单 (Making a Retro Pause Menu)
In order to add a custom font to Unity, we need to download it to our computer and then import it into Unity via drag and drop. First, we need to download SilkScreen (not a download link) and then unzip the downloaded file. After unzipping the file, we can see that there are a number of different types of SilkScreen. For the sake of this tutorial, we’ll be using slkscreb.ttf. We don’t need to install the font into our computer. Instead, let’s make a folder in the Assets pane named Fonts. Now we can open the Fonts folder and drag the the slkscreb.ttf file into the Assets pane.
为了将自定义字体添加到Unity,我们需要将其下载到计算机上,然后通过拖放将其导入到Unity中。 首先,我们需要下载SilkScreen ( 而不是下载链接 ),然后将下载的文件解压缩。 解压缩文件后,我们可以看到有许多不同类型的SilkScreen。 为了本教程的缘故,我们将使用slkscreb.ttf 。 我们不需要将字体安装到我们的计算机中。 相反,让我们在“资源”窗格中创建一个名为“字体”的文件夹。 现在,我们可以打开Fonts文件夹,并将slkscreb.ttf文件拖到Assets窗格中。
With SilkScreen added to Unity, we can now begin working on our pause menu. Our menu will be aligned to the top (see below) and will feature two buttons and the text from the last article:
将SilkScreen添加到Unity后,我们现在可以开始使用暂停菜单了。 我们的菜单将与顶部对齐(请参见下文),并具有两个按钮和上一篇文章的文字:
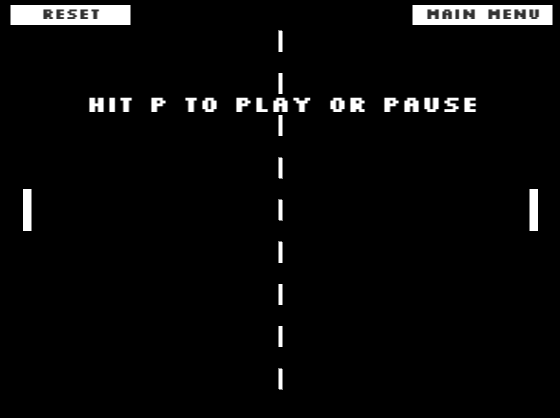
We should now create a button game object named ResetButton. In order to stick to the traditional theme we’ve set for ourselves, we should replace the button’s Source Image attribute (located in the Inspector under the Image element) with the white square sprite. We can do this by dragging the white square sprite from the Sprites folder into the value for the Source Image attribute. Now we should see that the button is a white rectangle without rounded corners.
现在,我们应该创建一个名为ResetButton的按钮游戏对象。 为了坚持我们为自己设置的传统主题,我们应该用白色方形精灵替换按钮的Source Image属性(位于Inspector中位于Image元素下方)。 我们可以通过将Sprites文件夹中的白色方形Sprite拖动到Source Image属性的值中来实现。 现在我们应该看到按钮是一个没有圆角的白色矩形。
Next, we need to change the font on the button to the more pixelated SilkScreen font. If we select the child text object from the hierarchy, we can make the text object’s text property look like the values below:
接下来,我们需要将按钮上的字体更改为像素化程度更高的SilkScreen字体。 如果从层次结构中选择子文本对象,则可以使文本对象的text属性看起来像下面的值:
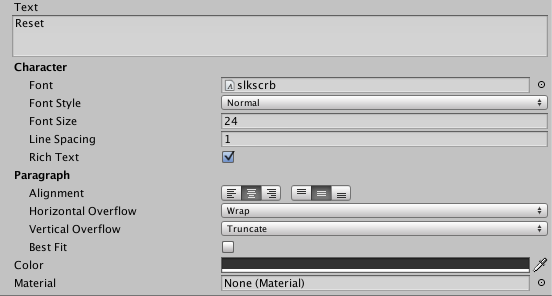
Note: To change the Font of the text we can simply drag the slkscreb.ttf file from the Assets pane into the Font attribute’s value. Also note that the font’s size may be different for everybody.
注意:要更改文本的字体,我们可以简单地将slkscreb.ttf文件从“资产”窗格拖动到“字体”属性的值中。 另请注意,每个人的字体大小可能有所不同。
To create the Main Menu button, we can select the Reset button in the hierarchy and duplicate it (command/ctrl + d or right-click -> duplicate). Now all we have to do is name the duplicated button MainMenuButton. We should align each button to its respective area on the screen (Reset to the top left, Main Menu to the top right).
要创建“主菜单”按钮,我们可以在层次结构中选择“重置”按钮并将其复制( command / ctrl + d或单击鼠标右键->复制 )。 现在,我们要做的就是将重复的按钮命名为MainMenuButton。 我们应该将每个按钮与屏幕上的相应区域对齐(“重置”在左上方,“主菜单”在右上方)。
Next we can style the text created from the last tutorial. If the text is not named PauseText already, we should change it to PauseText. We should also change the Font attribute from Arial to our SilkScreen font. Let’s make sure the text is white and is centered. Finally, we need to align it to the middle of the screen, slightly above the center.
接下来,我们可以为上一教程中创建的文本设置样式。 如果该文本尚未命名为PauseText,则应将其更改为PauseText。 我们还应该将Font属性从Arial更改为SilkScreen字体。 让我们确保文本为白色且居中。 最后,我们需要将其与屏幕中间对齐,略高于中心。
向暂停菜单添加功能 (Adding Functionality to the Pause Menu)
We’ve created a retro styled pause menu, but right now it’s constantly on screen when the game is played, and the buttons don’t do anything when they’re clicked. In order to add functionality to our menu, we should create an empty game object named UIManager. Now let’s create a script named UIManager and open it inside our IDE. For complete functionality, we can add the code below to our script:
我们已经创建了具有复古风格的暂停菜单,但是现在在玩游戏时它会一直显示在屏幕上,并且单击按钮后它们什么也没做。 为了向菜单添加功能,我们应该创建一个名为UIManager的空游戏对象。 现在,我们创建一个名为UIManager的脚本,并在我们的IDE中打开它。 为了获得完整的功能,我们可以将以下代码添加到脚本中:
GameObject[] pauseObjects;

    // Use this for initialization
    void Start () {
        pauseObjects = GameObject.FindGameObjectsWithTag("ShowOnPause");
    }

    // Update is called once per frame
    void Update () {

        //uses the p button to pause and unpause the game
        if(Input.GetKeyDown(KeyCode.P))
        {
            if(Time.timeScale == 1)
            {
                Time.timeScale = 0;
                showPaused();
            } else if (Time.timeScale == 0){
                Time.timeScale = 1;
                hidePaused();
            }
        }


        if(Time.timeScale == 0){
            //searches through pauseObjects for PauseText
            foreach(GameObject g in pauseObjects){
                if(g.name == "PauseText")
                    //makes PauseText to Active
                    g.SetActive(true);
            }
        } else {
            //searches through pauseObjects for PauseText
            foreach(GameObject g in pauseObjects){
                if(g.name == "PauseText")
                    //makes PauseText to Inactive
                    g.SetActive(false);
            }
        }
    }


    //Reloads the Level
    public void Reload(){
        Application.LoadLevel(Application.loadedLevel);
    }

    //controls the pausing of the scene
    public void pauseControl(){
        if(Time.timeScale == 1)
        {
            Time.timeScale = 0;
            showPaused();
        } else if (Time.timeScale == 0){
            Time.timeScale = 1;
            hidePaused();
        }
    }

    //shows objects with ShowOnPause tag
    public void showPaused(){
        foreach(GameObject g in pauseObjects){
            g.SetActive(true);
        }
    }

    //hides objects with ShowOnPause tag
    public void hidePaused(){
        foreach(GameObject g in pauseObjects){
            g.SetActive(false);
        }
    }

    //loads inputted level
    public void LoadLevel(string level){
        Application.LoadLevel(level);
    }
This UIManager is very similar to the UIManager from the Dodger tutorial series. The main difference is inside the Update() method. We added code that looks through the pauseObjects array for the pause text by using a foreach loop to look for an object named PauseText. Once found, it sets the pause text’s active state dependent on the time scale of the game.
该UIManager与Dodger教程系列中的UIManager非常相似。 主要区别在于Update()方法内部。 我们添加了代码,该代码通过使用foreach循环查找名为PauseText的对象,通过pauseObjects数组查找暂停文本。 一旦找到,它将根据游戏的时间范围设置暂停文本的活动状态。
Now that we’ve written our script, let’s add it to the UIManager game object inside Unity by dragging it onto the game object. To hide our menu when the screen is paused, we should make the buttons and pause text’s tags ShowOnPause. This means we need to create a new tag ShowOnPause for each of the objects.
现在,我们已经编写了脚本,我们将其拖动到游戏对象上,以将其添加到Unity中的UIManager游戏对象中。 要在屏幕暂停时隐藏菜单,我们应该按下按钮并暂停文本的ShowOnPause标签。 这意味着我们需要为每个对象创建一个新标签ShowOnPause。
With the tags added and the UIManager script attached to the UIManager game object, we can now pause the game to view our menu. We can also see that the pause text appears when the game is paused or when the ball is destroyed.
添加标签并在UIManager游戏对象上附加UIManager脚本后,我们现在可以暂停游戏以查看菜单。 我们还可以看到,当游戏暂停或球被破坏时,会显示暂停文本。
To finish up the menu, we need to add our methods to the buttons. We can select the Reset button and hit the + symbol on the OnClick() menu located in the Inspector under the Button element. Now we can drag the UIManager game object from the Hierarchy pane to the first input box. If we click the second dropdown box and select UIManager -> Reload, the Reload() function will be added to the button. The OnClick() menu should look like this:
要完成菜单,我们需要将我们的方法添加到按钮中。 我们可以选择“重置”按钮,然后在“检查器”中位于Button元素下方的OnClick()菜单上单击+符号。 现在,我们可以将UIManager游戏对象从“层次结构”窗格拖到第一个输入框。 如果单击第二个下拉框并选择UIManager-> Reload ,则Reload()函数将添加到该按钮。 OnClick()菜单应如下所示:

For the Main Menu button we can do the same as above, but add the LoadLevel() method instead. With the LoadLevel() method added, we’ll see a box appear that will allow us to add our string parameter. Inside the box we can type MainMenu, so that our Main Menu scene will be loaded when the button is clicked. The Main Menu button’s OnClick() menu should look like this:
对于Main Menu(主菜单)按钮,我们可以执行与上述相同的操作,但是添加LoadLevel()方法。 添加LoadLevel()方法后,我们将看到一个框,该框允许我们添加字符串参数。 在该框内,我们可以键入MainMenu,以便在单击按钮时将加载Main Menu场景。 主菜单按钮的OnClick()菜单应如下所示:

修复暂停功能 (Fixing the Pause Functionality)
Now that we’ve added our menu and UIManager, we’ve fixed some problems and added a problem. If we try to pause the game, we may notice (this may be dependent on the Unity version) that the pause doesn’t work. This is because we have two different scripts setting the screen’s time scale, thus causing them to cancel each other out. To fix this, we can open the PlayerController script and delete the code below:
现在,我们已经添加了菜单和UIManager,我们已经修复了一些问题并添加了一个问题。 如果我们尝试暂停游戏,我们可能会注意到(这取决于Unity版本)暂停不会起作用。 这是因为我们有两个不同的脚本来设置屏幕的时间刻度,从而使它们彼此抵消。 要解决此问题,我们可以打开PlayerController脚本并删除以下代码:
//pauses or plays game when player hits p
        if(Input.GetKeyDown(KeyCode.P) && Time.timeScale == 0){
            Time.timeScale = 1;
        } else if(Input.GetKeyDown(KeyCode.P) && Time.timeScale == 1){
            Time.timeScale = 0;
        }
添加主菜单 (Adding a Main Menu)
For this Pong clone, we’ll be creating an interesting main menu. This scene won’t be a static scene with just text and a play button. We’re going to add simulated gameplay to the background of our main menu. This means when players first open the game, they see the UI elements that we put in the scene, as well as two AI paddles playing against each other.
对于此Pong克隆,我们将创建一个有趣的主菜单。 该场景将不是仅带有文本和播放按钮的静态场景。 我们将在主菜单的背景中添加模拟的游戏玩法。 这意味着,当玩家首次打开游戏时,他们会看到我们放置在场景中的UI元素,以及两个彼此对战的AI球拍。
创建场景 (Creating the Scene)
To start making our main menu, we need a new scene. Instead of creating a whole new scene, we’re going to duplicate our current scene. We should make sure our scene is saved before we continue.
要开始制作主菜单,我们需要一个新场景。 除了创建一个新场景之外,我们将复制当前场景。 在继续之前,我们应确保场景已保存。
With the scene saved, we can now select it in the Assets pane and duplicate it (command/ctrl + d). Now let’s rename the duplicate to MainMenu and open it (by double clicking).
保存场景后,我们现在可以在“资源”窗格中选择它并复制它( command / ctrl + d )。 现在,让我们将重复项重命名为MainMenu并打开它(通过双击)。
Inside the Main Menu scene we should disable/delete the BallSpawner game object, the MiddleBar game object, the LeftBound game object, the RightBound game object, and the pause menu game objects from the hierarchy. We’re deleting these because they’re not needed, and may get in the way of the UI we’ll be adding.
在主菜单场景中,我们应该从层次结构中禁用/删除BallSpawner游戏对象,MiddleBar游戏对象,LeftBound游戏对象,RightBound游戏对象和暂停菜单游戏对象。 我们删除这些是因为它们不是必需的,并且可能会妨碍我们添加的UI。
添加UI (Adding the UI)
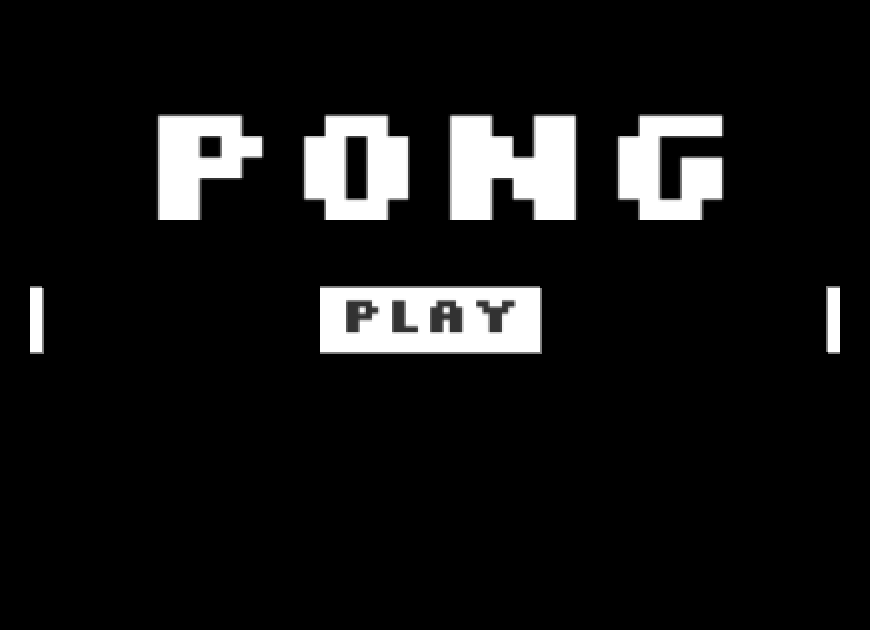
The main menu’s UI will be kept minimalistic. We’ll have a large title text that displays the word Pong and a button that says play.
主菜单的UI将保持简约。 我们将有一个大标题文本显示乒乓球字样和一个播放按钮。
We can begin by creating a text object named TitleText. The title text’s text element should have the attribute values as shown below:
我们可以从创建一个名为TitleText的文本对象开始。 标题文本的text元素应具有如下所示的属性值:
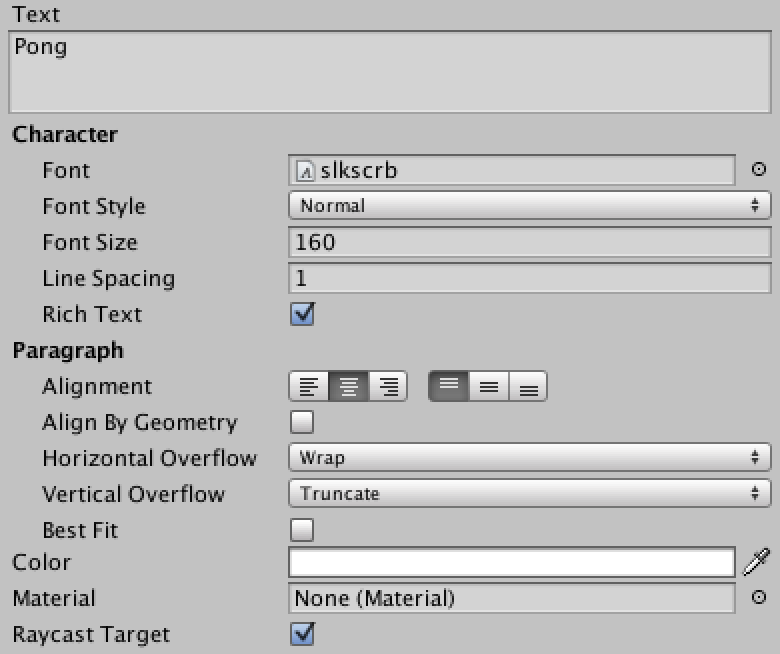
Next, we can create a button object and name it PlayButton. We should change the play button’s source image to the white square sprite. Let’s also add the LoadLevel() method to the play button with the string parameter being the name of our play scene. We can check the name of our play scene by finding it in the Assets pane or going to File -> Build Settings (the play scene should be the only one listed; if not, then it’s the top-most scene). The child text object’s properties should be the same as the title text’s, except the text should be kept gray and will be of a different font size.
接下来,我们可以创建一个按钮对象并将其命名为PlayButton。 我们应该将播放按钮的源图像更改为白色方形精灵。 让我们还将LoadLevel()方法添加到播放按钮,并使用字符串参数作为播放场景的名称。 我们可以通过在“资产”窗格中找到播放场景的名称或转到“ 文件”->“构建设置”来检查播放场景的名称(播放场景应该是列出的唯一一个;如果不是,则它是最顶层的场景)。 子文本对象的属性应与标题文本的属性相同,只是该文本应保持灰色并且字体大小不同。
Finally, we need to align the UI elements into a spot we like, such as below:
最后,我们需要将UI元素对齐到我们喜欢的位置,如下所示:
添加模拟游戏 (Adding Simulated Gameplay)
In order to simulate gameplay in the background of our main menu, we’ll need to add AI to the paddles that is similar to the AI we used for the Enemy in the play level. We’ll also need to add a ball so that AI paddles can play.
为了在主菜单的背景中模拟游戏玩法,我们需要向桨中添加AI,类似于在游戏级别中用于敌人的AI。 我们还需要添加一个球,以便AI球拍可以玩。
First, let’s add a ball to the scene by going to the Prefabs folder in the Assets pane and adding the ball prefab. We should make sure its transform position is X:0 Y:0 Z:0 so that it’s centered on the screen.
首先,通过转到“资源”窗格中的Prefabs文件夹并添加球预制件,将球添加到场景中。 我们应确保其变换位置为X:0 Y:0 Z:0 ,以使其在屏幕上居中。
Inside the Scripts folder in the Assets pane we need to create a new script named AutoPlayer, and then open it in our IDE. The AutoPlayer script should contain the code below:
在Assets窗格中的Scripts文件夹内,我们需要创建一个名为AutoPlayer的新脚本,然后在我们的IDE中将其打开。 AutoPlayer脚本应包含以下代码:
//Speed of the AI
    public float speed = 2.75F;

    //the ball
    Transform ball;

    //the ball's rigidbody 2D
    Rigidbody2D ballRig2D;

    //bounds of AI
    public float topBound = 4.5F;
    public float bottomBound = -4.5F;

    // Use this for initialization
    void Start () {
        //Continuously Invokes Move every x seconds (values may differ)
        InvokeRepeating("Move", .02F, .02F);
    }

    // Movement for the paddle
    void Move () {

        //finding the ball
        if(ball == null){
            ball = GameObject.FindGameObjectWithTag("Ball").transform;
        }

        //setting the ball's rigidbody to a variable
        ballRig2D = ball.GetComponent<Rigidbody2D>();

        //checking x direction of the ball
        if(ballRig2D.velocity.x > 0){

            //checking y direction of ball
            if(ball.position.y < this.transform.position.y-.3F){
                //move ball down if lower than paddle
                transform.Translate(Vector3.down*speed*Time.deltaTime);
            } else if(ball.position.y > this.transform.position.y+.3F){
                //move ball up if higher than paddle
                transform.Translate(Vector3.up*speed*Time.deltaTime);
            }

        }

        //set bounds of AI
        if(transform.position.y > topBound){
            transform.position = new Vector3(transform.position.x, topBound, 0);
        } else if(transform.position.y < bottomBound){
            transform.position = new Vector3(transform.position.x, bottomBound, 0);
        }
    }
We can now delete the PlayerController script from the Player game object in the hierarchy and add the AutoPlayer Script.
现在,我们可以从层次结构中的Player游戏对象中删除PlayerController脚本,并添加AutoPlayer脚本。
Inside our Scripts folder, let’s create another script named AutoEnemy and open it in our IDE. The AutoEnemy script should contain the following code:
在我们的Scripts文件夹中,让我们创建另一个名为AutoEnemy的脚本,并在我们的IDE中打开它。 AutoEnemy脚本应包含以下代码:
/Speed of the AI
    public float speed = 2.75F;

    //the ball
    Transform ball;

    //the ball's rigidbody 2D
    Rigidbody2D ballRig2D;

    //bounds of AI
    public float topBound = 4.5F;
    public float bottomBound = -4.5F;

    // Use this for initialization
    void Start () {
        //Continuously Invokes Move every x seconds (values may differ)
        InvokeRepeating("Move", .02F, .02F);
    }

    // Movement for the paddle
    void Move () {

        //finding the ball
        if(ball == null){
            ball = GameObject.FindGameObjectWithTag("Ball").transform;
        }

        //setting the ball's rigidbody to a variable
        ballRig2D = ball.GetComponent<Rigidbody2D>();

        //checking x direction of the ball
        if(ballRig2D.velocity.x < 0){

            //checking y direction of ball
            if(ball.position.y < this.transform.position.y-.3F){
                //move ball down if lower than paddle
                transform.Translate(Vector3.down*speed*Time.deltaTime);
            } else if(ball.position.y > this.transform.position.y+.3F){
                //move ball up if higher than paddle
                transform.Translate(Vector3.up*speed*Time.deltaTime);
            }

        }

        //set bounds of AI
        if(transform.position.y > topBound){
            transform.position = new Vector3(transform.position.x, topBound, 0);
        } else if(transform.position.y < bottomBound){
            transform.position = new Vector3(transform.position.x, bottomBound, 0);
        }
    }
We’ll need to mess around with the Player and Enemy’s speed values in order to get good simulated gameplay.
为了获得良好的模拟游戏体验,我们需要弄乱玩家和敌人的速度值。
If we hit play we should see that the background has simulated gameplay. However, if we click on the play button, we’ll notice that it doesn’t work. This is because we must add the scene to the build settings. We can do this by clicking File -> Build Settings and dragging the scene from the Assets pane to the menu or by clicking the Add Current button. After adding the Main Menu scene to the build settings, we need to drag it to the top of the scene list.
如果我们打游戏,我们应该看到背景已经模拟了游戏玩法。 但是,如果单击播放按钮,我们会注意到它不起作用。 这是因为我们必须将场景添加到构建设置中。 我们可以通过单击文件->构建设置,然后将场景从“资产”窗格拖到菜单中或单击“ 添加当前”按钮来完成。 将主菜单场景添加到构建设置后,我们需要将其拖到场景列表的顶部。
添加玩家分数界面 (Adding Player Score UI)
For our clone, we’re going to make it so that the game ends when a player or the AI reaches a score of 7. Before we can code game over functionality, we need to keep track of the two scores.
对于我们的克隆,我们将使其成功,以便在玩家或AI得分达到7时结束游戏。在对游戏进行功能编码之前,我们需要跟踪两个得分。
We can now save the Main Menu scene and open the Play scene. Let’s add a text object and name it ScoreText. The score text’s properties should be as pictured below:
现在,我们可以保存“主菜单”场景并打开“播放”场景。 让我们添加一个文本对象并将其命名为ScoreText。 乐谱文本的属性应如下图所示:
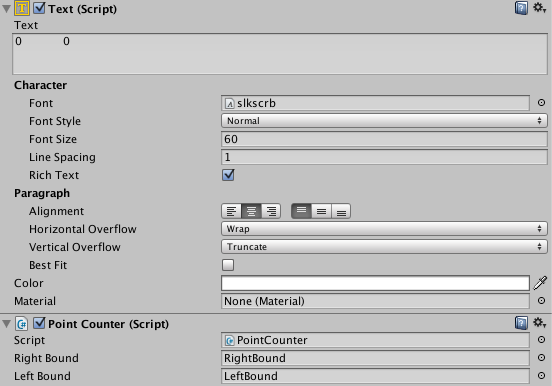
We should align the score to the top of the screen in the center. Now, let’s open the BoundController script and make it look like the code below:
我们应该将分数对准屏幕中心的顶部。 现在,让我们打开BoundController脚本,使其看起来像下面的代码:
//enemy transform
    public Transform enemy;

    public int enemyScore;
    public int playerScore;

    void Start(){
        enemyScore = 0;
        playerScore = 0;
    }

    void OnTriggerEnter2D(Collider2D other){
        if(other.gameObject.tag == "Ball"){
            if(other.gameObject.GetComponent<Rigidbody2D>().velocity.x > 0){
                enemyScore++;
            } else {
                playerScore++;
            }

            //Destroys other object
            Destroy(other.gameObject);

            //sets enemy's position back to original
            enemy.position = new Vector3(-6,0,0);
            //pauses game
            Time.timeScale = 0;
        }
    }
We need to drag the Enemy game object from the hierarchy to the Bound Controller Enemy property for both the left and right bounds objects. The enemy’s transform will be used to reset the enemy’s position after the ball is destroyed. After adding the Enemy game object to the bounds, we can create a new script named PointCounter and open it in our IDE. We should make the PointCounter script look like the code below:
我们需要将敌人游戏对象从层次结构中拖动到左右边界对象的“绑定控制器敌人”属性中。 球被摧毁后,敌人的变换将用于重置敌人的位置。 将Enemy游戏对象添加到边界后,我们可以创建一个名为PointCounter的新脚本并在我们的IDE中打开它。 我们应该使PointCounter脚本看起来像下面的代码:
using UnityEngine;
using UnityEngine.UI;
using System.Collections;

public class PointCounter : MonoBehaviour {

    public GameObject rightBound;
    public GameObject leftBound;
    Text text;
    // Use this for initialization
    void Start () {
        text = GetComponent<Text>();
        text.text = rightBound.GetComponent<BoundController>().enemyScore + "\t\t" +
            leftBound.GetComponent<BoundController>().playerScore;
    }

    // Update is called once per frame
    void Update () {
        text.text = rightBound.GetComponent<BoundController>().enemyScore + "\t\t" +
            leftBound.GetComponent<BoundController>().playerScore;
    }
}
We should attach the PointCounter script to the score text. We also need to drag the left and right bound game objects to their appropriate places as values for the RightBound and LeftBound variables for the PointCounter script.
我们应该将PointCounter脚本附加到乐谱文本。 我们还需要将左右绑定的游戏对象拖到适当的位置,以作为PointCounter脚本的RightBound和LeftBound变量的值。
完成游戏 (Finishing the Game)
The last thing we have to do to finish our Pong clone is create game over functionality so players know whether they lost to the AI or they beat it.
要完成Pong克隆,我们要做的最后一件事是通过功能创建游戏,以便玩家知道是输给AI还是击败AI。
创建菜单 (Creating the Menu)
Let’s start by creating a new tag named ShowOnFinish. After creating this tag we can create a text object named GameOverText. We can set the game over text’s tag to ShowOnFinish. We can set the text properties of the game over text to the same as the image below:
首先创建一个名为ShowOnFinish的新标签。 创建此标签后,我们可以创建一个名为GameOverText的文本对象。 我们可以将文本标签上的游戏设置为ShowOnFinish。 我们可以将游戏的文本属性设置为与以下图像相同的文本:
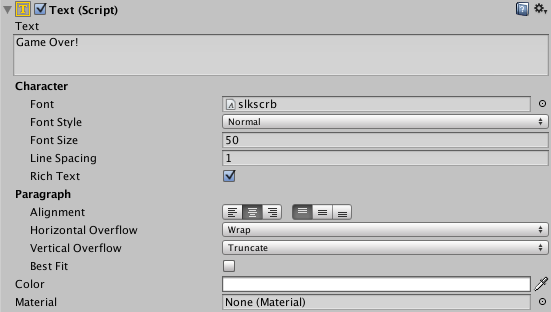
Now we can align the game over text to the center of the screen.
现在,我们可以将游戏的文字对准屏幕的中心。
Instead of creating all new buttons for the game over state, we can instead duplicate the main menu and reset buttons and set their tags to ShowOnFinish. We can name the new main menu button FinishMainMenuButton and the new reset button to FinishResetButton. The game over menu is now created, but we haven’t added any functionality to it.
代替为游戏结束状态创建所有新按钮,我们可以复制主菜单并重置按钮,并将其标签设置为ShowOnFinish。 我们可以将新的主菜单按钮命名为FinishMainMenuButton,将新的重置按钮命名为FinishResetButton。 现在已创建游戏结束菜单,但我们尚未向其添加任何功能。
增加功能 (Adding Functionality)
Let’s open the UIManager script and make the code look the same as below:
让我们打开UIManager脚本,并使代码与以下代码相同:
//arrays for pause and game over objects
    GameObject[] pauseObjects, finishObjects;

    //variables for the bounds
    public BoundController rightBound;
    public BoundController leftBound;

    //game over variables
    public bool isFinished;
    public bool playerWon, enemyWon;

    // Use this for initialization
    void Start () {
        pauseObjects = GameObject.FindGameObjectsWithTag("ShowOnPause");
        finishObjects = GameObject.FindGameObjectsWithTag("ShowOnFinish");
        hideFinished();
    }

    // Update is called once per frame
    void Update () {

        //checks to make sure the current level is play level
        if(Application.loadedLevel == 1){
            if(rightBound.enemyScore >= 7 && !isFinished){
                isFinished = true;
                enemyWon = true;
                playerWon = false;
            } else if (leftBound.playerScore >= 7  && !isFinished){
                isFinished = true;
                enemyWon = false;
                playerWon = true;
            }

            if(isFinished){
                showFinished();
            }
        }

        //uses the p button to pause and unpause the game
        if(Input.GetKeyDown(KeyCode.P) && !isFinished)
        {
            pauseControl();
        }

        if(Time.timeScale == 0  && !isFinished){
            //searches through pauseObjects for PauseText
            foreach(GameObject g in pauseObjects){
                if(g.name == "PauseText")
                    //makes PauseText to Active
                    g.SetActive(true);
            }
        } else {
            //searches through pauseObjects for PauseText
            foreach(GameObject g in pauseObjects){
                if(g.name == "PauseText")
                    //makes PauseText to Inactive
                    g.SetActive(false);
            }
        }
    }

    //Reloads the Level
    public void Reload(){
        Application.LoadLevel(Application.loadedLevel);
    }

    //controls the pausing of the scene
    public void pauseControl(){
        if(Time.timeScale == 1)
        {
            Time.timeScale = 0;
            showPaused();
        } else if (Time.timeScale == 0){
            Time.timeScale = 1;
            hidePaused();
        }
    }

    //shows objects with ShowOnPause tag
    public void showPaused(){
        foreach(GameObject g in pauseObjects){
            g.SetActive(true);
        }
    }

    //hides objects with ShowOnPause tag
    public void hidePaused(){
        foreach(GameObject g in pauseObjects){
            g.SetActive(false);
        }
    }

    //shows objects with ShowOnFinish tag
    public void showFinished(){
        foreach(GameObject g in finishObjects){
            g.SetActive(true);
        }
    }

    //hides objects with ShowOnFinish tag
    public void hideFinished(){
        foreach(GameObject g in finishObjects){
            g.SetActive(false);
        }
    }

    //loads inputted level
    public void LoadLevel(string level){
        Application.LoadLevel(level);
    }
We can now add the left and right bounds game objects to the appropriate variables for the UIManager script attached to the UIManager game object. We also need to create a new script named GameOver. Let’s open it and make the code look like this:
现在,我们可以将左右边界游戏对象添加到附加到UIManager游戏对象的UIManager脚本的适当变量中。 我们还需要创建一个名为GameOver的新脚本。 让我们打开它并使代码看起来像这样:
using UnityEngine;
using UnityEngine.UI;
using System.Collections;

public class GameOver : MonoBehaviour {

    public UIManager uiManager;
    private Text text;
    // Use this for initialization
    void Start () {
        text = GetComponent<Text>();
    }

    // Update is called once per frame
    void Update () {
        if(uiManager.playerWon){
            text.text = "GAME OVER!\nPLAYER WON!";
        } else if(uiManager.enemyWon){
            text.text = "GAME OVER!\nENEMY WON!";
        }
    }
}
Now all we have to do is add the script to the game over text game object and drag the UIManager game object to the UIManager variable. If we play the game and lose on purpose, we should see the words change and the buttons appear upon losing.
现在,我们要做的就是将脚本添加到文本游戏对象上的游戏,并将UIManager游戏对象拖到UIManager变量。 如果我们玩游戏而故意输了,我们应该看到单词更改,而输了则出现按钮。
Note: if the words don’t appear or are cut off, it means the width and height of the GameOverText’s Rect Transform should be made larger. Also, if the pause menu doesn’t work correctly, try recreating the buttons.
注意:如果单词没有出现或被剪掉,则意味着GameOverText的Rect变换的宽度和高度应加大。 另外,如果暂停菜单无法正常工作,请尝试重新创建按钮。
结论 (Conclusion)
Congratulations, we have officially made a complete, soundless Pong clone!
恭喜,我们已正式制作出完整无声的Pong克隆!
It took a while, but hopefully this tutorial was approachable enough for you to start experimenting with your own basic 2D physics games in Unity. Let us know what you come up with!
花费了一段时间,但希望本教程可以帮助您轻松地开始在Unity中尝试自己的基本2D物理游戏。 让我们知道您的想法!
Remember that you can download the full project on GitHub.
请记住,您可以在GitHub上下载完整项目 。
翻译自: https://www.sitepoint.com/building-a-pong-clone-in-unity-ui-and-gameplay/


 本教程详细介绍了如何在Unity中创建Pong克隆游戏,从UI设计、游戏玩法改进到暂停菜单和主菜单的实现,包括创建复古风格、改善碰撞检测、增强敌方AI、添加暂停和主菜单功能,以及玩家分数界面的实现。通过这个教程,读者可以学习到Unity游戏开发中涉及的基本UI设计、游戏逻辑优化和交互实现。


 1596
1596

 被折叠的 条评论
为什么被折叠?


