On February 12th, Nitrous.IO, the cloud development environment that lets you set up virtual boxes in a flash and use them from whichever platform through their Web IDE, finally added PHP support – something users have been clamoring for.
2月12日,Nitrous.IO(一种云开发环境,可让您快速设置虚拟框并通过其Web IDE在任何平台上使用它们)最终添加了PHP支持-用户一直在追捧。
You can read more about it in the announcement, but I figure it’s best if we demo by example and get a Laravel app up and running.
您可以在公告中阅读有关它的更多信息,但我认为最好以示例方式进行演示并启动并运行Laravel应用。
Note: This tutorial assumes basic Unix terminal proficiency.
注意:本教程假定您具有基本的Unix终端熟练程度。
入门 (Getting started)
Create an account on Nitrous.io if you don’t have one yet, or follow my ref link here to do so (full disclosure, this gives me nitrous – the currency used to bring more powerful VMs online). After spiffying up your profile, I encourage you to go into Public Keys and add a public SSH key of your own if you generally use them for SSH connections and similar. A detailed guide is available on GitHub.
如果您还没有Nitrous.io,请在Nitrous.io上创建一个帐户,或者在这里单击我的引用链接(完整披露,这给我带来了氮 –一种使更强大的VM联机的货币)。 散布您的个人资料后,建议您进入“公共密钥”并添加自己的公共SSH密钥(如果通常将其用于SSH连接或类似的连接)。 可以在GitHub上找到详细指南。
创建一个盒子 (Creating a box)
Let’s go into Boxes and click “New Box”. Select PHP, a region closest to you, and allocate as many resources as you wish – you can spend your entire Nitrous balance on this if you so choose – when you terminate a box, your nitrous is refunded.
让我们进入Box并单击“ New Box”。 选择PHP(最接近您的区域),并根据需要分配尽可能多的资源-如果您愿意,可以在其中花费全部Nitrous余额-终止包装盒时,您的亚硝酸盐将退还。

After clicking Create Box, your box will be provisioned – not unlike with Vagrant. You just won’t see as much output, and it’ll be much faster.
单击“创建框”后,将置备您的框-与Vagrant不同。 您不会看到太多输出,它将更快。

Once done, you’ll be greeted with a friendly and vaguely familiar interface, along with an introductory file that guides you through setting up the rest.
完成后,将为您提供一个友好且隐约熟悉的界面,以及一个指导性文件,指导您设置其余部分。

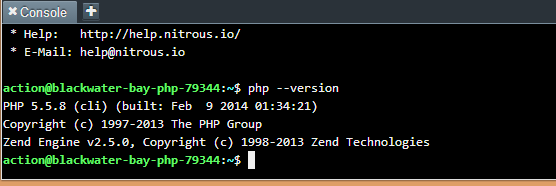
You can also run a PHP box by using any other template, and then using the Autoparts -> Install Parts menu to install PHP related tools like Apache, PHP, MySQL, etc. In the PHP box template, those parts are included. If you now use the included console to output the PHP version, you should see 5.5.8 displayed:
您还可以通过使用任何其他模板来运行PHP框,然后使用Autoparts-> Install Parts菜单来安装与PHP相关的工具,例如Apache,PHP,MySQL等。在PHP Box模板中,包括了那些部分。 如果现在使用附带的控制台输出PHP版本,则应该看到显示5.5.8:

“Parts” is something like Nitrous’ custom tailored package manager, and you use it to start services and install parts. Parts can also automatically install WordPress for you, but who would want that anyway?
“零件”类似于Nitrous的定制包装管理器,您可以使用它来启动服务和安装零件。 零件还可以为您自动安装WordPress,但是无论如何谁会想要呢?
信息 (PhpInfo)
Open the workspace folder, and create a file called index.php in the www subfolder with the contents:
打开工作空间文件夹,并在www子文件夹中创建一个名为index.php的文件,其内容为:
<?php
    phpinfo();
Then, go to Preview -> Port 3000 (the default). You should see the following PhpInfo screen in your browser:
然后,转到“预览”->“端口3000”(默认)。 您应该在浏览器中看到以下PhpInfo屏幕:

Note that the other ports won’t work unless you configure them that way. The first one (3000 SSL) is a premium feature, and you’ll have to pay for it, while all others can be defined if you use the console to edit httpd.conf:
请注意,除非您以其他方式配置它们,否则其他端口将不起作用。 第一个(3000 SSL)是一项高级功能,您需要付费,而如果使用控制台编辑httpd.conf ,则可以定义所有其他功能:
vim /home/action/.parts/etc/apache2/httpd.conf
Note that you can access these files through the file browser as well, just remember to click “Show Hidden” at the bottom of the file browser. I find it simpler to go through the command line, though.
请注意,您也可以通过文件浏览器访问这些文件,只需记住单击文件浏览器底部的“显示隐藏”即可。 不过,我发现通过命令行更简单。
安装PECL库 (Installing PECL libs)
Composer needs the Zip library to work, and installing it on our box is very simple, as per instructions
Composer需要Zip库才能工作,并且按照说明将其安装在我们的盒子上非常简单
pear config-set php_ini /home/action/.parts/etc/php5/php.ini
pecl config-set php_ini /home/action/.parts/etc/php5/php.ini
pecl install zip
To paste in the console, remember to press CTRL + SHIFT + V instead of just CTRL + V. Building and installing might take a couple minutes, wait it out.
要粘贴到控制台中,请记住按CTRL + SHIFT + V,而不只是CTRL + V。构建和安装可能需要几分钟,请耐心等待。
But having a www folder is so early 2000s. Almost smells of a shared host, doesn’t it? Let’s pro it up.
但是拥有www文件夹太早了2000年代。 几乎是共享主机的味道,不是吗? 让我们来证明这一点。
配置虚拟主机 (Configure a Virtual Host)
There are two paths you can take here. One is defining multiple virtual hosts, as is common with Apache. The other is renaming the www folder to public and using the workspace folder as our app’s folder. I’m not a fan of the latter, because it imposes some limits on my pre-built apps, so let’s go with the former.
您可以在此处采取两种方法。 一种是定义多个虚拟主机,这在Apache中很常见。 另一种是将www文件夹重命名为public ,并将workspace文件夹用作我们应用程序的文件夹。 我不喜欢后者,因为它对我的预构建应用程序施加了一些限制,因此让我们来看前者。
Once again, vim into httpd.conf: vim /home/action/.parts/etc/apache2/httpd.conf
再次将vim插入httpd.conf : vim /home/action/.parts/etc/apache2/httpd.conf
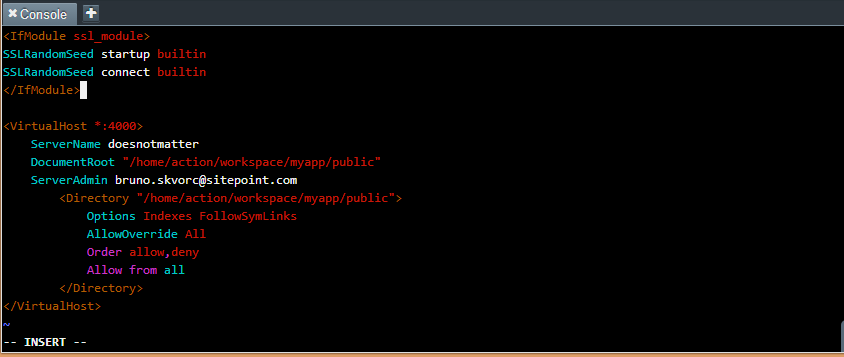
At the bottom of the file, add the following block:
在文件的底部,添加以下块:
<VirtualHost *:4000>
    ServerName doesnotmatter
    DocumentRoot "/home/action/workspace/myapp/public"
    ServerAdmin bruno.skvorc@sitepoint.com
        <Directory "/home/action/workspace/myapp/public">
            Options Indexes FollowSymLinks
            AllowOverride All
            Require all granted
            Order allow,deny
            Allow from all
        </Directory>
</VirtualHost>
Literally, add it to the end of the httpd.conf file:
从字面上看,将其添加到httpd.conf文件的末尾:

Additionally, at the top of the file where it says Listen 0.0.0.0:3000, you should add another line: Listen 0.0.0.0:4000. Do this for every port you want listened to.
另外,在文件顶部显示Listen 0.0.0.0:3000 ,您应该添加另一行: Listen 0.0.0.0:4000 。 对您要收听的每个端口执行此操作。
An alternative is putting all this into the config subfolder as the comment near the top of the httpd.conf file says. Pick your poison, either works.
另一种选择是将所有这些内容放入config子文件夹中,如httpd.conf文件顶部附近的注释所示。 选择你的毒药,要么起作用。
Now create the folder mentioned in this configuration.
现在创建此配置中提到的文件夹。
mkdir -p /home/action/workspace/myapp/publicThe -p parameter forces a recursive creation, meaning it creates all parent folders as well. Now add the same index.php file with the phpinfo(); content into this folder. A shorthand command to do it is this:
-p参数强制进行递归创建,这意味着它也会创建所有父文件夹。 现在,使用phpinfo();添加相同的index.php文件phpinfo(); 内容放入此文件夹。 一个简写的命令是这样的:
cd /home/action/workspace/myapp/public/
echo "<?php phpinfo();" > index.php
Restart Apache with parts restart apache2 and try opening the site on port 4000 via Preview -> Port 4000. You should see the same PhpInfo screen as before.
通过parts restart apache2重新启动Apache,然后尝试通过预览->端口4000在端口4000上打开站点。您应该看到与以前相同的PhpInfo屏幕。
You can set up other virtual hosts in the same way.
您可以用相同的方式设置其他虚拟主机。
安装作曲家 (Installing Composer)
Update: Note that Composer is now pre-installed, and you can skip this step. Still, this part covers installing of custom binaries, so you might want to read it nonetheless.
更新:请注意,Composer现在已预先安装,您可以跳过此步骤。 尽管如此,该部分仍涵盖自定义二进制文件的安装,因此您可能仍要阅读它。
Now that we got virtual hosts out of the way and can run several apps under one box if we so choose, let’s install Composer. We’ll be installing it globally – installing it once in every app makes absolutely no sense, especially on boxes with such limited hard drive space.
现在,我们已经摆脱了虚拟主机的束缚,并且可以选择在一个框内运行多个应用程序,让我们安装Composer。 我们将在全球范围内安装它-在每个应用程序中安装一次绝对没有意义,尤其是在硬盘空间如此有限的盒子上。
Nitrous.io boxes are limited in that you cannot create folders outside your home folder. To get around this limitation, we’ll just install it into a folder inside our home folder, and add said folder to the $PATH.
Nitrous.io框受到限制,因为您无法在主文件夹之外创建文件夹。 为了解决这个限制,我们将其安装到home文件夹内的一个文件夹中,然后将该文件夹添加到$PATH 。
mkdir ~/.tools
cd ~/.tools
curl -sS https://getcomposer.org/installer | php
vim ~/.bashrc
Once vimmed, edit .bashrc by adding the following to the end of it:
粘贴后,通过在其末尾添加以下内容来编辑.bashrc :
export PATH=$PATH:$HOME/.tools/Then, reload the .bashrc file by executing source ~/.bashrc.
然后,通过执行source ~/.bashrc重新加载.bashrc文件。
With that, Composer has been globally installed and you can use it from whichever app you want. Try it out by executing the following commands:
这样,Composer已被全局安装,您可以从任何所需的应用程序中使用它。 通过执行以下命令来尝试一下:
cd /home/action/workspace/myapp
composer self-update
创建一个示例Laravel应用 (Creating a sample Laravel app)
Composer, check. Virtual host, check. Let’s fire up Laravel, shall we? FYI, I chose Composer as the method of Laravel installation because it’s useful for much more than just Laravel, and you’ll eventually be needing it for other non-Laravel projects too.
作曲家,检查。 虚拟主机,请检查。 让我们启动Laravel,好吗? 仅供参考,我选择Composer作为Laravel的安装方法,因为它不仅对Laravel有用,而且最终会在其他非Laravel项目中使用。
First, let’s remove the myapp folder. Composer won’t create a project in a folder that’s not empty, so this will allow it to start from scratch.
首先,让我们删除myapp文件夹。 Composer不会在不为空的文件夹中创建项目,因此可以从头开始。
rm -rf /home/action/workspace/myappThen, initiate the create-project command:
然后,启动create-project命令:
cd /home/action/workspace
composer create-project laravel/laravel myapp --prefer-dist
After a minute or two, everything should be downloaded. Visiting the same 4000 port on our box should give us the Laravel greeting screen.
一两分钟后,应下载所有内容。 在我们的盒子上访问相同的4000端口应该会给我们Laravel问候屏幕。

Following the Quick Start Instructions, we add a closure route to /test by adding the following content to app/routes.php:
按照《 快速入门说明》 ,我们通过将以下内容添加到app/routes.php来将闭合路由添加到/test :
Route::get('test', function()
{
    return 'Test!';
});
Now, visiting {$URL}:4000/test gives us the following output:
现在,访问{$URL}:4000/test将获得以下输出:

将Laravel连接到MySQL (Connecting Laravel to MySQL)
Let’s first check if our database works. Try punching in mysql -u root into the Nitrous command line, and see if you get in. If you can list databases with SHOW DATABASES;, change database to test with USE test; and then list tables in that database with SHOW TABLES; (result should be an empty set), you’re ready.
让我们首先检查我们的数据库是否工作。 尝试在Nitrous命令行中打入mysql -u root ,看看是否可以进入。如果可以使用SHOW DATABASES;列出数据库,则可以SHOW DATABASES; ,改变数据库来test与USE test; 然后使用SHOW TABLES;列出该数据库中的SHOW TABLES; (结果应为空集),您已经准备好了。
Laravel is, by default, configured to use the same insecure settings Nitrous uses – database username “root” with no password. As such, the connection is ready by default – all you need to do is change the database name in the config file to “sample”, as that is the one we’ll be using in the following example.
默认情况下,Laravel被配置为使用Nitrous所使用的相同的不安全设置-数据库用户名“ root”,没有密码。 这样,默认情况下连接已准备就绪–您所需要做的就是将配置文件中的数据库名称更改为“ sample”,因为在以下示例中将使用该名称。
You should, naturally, change your credentials – in MySQL, add a user that’s only allowed to mess with a specific database, and add that user into the app/config/database.php file in the appropriate section. For user-based database privileges, read this answer. We won’t be doing that just for the purpose of this demo.
自然,您应该更改您的凭据-在MySQL中,添加仅允许与特定数据库打乱的用户,然后将该用户添加到适当部分的app/config/database.php文件中。 对于基于用户的数据库特权,请阅读此答案 。 我们不会仅出于本演示的目的而这样做。
We could follow the Migration example in the quick start doc, but I’d rather do it all in one go and have our sample data ready instantly. To create a sample database with a test table and three rows of sample values, execute the following command in the Nitrous console, regardless of the folder you’re currently in:
我们可以按照快速入门文档中的“迁移”示例进行操作,但我希望一次性完成所有操作,并立即准备好示例数据。 要创建具有test表和三行样本值的sample数据库,请在Nitrous控制台中执行以下命令,而不管您当前在哪个文件夹中:
wget -O- -q https://gist.github.com/Swader/8994154/raw/9bb8d253f92791de77fa01138febd404a306ccc6/sample.sql | mysql -u rootWhat this does, if you’re curious, is fetch my gist with the SQL code required to make it happen, outputs it to the standard output stream in the shell while silencing all errors and other log info, and applies it to MySQL after logging in as root.
如果您好奇的话,它的用途是获取实现它所需SQL代码,将其输出到Shell中的标准输出流,同时使所有错误和其他日志信息保持沉默,并在记录后将其应用于MySQL作为根。
We won’t be building a model just for the test data – I assume you can follow the extremely simple instructions on the Laravel page to make that happen yourself. Instead, we’ll just be demonstrating Laravel’s ability to connect to the database here.
我们将不仅仅为测试数据构建模型-我假设您可以按照Laravel页面上非常简单的说明进行操作。 相反,我们只是在这里演示Laravel连接数据库的能力。
In the routes file from before, replace our previously written closure with the following:
在之前的routes文件中,将我们先前编写的闭包替换为以下内容:
Route::get('test', function()
{
  var_dump(DB::select('select * from test'));
});
Refreshing the /test URL, we get the database output:
刷新/ test URL,我们得到数据库输出:

结论 (Conclusion)
This article proved how simple it is to get a Laravel configuration up and running on Nitrous.io. Play around, look at the documentation, try to break things. If you do, just terminate and recreate the box – it’s that simple.
本文证明了在Nitrous.io上启动并运行Laravel配置非常简单。 游玩,看一下文档,尝试破坏事物。 如果您这样做,只需终止并重新创建该框即可,就这么简单。
We’re in an age of virtual machines at every step, and our hardware and bandwidth are powerful enough to prevent us from polluting our main desktop environments with needless installations. Experiment without fear and let us know what you come up with, we’d love to take a look.
我们处在虚拟机时代的每一步,我们的硬件和带宽足够强大,可以防止不必要的安装污染我们的主要桌面环境。 无需担心,请尝试一下,让我们知道您的想法,我们很乐意为您提供帮助。
翻译自: https://www.sitepoint.com/getting-started-laravel-nitrous-io/


 213
213

 被折叠的 条评论
为什么被折叠?


