


dcom oxid
Welcome to the third and final part in this series introducing you to a great, alternative PHP e-commerce platform – OXID eSales. In case you missed them, part one of the series gave a broad introduction to OXID eSales. We looked at some of the features and requirements and finished up with installing a fully working shop. Part two dove deeper, looking at how themes are composed and we began creating a custom theme based off the default theme Azure.
欢迎来到本系列的第三部分,也是最后一部分,向您介绍一个出色的替代PHP电子商务平台– OXID eSales。 万一您错过它们, 本系列的第一部分对OXID eSales进行了广泛介绍。 我们研究了一些功能和要求,最后安装了一个可以正常运行的车间。 第二部分更深入地介绍了主题的构成,我们开始基于默认主题Azure创建自定义主题。
This is part three, and we’re going to get some hands-on experience with OXID by writing a custom module to extend its core functionality. The functionality we’ll be implementing will enable us to display the latest tweets from our twitter account, based on a new custom field we’ll be adding to the administration backend.
这是第三部分,我们将通过编写自定义模块扩展其核心功能来获得OXID的动手经验。 我们将要实现的功能将使我们能够基于我们将添加到管理后端的新自定义字段,显示来自Twitter帐户的最新推文。
创建一个模块 (Creating a Module)
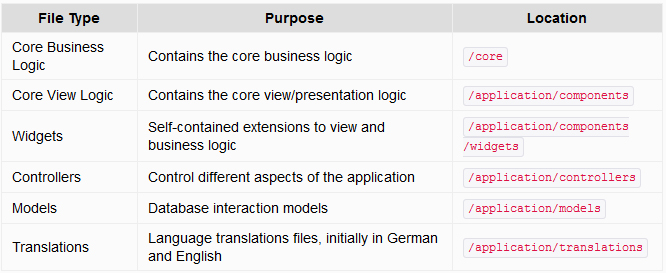
In OXID there are six types of what can be described as core files. They cover everything you can do in the shop, such as interacting with the database, language support (think internationalization), debugging, validation, PDF generation, images, themes, and more. Specifically, they are:
在OXID中,有六种类型可以称为核心文件。 它们涵盖了您在商店中可以做的所有事情,例如与数据库进行交互,语言支持(认为是国际化),调试,验证,PDF生成,图像,主题等等。 具体来说,它们是:
Unless you’re never going to upgrade, but especially if you are, it’s best to leave all these core files as they are. Otherwise you’re going to lose all of your hard work and changes when it’s time to upgrade.
除非您永远都不会升级,尤其是如果您不打算升级的话,那么最好将所有这些核心文件保持不变。 否则,当您需要升级时,您将失去所有的辛苦工作和更改。
If you’ve ever played around with Magento or platforms which implement a similar approach, OXID will be rather familiar to you. As with Magento, the user can extend core files with custom extensions which will survive an upgrade cycle. Whether you need extra currency support, more information displayed in a template which standard functions can’t provide, or need to store data which the standard structure doesn’t support, you can extend OXID to your heart’s content. Then, when it’s time to upgrade, your changes won’t be lost.
如果您曾经使用过Magento或实现类似方法的平台,那么OXID将非常熟悉。 与Magento一样,用户可以使用自定义扩展名扩展核心文件,这将在升级周期后继续存在。 无论您需要额外的货币支持,在模板中显示标准功能无法提供的更多信息,还是需要存储标准结构不支持的数据,都可以将OXID扩展到您的内心。 这样,当需要升级时,您的更改将不会丢失。
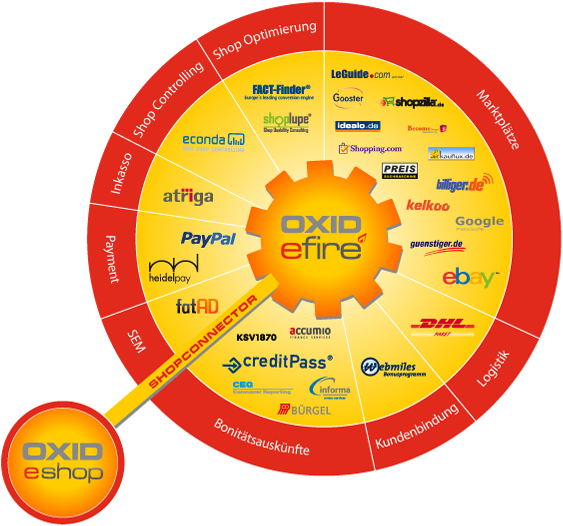
What’s also interesting is how OXID allows you to extend the core files in multiple locations. This affords the ability to use a variety of third party modules and extensions, such as from the OXID eFire market place. A sample of modules available can be seen in the graphic below.
有趣的是,OXID如何使您可以在多个位置扩展核心文件。 这提供了使用各种第三方模块和扩展的能力,例如来自OXID eFire市场的扩展。 下图显示了可用模块的示例。
扩展核心文件 (Extending a Core File)
So, how does one extend an Oxid class? In the image below you can see a simple illustration of the OXID class inheritance tree.
那么,如何扩展Oxid类呢? 在下面的图像中,您可以看到OXID类继承树的简单说明。
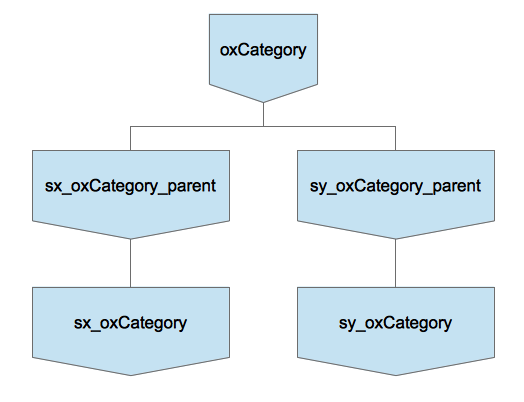
Let’s say we want to extend the functionality of oxCategory. At the top, you’ll see the core oxCategory class. Below it you’ll see two classes extending it, sx_oxCategory_parent and sy_oxCategory_parent. You’ll see these classes extended by sx_oxCategory and sy_oxCategory respectively. In a nutshell, that’s how you extend OXID core classes.
假设我们要扩展oxCategory的功能。 在顶部,您将看到核心oxCategory类。 在它下面,您将看到两个扩展它的类sx_oxCategory_parent和sy_oxCategory_parent 。 您将看到分别由sx_oxCategory和sy_oxCategory扩展的这些类。 简而言之,这就是扩展OXID核心类的方式。
All custom classes you create have to extend from a *_parent class. These classes are pseudo classes; you don’t actually instanciate them. But for inheritance in OXID to work, you need to extend from the pseudo classes so the internal OXID processes can track multiple classes extending core ones.
您创建的所有自定义类都必须从*_parent类扩展。 这些类是伪类。 您实际上并没有实例化它们。 但是,要使OXID中的继承起作用,您需要从伪类扩展,以便内部OXID进程可以跟踪扩展核心类的多个类。
Once you’ve done this, you then need to inform OXID which core classes your classes extend. This is done by adding extra information to the file metadata.php in our modules directory.
完成此操作后,您需要通知OXID您的类扩展了哪些核心类。 这是通过向modules目录中的metadata.php文件中添加其他信息来完成的。
让我们创建一个模块 (Let’s Create a Module)
If you worked through creating a theme in part 2, then this process will be pretty familiar to you. We’re going to extend the core OXID functionality so we can retrieve and display the current tweets for a designated Twitter account. This involves the following steps:
如果您在第2部分中完成了创建主题的工作,那么您将非常熟悉此过程。 我们将扩展核心OXID功能,以便我们可以检索和显示指定Twitter帐户的当前推文。 这涉及以下步骤:
- Customize the admin backend allowing us to specify the twitter account name 自定义管理员后端,允许我们指定Twitter帐户名
- Add a custom class to retrieve the twitter stream 添加自定义类以检索Twitter流
Extend the
oViewobjects so we can retrieve information in the templates扩展
oView对象,以便我们可以在模板中检索信息- Customiz the templates to retrieve and display the information Customiz模板以检索和显示信息
Before we start, ensure that you’ve created your Twitter application; as you’ll need it for the four configuration values required in the class we write below. When you’ve created yours, make a note of these values:
在开始之前,请确保您已经创建了Twitter应用程序 ; 因为您需要用到我们在下面编写的类中所需的四个配置值。 创建自己的值后,请记下以下值:
- Consumer Key 消费者密钥
- Consumer Secret 消费者的秘密
- Access Token 访问令牌
- Access Token Secret 访问令牌机密
We first need to create the basic structure of our module. Under modules, create a new directory called sitepointtwitter and in that directory create a file called metadata.php. In it add the following code:
我们首先需要创建模块的基本结构。 在modules ,创建一个名为sitepointtwitter的新目录,并在该目录中创建一个名为metadata.php的文件。 在其中添加以下代码:
<?php
/**
 * Metadata version
 */
$sMetadataVersion = '1.0';

/**
 * Module information
 */
$aModule = array(
    'id'           => 'sitepointtwitter',
    'title'        => 'SitePoint Twitter',
    'description'  => 'Module for retrieving and displaying a Twitter feed.',
    'thumbnail'    => 'picture.png',
    'version'      => '1.0',
    'author'       => 'Matthew Setter <matthew@maltblue.com>',
    'extend' => array(),
    'files' => array(
        'sitepointwTwitterFeed' =>
            'sitepointtwitter/widget/sitepointwtwitterfeed.php',
    )
);
These are the basic requirements for a module. At this point we’ve provided the basic registration information required, most of which is really only for display purposes which we’ll see shortly. However, the id value and the directory name have to match, so please make sure they do.
这些是模块的基本要求。 至此,我们已经提供了所需的基本注册信息,其中大多数实际上仅用于显示目的,我们将在不久后看到。 但是, id值和目录名称必须匹配,因此请确保它们匹配。
创建Twitter类 (Create the Twitter Class)
Now we’ll create a custom class which extends oxView, making available the Twitter information from our stream. Under modules/sitepointtwitter create a new file named sitepointview.php with the following code:
现在,我们将创建一个扩展oxView的自定义类,以使我们的流中的Twitter信息可用。 在modules/sitepointtwitter下,使用以下代码创建一个名为sitepointview.php的新文件:
<?php
class sitepointwTwitterFeed extends oxWidget
{
    /**
     * Current class template name.
     * @var string
     */
    protected $_sThisTemplate = 'widget/sidebar/twitterfeed.tpl';

    /**
     * Simple class to retrieve a list of the latest
     * feeds from a users twitter feed.
     *
     * @return array An array containing the Twitter feed information
     *
     */
    public function getTwitterFeed()
    {
        $oConfig = $this->getConfig();

        try {
            $twitter = new Twitter(
                '<your/consumer/key>',
                '<your/consumer/secret>',
                '<your/access/token>',
                '<your/access/token/secret>'
            );
        } catch (TwitterException $e) {
            print $e->getMessage();
            return array();
        }

        try {
            if ($statuses = $twitter->load(Twitter::ME)) {
                return $statuses;
            }
        } catch (InvalidArgumentException $e) {
            print $e->getMessage();
            return array();
        } catch (TwitterException $e) {
            print $e->getMessage();
            return array();
        }
    }
}
Before we continue with the code overview, clone a copy of the repository to a new directory, vendor, under modules/sitepointtwitter. To do this, simply run the following command:
在继续进行代码概述之前,请将存储库的副本克隆到modules/sitepointtwitter下的新目录vendor 。 为此,只需运行以下命令:
git clone git://github.com/dg/twitter-php.git
Then copy the two source files from the src to the vendor directory.
然后将两个源文件从src复制到vendor目录。
Now, back to the code. In the code above, we’ve created a class, sitepointView, which extends the pseudo-class oxWidget and uses the simplicity of David Grudl’s Twitter for PHP class to make one call and retrieve the latest tweets from our Twitter stream.
现在,回到代码。 在上面的代码中,我们创建了一个sitepointView类,该类扩展了伪类oxWidget并使用David Grudl的Twitter for PHP类的简单性进行了一次调用,并从我们的Twitter流中检索了最新的tweet。
We attempt to instantiate a new Twitter object, using the configuration settings from our Twitter developer account we previously created. If a TwitterException is thrown, we return an empty array. Otherwise, we move to the next step of attempting to retrieve the latest statuses from our Twitter stream. If we encounter an exception, as before, we return an empty array.
我们尝试使用先前创建的Twitter开发人员帐户中的配置设置实例化一个新的Twitter对象。 如果抛出TwitterException ,我们将返回一个空数组。 否则,我们进入尝试从Twitter流中检索最新状态的下一步。 如果像以前一样遇到异常,我们将返回一个空数组。
My aim in writing this code was to keep it as simple as possible. We could have logged the fact something went wrong, or done something else so as to notify the user. But instead, it’s coded so either way, an array is returned which can be parsed, keeping it simple and effective so the purposes of the example is not lost.
我编写此代码的目的是使其尽可能简单。 我们可能已经记录了出问题的事实,或者做了其他事情以通知用户。 但是相反,无论哪种方式都对其进行了编码,返回了一个可以解析的数组,使其简单有效,因此不会失去示例的用途。
With the class written we have to make the Twitter PHP classes available to our new OXID class. In the root of the modules directory, open the file functions.php and add the following lines:
使用编写的类,我们必须使Twitter PHP类可用于新的OXID类。 在modules目录的根目录中,打开文件functions.php并添加以下行:
// add in required classes for Twitter
require_once __DIR__ . "/sitepointtwitter/vendor/twitter.class.php";
require_once __DIR__ . "/sitepointtwitter/vendor/OAuth.php";
After this, clear the tmp directory and reload the shop. The module functionality will now be available.
之后,清除tmp目录并重新加载商店。 模块功能现在将可用。
自定义模板 (Customize the Templates)
So we’ve extended the backend configuration options, cloned the dependencies, extended oxView with our new class, and updated the metadata.php file making all the code available to our shop. Only one step remains – customising the view templates.
因此,我们扩展了后端配置选项,克隆了相关性,使用新类扩展了oxView ,并更新了metadata.php文件,使所有代码都可用于我们的商店。 仅剩下一个步骤–自定义视图模板。
Copy application/views/azure/tpl/layout/sidebar.tpl to application/views/sitepoint/tpl/layout/sidebar.tpl. Then open it and find the following block:
将application/views/azure/tpl/layout/sidebar.tpl复制到application/views/sitepoint/tpl/layout/sidebar.tpl 。 然后打开它并找到以下块:
[{block name="sidebar_tags"}]
    [{if $oView->showTags() && $oView->getClassName() ne "details" && $oView->getClassName() ne "alist" && $oView->getClassName() ne "suggest" && $oView->getClassName() ne "tags"}]
        [{oxid_include_widget nocookie=1 cl="oxwTagCloud" blShowBox="1" noscript=1 }]
    [{/if}]
[{/block}]
Above it, add in the following new block:
在其上方,添加以下新块:
[{block name="sidebar_twitter_feed"}]
    [{oxid_include_widget cl="sitepointwTwitterFeed" nocookie=$blAnon force_sid=$force_sid}]
[{/block}]
What this does is use a custom Smarty plugin to render the contents of the widget inline, using the class sitepointwTwitterFeed as indicated by the cl argument. There are a range of other possible arguments, which you can read more about in the online documentation.
这样做是通过使用cl参数指示的sitepointwTwitterFeed类,使用自定义的Smarty插件内嵌呈现小部件的内容。 还有许多其他可能的参数,您可以在在线文档中阅读更多内容。
Following this, create a new directory application/views/sitepoint/tpl/widget/sidebar. In it, create new file called twitterfeed.tpl which will be the template that the widget will render. Add in it the following code:
然后,创建一个新目录application/views/sitepoint/tpl/widget/sidebar 。 在其中,创建一个名为twitterfeed.tpl新文件,它将是小部件将呈现的模板。 在其中添加以下代码:
[{assign var=aTwitterFeed value=$oView->getTwitterFeed()}]

<style type="text/css">
    div#twitterFeedBox ul {
        border: 0px;
    }

    div#twitterFeedBox ul li {
        margin-top: 5px;
        margin-bottom: 5px;
        color: #999;
    }
</style>
<div id="twitterFeedBox" class="box twitterFeed">
    <h3>[{ oxmultilang ident="WIDGET_TWITTER_FEED_HEADER" }]</h3>
    <div class="content">
        <ul>
            [{foreach from=$aTwitterFeed item=sTweet key=iCount}]
            <li>[{$sTweet->text}].<br />on: [{$sTweet->created_at|date_format:"%e/%m/%Y"}]</li>
            [{/foreach}]
        </ul>
    </div>
</div>
Finally, in application/views/sitepoint/en/cust_lang.php add the following line:
最后,在application/views/sitepoint/en/cust_lang.php添加以下行:
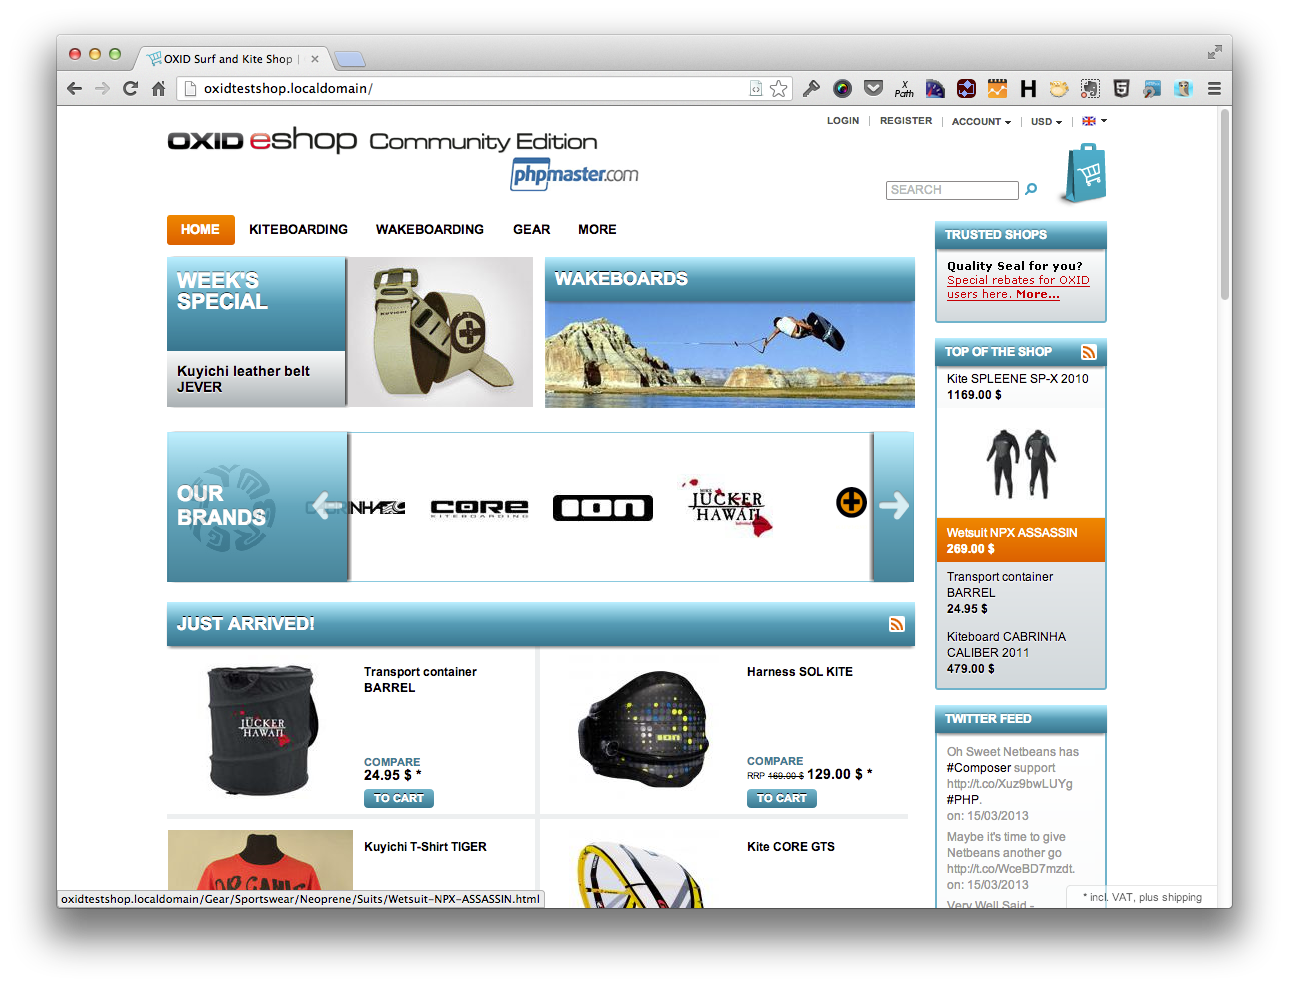
'WIDGET_TWITTER_FEED_HEADER' => 'Twitter Feed',This provides the translation required for the template’s H3 tag. Once you’ve done it, you then need to clear the tmp directory and reload OXID again so it becomes aware of the changes. After all is said and done, our shop will now look like the image below where you can see the twitter feed down on the bottom right hand side.
这提供了模板的H3标签所需的翻译。 完成后,您需要清除tmp目录并再次重新加载OXID,以便它知道更改。 说完一切之后,我们的商店现在看起来像下面的图片,您可以在其中看到Twitter消息在右下角向下滚动。
结论 (Conclusion)
This concludes the 3-part series introducing OXID eSales. We’ve gone through what it is, installed a working version of the community edition, modified aspects of the theme and created a reusable widget which displays a Twitter feed via an external library.
结束语介绍OXID eSales的3部分系列文章。 我们已经了解了它的含义,安装了社区版的工作版本,修改了主题的各个方面,并创建了可重用的小部件,该小部件通过外部库显示Twitter feed。
So what do you think? OXID is very very easy to get started with and extend – wouldn’t you agree?
所以你怎么看? OXID非常容易上手和扩展–您不同意吗?
I hope you’ve enjoyed this introduction and will try OXID out. If you’ve already started since part 1, what has your experience been like? Is it working well? I hope it has.
希望您喜欢此介绍,并尝试OXID。 如果您从第1部分开始就已经开始,那么您的经验是什么样的? 运行良好吗? 我希望有。
If you have any questions or queries, you can always jump on the OXID eSales forums or chat in the IRC channel.
如果您有任何疑问或疑问,可以随时跳至OXID eSales论坛或在IRC频道中聊天。
Until next time, all the best with OXID and don’t forget to share your feedback in the comments below.
在下一次之前,使用OXID一切都好,不要忘了在下面的评论中分享您的反馈。
Image via Fotolia
图片来自Fotolia
dcom oxid


 被折叠的 条评论
为什么被折叠?
被折叠的 条评论
为什么被折叠?
 到【灌水乐园】发言


