


preloader
We’ve all heard the hype, but you and I both know that Flash is a powerful tool, and needn’t be a turn-off for users (yes, even those on dial-up connections).
我们都听过炒作,但是您和我俩都知道Flash是一种功能强大的工具,不需要关闭用户的权限(是的, 甚至是那些使用拨号连接的用户)。
You can spend a lot of time honing your sites and movies to make the Flash experience more enjoyable for your visitors. For instance, you can help smooth the playback of Flash movies by displaying a ‘loading’ graphic to the user while the files download, and programming the movie to start playing back only once it’s fully loaded.
您可以花费大量时间来完善您的网站和电影,以使Flash体验对您的访问者来说更加有趣。 例如,通过在文件下载时向用户显示“正在加载”图形,以及将电影编程为仅在完全加载后才开始播放,可以帮助平滑Flash电影的播放。
However, these techniques can leave your visitors wondering ‘just how long is this going to take?’ Even worse, they may abandon your download before it’s completed — let alone beginning to play.
但是,这些技术会使您的访客感到疑惑,“这需要多长时间?” 更糟糕的是,他们可能会在下载完成之前放弃您的下载-更不用说开始播放了。
The solution? Keep your visitors informed!
解决方案? 让您的访客了解情况!
Use a feedback mechanism to inform your users of the download’s progress. Providing feedback through your Flash preloader will keep your visitors much happier, and reduce the risk of download abandonment.
使用反馈机制将下载进度告知用户。 通过Flash预加载器提供反馈将使访问者更加满意,并降低了放弃下载的风险。
The feedback you provide to users could be numeric, visual, and/or display any of:
您提供给用户的反馈可以是数字的,可视的和/或显示以下任何一种:
- percentage loaded 加载百分比
- bytes loaded 加载的字节
- percentage remaining 剩余百分比
- bytes remaining 剩余字节
- estimated time remaining 估计剩余时间
…or any combination of the above. Let’s see how it’s done.
…或以上的任意组合。 让我们看看它是如何完成的。
基本机制 (The Basic Mechanism)
When complete, our preloader will perform the following procedure:
完成后,我们的预加载器将执行以下过程:
- The movie starts. Stop the main timeline and display the preloader. 电影开始。 停止主时间轴并显示预加载器。
- Calculate and display file loading status. 计算并显示文件加载状态。
- If the movie is still loading, return to Step 2, otherwise 如果电影仍在加载,请返回到步骤2,否则
- Continue to play the main timeline. 继续播放主时间轴。
Firstly, we’ll need a blank frame at the start of your movie (on the main timeline). Insert this before there’s anything else on the stage.
首先,我们需要在电影的开头(在主时间轴上)保留空白帧。 在舞台上没有任何其他内容之前插入此内容。
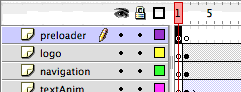
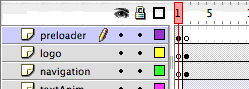
I’ve also added a layer for the preloader just because I want to — this will help keep the movie organised.
我还为预加载器添加了一层,只是因为我想这样做-这将有助于使电影井井有条。
Make the first frame of the preload layer a keyframe: click on it and press F6, or select Insert > Keyframe from the menu.
将预加载层的第一帧设为关键帧:单击它,然后按F6,或从菜单中选择“插入”>“关键帧”。
Now, let’s create our preloader movie clip.
现在,让我们创建预加载器影片剪辑。
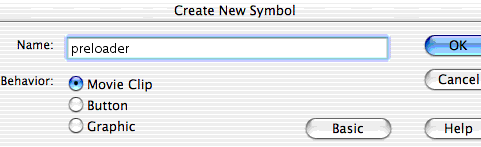
Select ‘New Symbol…’ from the ‘Insert’ menu. Name it something logical, and make sure it’s a Movie Clip, then click ok.
从“插入”菜单中选择“新符号…”。 将其命名为逻辑,并确保它是一个影片剪辑,然后单击“确定”。
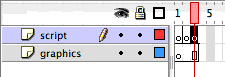
You’ll now see a blank stage and timeline for the new clip. Add a new layer here. Our preloader only needs two layers in total: one for the actionScript, and one for the graphics.
现在,您将看到空白片段和新剪辑的时间表。 在此处添加新层。 我们的预加载器总共只需要两层:一层用于actionScript,一层用于图形。
剧本 (The Script )
This is the fun part! Our new ‘preloader’ clip is going to be 3 frames long, and each of these will contain actionScript.
这是有趣的部分! 我们新的“预加载器”剪辑将是3帧长,其中每个将包含actionScript。
Now, to add code to any particular frame, it must be a keyframe. So, add a new layer, click on the second frame, and choose ‘Insert > Keyframe’ from the menu (or press F6). Click on the third frame and make it a keyframe, too. We don’t need to do this for the first frame of our movie, as, by default, the first frame is always a keyframe.
现在,要将代码添加到任何特定框架,它必须是关键框架。 因此,添加一个新层,单击第二个帧,然后从菜单中选择“插入>关键帧”(或按F6键)。 单击第三帧并将其设置为关键帧。 我们不需要在电影的第一帧中执行此操作,因为默认情况下,第一帧始终是关键帧。
Ok. Now let’s take the process step by step, and see what we need to do to achieve in each
好。 现在,让我们逐步进行该过程,并了解在每个过程中要实现的目标
Step 1. The Movie Starts. Stop the Main Timeline and Display the Preloader.
步骤1.电影开始。 停止主时间轴并显示预加载器。
In the actionScript layer, click on the first frame. If it’s not already open, bring up the ‘Actions’ window (you’ll find it under the ‘Windows’ menu).
在actionScript层中,单击第一帧。 如果尚未打开,请调出“操作”窗口(您可以在“ Windows”菜单下找到它)。
The ‘Actions’ window has two modes, ‘Normal’ and ‘Expert’. For us to be able to type code directly into the window, it will need to be in ‘Expert’ mode. To change modes, click on the arrow in the top-right corner on the window, and select ‘Expert Mode’ from the drop-down list.
“操作”窗口有两种模式,“正常”和“专家”。 为了使我们能够直接在窗口中键入代码,它将需要处于“专家”模式。 要更改模式,请单击窗口右上角的箭头,然后从下拉列表中选择“专家模式”。
The Actions window will be empty. Enter the following into the actionScript window:
“操作”窗口将为空。 在actionScript窗口中输入以下内容:
_parent.stop();That’s all for frame 1 (simple, yet effective!). Let’s look at what this code does…
这就是第1帧的全部内容(简单而有效!)。 让我们看看这段代码的作用……
We use the ‘stop()‘ action, because we want to stop the main timeline. But, because we’re inside the preloader movie clip, just calling ‘stop()‘ is going to stop the preloader’s timeline (while the main timeline happily keeps playing).
我们使用' stop() '操作,因为我们要停止主时间轴。 但是,由于我们位于预加载器影片剪辑中,因此只需调用“ stop() ”即可停止预加载器的时间轴(同时主时间轴愉快地继续播放)。
What we need to do is send the ‘stop’ message to the main timeline. Notice the ‘.’ (dot/full stop or period) in the statement. The best way to pass messages between timelines and movieclips is to use this ‘dot syntax’. It works liked this:
我们需要做的是向主时间轴发送“停止”消息。 注意“。” (句点/句号或句点)。 在时间轴和电影剪辑之间传递消息的最佳方法是使用此“点语法”。 它像这样工作:
target.message(or target.property, as we’ll see later)
(或target.property ,我们将在后面看到)
In our case, ‘_parent’ is the target (the parent object is the one that contains the referring clip).
在我们的例子中,“ _ parent”是目标(父对象是包含引用剪辑的对象)。
So, _parent.stop(); sends the timeline we’re within (i.e. the main timeline), the ‘stop()’ command.
因此, _parent.stop(); 发送我们所在的时间轴(即主时间轴),“ stop()”命令。
Step 2. The Preloader Calculates and Displays the Loading Status.
步骤2.预加载器计算并显示加载状态。
How do we calculate the values?
我们如何计算值?
To calculate the loading progress, there are two main functions that we’ll need to use:
要计算加载进度,我们需要使用两个主要功能:
getBytesLoaded()getBytesLoaded()getBytesTotal()getBytesTotal()
These both return numerical values for:
这些都返回以下数值:
- the number of bytes that have been downloaded (in the current movie) 已下载的字节数(当前电影中)
- the total number of bytes (in the current movie) 总字节数(当前电影中)
Again, we’ll use ‘_parent.‘ to target the main timeline, because bytesLoaded and bytesTotal are properties of the entire ‘main’ movie.
同样,我们将使用' _parent. 以主时间轴为目标,因为bytesLoaded和bytesTotal是整个“主”电影的属性。
Personally, I don’t really like bytes, they’re very small, slippery, and there are always a lot of them (moving pretty quickly).
就我个人而言,我并不是很喜欢字节,它们很小,很滑,而且总是很多(移动很快)。
To display something more friendly to our visitors, I’m going to turn them into kBytes, the value we usually see when waiting for data transfers and downloads.
为了向访问者显示更友好的内容,我将把它们变成千字节,这是我们在等待数据传输和下载时通常看到的值。
There are 1024 bytes in a kByte, so, click on frame 2 and enter the following lines of code into the actionScript window…
一千字节中有1024个字节,因此,单击第2帧,然后在actionScript窗口中输入以下代码行…
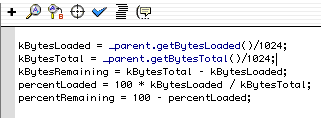
kBytesLoaded = _parent.getBytesLoaded()/1024;

kBytesTotal = _parent.getBytesTotal()/1024;
Armed with this information, we can calculate some more exciting values…
有了这些信息,我们可以计算出更多令人兴奋的值……
kBytesRemaining = kBytesTotal - kBytesLoaded;

percentLoaded = 100 * kBytesLoaded / kBytesTotal;

percentRemaining = 100 - percentLoaded;
Enter these lines of code also.
也输入这些代码行。
Ok, enough of that for the moment, let’s look at Step 3.
好的,到目前为止,让我们看一下步骤3。
Step 3. If Still Loading, Return to Step 2, Otherwise Continue Playing the Main Timeline.
步骤3.如果仍在加载,请返回步骤2,否则继续播放主时间轴。
In the timeline, click on the third frame of the actionScript layer. Again, the Actions window is empty.
在时间轴中,单击actionScript层的第三帧。 同样,“操作”窗口为空。
Now our procedure says, “If the movie is still loading, return to step 2” — frame 2, where our information will be calculated all over again.
现在,我们的过程说:“如果电影仍在加载,请返回到步骤2”(第2帧),我们的信息将重新计算。
Hmm, ‘if still loading’… Well, we’ve got some useful info from our calculations in frame 1, how about:
嗯,“如果仍在加载中”……嗯,我们从第一帧的计算中获得了一些有用的信息,如何:
if (percentLoaded < 100){

  gotoAndPlay(2);

}
That is, if whatever is in the brackets (percentLoaded < 100) is true, then do whatever is in the curly brackets {gotoAndPlay(2);}
也就是说,如果括号中的内容( percentLoaded <100)为真,则执行括号中的任何内容{gotoAndPlay(2);}
That looks pretty good…
看起来不错…
But I don’t like it! The computer’s doing its best to perform all the calculations, and it does a pretty good job, but sometimes, instead of getting to 100% you may actually end up with 99.9999999999%.
但是我不喜欢它! 计算机会尽力执行所有计算,并且做得很好,但是有时,您可能最终获得99.9999999999%,而不是达到100%。
This value would leave the visitor stuck in the loader until the computer decides that 99.9999999999 is not less than 100, and personally, I don’t think it’s going to happen.
此值将使访客停留在加载程序中,直到计算机确定99.9999999999不小于100,就我个人而言,我认为这不会发生。
So let’s change the code to:
因此,让我们将代码更改为:
if (percentLoaded < 99){

  gotoAndPlay(2);

}
…otherwise continue playing the main timeline.
…否则继续播放主时间轴。
Modify the code again so that it looks like this:
再次修改代码,使其如下所示:
if (percentLoaded < 99){

  gotoAndPlay(2);

} else {

  _parent.play();

  stop();

}
Here,
这里,
‘_parent.play()‘ sends the ‘play‘ command to the main timeline, which we stopped it earlier using ‘_parent.stop();‘
' _parent.play() '将' play '命令发送到主时间轴,我们之前使用' _parent.stop();其停止了_parent.stop(); '
‘stop();‘ will stop the current (preloader) timeline
' stop(); '将停止当前(预加载器)时间轴
And we’re done! (See, I told you it was the fun bit)
我们完成了! (看,我告诉你这很有趣)
测试一下 (Test it Out)
Before we try this out, we need obviously need to have our preloader in the movie (and not just in the library where it currently is).
在尝试之前,显然我们需要在电影中添加预加载器(而不仅仅是在当前存储库中)。
So, go to the main timeline, click on the first frame, and drag our ‘preloader’ movie clip from the library to the stage. If you can’t find the library, select it from the ‘Windows’ menu.
因此,转到主时间轴,单击第一帧,然后将我们的“预加载器”电影剪辑从库中拖到舞台上。 如果找不到该库,请从“ Windows”菜单中选择它。
Note that if you started out with a blank movie, you’ll need to add some content to it now, otherwise we can’t tell if the preloader is working. Import an image or something else that will increase the movie’s filesize, and place it on frame 2 (or some later frame) in the main timeline.
请注意,如果您是从空白电影开始的,则需要立即向其中添加一些内容,否则我们无法确定预加载器是否在工作。 导入图像或其他会增加电影文件大小的图像,然后将其放置在主时间轴的第2帧(或稍后的某个帧)上。
Ok, test your movie, and make sure you turn on ‘show streaming’ (under the ‘view’ menu) when the preview runs. It should wait on frame 1 until loading is complete, and then continue to play.
好的,测试电影,并确保在运行预览时打开“显示流”(在“视图”菜单下)。 它应该在第1帧上等待,直到加载完成,然后继续播放。
Brilliant!
辉煌!
“Ummm, yeah, but there’s nothing on stage,” you’re thinking. “I thought this was all about feedback?”
“嗯,是的,但是舞台上什么都没有,”你在想。 “我认为这全都与反馈有关?”
Alright, alright, I’m getting to it!
好吧,好吧,我要去做!
提供反馈 (Providing Feedback)
All of the following changes must be made within the ‘preloader’ movie clip, so if you’re not already there, double click ‘preloader’ in the library.
以下所有更改都必须在“预加载器”影片剪辑中进行,因此,如果您还不存在,请在库中双击“预加载器”。
Before we look at representing the preloader’s progress visually, let’s start by displaying a numerical percentage loaded indicator.
在以视觉方式呈现预加载器的进度之前,我们先显示一个数字百分比加载指示器。
Click on the graphics layer, and draw a text box in the center of the stage. In the ‘Text Options’ panel, select ‘Dynamic Text’ and type ‘progress’ as the name for the variable.
单击图形层,然后在舞台中央绘制一个文本框。 在“文本选项”面板中,选择“动态文本”,然后键入“ progress”作为变量的名称。
In FlashMX, click the Characters… button and select ‘Only’, then select ‘Numerals’ and type a ‘%’ into the ‘and these characters’ field.
在FlashMX中,单击“字符”按钮,然后选择“仅”,然后选择“数字”,然后在“和这些字符”字段中键入“%”。
If you’re using Flash5, under the font embedding options, click the button marked ‘123’ and type a percentage sign (%) into the field on the right.
如果您使用的是Flash5,请在字体嵌入选项下,单击标记为“ 123”的按钮,然后在右侧字段中输入一个百分号(%)。
This will only embed outlines for numerical characters and the ‘%’. By only embedding some characters, we reduce the bytesize of the font definition, and minimize any potential lag while the font loads.
这只会嵌入数字字符和“%”的轮廓。 通过仅嵌入一些字符,我们减小了字体定义的字节大小,并最大程度地减小了字体加载时的潜在延迟。
Note that, if you wish to avoid font loading altogether, choose a system font and don’t select any embedding options. This will cause the movie to use a font on the user’s system rather than requiring downloaded outlines. Note however, that you will lose control over some of the display properties. System fonts are not able to be rotated, skewed, scaled disproportionately or have alpha values applied.
请注意,如果您希望完全避免字体加载,请选择系统字体并且不要选择任何嵌入选项。 这将导致影片在用户系统上使用字体,而不需要下载轮廓。 但是请注意,您将无法控制某些显示属性。 系统字体不能过度旋转,倾斜,缩放或应用Alpha值。
That’s all we need on stage, but if you test your movie now, you still won’t see anything!
这就是我们在舞台上需要的,但是如果您现在测试电影,您仍然看不到任何东西!
What we have to do is get a message from our calculations in frame 2 into the dynamic text field we’ve just created.
我们要做的是从第2帧的计算中获得一条消息,将其发送到我们刚刚创建的动态文本字段中。
Click on frame 2 in the actionScript layer, and if you’ve closed it, open the actions window again.
单击actionScript层中的第2帧,如果已将其关闭,请再次打开action窗口。
What we want to do now is set the variable ‘progress’ (our dynamic text field) to display something like ‘75%’. Well, not really 75, but whatever is calculated by the ‘percentRemaining’ code, which will be updated repeatedly as the movie loops through frame 1.
我们现在要做的是将变量“ progress”(我们的动态文本字段)设置为显示“ 75%”之类的内容。 好吧,不是真的75,而是由“ percentRemaining”代码计算出的任何值,随着电影在第1帧循环播放,该代码将重复更新。
After the existing code, enter the following…
在现有代码之后,输入以下内容...
progress = percentRemaining add '%';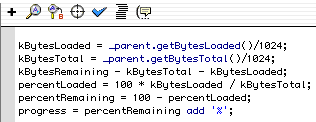
This will add a ‘%’ character to the end of ‘percentRemaining’, and put the result into the ‘progress’ text field.
这将在'percentRemaining'的末尾添加'%'字符,并将结果放入'progress'文本字段中。
Test again it now!
现在再次测试!
Chances are you don’t like it. I don’t, either. The code we entered will display numbers like 27.568793256432%. In fact, because we didn’t embed a decimal point with our characters, it will probably display figures like 27568793256432% which is just silly.
您可能不喜欢它。 我也不知道 我们输入的代码将显示类似27.568793256432%的数字。 实际上,因为我们没有在字符中嵌入小数点,所以它可能会显示像27568793256432%这样的数字,这很愚蠢。
Although we’re about to get rid of all these numbers, go back to the character embedding options and add a full stop/period/decimal point (or whatever you’d like to call it) into the field with the ‘%’. You might want it later.
尽管我们将摆脱所有这些数字,但请返回到字符嵌入选项,并在字段中使用'%'添加句号/句点/小数点(或您要调用的小数点)。 您稍后可能会想要。
Now, we need to chop all those decimal places off the end of our number. And there’s a nice simple way to do it.
现在,我们需要将数字末尾的所有小数位都切掉。 有一个很好的简单方法来做到这一点。
Flash contains a whole bunch of math-related functions, one of which is ‘floor()‘.
Flash包含一整套与数学相关的函数,其中之一是“ floor() ”。
Give the floor function a number, and it will find the integer (whole number) that is immediately below it. That’s exactly what we want! ‘87.568793256432’ becomes ’87’.
给floor函数一个数字,它将找到紧接其下的整数(整数)。 这正是我们想要的! '87 .568793256432'变为'87'。
So, change the last line to…
因此,将最后一行更改为...
progress = Math.floor(percentRemaining) add '%';Test it again… Beautiful!
再次测试……美丽!
Ok, that was percent remaining to load, but you might want something else, and, chances are, it’s just as easy.
好的,那是剩余的要加载的百分比,但是您可能还需要其他东西,并且很可能,这同样容易。
How about those messages that say things like ‘125 of 200 kBytes loaded’
那些类似“ 125 of 200 kBytes loading”的消息怎么样
The message is a little lengthy, but let’s do it anyway — it’ll give those waiting users something to read.
该消息有些冗长,但无论如何我们都可以做—它会为那些等待中的用户提供一些阅读的信息。
progress = Math.floor(kBytesLoaded) add ' of '

add Math.floor(kBytesTotal) add ' kBytes loaded';
Easy, huh?
容易吧?
No! Wait a minute, we’ve just added a whole bunch of characters that we didn’t include, and they may not display on a machine that doesn’t have your font installed. Click on the ‘progress’ text field and in the font embedding options add ‘ofkByteslad’ into the field to embed these characters as well.
没有! 请稍等,我们刚刚添加了一大堆我们没有包括的字符,它们可能不会显示在未安装您字体的计算机上。 单击“进度”文本字段,然后在字体嵌入选项中将“ ofkByteslad”添加到该字段中,以同时嵌入这些字符。
获取图形 (Getting Graphic)
Ok, enough with the text messages. How do you do one of those snazzy, progress-indicating loading bars?
好了,短信就够了。 您如何处理那些令人眼花,乱的进度指示加载栏?
Well, it’s really simple.
好吧,这真的很简单。
Draw a solid rectangle on the stage underneath your text field (or wherever you want it to appear, really).
在您的文本字段下方的舞台上(或实际上希望显示的任何位置)绘制一个实心矩形。
With the selection tool, single click on the rectangle’s fill (this will select the fill, but not the stroke). I’m going to only scale the fill and leave behind the stroke as an indicator of the total size.
使用选择工具,单击矩形的填充(这将选择填充,而不是笔触)。 我将仅缩放填充并留下笔触作为总大小的指标。
Convert the selected fill into a symbol (menu: ‘Insert’ > ‘Convert to Symbol…’ or press F8). The Symbol Properties dialog box appears. Enter a symbol name and click ‘OK’.
将选定的填充转换为符号(菜单:“插入”>“转换为符号…”或按F8)。 出现“符号属性”对话框。 输入符号名称,然后单击“确定”。
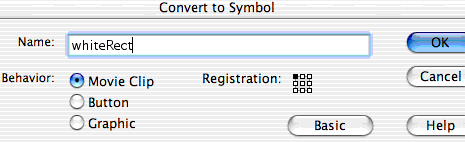
Note that if you’re using FlashMX, you must select a registration point option on the left in the little grid. If you’re using Flash5, we’ll need to fix something else in just a minute.
请注意,如果您使用的是FlashMX,则必须在小网格左侧选择一个注册点选项。 如果您使用的是Flash5,我们需要在一分钟内修复其他问题。
Now, when you create or place a movieClip on the stage, you may have noticed that you can give it an ‘instance’ name (this is on the ‘Properties’ panel in MX and on the ‘Instance’ panel in 5). This name allows the clip to be identified by actionScript, and various clip properties can inspected and controlled.
现在,当您在舞台上创建或放置movieClip时,您可能已经注意到可以给它指定一个“实例”名称(这在MX中的“属性”面板上和在5中的“实例”面板上)。 此名称允许通过actionScript识别剪辑,并且可以检查和控制各种剪辑属性。
On the ‘Properties’ / ‘Instance’ (FlashMX / Flash5) panel, enter ‘loadBar’ as the instance name.
在“属性” /“实例”(FlashMX / Flash5)面板上,输入“ loadBar”作为实例名称。
Just as we used our calculated variables to set the text in our text field, we’ll now use them to set the scale of our ‘loadBar‘.
正如我们使用计算出的变量来设置文本字段中的文本一样,现在我们将使用它们来设置' loadBar '的比例。
To help you differentiate them from functions and variables, property names start with the underscore character ‘_‘.
为了帮助您将它们与函数和变量区分开,属性名称以下划线字符_开头。
The property we will set is ‘_xScale‘. There’s also a ‘_width‘ property, but they differ slightly. ‘_width‘ sets the actual width of a clip in pixels, whereas ‘_xScale‘ sets the width as a percentage of the clip’s defined size.
我们将设置的属性为' _xScale '。 还有一个' _width '属性,但是它们略有不同。 “ _width ”设置剪辑的实际宽度(以像素为单位),而“ _xScale ”将宽度设置为剪辑的定义大小的百分比。
_xScaleis the best choice in this case, as we've just defined the clip at a size that fits perfectly into the stroke we left on the stage (when it has a scale of 100%). Our 'percentLoaded' value also ranges from 0% to 100%, so they should be very happy together.Note that you could also use the width property, however, unless you wanted to scale from 0 to 100 pixels width, there would be a tiny bit more maths involved. In this situation,
xScaleis easier.Now, to set the properties of a movieClip, we must tell Flash which movie we're talking about. This is the instance name we entered before (
loadBar). This is how it looks...It's dot syntax again, but this time we're using it to set a property, rather than calling a function.
Go ahead and add it to the script on frame 2. Now it looks like ...
kBytesLoaded = _parent.getBytesLoaded()/1024;
kBytesTotal = _parent.getBytesTotal()/1024;
kBytesRemaining - kBytesTotal - kBytesLoaded;
percentLoaded = 100 * kBytesLoaded / kBytesTotal;
percentRemaining = 100 - percentLoaded;
progress = Math.floor(kBytesLoaded) add ' of '
add Math.floor(kBytesTotal) add 'kBytes loaded';
loadBar._xScale = percentLoaded;
Flash 5 Note When you test your movie, it may not appear exactly as you expected. Rather than growing from one side of the display to the other, loadBar grows out from the center. This is because the scaling of the clip is based around its 'registration point'.Select the loadBar symbol, and you'll see a cross in the center. This is the registration point.
Let's move the registration point to the left hand edge of the rectangle. This will make the scaling clip stretch out to the right.
Double-click the clip to enter edit mode, and click once on the rectangle to select it.
In the 'info' panel (menu, Window > Panels > Info), the position of the shape relative to the clip's registration point is shown in the fields marked X and Y. Next to this is a little set of boxes, some are grey, one is white, one is black. Here, you set whether the X,Y values are relative to the center of the shape, or to the top-left corner. In the following image, the X,Y values are 0.0 relative to the center.
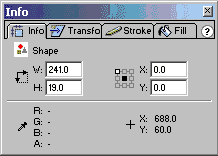
Click on the corner box and notice that the X,Y values change. Enter 0 (zero) into the X value, and hit the tab key to set it. The rectangle on the stage jumps to the right, so that its left hand edge is aligned with the registration point.
Well that's good, but it's a bit annoying that our clip is now in the wrong position.
Exit the clip's edit by clicking the 'Scene 1' link in the top-left of the window (just above the timeline). Click and drag the clip back to the left, so that it fits within the stroke again.
Test the movie again and you'll see a more 'traditional' progress bar.
You may have noticed that, before there's any movement, the bar is very briefly displayed at 100% width. This is because, before it has a chance to do any calculations in frame 1, the bar is shown as it is placed on the timeline. But there's an easy fix! Select the clip, and, in the info panel, enter 1 into the width field. Hit the tab key to set it.
Test the movie again... it's fixed!
A Little Bit Extra
Well, at the very start, I said that one of the possible feedback displays we could use was the estimated time remaining. It will require just a little more code, so let's do it.
Another handy function in Flash is '
getTimer()' which returns the number of milliseconds since the movie started. Just as I'm not rapt in bytes, I'm also not that fond of milliseconds. I'm going to use (getTimer()/1000), which will give the value in seconds instead.In the frame 2 code, let's calculate the number of kBytes per second -- you could display that, too, if you like.
It's that's simple: the number of kBytes loaded, divided by the number of seconds it's taken.
And now, the time remaining:
timeRemaining = kBytesRemaining / kBytesSec;Another simple one. We divide the amount remaining by the newly calculated download speed.
So our display message might be ...
Hey that's cool! Now your visitors know if there really is enough time to put the kettle on before your movie starts!
So, don't leave your visitors twiddling their thumbs, grinding their teeth, and potentially abandoning the download altogether. Tell them what's going on -- it's that easy! Keep them informed, keep them happy.
And that's just the beginning. There's so much more you could do. Check out other movieClip properties you can access, play with the rotation or position values, get in there and mess around, and have some fun!
Problems, Workarounds, Other Bits 'n' Pieces
The preloader we've built here will work well for most Flash movies. However, there are situations where it will not perform as you might like.
Loaded Submovies
The values returned by
getBytesLoadedandgetBytesTotalonly apply to the main movie. If you're loading movies and sounds into your main movie, these bytes are not counted by the preloader, and as soon as the main movie is loaded, it will continue regardless of any external files that are still loading.If you had a submovie being loaded into level 1 and wanted it, as well as the main movie, to preload, you could do something along the following lines...
kBytesLoaded = (_parent.getBytesLoaded() +
_level1.getBytesLoaded()) / 1024;
kBytesTotal = (_parent.getBytesTotal () +
_level1.getBytesTotal ()) / 1024;Linked Assets
When a movie's library contains items with linkage, the linked objects, and any objects they depend on, are exported in the first frame (this can be avoided in MX -- see below).
As Flash doesn't display a frame until it has loaded, this can produce a 'stalled' effect when loading the movie (because the first frame can obviously get quite large).
Files using '
attachSound()' and 'attachMovie()' have linked assets. Linkage can also be common in Flash components.Flash MX introduced a way of linking assets that does not place them in frame 1 of your movie. By default, linked assets are still written into frame one, but this can be avoided.
Uncheck the 'export in first frame' option for the linked asset(s). Doing this will prevent the item from being exported, unless it's manually placed on the stage. You'll then need to manually place the item in a frame after your preloader and before any actionScript that calls the attach function.
Chances are, you don't want these items manually placed, which is why you're using attach functions in the first place, so you'll probably want to place them somewhere offscreen, or on a frame that doesn't ever get played.
This can all get a little laborious (particularly if you're using components) as these often have numerous exported subelements, which you will also have to adjust and manually relocate.
Resources and Links
Got problems? Here are some links that could ease your troubles.
ActionScript.org Flash community forums, movies, tutorials.http://www.actionscripts.org
'AssetMover'. Utility that moves linked assets to a specified frame. http://www.flexidev.com
Flashcoders/Flashnewbie (and other lists). Some great mailing lists. Things can get pretty hardcore on the Flashcoders list (and will fill up your inbox. You might want to subscribe to the digest!).http://chattyfig.figleaf.com
FlashKit. Flash community sites, forums, tutorials, movies. Stuff for everyone, from designers to code junkies.http://www.flashkit.com
Neave's Webgames. Completely off-topic, but when you need to kill some time, this site has some classic games recreated in Flash (completely free -- downloadable .fla's and all). Hey, wait a minute, don't get distracted -- make your preloader first!http://www.neave.com/webgames/
And, on my desk, amongst other volumes, is "ActionScript for Flash MX – The Definitive Guide – 2nd Edition" by Colin Moock. Over a thousand pages of ActionScript information. It's not really a tutorial/how-to book, but it's a very solid reference.
preloader


 1万+
1万+


 被折叠的 条评论
为什么被折叠?
被折叠的 条评论
为什么被折叠?
 到【灌水乐园】发言


