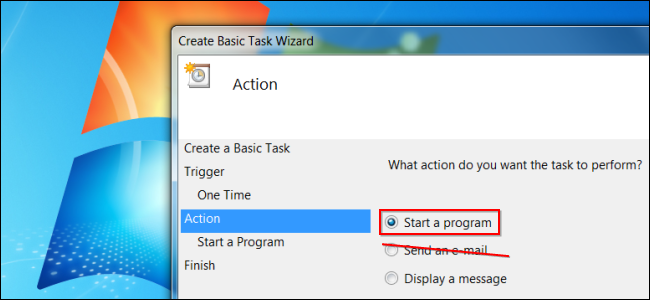
The Windows Task Scheduler can automatically send email at a specific time or in response to a specific event, but its integrated email feature won’t work very well for most users.
Windows Task Scheduler可以在特定时间或响应特定事件自动发送电子邮件,但是其集成的电子邮件功能对于大多数用户而言效果不佳。
Instead of using the Task Scheduler’s email feature to send emails, you can use the SendEmail utility. It allows you to construct a single-line command that authenticates with an SMTP server and sends an email.
您可以使用SendEmail实用程序,而不是使用Task Scheduler的电子邮件功能发送电子邮件。 它允许您构造一个单行命令,该命令通过SMTP服务器进行身份验证并发送电子邮件。
任务计划程序的电子邮件功能存在的问题 (The Problem With The Task Scheduler’s Email Function)
When we covered setting up your computer to send you email notifications when anyone logs in, we found that the built-in email feature had some issues.
当我们涵盖了设置您的计算机以在任何人登录时向您发送电子邮件通知时 ,我们发现内置电子邮件功能存在一些问题。
While you can enter any SMTP server you like, the Task Scheduler doesn’t support authentication, so you can’t provide a username and password for your SMTP server. The type of SMTP server most users have access to (for example, Gmail’s SMTP server, or an SMTP server provided by your Internet service provider) requires authentication, so it can’t easily be used from the Task Scheduler.
尽管您可以输入所需的任何SMTP服务器,但“任务计划程序”不支持身份验证,因此您无法为SMTP服务器提供用户名和密码。 大多数用户可以访问的SMTP服务器类型(例如,Gmail的SMTP服务器或Internet服务提供商提供的SMTP服务器)需要身份验证,因此无法从“任务计划程序”中轻松使用。
If you’re running an SMTP server on your local computer, the Task Scheduler’s email function may be useful to you. However, the average user will need another tool – that’s where SendEmail comes in.
如果您在本地计算机上运行SMTP服务器,则任务计划程序的电子邮件功能可能对您有用。 但是,普通用户将需要另一个工具-这就是SendEmail的用处。
使用SendEmail (Using SendEmail)
First, download SendEmail, a free (and open source) tool for sending emails from the command line. Extract the downloaded archive into a folder on your computer.
首先, 下载SendEmail ,这是一个免费的(开放源代码)工具,用于从命令行发送电子邮件。 将下载的存档解压缩到计算机上的文件夹中。
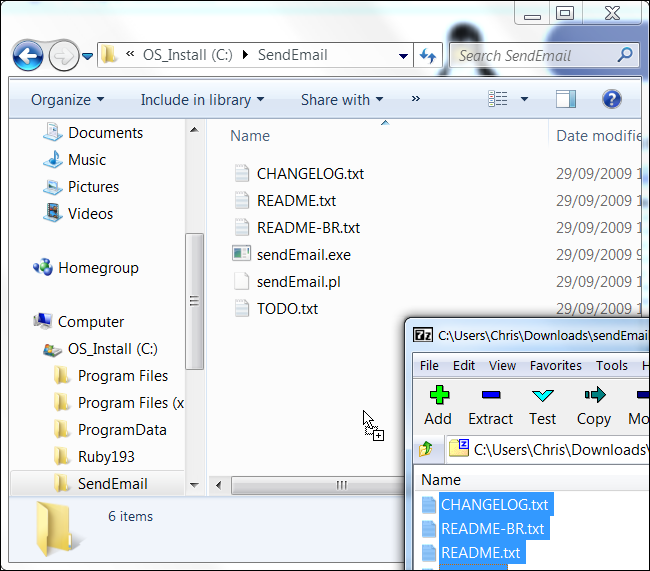
Next, launch the Windows Task Scheduler and create a new task – consult our guide to creating scheduled tasks for more information. You can create a task that automatically sends an email at a specific time or a task that sends an email in response to a specific event.
接下来,启动Windows Task Scheduler并创建一个新任务–有关更多信息,请参阅我们的指南以创建计划任务 。 您可以创建一个在特定时间自动发送电子邮件的任务,或者创建一个响应特定事件而发送电子邮件的任务。
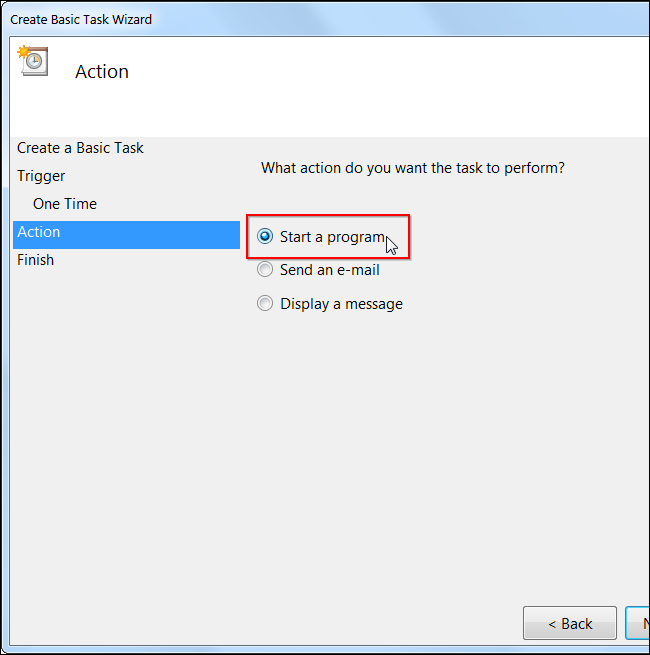
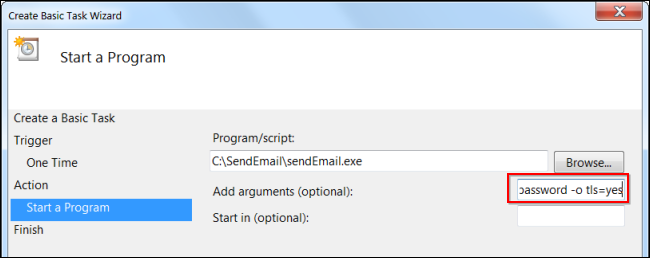
When you reach the Action window, select Start a program instead of Send an e-mail.
当您到达“操作”窗口时,选择“启动程序”而不是“发送电子邮件”。
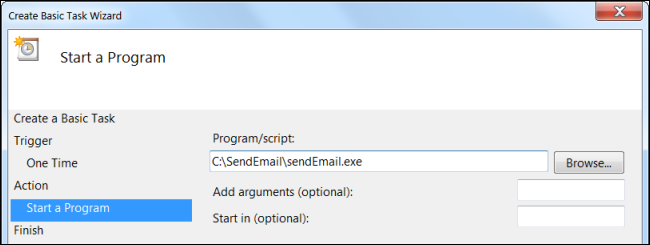
In the Program/script box, use the Browse button and navigate to the SendEmail.exe file on your computer.
在“程序/脚本”框中,使用“浏览”按钮并导航到计算机上的SendEmail.exe文件。
Finally, you’ll have to add the arguments required to authenticate with your SMTP server and construct your email. Here’s a list of the options you can use with SendEmail:
最后,您必须添加使用SMTP服务器进行身份验证和构建电子邮件所需的参数。 以下是可与SendEmail一起使用的选项的列表:
Server Options
服务器选项
-f EMAIL – The email address you’re sending from.
-f EMAIL –您从中发送的电子邮件地址。
-s SERVER:PORT – The SMTP server and port it requires.
-s SERVER:PORT –所需的SMTP服务器和端口。
-xu USERNAME – The username you need to authenticate with the SMTP server.
-xu USERNAME –您需要通过SMTP服务器进行身份验证的用户名。
-xp PASSWORD – The password you need to authenticate with the SMTP server.
-xp PASSWORD-使用SMTP服务器进行身份验证所需的密码。
-o tls=yes – Enables TLS encryption. May be necessary for some SMTP servers.
-o tls = yes –启用TLS加密。 对于某些SMTP服务器可能是必需的。
If you’re using Gmail’s SMTP servers, these are the server options you’ll need:
如果您使用的是Gmail的SMTP服务器,则需要使用以下服务器选项:
-s smtp.gmail.com:587 -xu you@gmail.com -xp password -o tls=yes
-s smtp.gmail.com:587 -xu you@gmail.com -xp密码-o tls = yes
Of course, you’ll have to enter your own email address and password here.
当然,您必须在这里输入您自己的电子邮件地址和密码。
Destination Options
目标选项
-t EMAIL – The destination email address. You can send an email to multiple addresses by including a space between each address after the -t option.
-t EMAIL-目标电子邮件地址。 您可以通过在-t选项后的每个地址之间包含一个空格来向多个地址发送电子邮件。
-cc EMAIL – Any addresses you’d like to CC on the email. You can specify multiple addresses by placing a space between each email address, just as with the -t command above.
-cc EMAIL –您想在电子邮件中抄送的任何地址。 您可以通过在每个电子邮件地址之间放置一个空格来指定多个地址,就像上面的-t命令一样。
-bcc EMAIL – The BCC version of the CC option above.
-bcc EMAIL –上面CC选项的BCC版本。
Email Options
电子邮件选项
-u SUBJECT – The subject of your email
-u主题-您的电子邮件主题
-m BODY – The message body text of your email.
-m BODY-电子邮件的消息正文文本。
-a ATTACHMENT – The path of a file you’d like to attach. This is optional.
-a ATTACHMENT-您要附加的文件的路径。 这是可选的。
For example, let’s say your email address is you@gmail.com and you’d like to send an email to person@example.com. You’d use the following options:
例如,假设您的电子邮件地址为you@gmail.com,而您想发送电子邮件至person@example.com。 您将使用以下选项:
-f you@gmail.com -t person@example.com -u Subject -m This is the body text! -s smtp.gmail.com:587 -xu you@gmail.com -xp password -o tls=yes
-f you@gmail.com -t person@example.com -u主题-m这是正文! -s smtp.gmail.com:587 -xu you@gmail.com -xp密码-o tls = yes
Once you’ve put together your options, copy and paste them into the Add arguments box.
将所有选项组合在一起后,将其复制并粘贴到“添加参数”框中。
Save your task and you’re done. Your task will automatically send email on the schedule (or in response to the event) you specified.
保存任务即可完成。 您的任务将按照您指定的时间表(或响应事件)自动发送电子邮件。
There’s a lot more you can do with SendEmail, including integrating it into a script that automatically sends emails or creating a shortcut that sends an email when you double-click it.
您可以使用SendEmail做更多的事情,包括将其集成到自动发送电子邮件的脚本中,或者创建双击电子邮件时发送电子邮件的快捷方式。
翻译自: https://www.howtogeek.com/125045/how-to-easily-send-emails-from-the-windows-task-scheduler/


 264
264


 被折叠的 条评论
为什么被折叠?


