


linux中fstab文件

If you’re running Linux, then it’s likely that you’ve needed to change some options for your file systems. Getting acquainted with fstab can make the whole process a lot easier, and it’s much easier than you think.
如果您正在运行Linux,则可能需要更改文件系统的某些选项。 熟悉fstab可以使整个过程更加轻松,并且比您想象的要容易得多。
什么是Fstab? (What Is Fstab?)
Fstab is your operating system’s file system table. If you want a review of file systems, be sure to check out our other article, HTG Explains: Which Linux File System Should You Choose? In the old days, it was the primary way that the system mounted files automatically. Nowadays, you can plug in a USB drive of any kind and it’ll just pop up in Nautilus like it does in Windows and Mac OS, but once upon a time, you had to manually mount those disks to a specific folder using the “mount” command. This held true for DVDs, CDs, and even floppies (remember those?).
Fstab是操作系统的文件系统表。 如果您想查看文件系统,请务必阅读我们的另一篇文章HTG Explains:您应该选择哪个Linux文件系统? 在过去,这是系统自动挂载文件的主要方式。 如今,您可以插入任何类型的USB驱动器,就像在Windows和Mac OS中一样,它会在Nautilus中弹出,但是从前,您必须使用“安装”命令。 DVD,CD甚至软盘都适用(记得吗?)。
Back then, your only alternative was the tell the computer that anytime a specific device was plugged in, it should be automatically mounted in a specific place. This is where fstab came in, and it was awesome. Suppose you swapped hard disks on your IDE or SCSI controller. The computer could load the file systems in a different order, potentially messing things up. Fstab is configured to look for specific file systems and mount them automatically in a desired way each and every time, preventing a myriad of disasters from occurring.
那时,您唯一的选择是告诉计算机,只要插入特定设备,就应将其自动安装在特定位置。 这是fstab出现的地方,它很棒。 假设您交换了IDE或SCSI控制器上的硬盘。 计算机可能会以不同的顺序加载文件系统,从而可能使事情混乱。 Fstab配置为查找特定的文件系统,并每次以所需的方式自动挂载它们,从而避免了无数灾难的发生。
您的Fstab文件 (Your Fstab File)
The fstab file is located at:
fstab文件位于:
/etc/fstab
/ etc / fstab
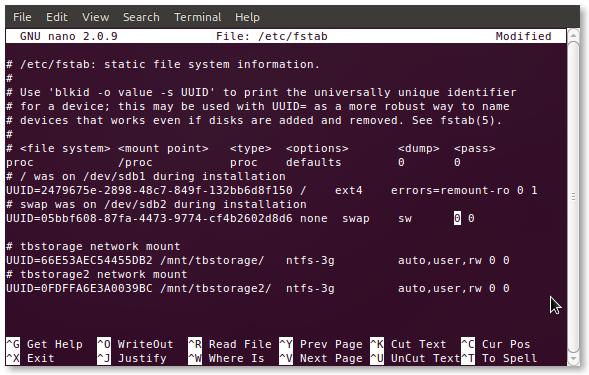
Let’s take a look at my fstab file, shall we?
让我们看看我的fstab文件,好吗?
You’ll definitely see differences, but if you want to follow along with your own fstab just pop this command into a terminal:
您肯定会看到不同之处,但是如果您想继续使用自己的fstab,只需将此命令弹出到终端即可:
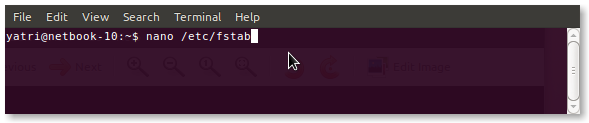
You can also use gedit if you’re not comfortable with nano.
如果您对nano不满意,也可以使用gedit。
The Obvious Options
显而易见的选择
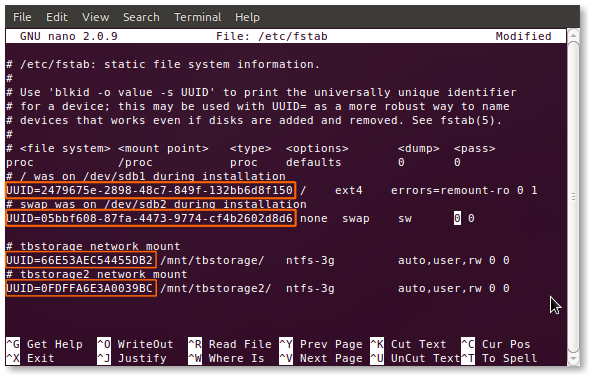
You’ll notice all of the entries begin with UUIDs. You may remember seeing this in one of our previous articles, How to Choose a Partition Scheme for Your Linux PC, but we’ll explain it again anyway. Each file system, during formatting, gets assigned a Universally Unique Identifier, which it takes to the grave. Since it cannot be changed, this is the ideal way to select file systems for mounting, especially for important ones. Let’s say your /home partition is on a second hard drive and you end up moving it to an external hard drive; fstab will still find that partition and mount it correctly, avoiding a failed boot. If you switch to (or are stuck using) the old method of using device identifiers to select partitions (i.e. /dev/sda1), this advantage disappears because hard drives and partitions are counted by their controllers, and can thus change.
您会注意到所有条目都以UUID开头。 您可能还记得在我们以前的文章之一“ 如何为Linux PC选择分区方案”中看到过这一点,但是无论如何我们都会再次说明。 在格式化过程中,每个文件系统都分配有一个通用唯一标识符,该标识符将引人注意。 由于无法更改,因此这是选择要安装的文件系统的理想方式,尤其是对于重要的文件系统。 假设您的/ home分区位于第二个硬盘驱动器上,并且最终将其移动到外部硬盘驱动器上。 fstab仍会找到该分区并将其正确挂载,以避免引导失败。 如果切换到(或卡在)使用设备标识符来选择分区(即/ dev / sda1)的旧方法,则该优势将消失,因为硬盘驱动器和分区由其控制器计数,因此可以更改。
Edit: Using UUIDs in your fstab file, while convenient for most home users, does have a few big caveats. This doesn’t work when using things like “assembled” or “network-based” devices. If you’re more of an advanced user, or plan on using things like software RAID in the future, you’re better off not using UUIDs.
编辑:在fstab文件中使用UUID,虽然对于大多数家庭用户来说很方便,但确实有一些警告。 当使用“组装”或“基于网络”的设备时,此功能不起作用。 如果您是高级用户,或者计划将来使用诸如软件RAID之类的东西,最好不要使用UUID。
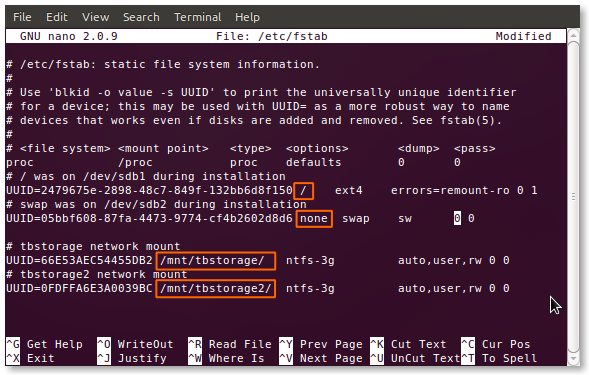
The next section of fstab, like all subsequent ones, is separated by either a space or a tab, or a combination of them. Here, you’ll find the mount point. As you can see, I have a root (/) mount point, a swap, and two that I manually added in for my shared network storage drives. If you’re adding an entry to fstab, then you’ll have to manually create the mount point before you restart your computer (and the changes take effect).
像所有后续部分一样,fstab的下一部分由空格或制表符或它们的组合分隔。 在这里,您将找到安装点。 如您所见,我有一个根(/)挂载点,一个交换和两个为共享网络存储驱动器手动添加的交换点。 如果要将条目添加到fstab,则必须在重新启动计算机之前手动创建安装点(更改才会生效)。

Next is the section which identifies the type of file system on the partition. Many, such as ext2/3/4, ReiserFS, jFS, etc. are natively read by Linux. Your particular system may still need to have particular packages installed to be able to read and write to them. The perfect examples are my NTFS partitions; you can see that I’m using the ntfs-3g driver to access them.
接下来是标识分区上文件系统类型的部分。 Linux原生读取了许多文件,例如ext2 / 3/4,ReiserFS,jFS等。 您的特定系统可能仍需要安装特定的软件包才能对其进行读取和写入。 我的NTFS分区就是最好的例子。 您可以看到我正在使用ntfs-3g驱动程序来访问它们。
The Scarier Stuff
恐怖的东西
The next few sections are what usually scare away newcomers, but they’re really not so complicated. There’s a large set of options available, but there’s a handful or so of very common ones. Let’s take a look at them. (The default option is first, followed by alternatives, but as Linux distros can be very different, your mileage may vary.)
接下来的几节通常会吓到新手,但实际上并没有那么复杂。 有很多可用的选项,但是有少数几个非常常见的选项。 让我们看看它们。 (默认选项是第一个,然后是其他选项,但是由于Linux发行版可能非常不同,因此您的里程可能会有所不同。)
- auto/noauto: Specify whether the partition should be automatically mounted on boot. You can block specific partitions from mounting at boot-up by using “noauto”. auto / noauto:指定是否在启动时自动挂载该分区。 您可以使用“ noauto”阻止特定分区在启动时挂载。
- exec/noexec: Specifies whether the partition can execute binaries. If you have a scratch partition that you compile on, then this would be useful, or maybe if you have /home on a separate file system. If you’re concerned about security, change this to “noexec”. exec / noexec:指定分区是否可以执行二进制文件。 如果您具有要在其上进行编译的临时分区,那么这将很有用,或者如果您在单独的文件系统上具有/ home,则可能会有用。 如果您担心安全性,请将其更改为“ noexec”。
- ro/rw: “ro” is read-only, and “rw” is read-write. If you want to be able to write to a file-system as the user and not as root, you’ll need to have “rw” specified. ro / rw:“ ro”是只读的,“ rw”是读写的。 如果要能够以用户身份而不是root用户身份写入文件系统,则需要指定“ rw”。
- sync/async: This one is interesting. “sync” forces writing to occur immediately on execution of the command, which is ideal for floppies (how much of a geek are you?) and USB drives, but isn’t entirely necessary for internal hard disks. What “async” does is allow the command to execute over an elapsed time period, perhaps when user activity dies down and the like. Ever get a message asking to your “wait while changes are being written to the drive?” This is usually why. 同步/异步:这很有趣。 “同步”强制执行命令后立即进行写操作,这对于软盘(您有多怪胎?)和USB驱动器是理想的选择,但对于内部硬盘并不是完全必要的。 “异步”的作用是允许命令在经过的时间段内执行,也许是在用户活动停止等时。 是否曾经收到一条消息询问您“等待更改写入驱动器?”。 这通常是为什么。
- nouser/user: This allows the user to have mounting and unmounting privileges. An important note is that “user” automatically implies “noexec” so if you need to execute binaries and still mount as a user, be sure to explicitly use “exec” as an option. nouser / user:这允许用户具有安装和卸载特权。 一个重要的注意事项是,“用户”自动包含“ noexec”,因此,如果您需要执行二进制文件并仍然以用户身份挂载,请确保明确使用“ exec”作为选项。
These options are separated by a comma and no spaces, and can be put in any order. If you’re not sure about the defaults, it’s okay to explicitly state your options. Things that are mounted from temporary places (like USB) won’t follow this basic pattern unless you created entries for them (by UUID) in fstab. It’s convenient when you want an external hard drive to always mount in a particular way, because normal thumb-drives and the like won’t be affected.
这些选项用逗号分隔,没有空格,并且可以按任何顺序放置。 如果不确定默认值,则可以明确声明您的选项。 除非您在fstab中为它们(通过UUID)创建了条目,否则从临时位置(如USB)挂载的事物将不会遵循此基本模式。 当您希望始终以特定方式安装外部硬盘驱动器时,这很方便,因为普通的拇指驱动器等不会受到影响。
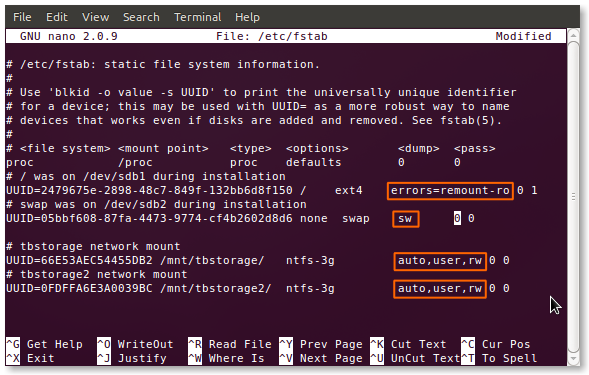
You can see that my two storage drives have user mounting privileges enabled, read-write access enabled, and auto-mounting is turned on. I don’t compile much software, but when I do, I add the “exec” option at the end of the list.
您可以看到我的两个存储驱动器启用了用户安装特权,启用了读写访问,并且自动安装已打开。 我编译的软件不多,但是在编译时,我在列表的末尾添加了“ exec”选项。
Dumping and Fscking
倾销和剥皮
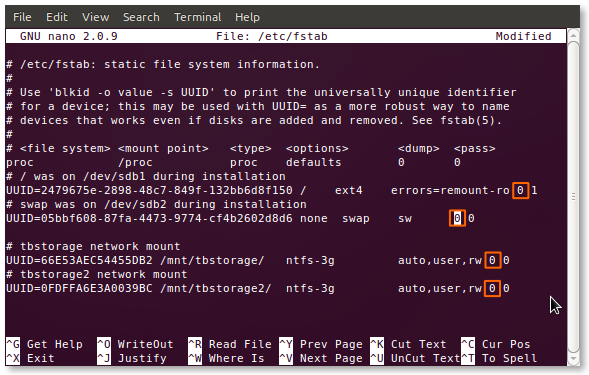
The next option is a binary value (“0” for false and “1” for true) for “dumping.” This is a pretty much out-dated method of backup for cases when the system went down. You should leave this as “0”.
下一个选项是用于“转储”的二进制值(“ 0”表示错误,“ 1”表示真)。 对于系统故障的情况,这是一种非常过时的备份方法。 您应该将其保留为“ 0”。
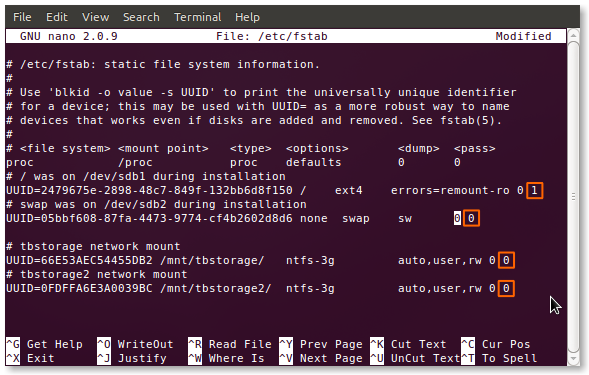
The last option is a numeric value for “passing.” This tells the system the order in which to fsck (pronounce that however you like), or perform a file system check. If a disk has an option of “0” it will be skipped, like my NTFS-formatted storage drives. The root file system should always be “1” and other file systems can go afterward. This works best for journaling file systems like ext3/4 and ReiserFS. Older file systems like FAT16/32 and ext2 can take a while, so it’s better to turn their fscking off and do it periodically yourself.
最后一个选项是“通过”的数值。 这告诉系统执行fsck(按您的喜好发音)或执行文件系统检查的顺序。 如果磁盘的选项为“ 0”,则它将被跳过,例如我的NTFS格式的存储驱动器。 根文件系统应始终为“ 1”,其他文件系统可以随后使用。 这最适合记录ext3 / 4和ReiserFS等文件系统。 较旧的文件系统,例如FAT16 / 32和ext2,可能需要一段时间,因此最好关闭fscking并定期进行操作。
Now that you know what you’re doing, you can go crazy with automatic mounting and the like. It’s very convenient when you’ve got a ton of partitions that need to be managed. Always remember to make a backup in case something goes wrong, but have fun, and be sure to leave your experiences in the comments!
既然您知道自己在做什么,就可以通过自动安装等方式发疯。 当您有大量需要管理的分区时,这非常方便。 始终记得进行备份,以防万一出了点问题,但要乐在其中,并确保在评论中留下您的经验!
翻译自: https://www.howtogeek.com/howto/38125/htg-explains-what-is-the-linux-fstab-and-how-does-it-work/
linux中fstab文件


 5963
5963

 被折叠的 条评论
为什么被折叠?
被折叠的 条评论
为什么被折叠?
 到【灌水乐园】发言


