


Word provides built-in styles for several different levels of headings and subheads—Heading 1, Heading 2, and so on. The styles define the font family, size, color, and more. While you can create your own styles and use those as headings, or adjust the formatting of headings look on the fly, you can also change the default styles if you want.
Word为几种不同级别的标题和副标题(标题1,标题2等)提供了内置样式。 样式定义字体系列,大小,颜色等。 您可以创建自己的样式并将其用作标题,也可以随时调整标题的格式,但也可以根据需要更改默认样式。
如何自定义标题样式 (How to Customize a Heading Style)
On the “Home” tab in Word, you’ll find some built-in styles in the “Styles” group, including the Heading 1 and Heading 2 styles.
在Word的“主页”选项卡上,您可以在“样式”组中找到一些内置样式,包括标题1和标题2样式。

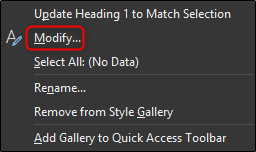
You can right-click either of those heading styles and then select “Modify” to get started customizing them.
您可以右键单击任何一种标题样式,然后选择“修改”以开始自定义它们。
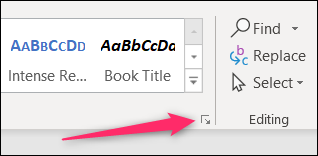
But Word also includes a bunch of other heading levels—nine in all. To see them, click the little arrow at the bottom right of the “Styles” group.
但是,Word还包括许多其他标题级别-总计九个。 要查看它们,请单击“样式”组右下角的小箭头。
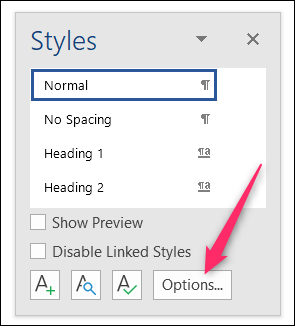
By default, the Styles window that opens shows only recommended styles, which is the same group Word shows on the Ribbon. To change that so you can see all the styles, hit the “Options” button.
默认情况下,打开的“样式”窗口仅显示推荐的样式,这与Word在功能区上显示的组相同。 要更改它,以便您可以查看所有样式,请单击“选项”按钮。
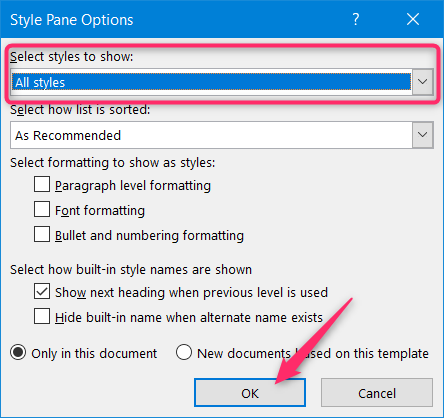
In the Style Pane Options window that opens, open the “Select styles to show” drop-down, change it from “Recommended” to “All Styles,” and then hit “OK.”
在打开的“样式窗格选项”窗口中,打开“选择要显示的样式”下拉菜单,将其从“推荐”更改为“所有样式”,然后单击“确定”。
The Styles window will now show all nine heading levels.
现在,“样式”窗口将显示所有九个标题级别。

Right-click any of them and then choose “Modify” to start customizing the style.
右键单击任意一个,然后选择“修改”以开始自定义样式。

Whether you started modifying a style from the Ribbon or the Styles window, the “Modify Style” window opens up, and the rest of the process is the same.
无论是从功能区还是从“样式”窗口开始修改样式,都会打开“修改样式”窗口,其余过程相同。
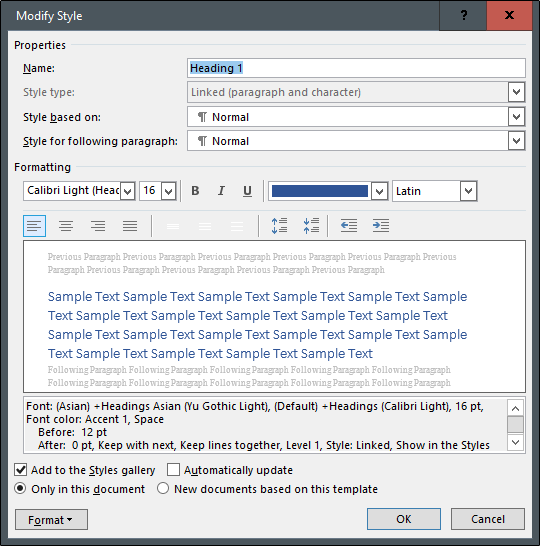
In the “Properties” section, you can rename the style, select the “Style Type” (only available for certain headings), base the style you’re editing off of another style, and even change the style for the paragraph that follows the heading. We’ll name our heading “Custom Style” and leave the rest alone since the default options are already pretty good for headings.
在“属性”部分中,您可以重命名样式,选择“样式类型”(仅适用于某些标题),将要编辑的样式作为其他样式的基础,甚至可以更改后面的段落的样式。标题。 我们将标题命名为“自定义样式”,而其余部分则保留下来,因为默认选项已经非常适合标题。

For the “Formatting” section, we’ll break it down into four separate pieces.
对于“格式设置”部分,我们将其分为四部分。
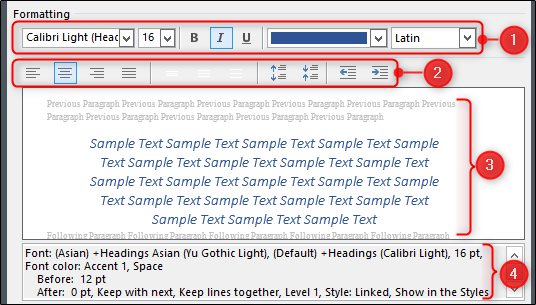
- This section lets you modify the font type, size, and color. You can also apply bold, italics, or underline to your text. The drop-down menu on the right lets you choose the script type (like Latin or Asian). 本部分允许您修改字体类型,大小和颜色。 您还可以对文本使用粗体,斜体或下划线。 右侧的下拉菜单可让您选择脚本类型(如拉丁或亚洲)。
- This section lets you set your alignment and indention preferences. 本部分允许您设置对齐方式和缩进首选项。
- This section shows you see a live preview of the changes. 本部分显示了更改的实时预览。
- This section shows a written description of your heading style. 本节显示您的标题样式的书面说明。
The next bit in the Modify Style window lets you choose whether to add the style to the Styles gallery and whether to automatically update the style if you make manual adjustments to a paragraph in your document that uses that style (we don’t generally recommend using that option because it always leaves people wondering how their style got changed). You can also choose whether the style changes you’re making should apply only to the current document or should apply to new documents based on this template. Since the template your document is based on is likely Word’s main normal.dot template, choosing this option usually means changes will apply to all your documents.
如果您对使用该样式的文档中的段落进行手动调整,则可以使用“修改样式”窗口中的下一位选择是否将样式添加到“样式”库中以及是否自动更新样式(通常不建议使用该选项,因为它总是使人们想知道样式是如何改变的)。 您还可以基于此模板,选择要进行的样式更改是仅应用于当前文档还是应用于新文档。 由于文档所基于的模板很可能是Word的主要normal.dot模板,因此选择此选项通常意味着更改将应用于所有文档。
If you’re unsure about any of these options, we recommend leaving them at their default settings. If you want to learn more about how styles work, check out our guide to mastering styles and themes.
如果您不确定这些选项中的任何一个,我们建议保留它们的默认设置。 如果您想了解有关样式如何工作的更多信息,请查阅我们的掌握样式和主题指南 。
Once you’ve made your choices, select “OK” to apply the modifications.
做出选择后,选择“确定”以应用修改。

If you edited the name of the heading, you’ll see that change take place both on the Ribbon and in the Styles menu.
如果您编辑了标题的名称,则会在功能区和“样式”菜单中看到更改。
Now just select the style and start typing!
现在,只需选择样式并开始输入即可!
翻译自: https://www.howtogeek.com/399978/how-to-change-heading-styles-in-ms-word/


 1万+
1万+


 被折叠的 条评论
为什么被折叠?
被折叠的 条评论
为什么被折叠?
 到【灌水乐园】发言


