


angular 响应式布局
Nowadays, most applications have a commenting system of sorts, whether it’s commenting on a status update or a story or even a live feed. With status updates also comes the ‘like’ feature which was made popular by companies like Facebook. In this tutorial, we will add reactions to a comment just like Facebook allows you do on status updates.
如今,大多数应用程序都具有各种评论系统,无论是对状态更新,故事还是实时提要进行评论。 随着状态更新,还提供了“喜欢”功能,该功能在Facebook等公司中广受欢迎。 在本教程中,我们将为评论添加React,就像Facebook允许您进行状态更新一样。
我们将要建设的 ( What we will be building )
We will be building a simple application where you can publish a status and after publishing a status, you can add reactions to it. You can like, dislike and love any status on the application.
我们将构建一个简单的应用程序,您可以在其中发布状态,并在发布状态后向其添加响应。 您可以喜欢 , 不喜欢和喜欢应用程序上的任何状态。
The application will be powered by Angular 4 in the front-end and Firebase in the backend. In following articles, I will demonstrate how to add other real-time features to the app using a tool like Pusher, but for this one, we will be focusing on the update and reactions part. It will look something like this after we are done.
该应用程序将由前端的Angular 4和后端的Firebase提供支持。 在接下来的文章中,我将演示如何使用Pusher之类的工具向应用程序添加其他实时功能,但是对于这一点,我们将重点关注更新和React部分。 完成后,它将看起来像这样。

构建我们的状态更新React应用程序的要求 (Requirements for building our status update reactions app)
To successfully follow along in this tutorial, you need to have a few things in place. Here is a list of those things:
要成功遵循本教程,您需要准备一些东西。 以下是这些内容的列表:
- NodeJS & npm installed on your local machine. 在本地计算机上安装了NodeJS和npm 。
angular-cliinstalled on your machine. Run$ npm install -g @angular/clito install it. 在计算机上安装的angular-cli。 运行$ npm install -g @angular/cli进行安装。- Visual Studio Code or any text editor of your choice. Visual Studio代码或您选择的任何文本编辑器。
- Basic knowledge of Sass, TypeScript and JavaScript. Sass,TypeScript和JavaScript的基本知识。
- Firebase account to create a database for our application. Firebase帐户为我们的应用程序创建数据库。
Let us get started with building the application. To start we will need to create our Angular application. You can create a new application by running the ng new command as will be explained below.
让我们开始构建应用程序。 首先,我们需要创建我们的Angular应用程序。 您可以通过运行ng new命令来创建新应用程序,如下所述。
创建我们的新Angular应用程序 ( Creating our new Angular application )
To create our new application, we can use the Angular CLI and just run the command below in the directory we want to create our project in:
要创建新应用程序,我们可以使用Angular CLI并在要在其中创建项目的目录中运行以下命令:
$ ng new reactions --style scss --skipTestsThe command above will create a new directory called reactions, and will set our default style engine to SCSS, and will skip creating tests for the application. Tests are important but we won’t be needing them for this tutorial.
上面的命令将创建一个名为React新的目录,并将我们的默认样式引擎设置为SCSS,并跳过创建用于应用测试。 测试很重要,但在本教程中我们将不需要它们。
Once this is complete, open your project in a text editor of your choice. Visual Studio Code is recommended solely because it has inbuilt support for TypeScript, but you can use whichever you want to use.
完成此操作后,在您选择的文本编辑器中打开您的项目。 仅建议使用Visual Studio Code,因为它具有对TypeScript的内置支持,但是您可以使用任何想要使用的代码。
创建Angular应用程序UI ( Creating the Angular Application UI )
Let us focus on building the front-end or UI of our application. We will need FontAwesome and Bootstrap for the application so let’s pull those in:
让我们专注于构建应用程序的前端或UI。 对于该应用程序,我们将需要FontAwesome和Bootstrap,因此我们将它们引入:
npm install --save bootstrap font-awesomeNow we need to import Bootstrap and FontAwesome into our stylesheets build process. Open up your src/styles.scss file and add the following to the file:
现在我们需要将Bootstrap和FontAwesome导入我们的样式表构建过程。 打开您的src/styles.scss文件,并将以下内容添加到该文件中:
// import bootstrap and font awesome into our scss file
@import "~bootstrap/dist/css/bootstrap.min.css";
@import "~font-awesome/css/font-awesome.css";

body {
    background-color: #e6ecf0;
}
For this tutorial, we do not need the JavaScript part of Bootstrap but if you want to add this to your application, you can import it in the scripts section of .angular.cli.json. You will need to add the path relative to the file. For example, to add Bootstrap, the path will be: ../node_modules/bootstrap/dist/js/bootstrap.js
对于本教程,我们不需要BootstrapJavaScript部分,但是如果要将其添加到应用程序中,可以将其导入.angular.cli.json的脚本部分。 您将需要添加相对于文件的路径。 例如,要添加Bootstrap,路径将为: ../node_modules/bootstrap/dist/js/bootstrap.js
Now we are ready to start building our application. To serve our application, run the command below to serve your application:
现在,我们准备开始构建应用程序。 要提供我们的应用程序,请运行以下命令来提供您的应用程序:
ng serve --openOnce the build is complete, it will automatically open the application on your default browser. If you did everything correctly, you should see the default Angular page on your screen. Perfect.
构建完成后,它将在您的默认浏览器上自动打开该应用程序。 如果您正确执行了所有操作,则应该在屏幕上看到默认的“ Angular”页面。 完善。

为我们的页面创建Angular组件 ( Creating Angular components for our page )
Next, let's create some components to make up the page. We will create a navigation component where we will add our navigation items. It is unimportant to the tutorial and it is just going to be there for aesthetic reasons. Generate the component using the ng g component command as seen below:
接下来,让我们创建一些组成页面的组件。 我们将创建一个导航组件,在其中添加导航项。 对于本教程而言,它并不重要,并且出于美学原因也将只存在于本教程中。 使用ng g component命令生成组件,如下所示:
创建角度导航组件 (Creating the Angular navigation component)
$ ng g component nav --spec=falseThe
--specflag is basically a boolean that specifies if a spec file is generated. We do not need this for this tutorial.
--spec标志基本上是一个布尔值,用于指定是否生成规格文件。 在本教程中,我们不需要这样做。
This should create a new nav directory in the ./src/app folder. Open the nav.component.html file and replace the contents with the code below:
这应该在./src/app文件夹中创建一个新的nav目录。 打开nav.component.html文件,并将内容替换为以下代码:
<!-- Bootstrap navigation bar -->
<nav class="navbar navbar-fixed navbar-default">
  <div class="container">
    <div class="navbar-header">
      <button type="button" class="navbar-toggle collapsed" data-toggle="collapse" data-target="#bs-example-navbar-collapse-1" aria-expanded="false">
        <span class="sr-only">Toggle navigation</span>
        <span class="icon-bar"></span>
        <span class="icon-bar"></span>
        <span class="icon-bar"></span>
      </button>
    </div>
    <div class="collapse navbar-collapse" id="bs-example-navbar-collapse-1">
      <ul class="nav navbar-nav">
        <li class="active"><a href="#"><i class="fa fa-home"></i> Home <span class="sr-only">(current)</span></a></li>
        <li><a href="#"><i class="fa fa-bell-o"></i> Notifications</a></li>
        <li><a href="#"><i class="fa fa-commenting-o"></i> Messages</a></li>
      </ul>
      <ul class="nav navbar-nav navbar-right">
        <li class="profile-photo">
          <a href="#" alt="John Doe"><img src="https://randomuser.me/api/portraits/men/84.jpg" alt=""></a>
        </li>
      </ul>
      <form class="navbar-form navbar-right">
        <div class="form-group">
          <input type="text" class="form-control" placeholder="Search" disabled>
        </div>
      </form>
    </div>
  </div>
</nav>
This is just a basic Bootstrap navigation bar. Now let’s add some custom styling to the navigation bar component. Open the nav.component.scss file and add the following:
这只是一个基本的Bootstrap导航栏。 现在,让我们向导航栏组件添加一些自定义样式。 打开nav.component.scss文件并添加以下内容:
// Style the navigation bar icon
.nav i.fa {
    font-size: 18px;
    margin-right: 5px;
    top: 3px;
}

// Style the navigation bar profile photo
.nav > li.profile-photo > a {
    padding: 8px 0;
    img {
        border-radius: 100%;
        max-width: 34px;
    }
}
Finally, to see our navigation bar, we will need to clear the contents of our app.component.html file and replace it with the component selector, as shown in the code below:
最后,要查看导航栏,我们需要清除app.component.html文件的内容,并将其替换为组件选择器,如以下代码所示:
<!-- Show the angular navigation component -->
<app-nav></app-nav>

<div class="container">
    <div class="row">
        <div class="col-xs-12 col-md-3">
            <!--<app-sidebar></app-sidebar>-->
        </div>
        <div class="col-xs-12 col-md-9">
            <div class="statuses">
                <!--<app-statuses></app-statuses>-->
            </div>
        </div>
    </div>
</div>
We commented out the
app-sidebarandapp-statusescomponent selectors because they do not exist yet. We will create them later in the article and uncomment the component selectors to show them.我们注释掉了
app-sidebar和app-statuses组件选择器,因为它们还不存在。 我们将在文章后面创建它们,并取消注释组件选择器以显示它们。
If you are still running the ng serve command, refresh the page and you should see your changes on the browser.
如果您仍在运行ng serve命令,请刷新页面,然后应该在浏览器中看到所做的更改。

创建Angular侧栏组件 (Creating the Angular sidebar component)
The next thing we want to add after the navigation is the sidebar. As we did before, we will run the ng g component command to create the sidebar Angular component:
导航后,我们要添加的下一个内容是侧边栏。 和之前一样,我们将运行ng g component命令来创建侧边栏Angular组件:
$ ng g component sidebar --spec=falseOpen the sidebar.component.html file and replace the contents with the HTML code below:
打开sidebar.component.html文件,然后将内容替换为以下HTML代码:
<aside class="main">
  <div class="profile-block">
    <div class="photo">
      <div class="banner-photo"></div>
    </div>
    <div class="profile">
      <div class="row">
        <div class="col-xs-4">
          <div class="profile-photo">
            <img src="https://randomuser.me/api/portraits/men/84.jpg" alt="">
          </div>
        </div>
        <div class="col-xs-8">
          <span class="name">John Doe</span>
          <span class="handle">@johndoe</span>
        </div>
      </div>
      <div class="row assets">
        <div class="col-xs-6">
          <span class="assets-title">Following</span>
          <span class="assets-count">10</span>
        </div>
        <div class="col-xs-6">
          <span class="assets-title no-left-pad">Followers</span>
          <span class="assets-count no-left-pad">103K</span>
        </div>
      </div>
    </div>
  </div>
  <div class="followers">
    <h3>Followers</h3>
    <div class="row">
      <div class="col-xs-12">
        <ul class="list-inline">
          <li><a href="#"><img src="https://randomuser.me/api/portraits/women/25.jpg" alt=""></a></li>
          <li><a href="#"><img src="https://randomuser.me/api/portraits/women/26.jpg" alt=""></a></li>
          <li><a href="#"><img src="https://randomuser.me/api/portraits/men/25.jpg" alt=""></a></li>
          <li><a href="#"><img src="https://randomuser.me/api/portraits/men/89.jpg" alt=""></a></li>
          <li><a href="#"><img src="https://randomuser.me/api/portraits/men/39.jpg" alt=""></a></li>
          <li><a href="#"><img src="https://randomuser.me/api/portraits/men/59.jpg" alt=""></a></li>
          <li><a href="#"><img src="https://randomuser.me/api/portraits/women/39.jpg" alt=""></a></li>
          <li><a href="#"><img src="https://randomuser.me/api/portraits/women/79.jpg" alt=""></a></li>
        </ul>
      </div>
    </div>
  </div>
</aside>
This should add a make-believe sidebar. Next, open the sidebar.component.scss file and add the accompanying style for the sidebar component:
这应该添加一个相信的侧边栏。 接下来,打开sidebar.component.scss文件,并为sidebar组件添加随附的样式:
aside.main {
.photo {
height: 95px;
width: 100%;
background-color: #d9d9d9;
}
.banner-photo {
background-image: url(https://pbs.twimg.com/profile_banners/843496574332354560/1497099556/600x200);
height: 100%;
width: 100%;
background-repeat: no-repeat;
background-size: cover;
background-position: center;
}
.profile {
background-color: #fff;
min-height: 50px;
.profile-photo {
img {
max-width: 100%;
width: 72px;
float: right;
left: 25px;
position: absolute;
border-radius: 100%;
top: -26px;
border: 2px solid #fff;
}
}
.col-xs-8 {
padding-left: 10px;
}
.name {
font-weight: 600;
font-size: 18px;
margin-top: 5px;
display: block;
line-height: 1.2;
}
.handle {
display: block;
margin-bottom: 10px;
color: #657786;
}
}
.assets {
padding: 10px 0;
.assets-count {
padding: 0 16px;
display: block;
font-size: 13px;
color: #657786;
}
.assets-title {
font-weight: 600;
padding: 0 16px;
color: #657786;
display: block;
}
.no-left-pad {
padding-left: 0;
}
}
.followers {
margin-top: 10px;
padding: 10px 16px;
background-color: #fff;
h3 {
margin: 0 0 10px;
font-size: 17px;
font-weight: 600;
color: #14171a;
}
.list-inline {
margin-bottom: 0;
}
.list-inline li {
padding: 10px 5px;
a {
display: block;
}
}
img {
border-radius: 100%;
max-width: 45px;
}
}
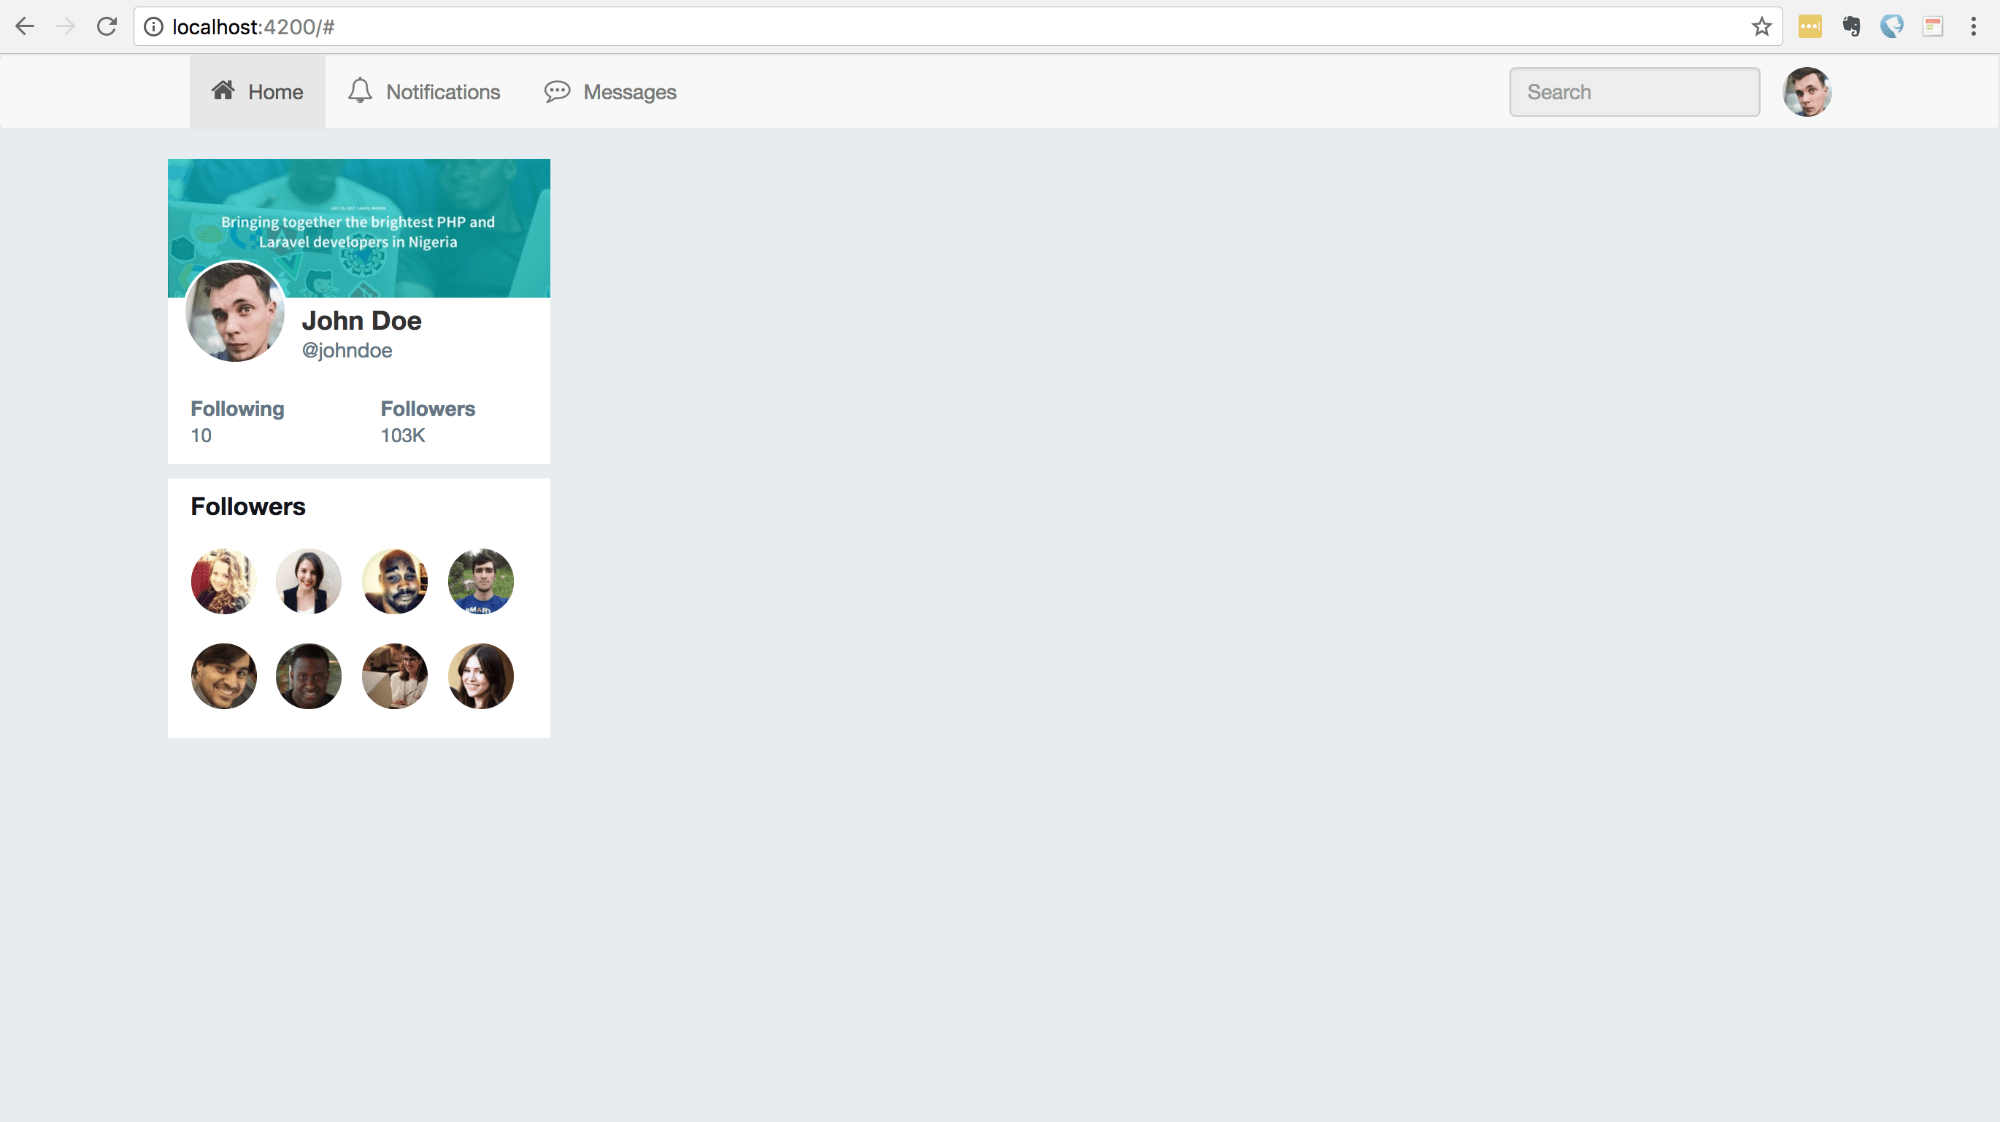
}Now go to the app.component.html file and uncomment the <app-statuses></app-statuses> tag. This should make the sidebar instantly visible on the browser. So far you should have something similar to the screenshot below:
现在转到app.component.html文件,并取消注释<app-statuses></app-statuses>标记。 这应该使侧边栏在浏览器上立即可见。 到目前为止,您应该拥有类似于以下屏幕截图的内容:
将我们的应用程序连接到Firebase ( Connecting our application to Firebase )
Now, let’s create the statuses component and the statuses service. The statuses service will be the place where all the calls to Firebase will happen from. It will be the proxy between our application and Firebase. It is important to use services for such interfacing because it becomes reusable as opposed to using Firebase directly.
现在,让我们创建状态组件和状态服务。 状态服务将是对Firebase进行所有调用的地方。 它将是我们的应用程序和Firebase之间的代理。 使用服务进行此类接口非常重要,因为与直接使用Firebase相比,它变得可重用。
Before we create the component let us import Firebase and the AngularFire library. You will need to stop the ng serve command if it is currently running. Now run the command below to install the required Firebase libraries:
在创建组件之前,让我们导入Firebase和AngularFire库。 如果ng serve命令当前正在运行,则需要停止该命令。 现在,运行以下命令以安装所需的Firebase库:
$ npm install angularfire2 firebase --saveAfter it is done, we need to configure firebase. Open the app.module.ts file and add the following into the file:
完成后,我们需要配置firebase。 打开app.module.ts文件,并将以下内容添加到文件中:
// Import the AngularFireModule and the AngularFireDatabaseModule
import { AngularFireModule } from 'angularfire2';
import { AngularFireDatabaseModule } from 'angularfire2/database';

// Define the firebase database configuration keys, get it from your Firebase application console
export const firebaseConfig = {
  apiKey: "",
  authDomain: "",
  databaseURL: "",
  projectId: "",
  storageBucket: "",
  messagingSenderId: ""
};
Scroll down to the imports section of the same file and add the AngularFireModule and AngularFireDatabaseModule to the @NgModule imports as shown below:
向下滚动到同一文件的imports部分,然后将AngularFireModule和AngularFireDatabaseModule添加到@NgModule导入中,如下所示:
@NgModule({
  // ...
  imports: [
    // ...

    // Import as an NgModule...
    AngularFireModule.initializeApp(firebaseConfig),
    AngularFireDatabaseModule
  ]
  // ...
})
Next, go to the Firebase website and create a new Firebase application.
接下来,转到Firebase网站并创建一个新的Firebase应用程序 。
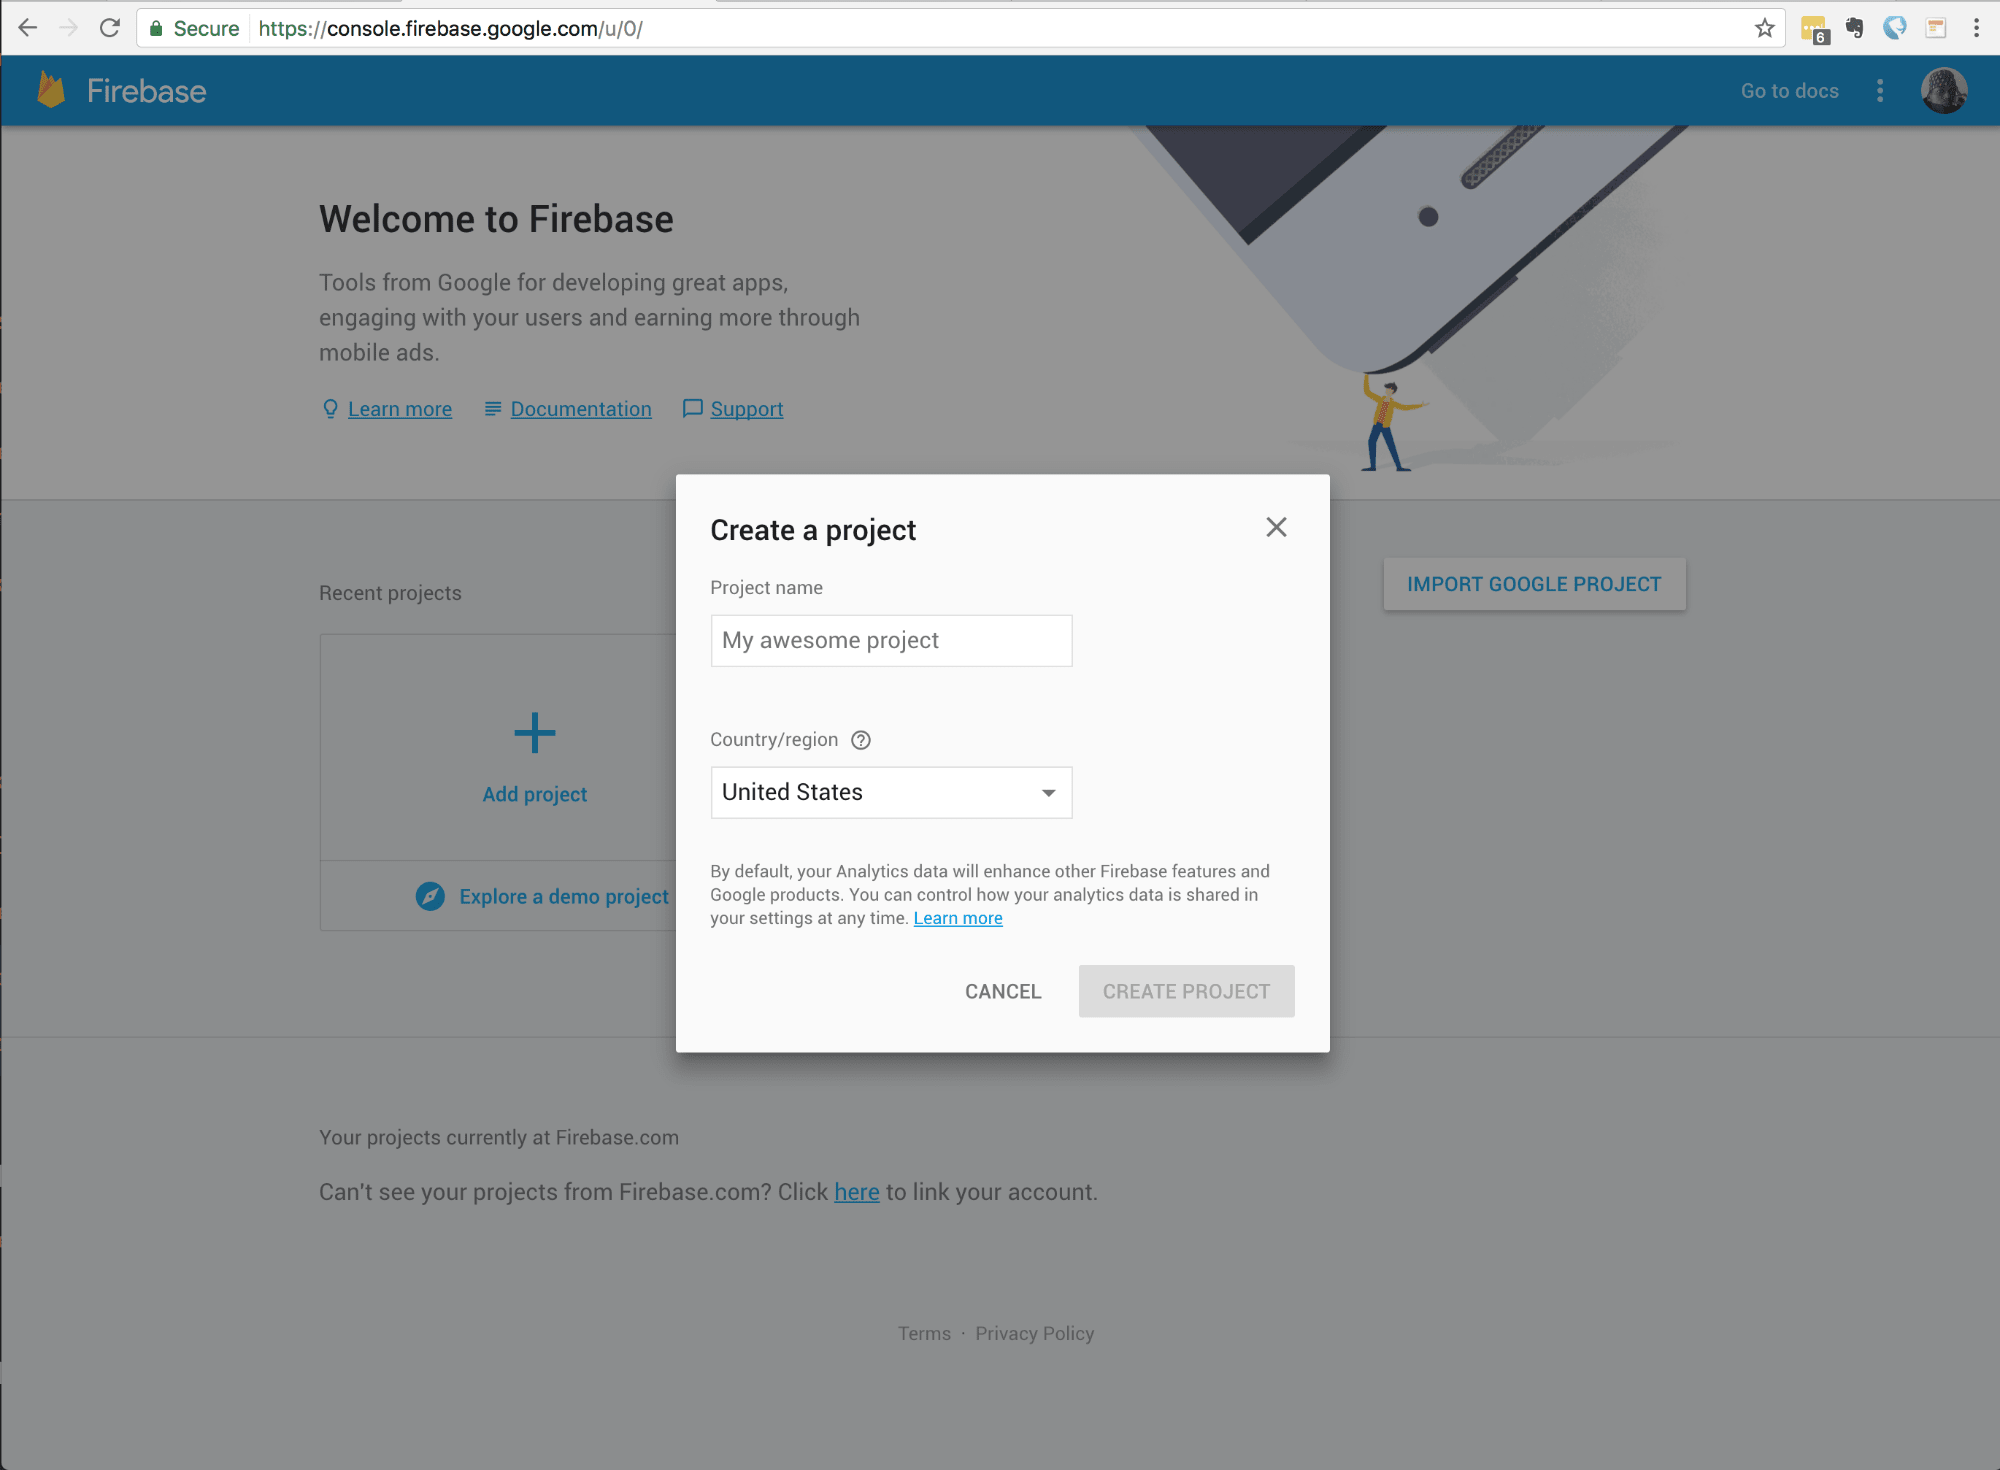
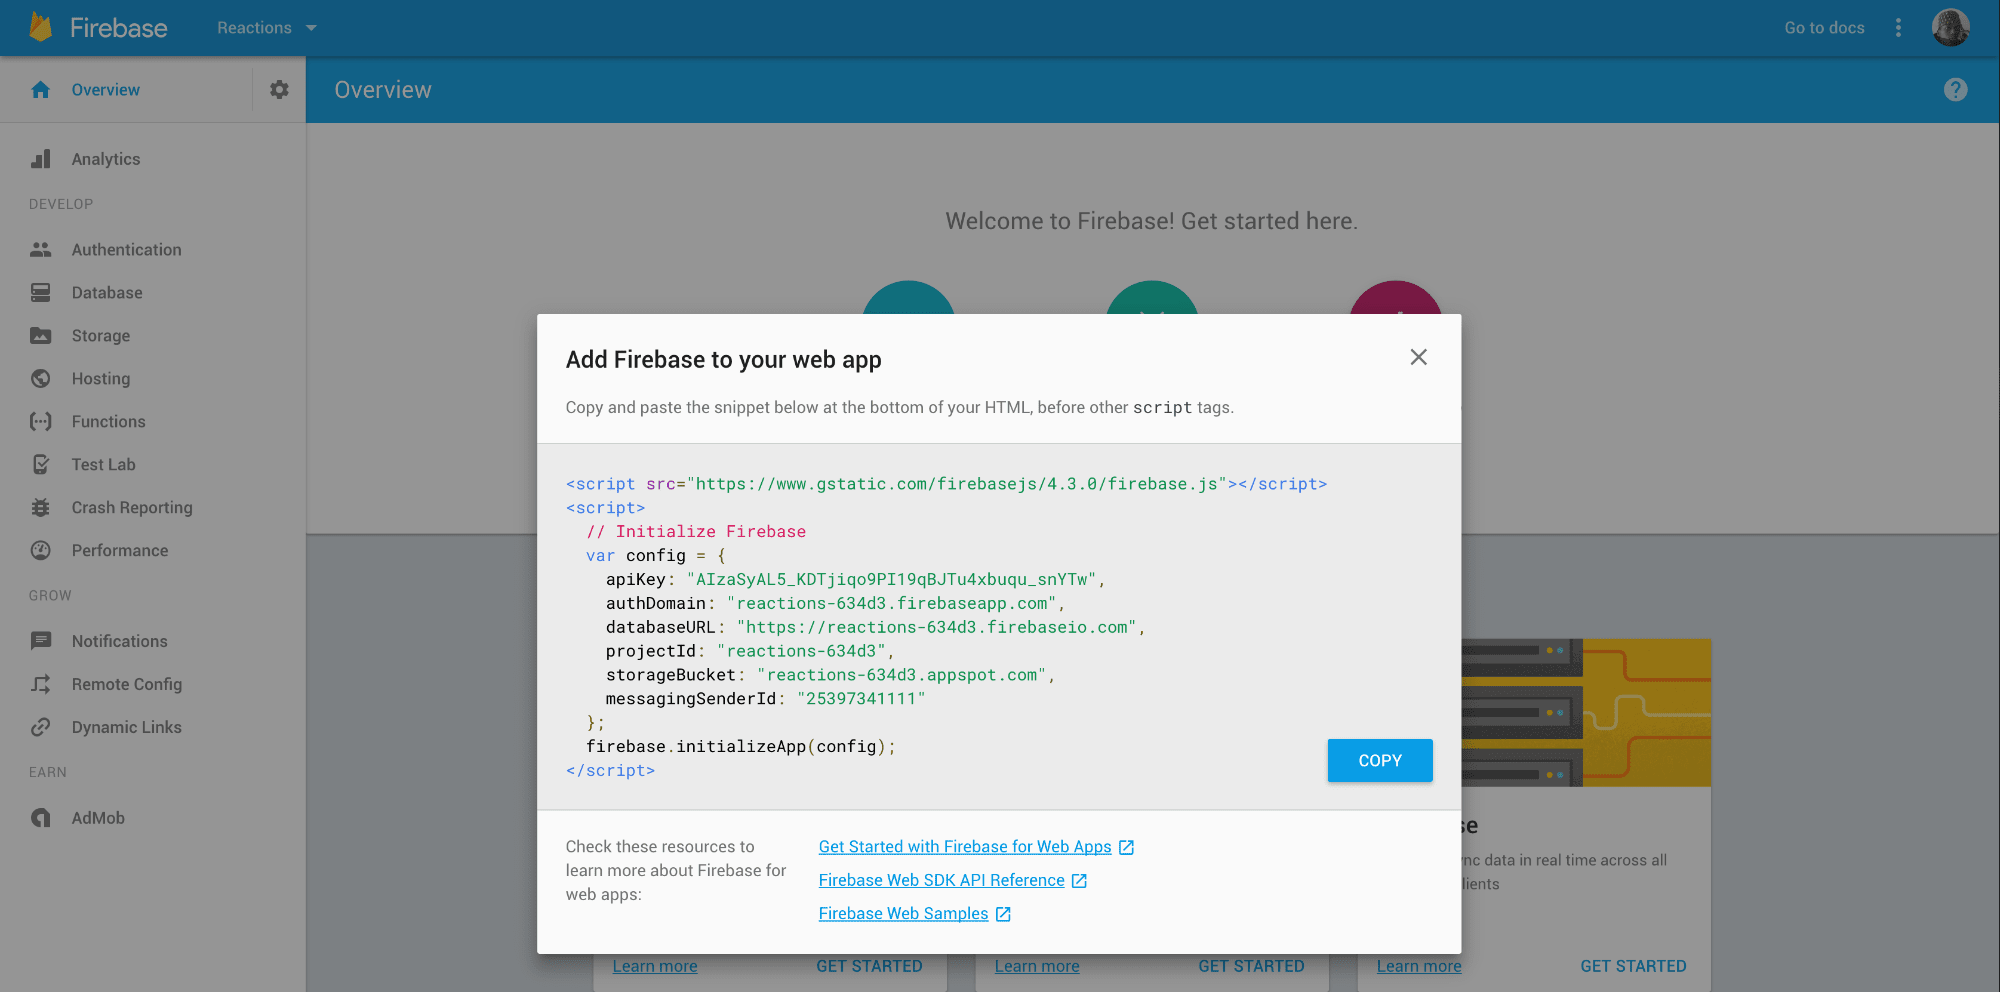
When the application has been created, navigate to “Add Firebase to your web app” and then use the credentials to replace the empty firebaseConfig constant in your app.module.ts file.
当应用程序已经创建,定位到“火力地堡添加到您的Web应用程序”,然后使用证书来代替空firebaseConfig不断在app.module.ts文件。
One last thing, in your Firebase application dashboard, navigate to “Database” and then click on “Rules”, in the field, paste the following:
最后一件事,在Firebase应用程序仪表板中,导航到“数据库”,然后单击“规则”,在该字段中粘贴以下内容:
{
  "rules": {
    "statuses": {
      ".read": "true",
      ".write": "true",
      ".indexOn": "createdAt"
    }
  }
}
IMPORTANT: This will turn off authentication for your Firebase and should only be used for the purposes of this application ALONE. This is NOT recommended for a production application!
重要说明:这将关闭Firebase的身份验证,仅应单独用于此应用程序。 不建议将其用于生产应用!
创建状态角组件和服务 ( Creating the Status Angular Component & Service )
Now that we have Firebase plugged in, we can create the statuses component and the service.
现在,我们已经插入了Firebase,我们可以创建状态组件和服务。
$ ng g component statuses --spec=false
$ ng g service statuses/statuses --spec=false
The first command basically creates a status component, while the second command creates a statuses.service.ts file in the ./app/statuses directory.
第一个命令基本上创建一个状态组件,而第二个命令在./app/statuses目录中创建一个statuses.service.ts文件。
Open the ./app/statuses/status.service.ts file so we can add the Firebase functionality. Replace the existing code with the code below:
打开./app/statuses/status.service.ts文件,以便我们可以添加Firebase功能。 将现有代码替换为以下代码:
// Import the required packages to the service
import { Injectable } from '@angular/core';
import { AngularFireDatabase, FirebaseListObservable } from 'angularfire2/database';
import "rxjs/add/operator/map";

@Injectable()
export class StatusesService {

  // Flag to see if status update is in progress
  private inProgress: boolean = false

  // Possible available reactions
  private reactions: string[] = ['like', 'love', 'dislike']

  // All the statuses available
  public statuses: FirebaseListObservable<any[]>

  // The maimum length and minimum length of a status
  public maxLength:number = 500
  public minLength:number = 0

  // Flag that determines if the status text is valid or nah
  public statusTextValid: boolean = false

  // Class constructor, injects the angular fire database as this.af
  constructor(private af: AngularFireDatabase) { }

  // ----------------------------------------------------------------------
  // Method to post the status to Firebase
  // ----------------------------------------------------------------------

  post(status: string) {
    if ( ! this.updating()) {
      this.inProgress = true
      let payload = {text: status, like:0, dislike:0, love:0, createdAt: {".sv": "timestamp"}};
      this.statuses.push(payload).then( snapshot => {
        this.inProgress = false
      })
    }
  }

  // ----------------------------------------------------------------------
  // Method to send a reaction to a status to Firebase
  // ----------------------------------------------------------------------

  react(reaction: string, status) {
    if (~this.reactions.indexOf(reaction)) {
      let reactions: any = {}
      let count: number = isNaN(parseInt(status[reaction])) ? 0 : parseInt(status[reaction])
      reactions[reaction] = count+1
      this.statuses.update(status.$key, reactions)
    }
  }

  // ----------------------------------------------------------------------
  // Method to get the recent statuses from Firebase
  // ----------------------------------------------------------------------

  recent(amount: number): FirebaseListObservable<any[]> {
    return this.statuses = this.af.list('/statuses').map(arr => arr.reverse()) as FirebaseListObservable<any[]>;
  }

  // ----------------------------------------------------------------------
  // Method to check the validity of a status update
  // ----------------------------------------------------------------------

  valid(status: string) : boolean {
    return status.length >= this.minLength && status.length <= this.maxLength
  }

  // ----------------------------------------------------------------------
  // Method to check the in progress flag
  // ----------------------------------------------------------------------

  updating() : boolean {
    return this.inProgress
  }
}
Whoa! That is a lot! The first 3 lines simply import node modules that we will be needing for the service to work properly. We define a couple of private and public properties for the class that will be used both internally and externally in the class.
哇! 好多! 前三行只是导入节点模块,我们需要该模块才能正常运行该服务。 我们为该类定义了几个private和public属性,这些属性将在该类的内部和外部使用。
In the constructor, we initialize the af property which is for working with Firebase. We also create a post method, and in there, we define the logic for posting status updates to Firebase.
在构造函数中,我们初始化用于Firebase的af属性。 我们还创建了一个post方法,并在其中定义了将状态更新发布到Firebase的逻辑。
The react method checks if the reaction is valid and if it is, it posts a reaction to the Firebase. The recent method fetches the most recent statuses from Firebase. The valid method just checks if the status text is valid and the updating checks to see if there is currently a post to Firebase pending completion.
react方法检查React是否有效,如果有效,则将React发布到Firebase。 recent方法从Firebase获取最新状态。 valid方法仅检查状态文本是否有效, updating检查当前是否有Firebase待完成的帖子。
Next, we have to register the service so our application can see and use it. In the app.module.ts file, add the following:
接下来,我们必须注册服务,以便我们的应用程序可以查看和使用它。 在app.module.ts文件中,添加以下内容:
// Import the status service and forms module
import { FormsModule } from '@angular/forms';
import { StatusesService } from './statuses/statuses.service';

@NgModule({
  imports: [
    // .... other modules
    FormsModule,
    // ...other modules
  ],
  providers: [
    // Add the status service as a provider
    StatusesService
  ],
  // ...
})
Great, now we have registered the service. Moving on.
太好了,现在我们已经注册了服务。 继续。
The next thing we will do is update our statuses.component.ts to interact with our application using the statuses.service.ts file. Open the statuses.component.ts file and replace it with the following:
我们要做的下一步是更新statuses.component.ts以使用statuses.service.ts文件与我们的应用程序进行交互。 打开statuses.component.ts文件,并将其替换为以下内容:
import { Component, OnInit } from '@angular/core';
import { StatusesService } from './statuses.service';

@Component({
  selector: 'app-statuses',
  templateUrl: './statuses.component.html',
  styleUrls: ['./statuses.component.scss']
})
export class StatusesComponent implements OnInit {

  // Status text
  public statusText: string

  // The status available
  public statuses: any[]

  // Flag to see if a new status can be added or nah
  public canPostStatus: boolean = false

  // ---------------------------------------------------------
  // Class constructor, injects StatusService as this.status
  // ---------------------------------------------------------

  constructor(public status: StatusesService) { }

  // ---------------------------------------------------------
  // ngOnInit is automatically fired on intialisation
  // ---------------------------------------------------------

  ngOnInit() {
    // Get 50 of the most recent statuses
    this.status.recent(50)
  }

  // ---------------------------------------------------------
  // Get the status of the text if it's valid or nah
  // ---------------------------------------------------------

  typingStatus() {
    this.canPostStatus = this.status.valid(this.statusText) && this.status.updating() == false;
  }

  // ---------------------------------------------------------
  // Post a status if it is valid
  // ---------------------------------------------------------

  postStatus() {
    this.status.valid(this.statusText) && this.status.post(this.statusText)
  }

  // ---------------------------------------------------------
  // React to an existing post
  // ---------------------------------------------------------

  react(reaction: string, status) {
    this.status.react(reaction, status)
  }
}
Above, we defined some properties and methods to use in the lifetime of the component. The ngOnInit method is called automatically when the component is initialized. In the constructor, we inject the status service into the component so the methods will be available to this component.
上面,我们定义了一些在组件生命周期中使用的属性和方法。 初始化组件时,将自动调用ngOnInit方法。 在constructor ,我们将状态服务注入到组件中,以便该组件可以使用这些方法。
The typingStatus method will be called every time someone updates the status text from the front-end. We use this to determine if the post button should be enabled or not. The postStatus posts the status to Firebase using the status service, and finally, the react method posts to Firebase using the service.
每当有人从前端更新状态文本时,都会调用typingStatus方法。 我们使用它来确定是否应启用发布按钮。 postStatus使用状态服务将状态发布到Firebase,最后, react方法使用该服务发布到Firebase。
将我们的状态组件添加到应用程序 ( Adding our Status Component to the application )
Once we are done with the backend of our Status Component, we will now add the UI to interact with the component.
一旦完成了状态组件的后端,我们现在将添加UI以与组件交互。
Open the statuses.component.html and add replace the content with the HTML below:
打开statuses.component.html并添加以下内容以替换HTML:
<div class="create-status">
  <form class="clearfix">
    <div class="form-group">
      <textarea class="form-control" rows="3" placeholder="Whats happening?" [(ngModel)]="statusText" (ngModelChange)="typingStatus()" name="statusText"></textarea>
    </div>
    <div class="pull-right">
      <span class="countdown">
        <!-- Show the characters remaining for the status to remain valid -->
        <span *ngIf="statusText">{{this.status.maxLength - statusText.length}}</span>
        <span *ngIf="!statusText">{{this.status.maxLength}}</span>
      </span>
      <!-- On click of this button, post status -->
      <button class="btn btn-primary btn-md" [disabled]="canPostStatus != true" (click)="postStatus()">Post</button>
    </div>
  </form>
</div>
<div class="list-statuses clearfix">
  <ul>
    <!-- Loop through the statuses and display them -->
    <li *ngFor="let status of status.statuses | async">
      <div class="photo">
        <img src="https://randomuser.me/api/portraits/men/84.jpg" alt="">
      </div>
      <div class="status">
        <p>{{status.text}}</p>
        <div class="reaction">
          <ul class="list-inline pull-left">
            <!-- On click of any of the reactions, call the react method -->
            <li><a href="#" class="btn btn-sm btn-default" (click)="react('like', status)">Like</a></li>
            <li><a href="#" class="btn btn-sm btn-default" (click)="react('dislike', status)">Dislike</a></li>
            <li><a href="#" class="btn btn-sm btn-default" (click)="react('love', status)">Love</a></li>
          </ul>
          <div class="counts pull-right">
            <!-- Show the reaction counts -->
            <span class="thumbs reaction" [hidden]="!status.like || status.like <= 0"><span class="count">{{status.like}}</span> Like</span>
            <span class="thumbs reaction" [hidden]="!status.dislike || status.dislike <= 0"><span class="count">{{status.dislike}}</span> Dislike</span>
            <span class="heart reaction" [hidden]="!status.love || status.love <= 0"><span class="count">{{status.love}}</span> Love</span>
          </div>
        </div>
      </div>
    </li>
  </ul>
</div>
This is basically HTML that has some parts where Angular is injected. On line 3, we add a text area and we use the ngModel and ngModelChange attributes to bind a model and listen for model changes respectively.
这基本上是HTML,其中某些部分已注入Angular。 在第3行,我们添加了一个文本区域,并使用ngModel和ngModelChange属性来绑定模型并分别侦听模型更改。
On line 8 and 9, we just calculate the available amount of characters left as the user types. On line 11, we have the post button that is disabled when the canPostStatus variable is false. We also attached a click event callback postStatus. Finally, we loop through all the statuses available on Firebase.
在第8行和第9行,我们只计算用户输入时剩余的可用字符数。 在第11行上,当canPostStatus变量为false时,我们将disabled发布按钮。 我们还附加了click事件回调postStatus 。 最后,我们遍历Firebase上所有可用的状态。
Finally, we will update the statuses component's SCSS file. Paste the following in the statuses.component.scss file:
最后,我们将更新状态组件的SCSS文件。 将以下内容粘贴到statuses.component.scss文件中:
.create-status {
padding: 10px;
background-color: #fcfcfc;
border-bottom: 1px solid #f0f0f0;
form {
.form-group {
margin-bottom: 5px;
}
.countdown {
color: #657786;
margin-right: 5px;
display: inline-block;
font-size: 13px;
}
textarea {
border-radius: 15px;
padding: 10px 15px;
border-color: #f0f0f0;
resize: none;
margin: 0;
&:focus {
border-color: #00baba;
}
}
button {
border-radius: 15px;
background-color: #00baba;
border: none;
outline: none;
min-width: 80px;
&:focus, &:hover {
background-color: darken(#00baba, 5%);
&[disabled] {
background-color: #00baba;
}
}
}
}
}
.list-statuses {
background-color: #fff;
ul {
list-style: none;
padding: 0;
li {
padding: 20px;
border-bottom: 1px solid #f0f0f0;
&:last-child {
border: none;
}
}
}
.photo {
float:left;
height:40px;
width:40px;
margin-right: 10px;
img {
max-width: 100%;
border-radius: 100%;
}
}
.status {
overflow: hidden;
color: #474747;
p:last-child {
margin-bottom: 0;
}
ul {
list-style: none;
float: left;
padding-left: 5px;
margin-top: 10px;
li {
padding: 0;
}
}
}
.counts {
line-height: 40px;
.reaction {
display: inline-block;
font-weight: 600;
color: #140044;
margin-left: 5px;
&[hidden] {
display: none;
}
}
}
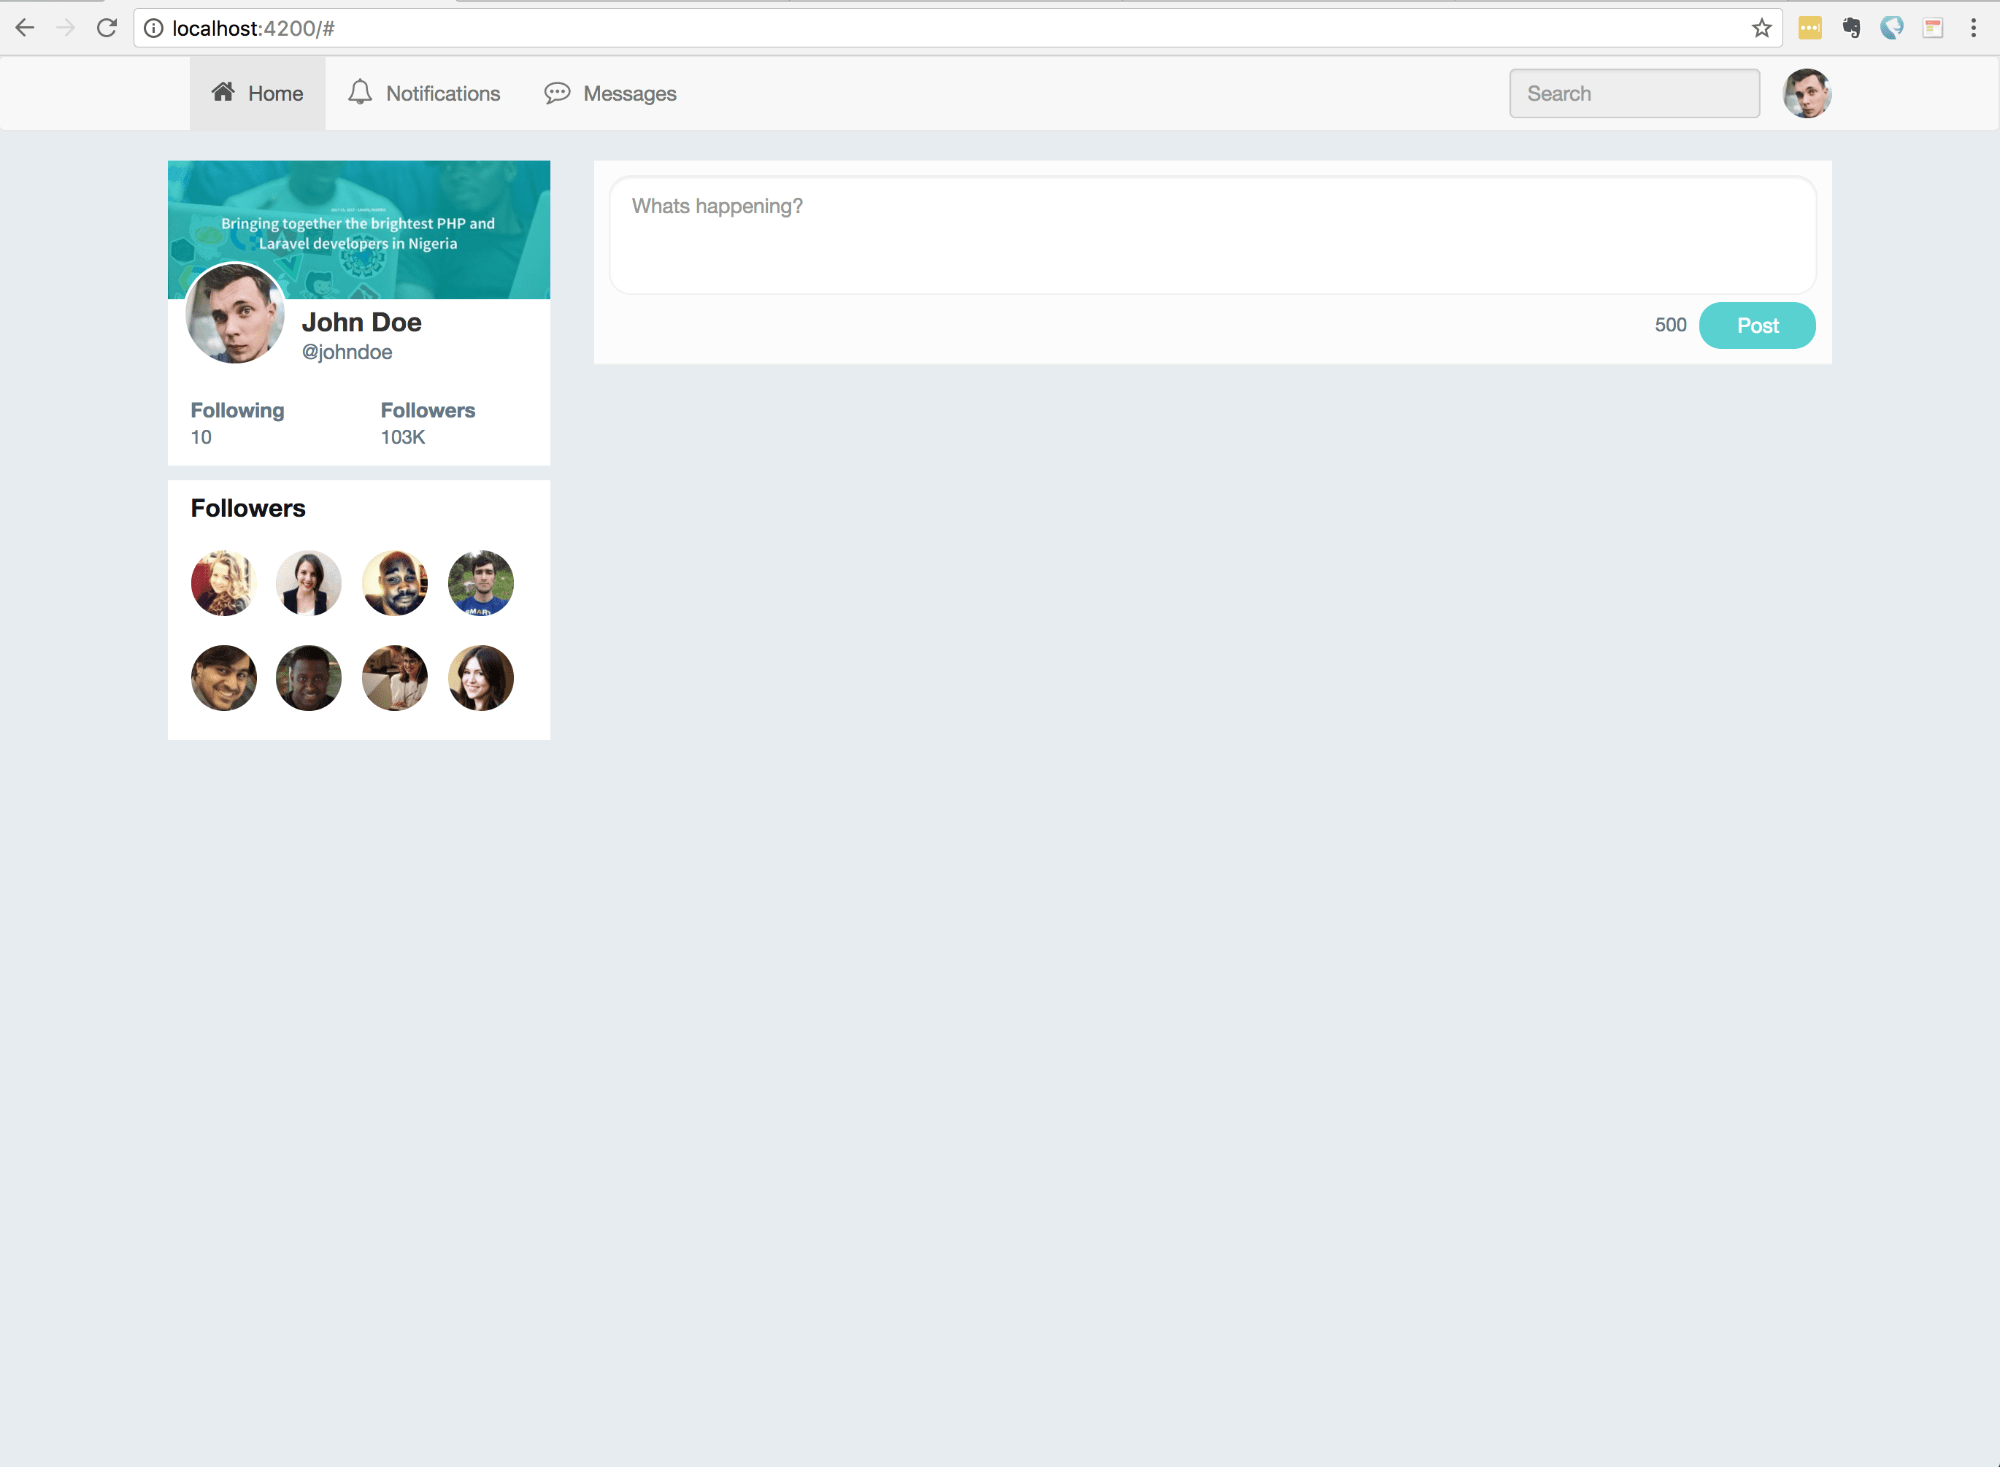
}Alright great! Now go to the app.component.html file and uncomment the app-statuses tag to show your changes. If all goes well and you have ng serve still active, you should see something like this:
好极了! 现在转到app.component.html文件,并取消注释app-statuses标记以显示您的更改。 如果一切顺利,并且您的ng serve仍处于活动状态,则应该看到类似以下内容:
结论 ( Conclusion )
We have successfully created a simple application that has reactions built-in with Firebase and Angular 4. You can use this as the backbone to your application and you can extend the functionality of this application by adding some more reactions and animations. For practice, I would suggest you do just that.
我们已经成功创建了一个简单的应用程序,该应用程序具有Firebase和Angular 4内置的React。您可以将其用作应用程序的主干,并可以通过添加更多React和动画来扩展此应用程序的功能。 对于练习,我建议您这样做。
If you have any feedback or have any questions, feel free to leave a comment below. You can see the source code to this application on Github.
如果您有任何反馈或疑问,请在下面发表评论。 您可以在Github上查看此应用程序的源代码。
翻译自: https://scotch.io/tutorials/build-a-status-update-app-w-reactions-using-angular-v4-and-firebase
angular 响应式布局


 3592
3592

 被折叠的 条评论
为什么被折叠?
被折叠的 条评论
为什么被折叠?
 到【灌水乐园】发言


