


vue项目构建和部署
Vue-Native is a framework written by GeekyAnts, it is a framework built to deliver cross platform mobile native applications. It is inspired by the React-native API, hence it gives a developer the ability to build cross platform applications in Vue.js using React Native’s robust system.
Vue-Native是GeekyAnts编写的框架,它是为交付跨平台移动本机应用程序而构建的框架。 它受React-native API的启发,因此使开发人员能够使用React Native的强大系统在Vue.js中构建跨平台应用程序。
Vue Native was originally a fork from React-vue, a compiler that gave developers that ability to write Vue and React in the same codebase. In this article, we’ll build a simple application to introduce the APIs and components available in Vue native.
Vue Native最初是React-vue的分支,该编译器使开发人员能够在同一代码库中编写Vue和React。 在本文中,我们将构建一个简单的应用程序,以介绍Vue本机中可用的API和组件。
We’ll be building a simple application that fetches the trending Gifs on Giphy, using the Giphy API. We’ll also display the Gif and details about it using components like ScrollView, Text, Image etc.
我们将构建一个简单的应用程序,该应用程序使用Giphy API在Giphy上获取流行的Gif。 我们还将使用ScrollView,Text,Image等组件显示Gif及其详细信息。
先决条件 ( Prerequisites )
To follow this tutorial, you’ll need to have Node > 6.0 installed. You’ll also need any of the package managers, NPM (this comes packaged with Node) or Yarn.
要遵循本教程,您需要安装Node > 6.0。 您还需要任何软件包管理器,NPM(与Node一起打包)或Yarn。
Basic knowledge of Javascript and Vue is also required. You can follow the official Vue documentation here to get up to speed.
还需要Javascript和Vue的基础知识。 您可以在此处按照Vue的官方文档进行操作。
入门 ( Getting started )
Before we get started, we’ll need to setup the project and install project dependencies. We’ll be making use of Vue native CLI to bootstrap our application. There’s also an installation option using Create React Native App, this option is longer but you can find the instructions here.
在开始之前,我们需要设置项目并安装项目依赖项。 我们将使用Vue本机CLI引导我们的应用程序。 还有一个使用Create React Native App的安装选项,该选项较长,但是您可以在此处找到说明。
First, install the Vue Native CLI by running the following command:
首先,通过运行以下命令安装Vue本机CLI:
yarn global add vue-native-cli
//  ornpm install -g vue-native-cli
Then initialize a new project by running the following command:
然后通过运行以下命令初始化一个新项目:
vue-native init vue-gifsRunning this command will bootstrap a Create React Native App application using the Expo CLI.
运行此命令将使用Expo CLI引导一个Create React Native App应用程序。
At the time of writing the Vue Native CLI needs the React Native version_ 0.55.4_ and expo version 29.0.0, so update your package.json to set these versions. We’ll also add commands to build for ios and android platforms by updating the scripts object.
在撰写本文时,Vue Native CLI需要React Native version_ 0.55.4_和expo版本29.0.0 ,因此更新您的package.json以设置这些版本。 我们还将通过更新脚本对象添加用于ios和android平台构建的命令。
//package.json{
  "name": "vue-gifs",
  "main": "node_modules/expo/AppEntry.js",
  "private": true,
  "scripts": {
    ...
    "build:ios": "expo build:ios",
    "build:android": "expo build:android",
  },
  "dependencies": {
    "expo": "^29.0.0",
    ...
    "react-native": "0.55.4",
    ...
  },
  "devDependencies": {
    "babel-preset-expo": "^4.0.0",
    ...
  }
}
Then update the sdkVersion in the app.json file to match the expo version. Open the app.json file and update it like the snippet below:
然后更新app.json文件中的sdkVersion以匹配博览会版本。 打开app.json文件并按照以下代码片段进行更新:
{
  "expo": {
    "name": "vue-gifs",
    "description": "This project is really great.",
    ...
    "sdkVersion": "29.0.0",
    ...
  }
}
Everything else will remain the same. After making these changes, run npm install or yarn to install the required versions for the application. When this is done, run npm start to run the application.
其他所有内容将保持不变。 进行这些更改后,运行npm install或yarn来安装应用程序所需的版本。 完成此操作后,运行npm start来运行该应用程序。
To build and run our application, we’ll be using Expo. Expo is an open source toolchain built around React-native for building Android and iOS applications. It provides access to the system’s functionality like the Camera, Storage etc.
为了构建和运行我们的应用程序,我们将使用Expo。 Expo是一个基于React-native构建的开源工具链,用于构建Android和iOS应用程序。 它提供对系统功能(如摄像机,存储设备等)的访问。
在手机上测试 ( Testing on mobile )
To test the application on mobile, the expo-cli provides various methods to test the application. The first is using a URL generated after running the application, this URL can be visited on your mobile browser to test the application.
为了在移动设备上测试应用程序,expo-cli提供了各种方法来测试应用程序。 第一种是使用运行应用程序后生成的URL,可以在您的移动浏览器上访问该URL来测试应用程序。
Run the npm run start-native command within your project folder to run the application using expo. expo typically starts your application on port 19002, visit http://localhost:19002 to view the expo dev tools. Within the dev tools you can send the preview link as an SMS or email to your mobile phone.
在项目文件夹中运行npm run start-native命令,以使用expo运行该应用程序。 expo通常在端口19002上启动您的应用程序,请访问http:// localhost:19002以查看expo dev工具。 在开发工具中,您可以通过SMS或电子邮件将预览链接发送到您的手机。

You can select any of the three connection options. An external tunnel, LAN or Local connection. For the local connection, your mobile phone and work PC have to be connection to the same network but the tunnel works regardless.
您可以选择三个连接选项中的任何一个。 外部隧道,LAN或本地连接。 对于本地连接,您的手机和工作PC必须连接到同一网络,但是无论如何隧道都可以工作。
The next method which is the easiest is downloading the Expo mobile app, it can be found on both the Apple App store and the Android Play store. On iOS, after installing the app, open up your camera and scan the barcode above to run your application. While on Android, you can use the Expo app to scan the barcode and run the application.
下一种最简单的方法是下载Expo移动应用程序,可以在Apple App Store和Android Play商店中找到它。 在iOS上,安装应用程序后,打开相机并扫描上方的条形码以运行您的应用程序。 在Android上,您可以使用Expo应用程序扫描条形码并运行该应用程序。
Run any of the following command to test on either platforms:
运行以下任何命令以在两个平台上进行测试:
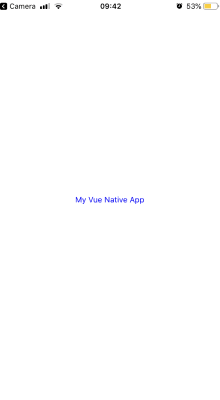
npm startAfter starting the application, scan the barcode and view the application on the expo app. You should see a view similar to the screenshot below:
启动应用程序后,扫描条形码并在expo应用程序上查看该应用程序。 您应该看到类似于以下屏幕截图的视图:
 Let’s see the other methods we can test the application on mobile. The next option for testing on a mobile device is using an emulator or simulator. Using
Android studio或Xcode ,您可以启动各自平台的模拟器。 下载并安装用于所选平台的工具,适用于iOS的Xcode和适用于Android的Android studio。 安装后,运行以下任何命令以启动应用程序:
npm run ios
  # OR
npm run android
创建一个Giphy应用程序 ( Creating a Giphy application )
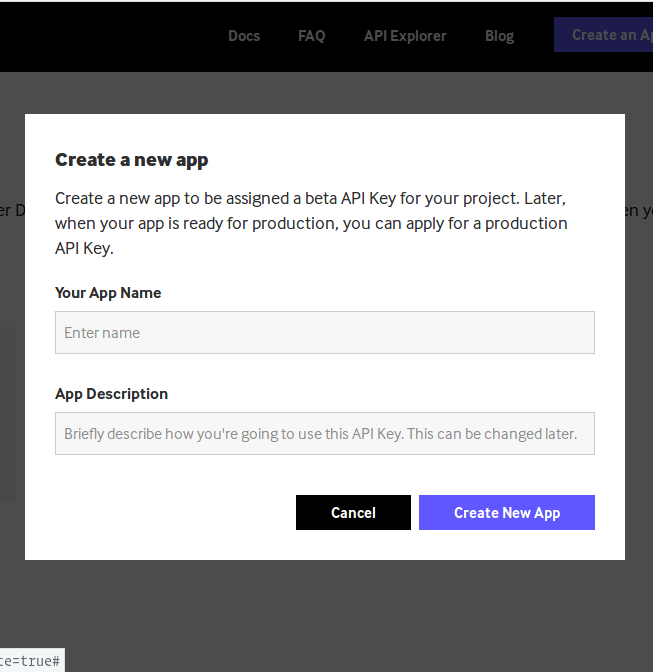
To get started consuming the Giphy API, you’ll need to log in to your Giphy account, create one if you haven’t already. The next step is to create an app on the developer platform. On your developer account dashboard, there’s a Create App button, click it and fill in the details about your application.
要开始使用Giphy API,您需要登录到Giphy 帐户 ,如果尚未创建,请创建一个。 下一步是在开发人员平台上创建一个应用程序。 在开发人员帐户仪表板上,有一个“ 创建应用程序”按钮,单击它并填写有关您的应用程序的详细信息。
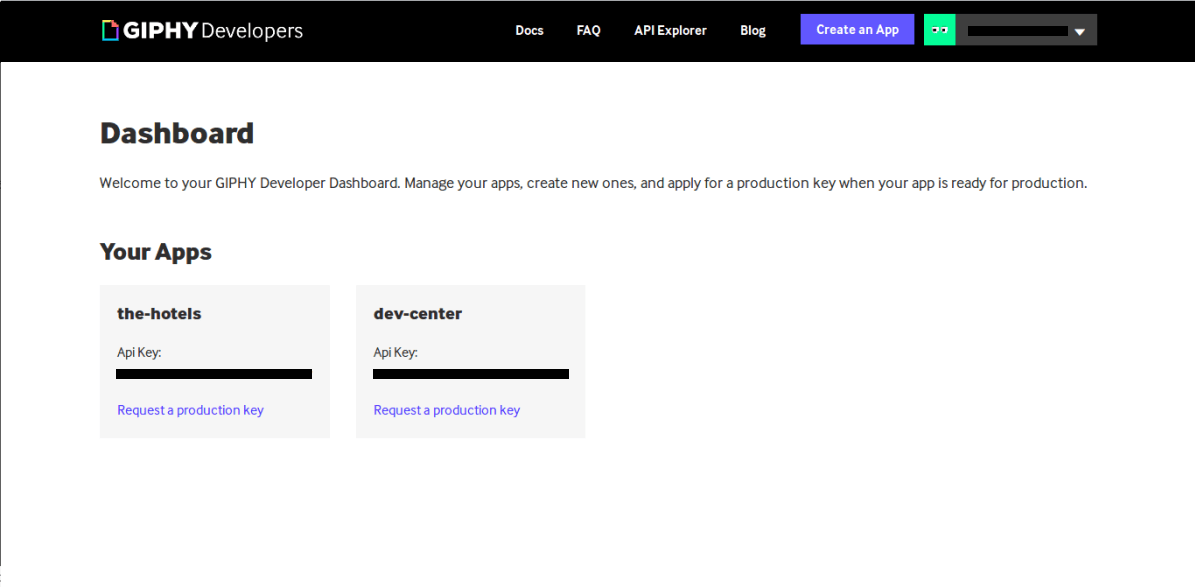
After creating the app, your new application should be displayed on your dashboard with an API key, this key will be used when making requests to Giphy
创建应用程序后,应使用API密钥将新应用程序显示在仪表板上,在向Giphy发出请求时将使用此密钥
To make requests to the Giphy service, we’ll make use of their Javascript SDK. Run the following command to install the package:
为了向Giphy服务发出请求,我们将使用其Javascript SDK 。 运行以下命令以安装软件包:
npm install --save giphy-js-sdk-coreNow we can go ahead and consume the APIs with the help of this SDK.
现在,我们可以继续使用此SDK来使用API。
应用程序组件 ( App component )
Our application is a simple one that displays the trending gifs on the Giphy platform. Using the Giphy API, we’ll get the associated gif image, title and type from the returned data. The data will be displayed using some of the components provided by vue-native. Open the App.vue file in the root folder and update it like the snippet below:
我们的应用程序很简单,可以在Giphy平台上显示趋势gif。 使用Giphy API ,我们将从返回的数据中获取关联的gif图像,标题和类型。 数据将使用vue-native提供的某些组件显示。 打开根文件夹中的App.vue文件,然后像下面的代码片段一样对其进行更新:
<template>
    <view>
        <scroll-view class="scroll-view">
           //Todo: Create gif item and header
           <view class="loading-container" :style="{flex: 1, justifyContent: 'center'}" v-if="loading">
              <activity-indicator size="large" color="#0000ff"></activity-indicator>
            </view>         </scroll-view>
    </view>
</template>
<script>
  import Giphy from 'giphy-js-sdk-core';
  const client = Giphy('GIPHY_API_KEY');

  export default {
    name: 'App',
    data() {
      return {
        gifs: [],
        loading: true,
      };
    },
    async created() {
      const response = await client.trending('gifs', {limit: 20});
      this.gifs = response.data;
    },
  };
</script>
<style>
    .scroll-view {
        padding-top: 20px;
        padding-bottom: 30px;
    }
    .loading-container {
        height: 600px;
    }
</style>
In the snippet above, the App component renders a scrollview component that houses the components elements. It only displays an activityindicator, this will be replaced by the list of gif when the call to the API is complete.
在上面的代码段中, App组件呈现了一个滚动视图组件,其中包含了components元素。 它仅显示一个活动指示器,当对API的调用完成时,它将由gif列表替换。
Also, we instantiate the Giphy client using the API key obtained from the developers dashboard and replace the placeholder string with the API key. Calling the trending method makes a call to the Giphy trending endpoint. The first provided parameter is gifs, this indicates which trending items should be returned, gifs or stickers. The second parameter is an object providing optional parameters like the limit, offset, rating and fmt (format).
此外,我们使用从开发人员仪表板获得的API密钥实例化Giphy客户端,并将占位符字符串替换为API密钥。 调用趋势方法将调用Giphy趋势端点。 提供的第一个参数是gifs ,它指示应返回哪些趋势项, gif或stickers 。 第二个参数是一个对象,提供可选参数,例如limit , offset , rating和fmt (格式)。
We’ll just be providing a limit parameter, limiting the results to 20 items. This call is made in the created lifecycle of the component. Next, we’ll create the gif item to render the returned results.
我们将只提供一个限制参数,将结果限制为20个项目。 在组件的已创建生命周期中进行此调用。 接下来,我们将创建gif项目以呈现返回的结果。
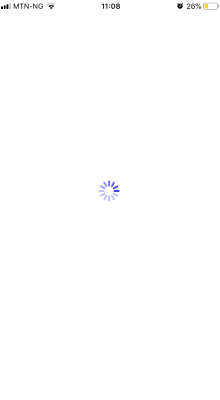
After reloading, the application should display the activity indicator:
重新加载后,应用程序应显示活动指示器:
创建gif项目组件 ( Creating the gif item component )
Each gif item will be displayed using a View component, the View component is an important building block, it supports layout using flexbox, styling and accessibility. Each item will display the gif, title and type. Create a folder components in the root folder. Within the components directory, create a named GifItem.vue and update it with the code below:
每个gif项目都将使用View组件显示,该View组件是重要的构建块,它支持使用flexbox进行布局,样式和可访问性。 每个项目将显示gif,标题和类型。 在根文件夹中创建一个文件夹组件 。 在components目录中,创建一个名为GifItem.vue并使用以下代码对其进行更新:
// GifItem.vue

<template>
  <view class="container">
    <image class="img" :source="{uri: `${gif.images.original.url}`}" style="max-width:100%;"/>
    <text class="title">{{titleCase(gif.title)}}</text>
  </view>
</template>
<script>
export default {
  name: "GifItem",
  props: ["gif"],
  methods: {
    titleCase(text) {
      const textArray = text.split(" ");
      return textArray
        .map(text => {
          const trimmedText = text.trim();
          return `${trimmedText[0].toUpperCase()}${trimmedText.slice(1)}`;
        })
        .join(" ");
    }
  }
};
</script>
<style>
.container {
  display: flex;
  flex-direction: column;
  align-items: center;
  margin-bottom: 30px;
  position: relative;
}
.img {
  height: 200px;
  width: 300px;
}
.title {
  font-size: 14px;
  font-weight: 500;
  margin-top: 7px;
}
</style>
Using the Image component, we can display the source of each gif and the Text component to display the gif title. The Image component takes a source prop which is an object with a uri property.
使用“ 图像”组件,我们可以显示每个gif的源,并显示“ 文本”组件以显示gif标题。 Image组件采用源 prop,该对象是具有uri属性的对象。
The titleCase method takes the title of each gif and returns the text in title case, capitalizing the first letter of each word in the text. The GifItem component will take a single prop gif.
titleCase方法获取每个gif的标题,并以标题大小写形式返回文本,将文本中每个单词的首字母大写。 GifItem组件将使用单个prop gif 。
Let’s update the App.vue file to include the new GifItem. Update the file with the snippet below:
让我们更新App.vue文件以包括新的GifItem 。 使用以下代码段更新文件:
<template>
    <view>
        <scroll-view class="scroll-view">
            <gif-item v-for="gif in gifs" :gif="gif" :key="gif.id" v-if="!loading"/>
            <view class="loading-container" :style="{flex: 1, justifyContent: 'center'}" v-if="loading">
                <activity-indicator size="large" color="#0000ff"></activity-indicator>
            </view>
        </scroll-view>
    </view>
</template>
<script>
  import Giphy from 'giphy-js-sdk-core';
  const client = Giphy('API_KEY');
  import GifItem from './components/GifItem';

  export default {
    name: 'App',
    data() {
      return {
        gifs: [],
        loading: true
      };
    },
    async created() {
      const response = await client.trending('gifs', {limit: 20});
      this.gifs = response.data;
      this.loading = false;
    },
    components: {GifItem}
  };
</script>
<style>
    .scroll-view {
        padding-top: 20px;
        padding-bottom: 30px;
    }
    .loading-container {
        height: 600px;
    }
</style>
When you open the application in the expo app, you’ll see something similar to the screenshot below:
在expo应用程序中打开该应用程序时,您将看到类似于以下屏幕截图的内容:

If you can’t see gifs listed, go through the tutorial again to see what you’ve have missed along the way.
如果看不到列出的gif,请再次阅读本教程,以了解您一路错过的内容。
标头组件 ( Header component )
After successfully querying for trending gifs and displaying them using native components, let’s include a header to give the application context. Using the View component, we’ll create an area that will act as the header for our application. Create file called header.vue within the components directory and update it with the code below:
成功查询趋势gif并使用本机组件显示它们后,让我们包括一个标题以提供应用程序上下文。 使用View组件,我们将创建一个区域,该区域将充当应用程序的标题。 在components目录中创建名为header.vue的文件,并使用以下代码对其进行更新:
// /components/header.vue
<template>
    <view class="header-container">
        <text class="header">Trending</text>
    </view>
</template>
<script>
  export default {
    name: 'header.vue'
  };
</script>
<style scoped>
    .header-container {
        background-color: rgba(0, 0, 0, 0.05);
        display: flex;
        justify-content: center;
        padding-top: 15px;
        padding-bottom: 15px;
        border-bottom-color: aquamarine;
        border-bottom-width: 1px;
        margin-top: 20px;
    }
    .header {
        font-size: 16px;
        color: black;
        opacity: 0.8;
        font-weight: 600;
        text-align: center;
    }
</style>
Now let’s add the header component to the App component. This will display a simple header at the top of the application. Update the `App.vue` file to include the Header component:
现在,将标题组件添加到App组件。 这将在应用程序顶部显示一个简单的标题。 更新`App.vue`文件以包含Header组件:
<template>
    <view>
        <header/>
        <scroll-view class="scroll-view">
            ...
        </scroll-view>
    </view>
</template>
<script>
  import Giphy from 'giphy-js-sdk-core';
  const client = Giphy('TxuQbNU1nyDBwpqrcib61LxmOzsXTPEk');

  import GifItem from './components/GifItem';
  import Header from './components/header';

  export default {
    name: 'App',
    data() {
     ...
    },
    async created() {
      ...
    },
    components: {GifItem, Header}
  };
</script>
<style>
   ...
</style>
After the application refreshes the header will be added to the top of the application.
应用程序刷新后,标题将添加到应用程序的顶部。

We’ve been able to achieve a lot of display functionality using the components provided by Vue-native.
使用Vue-native提供的组件,我们已经能够实现很多显示功能。
部署应用程序 ( Deploying the application )
We’ll be deploying our application to the Android Play store. To achieve this, we’ll need to update the app.json to include Android specific properties. Open the app.json file and update the file to include the `android` field:
我们将把应用程序部署到Android Play商店。 为此,我们需要更新app.json以包含Android特定的属性。 打开app.json文件并更新文件,使其包含`android`字段:
{
  "expo": {
    ...
    "android": {
      "package": "com.vue.gifs"
    }
  }
}
The android.package field is a unique value that will represent your package in the app store. You can read more on the package naming convention here. After updating the file, run the npm run build:android command.
android.package字段是一个唯一值,它将代表您在应用商店中的包。 您可以在此处阅读有关包命名约定的更多信息 。 更新文件后,运行npm run build:android命令。
This command will present you with a prompt, asking you to provide a keystore or to generate a new one. If you have an existing keystore, you can select this option or let expo generate one for your application.
此命令将提示您,要求您提供密钥库或生成一个新的密钥库 。 如果您已有密钥库,则可以选择此选项,或者让expo为您的应用程序生成一个。

After completion, a download link will be generated for your application, clicking on this link will be trigger a download for your apk.
完成后,将为您的应用程序生成一个下载链接,单击此链接将触发您的apk下载。

To deploy the downloaded APK to the Android Play Store, visit the Play Console to create an account, then you’ll be required to pay a registration fee of $25 before proceeding. When registration is complete, visit this page and follow the steps to upload your application to the Play Store.
要将下载的APK部署到Android Play商店,请访问Play控制台创建一个帐户,然后您需要支付25美元的注册费才能继续操作。 注册完成后,请访问此页面并按照步骤将您的应用程序上传到Play商店。
摘要 ( Summary )
Vue native has provided a solution to build for mobile platforms using Vuejs. It compiles to React and uses components provided by React Native. As as the time of writing, some of it’s components require that you write JSX with the actual React Native components. Since Vue native works with React native, you can follow the official React native documentation. Vue native is still in it’s infant stages and has a lot of potential, it creates an opportunity for Vue.js developers to build cross platform mobile applications. You can view the source code for the demo here.
Vue本机提供了使用Vuejs构建用于移动平台的解决方案。 它编译为React并使用React Native提供的组件。 在撰写本文时,其中的某些组件要求您使用实际的React Native组件编写JSX。 由于Vue本机可以与React本机一起使用,因此您可以遵循官方的React本机文档。 Vue本机仍处于起步阶段,并且具有很大的潜力,它为Vue.js开发人员提供了构建跨平台移动应用程序的机会。 您可以在此处查看演示的源代码。
翻译自: https://scotch.io/tutorials/how-to-setup-build-and-deploy-native-apps-with-vue
vue项目构建和部署


 2541
2541

 被折叠的 条评论
为什么被折叠?
被折叠的 条评论
为什么被折叠?
 到【灌水乐园】发言


