


ruby on rails
In the first part of this tutorial you were able to set up a blog that accepts postings using a nice editor called Ckeditor. The format of our blog posts can be well formatted to suit our taste. At this moment anyone who visits our blog can create a new post. You do not want to push this kind of a blog to the internet because it is unwise and unprofessional. In this part, we are going to learn the following:
在本教程的第一部分中,您能够使用一个名为Ckeditor的不错的编辑器来建立一个接受发布的博客。 我们博客文章的格式可以很好地适应我们的口味。 目前,任何访问我们博客的人都可以创建一个新帖子。 您不想将这种博客推向互联网,因为它是不明智和不专业的。 在这一部分中,我们将学习以下内容:
- How to enable authentication using Devise. 如何使用Devise启用身份验证。
- How to enable image uploading. 如何启用图片上传。
To properly understand this let's write some code to show it. Let's go the easy part first. The source for this tutorial is available on Github.
为了正确理解这一点,让我们编写一些代码来显示它。 首先让我们开始简单的部分。 该教程的源代码可以在Github上找到 。
安装Devise Gem。 (Installing Devise Gem.)
Devise is is a flexible authentication solution for Rails.
Devise是Rails的灵活身份验证解决方案。
Add Devise gem to your Gemfile,
将Devise gem添加到您的Gemfile ,
#Gemfile

gem 'devise'
Now run the command to install the gem;
现在运行命令来安装gem;
bundle installRun the command to generate the necessary Devise files.
运行命令以生成必要的Devise文件。
rails g devise:installRunning the command creates two new files in your application. You can find them at; config/initializers/devise.rb and config/locales/devise.en.yml. The first is an initializer that is required for Devise to work in your application. According to the output displayed on your terminal you need to perform some tasks. First, navigate to config/environments/development.rb and paste in the line below just above the end line like I have below:
运行命令将在您的应用程序中创建两个新文件。 您可以在以下位置找到它们: config/initializers/devise.rb和config/locales/devise.en.yml 。 第一个是Devise在您的应用程序中工作所需的初始化程序。 根据终端上显示的输出,您需要执行一些任务。 首先,导航到config/environments/development.rb并粘贴到end行上方的下面的行中,就像我在下面看到的那样:
#config/environments/development.rb
...
  config.action_mailer.default_url_options = { host: 'localhost', port: 3000 }
end
This is to help handle your mailer in the development environment. The second thing to do is add a block of code in your application layout for flash messages. So go ahead and open app/views/layouts/application.html.erb Paste the line below above the yield block:
这是为了帮助您在开发环境中处理邮件。 第二件事是在您的应用程序布局中为闪存消息添加代码块。 因此,继续打开app/views/layouts/application.html.erb将以下行粘贴在yield块上方:
#app/views/layouts/application.html.erb
...
  <p class="notice"><%= notice %></p>
  <p class="alert"><%= alert %></p>
Now to generate your Admin model, run the command below:
现在,要生成您的Admin模型,请运行以下命令:
rails generate devise AdminAnd that should do it! When that is done, run the command to migrate your database:
那应该做到的! 完成后,运行命令来迁移数据库:
rake db:migrateYou will want to generate Devise views. Devise provides you with a command to do that:
您将要生成Devise视图。 Devise为您提供了执行此操作的命令:
rails g devise:views adminAnd that will generate a lot of files for you. For the purpose of this tutorial, we want to edit the formats of a few pages Devise generated for us so that they look beautiful and presentable for our users. Paste the code below into their respective files: This is the file that will handle the editing of our Admin profile. We want to make it look beautiful using Devise. You will agree with me that user experience is very important.
这将为您生成很多文件。 出于本教程的目的,我们希望编辑为我们生成的Devise的几页格式,以使它们对我们的用户而言看起来美观且易于使用。 将以下代码粘贴到它们各自的文件中:这是将处理我们的管理员配置文件的文件。 我们希望使用Devise使它看起来更漂亮。 您会同意我的观点,用户体验非常重要。
#views/admins/registrations/edit.html.erb

<div class="col-sm-offset-4 col-sm-4 col-xs-12">
  <h2 class="text-center">Edit <%= resource_name.to_s.humanize %></h2>

  <%= form_for(resource, as: resource_name, url: registration_path(resource_name), html: { method: :put, class: "form" }) do |f| %>
    <%= devise_error_messages! %>

    <div class="form-group">
      <%= f.label :email %><br />
      <%= f.email_field :email, autofocus: true, class: "form-control" %>
    </div>

    <% if devise_mapping.confirmable? && resource.pending_reconfirmation? %>
      <div>Currently waiting confirmation for: <%= resource.unconfirmed_email %></div>
    <% end %>

    <div class="form-group">
      <%= f.label :password %> <i>(leave blank if you don't want to change it)</i><br />
      <%= f.password_field :password, autocomplete: "off", class: "form-control" %>
    </div>

    <div class="form-group">
      <%= f.label :password_confirmation %><br />
      <%= f.password_field :password_confirmation, autocomplete: "off", class: "form-control" %>
    </div>

    <div class="form-group">
      <%= f.label :current_password %> <i>(we need your current password to confirm your changes)</i><br />
      <%= f.password_field :current_password, autocomplete: "off", class: "form-control" %>
    </div>

    <%= f.submit "Update", class: "btn btn-primary btn-lg" %>
  <% end %>

  <h3 class="text-center">Cancel my account</h3>

  <p>Unhappy? <%= button_to "Cancel my account", registration_path(resource_name), data: { confirm: "Are you sure?" }, method: :delete, class: "btn btn-danger btn-lg" %></p>

  <%= link_to "Back", :back, class: "btn btn-primary btn-lg" %>

</div>
Next we want to work on the sign up page for our Admin. It is important you know that we are just editing the default pages by adding some snippets of code from bootstrap. Copy and paste the code below into views/admins/registrations/new.html.erb and see the beautiful look that turns up.
接下来,我们要在管理员的注册页面上工作。 重要的是要知道,我们只是通过添加一些引导程序代码片段来编辑默认页面。 将下面的代码复制并粘贴到views/admins/registrations/new.html.erb ,即可看到漂亮的外观。
#views/admins/registrations/new.html.erb

<div class="col-sm-offset-4 col-sm-4 col-xs-12">
  <h2 class="text-center">Sign up</h2>

  <%= form_for(resource, as: resource_name, url: registration_path(resource_name), html: {class: "form"}) do |f| %>
    <%= devise_error_messages! %>

    <div class="form-group">
      <%= f.label :email %><br />
      <%= f.email_field :email, autofocus: true, class: "form-control" %>
    </div>

    <div class="form-group">
      <%= f.label :password %>
      <% if @minimum_password_length %>
      <em>(<%= @minimum_password_length %> characters minimum)</em>
      <% end %><br />
      <%= f.password_field :password, autocomplete: "off", class: "form-control" %>
    </div>

    <div class="form-group">
      <%= f.label :password_confirmation %><br />
      <%= f.password_field :password_confirmation, autocomplete: "off", class: "form-control" %>
    </div>

    <%= f.submit "Sign up", class: "btn btn-primary btn-lg" %>
  <% end %>

</div>
<%= render "admins/shared/links" %>
We are done with the registrations of our Admin. You should have noticed by now that Devise groups all of these pages into separate folders. This is because there are different controllers handling each of this pages. The next page we want to edit is the sign in page. Paste the following code into views/admins/sessions/new.html.erb
我们已经完成了管理员的注册。 您现在应该已经注意到Devise将所有这些页面分组到单独的文件夹中。 这是因为有不同的控制器处理每个页面。 我们要编辑的下一页是登录页面。 将以下代码粘贴到views/admins/sessions/new.html.erb
#views/admins/sessions/new.html.erb

<div class="col-sm-offset-4 col-sm-4 col-xs-12">
  <h2 class="text-center">Log in</h2>

  <%= form_for(resource, as: resource_name, url: session_path(resource_name), html: {class: "form"}) do |f| %>
    <div class="form-group">
      <%= f.label :email %><br />
      <%= f.email_field :email, autofocus: true, class: "form-control" %>
    </div>

    <div class="form-group">
      <%= f.label :password %><br />
      <%= f.password_field :password, autocomplete: "off", class: "form-control" %>
    </div>

    <% if devise_mapping.rememberable? %>
      <div class="form-group">
        <%= f.check_box :remember_me %>
        <%= f.label :remember_me %>
      </div>
    <% end %>

    <%= f.submit "Log in", class: "btn btn-primary btn-lg" %>
  <% end %>

</div>

<%= render "admins/shared/links" %>
I told you about partial in the first part of this tutorial. Devise has a partial that it uses to render common links across all the pages we have seen above. This partial is in a different folder called shared. Let us edit that as well. Paste the code below in views/admins/shared/_links.html.erb
在本教程的第一部分中,我已经介绍了部分内容。 Devise的一部分用于呈现我们在上面看到的所有页面上的公共链接。 此部分位于另一个名为shared文件夹中。 让我们对其进行编辑。 将以下代码粘贴到views/admins/shared/_links.html.erb
#views/admins/shared/_links.html.erb

<div class="col-sm-offset-4 col-sm-4 col-xs-12">
  <% if controller_name != 'sessions' %>
    <%= link_to "Log in", new_session_path(resource_name) %><br />
  <% end %>

  <% if devise_mapping.registerable? && controller_name != 'registrations' %>
    <%= link_to "Sign up", new_registration_path(resource_name) %><br />
  <% end %>

  <% if devise_mapping.recoverable? && controller_name != 'passwords' && controller_name != 'registrations' %>
    <%= link_to "Forgot your password?", new_password_path(resource_name) %><br />
  <% end %>

  <% if devise_mapping.confirmable? && controller_name != 'confirmations' %>
    <%= link_to "Didn't receive confirmation instructions?", new_confirmation_path(resource_name) %><br />
  <% end %>

  <% if devise_mapping.lockable? && resource_class.unlock_strategy_enabled?(:email) && controller_name != 'unlocks' %>
    <%= link_to "Didn't receive unlock instructions?", new_unlock_path(resource_name) %><br />
  <% end %>

  <% if devise_mapping.omniauthable? %>
    <% resource_class.omniauth_providers.each do |provider| %>
      <%= link_to "Sign in with #{OmniAuth::Utils.camelize(provider)}", omniauth_authorize_path(resource_name, provider) %><br />
    <% end %>
  <% end %>
</div>
Note that we did all of the edits above to provide a great experience for our admins. When you reload the page you will notice that nothing changes. This is because of the way Devise was built to serve its views. To make our changes work, we have to edit a line in Devise initializer. Go to line 223, of your Devise initializer; config/initializers/devise.rb, uncomment the line and change false to true, so it looks like this:
请注意,我们进行了所有上述编辑,以为管理员提供出色的体验。 当您重新加载页面时,您会发现没有任何变化。 这是因为设计Devise的目的是提供其视图。 为了使更改生效,我们必须在Devise初始化程序中编辑一行。 转到您的Devise初始化程序的第223行; config/initializers/devise.rb ,取消注释该行并将false更改为true ,因此如下所示:
config.scoped_views = trueNow point your browser to http://localhost:3000/admins/sign_in and see the new format of your sign in page.
现在,将浏览器指向http://localhost:3000/admins/sign_in然后查看登录页面的新格式。
You need a navigation bar so that users can easy move from one page to another. We do not need something too serious. Create a navigation partial.
您需要一个导航栏,以便用户可以轻松地从一页移动到另一页。 我们不需要太严重的事情。 创建导航局部。
touch app/views/layouts/_navigation.html.erbPaste the following code into the file you just created.
将以下代码粘贴到刚创建的文件中。
#app/views/layouts/_navigation.html.erb

<nav class="navbar navbar-default">
  <div class="container-fluid">
    <!-- Brand and toggle get grouped for better mobile display -->
    <div class="navbar-header">
      <button type="button" class="navbar-toggle collapsed" data-toggle="collapse" data-target="#navbar-collapse" aria-expanded="false">
        <span class="sr-only">Toggle navigation</span>
        <span class="icon-bar"></span>
        <span class="icon-bar"></span>
        <span class="icon-bar"></span>
      </button>
      <a class="navbar-brand" href="#">Scotch Blog</a>
    </div>
    <div class="collapse navbar-collapse" id="navbar-collapse">
      <ul class="nav navbar-nav navbar-right">
        <li><%= link_to 'Home', root_path %></li>
        <% if admin_signed_in? %>
        <!--This block is only visible to signed in admins -->
          <li><%= link_to 'New Post', new_post_path %></li>
          <li><%= link_to 'My Account', edit_admin_registration_path  %></li>
          <li><%= link_to 'Logout', destroy_admin_session_path, :method => :delete %></li>
        <!-- The block ends here -->
        <% else %>
          <li><%= link_to 'Login', new_admin_session_path  %></li>
        <% end %>
      </ul>
    </div>
  </div>
</nav>
Before the navigation bar can be visible on your website you need to render it. In this case, the rendering will be done from the application layout. See what I have in mine;
在导航栏在您的网站上可见之前,您需要渲染它。 在这种情况下,将通过应用程序布局进行渲染。 看看我的内在;
#app/views/layouts/application.html.erb

<!DOCTYPE html>
<html>
<head>
  <title>ScotchBlog</title>
  <%= stylesheet_link_tag    'application', media: 'all', 'data-turbolinks-track' => true %>
  <%= javascript_include_tag 'application', 'data-turbolinks-track' => true %>
  <%= csrf_meta_tags %>
</head>
<body>
  <!-- Render navigation bar -->
  <%= render "layouts/navigation" %>
  <p class="notice"><%= notice %></p>
  <p class="alert"><%= alert %></p>
  <div class="container-fluid">
    <%= yield %>
  </div>

</body>
</html>
Now reload your browser and you should see the navigation bar displayed.
现在重新加载浏览器,您应该看到显示的导航栏。
验证动作 (Authenticate Action)
At this point, you have your admin all set up. Now you can set up the authentication as stated earlier; we need just one line to do so. Navigate to app/controllers/posts_controller.rb and add this line of code.
至此,您已经设置了所有管理员。 现在,您可以按照前面所述设置身份验证; 我们只需要一行即可。 导航到app/controllers/posts_controller.rb并添加以下代码行。
#app/controllers/posts_controller.rb
...
  #This authenticates admin whenever a post is to be created, updated or destroyed.
  before_action :authenticate_admin!, except: [:index, :show]
We are using the before_action callback provide by Rails to make sure that whenever ANY action EXCEPT index and show is called, authentication will be requested.
我们正在使用Rails提供的before_action回调,以确保每当调用除 index和show 任何操作时,都将请求身份验证。
验证方式 (Validation)
One more thing, you need to validate the presence of title and body each time a post is going to be created. You do not want your admins to create posts that have no title or body; that will piss your users off. Validation is always done in the Model. Open up your Post model and make it look like this:
还有一件事,您每次创建帖子时都需要验证标题和正文的存在。 您不希望管理员创建没有标题或正文的帖子; 这会激怒您的用户。 验证始终在模型中完成。 打开您的Post模型,使其如下所示:
#app/models/post.rb

class Post < ActiveRecord::Base
  #This validates presence of title, and makes sure that the length is not more than 140 words
  validates :title, presence: true, length: {maximum: 140}
  #This validates presence of body
  validates :body, presence: true
end
索引页面上的管理员操作 (Admin Actions on Index Page)
To make work easy for the admin, and for the sake of user experience, it is wise that we include links for easy navigation in the index. One important issue: though, these links have to be visible to just the admin. Now open your index file and paste in the code I have below:
为了使管理员易于工作,并为了用户体验,明智的做法是在索引中包含易于导航的链接。 一个重要的问题:但是,这些链接仅对管理员可见。 现在打开您的索引文件并粘贴以下代码:
#app/views/posts/index.html.erb

<div class="container">
  <div class="col-sm-10 col-sm-offset-1 col-xs-12">
    <% @posts.each do |post| %>
    <div class="col-xs-12 text-center">
      <div class="text-center">
        <h2><%= post.title %></h2>
        <h6><%= post.created_at.strftime('%b %d, %Y') %></h6>
      </div>
      <div>
        <%= raw(post.body).truncate(358) %>
      </div>
      <div class="text-center">
        <%= link_to "READ MORE", post_path(post) %>
      </div>
      <% if admin_signed_in? %>
        <%= link_to "Show", post_path(post), class: "btn btn-primary" %>
        <%= link_to "Edit", edit_post_path(post), class: "btn btn-default" %>
        <%= link_to "Delete", post_path(post), class: "btn btn-danger", data: {:confirm => "Are you sure?"}, method: :delete %>
      <% end %>
      <hr />
    </div>
    <% end %>
  </div>
</div>
Now log out if you are logged in and you should not be able to create a new post when you point your browser to http://localhost:3000/posts/new. At this point, your blog is secured from intruders who may want to gain unprivileged access.
现在,如果您已登录,请注销,将浏览器指向http://localhost:3000/posts/new时,您将无法创建新帖子。 此时,您的博客已受到可能想要获得非特权访问权限的入侵者的保护。
图片上传 (Image Uploading for Posts)
First, we want to enable image upload for our posts which allow images to be uploaded when new posts are created. We will make use of a gem called carrierwave. Open your Gemfile and add it in.
首先,我们要为帖子启用图片上传功能,以便在创建新帖子时上传图片。 我们将利用一种称为carrierwave的宝石。 打开您的Gemfile并将其添加。
#Gemfile
...
gem 'carrierwave'
gem 'mini_magick'
Carrierwave helps you enable seamless upload of images in your Rails application. Mini_Magick helps in the processing of your images. Run the command to install.
Carrierwave可帮助您在Rails应用程序中无缝上传图像。 Mini_Magick帮助您处理图像。 运行命令进行安装。
bundleinstallNext, we run the generator command to generate some important files to ensure CarrierWave works with CKEditor.
接下来,我们运行generator命令生成一些重要文件,以确保CarrierWave与CKEditor一起使用。
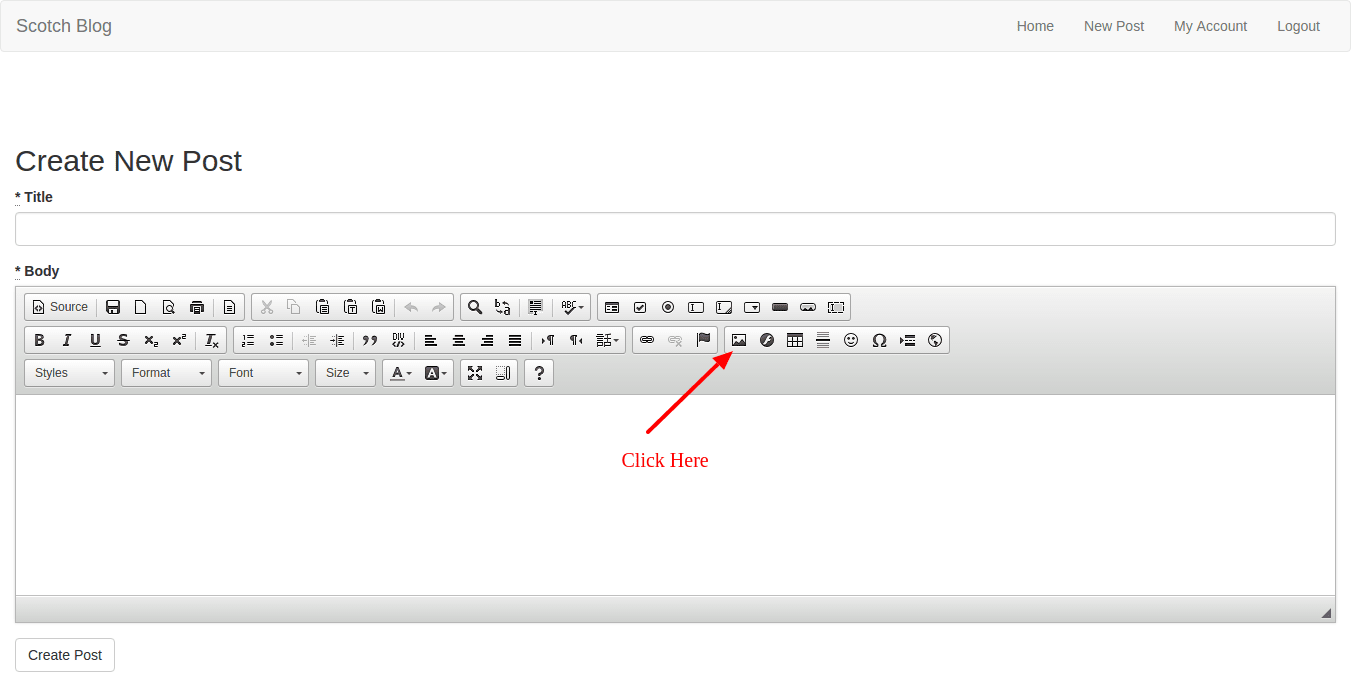
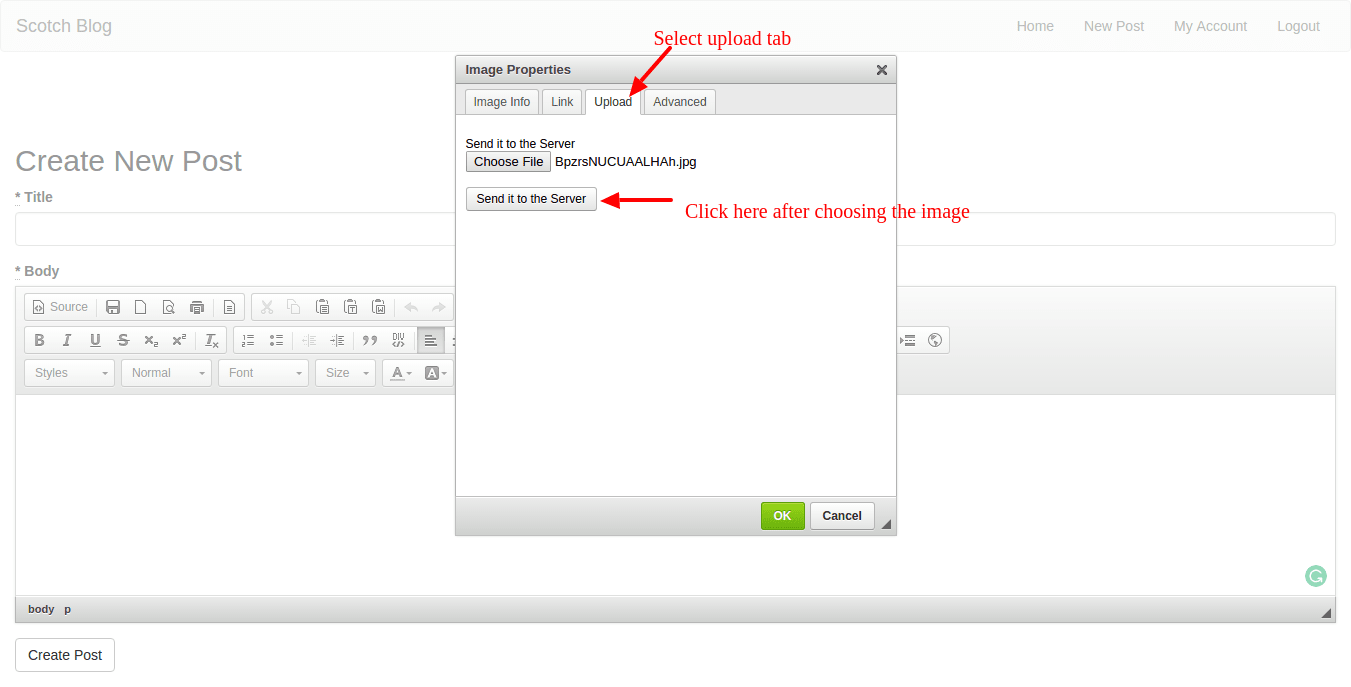
rails generate ckeditor:install --orm=active_record --backend=carrierwaveThat will generate some outputs for us. Next, migrate your database by running the command: rake db:migrate. Run rails server to start up your server. Point your browser to http://localhost:3000/posts/new. Follow the steps shown in the screenshots below.
这将为我们带来一些输出。 接下来,通过运行以下命令来迁移数据库: rake db:migrate 。 运行rails server以启动服务器。 将浏览器指向http://localhost:3000/posts/new 。 请按照以下屏幕快照中显示的步骤进行操作。
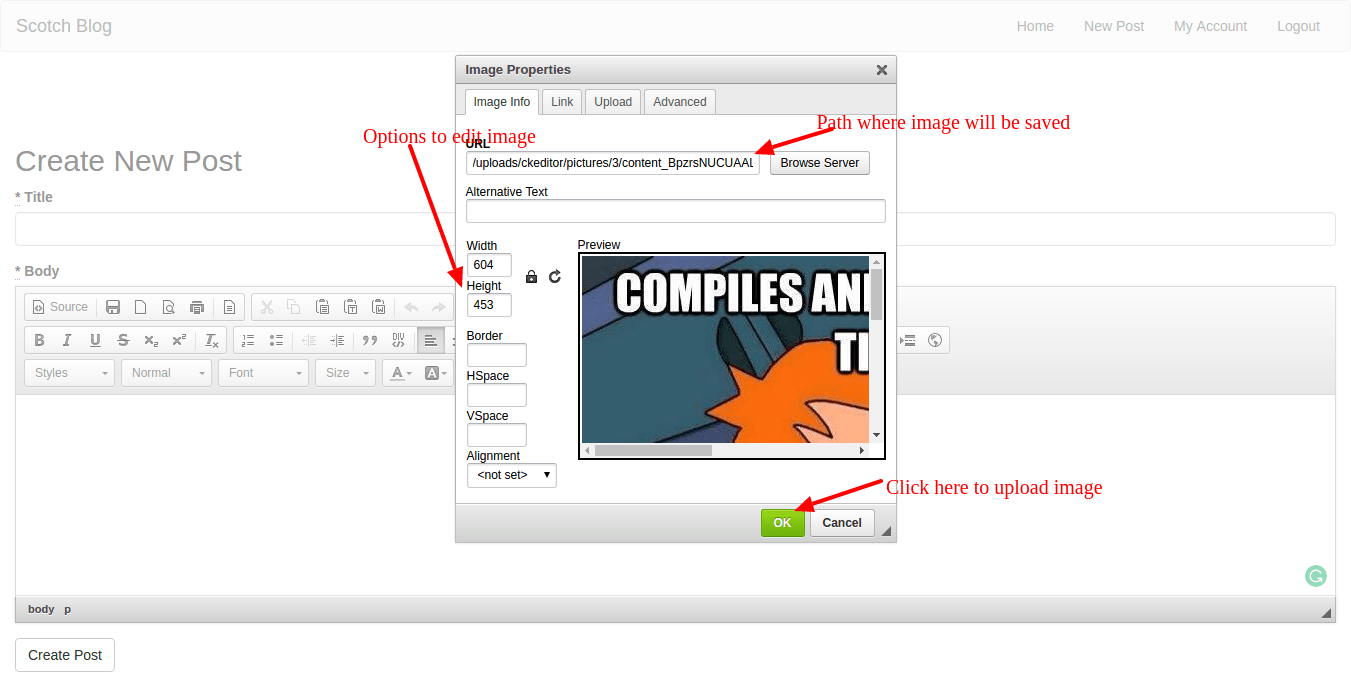
When done, paste in some text and write a title. Click on the Create Post button to submit your post. Your new posts should have an image uploaded. That was easy!
完成后,粘贴一些文本并写一个标题。 单击Create Post按钮以提交您的帖子。 您的新帖子应该上传了图片。 那很简单!
管理员上传图片 (Image Uploading for Admins)
Next, let us add an avatar feature for our admins. We will also make use of carrierwave. Create an initializer for carrierwave at config/initializers/carrier_wave.rb and the in the code below:
接下来,让我们为管理员添加头像功能。 我们还将利用载波。 在config/initializers/carrier_wave.rb和下面的代码中为carrierwave创建一个初始化程序:
#config/initializers/carrier_wave.rb

require 'carrierwave/orm/activerecord'
We will start with generating an uploader;
我们将从生成一个上传器开始;
rails generate uploader AvatarThis will create a new file in app/models/uploaders/avatar_uploader.rb Open the file in your text editor and edit yours to look like mine.
这将在app/models/uploaders/avatar_uploader.rb创建一个新文件。在文本编辑器中打开该文件,然后对其进行编辑,使其看起来像我的。
#app/uploaders/avatar_uploader.rb

# encoding: utf-8

class AvatarUploader < CarrierWave::Uploader::Base

  #include mini_magick for image processing
  include CarrierWave::MiniMagick

  #storage option
  storage :file

  #directory for storing image
  def store_dir
    "uploads/#{model.class.to_s.underscore}/#{mounted_as}/#{model.id}"
  end

  # Create different versions of your uploaded files:
  version :thumb do
    process :resize_to_fit => [50, 50]
  end

  version :medium do
    process :resize_to_fit => [300, 300]
  end

  version :small do
    process :resize_to_fit => [140, 140]
  end

  # Add a white list of extensions which are allowed to be uploaded.
  def extension_white_list
    %w(jpg jpeg gif png)
  end
end
Let us add a string column to our admin table for the avatars.
让我们在化身的admin表中添加一个字符串列。
rails g migration add_avatar_to_admins avatar:string
rake db:migrate
Open your admin model and mount your AvatarUploader. Here is how to do it;
打开您的admin模型并安装AvatarUploader 。 这是怎么做的;
#app/models/admin.rb

class Admin < ActiveRecord::Base
  # Include default devise modules. Others available are:
  # :confirmable, :lockable, :timeoutable and :omniauthable
  devise :database_authenticatable, :registerable,
         :recoverable, :rememberable, :trackable, :validatable

  #mount avatar uploader
  mount_uploader :avatar, AvatarUploader
end
For admins to be able to upload images, we need to whitelist avatar, which makes it a permitted parameter. We will do it inside our application_controller.rb. Like this:
为了使管理员能够上传图像,我们需要将avatar列入白名单,这使其成为允许的参数。 我们将在application_controller.rb 。 像这样:
#app/controllers/application_controller.rb
class ApplicationController < ActionController::Base
# Prevent CSRF attacks by raising an exception.
# For APIs, you may want to use :null_session instead.
protect_from_forgery with: :exception
before_action :configure_permitted_parameters, if: :devise_controller?
protected
#configure permitted parameters for devise
def configure_permitted_parameters
added_attrs = [:email, :password, :password_confirmation, :remember_me, :avatar, :avatar, :avatar_cache]
devise_parameter_sanitizer.permit :sign_up, keys: added_attrs
end
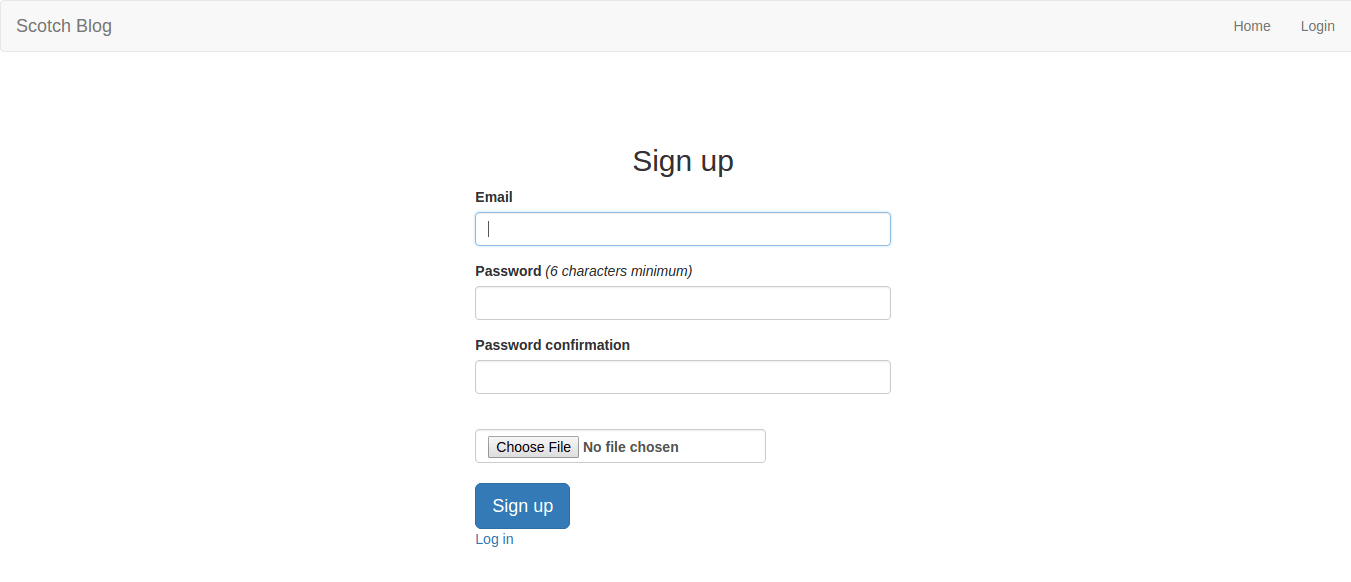
endFinally, let us add the field in our views through which the images will be uploaded in our admin sign up page.
最后,让我们在视图中添加字段,通过该字段将图像上传到我们的管理员注册页面中。
#app/views/admins/registrations/new.html.erb

<div class="col-sm-offset-4 col-sm-4 col-xs-12">
  <h2 class="text-center">Sign up</h2>

  <%= form_for(resource, as: resource_name, url: registration_path(resource_name), html: {multipart: :true, class: "form"}) do |f| %>
    <%= devise_error_messages! %>

    <div class="form-group">
      <%= f.label :email %><br />
      <%= f.email_field :email, autofocus: true, class: "form-control" %>
    </div>

    <div class="form-group">
      <%= f.label :password %>
      <% if @minimum_password_length %>
      <em>(<%= @minimum_password_length %> characters minimum)</em>
      <% end %><br />
      <%= f.password_field :password, autocomplete: "off", class: "form-control" %>
    </div>

    <div class="form-group">
      <%= f.label :password_confirmation %><br />
      <%= f.password_field :password_confirmation, autocomplete: "off", class: "form-control" %>
    </div>

    <!-- Field for image upload -->
    <div class="form-group">
      <%= f.label :avatar do %><br />
        <%= f.file_field :avatar, class: "form-control" %>
        <%= f.hidden_field :avatar_cache %>
      <% end %>
    </div>

    <%= f.submit "Sign up", class: "btn btn-primary btn-lg" %>
  <% end %>

</div>
<%= render "admins/shared/links" %>
The page will look like this:
该页面将如下所示:
结论 ( Conclusion )
In this part you have learned how to authenticate in your Rails application using Devise. You also learned about a gem called carrierwave. With this gem, you were able to enable image uploading in your blog. I hope you enjoyed it.
在这一部分中,您学习了如何使用Devise在Rails应用程序中进行身份验证。 您还了解了一种名为carrierwave的宝石。 有了这个gem,您就可以在博客中启用图片上传功能。 我希望你喜欢它。
翻译自: https://scotch.io/tutorials/build-a-blog-with-ruby-on-rails-part-2
ruby on rails


 5176
5176

 被折叠的 条评论
为什么被折叠?
被折叠的 条评论
为什么被折叠?
 到【灌水乐园】发言


